- OpenVPN AutoStart Ubuntu 18.04
- 3 Answers 3
- Dependencies
- OpenVPN Configuration
- Systemd Startup Service Setup
- How to auto start openvpn (client) on Ubuntu CLI?
- Setting up your vpn to run from bash
- Remove existing (broken) service config for openvpn
- Set up openvpn to run as a systemd service
- Connect to VPN Automatically on Ubuntu 20.04/18.04
- Connect to VPN Automatically on Ubuntu 20.04/18.04
- Install Required Packages
- Running OpenVPN Client as Service on Ubuntu 20.04/18.04
- Run OpenVPN Client as a Service
- Automatically Connect to VPN with Network-Manager
- Open Network Manager Connection Editor
- Related Tutorials
- SUPPORT US VIA A VIRTUAL CUP OF COFFEE
OpenVPN AutoStart Ubuntu 18.04
I am trying to set OpenVPN to autostart on boot. With 18.04 Mate I have tried my usual put opvpn config into /etc/openvpn and then edit /etc/default/openvpn to connect all. This does not work, although it worked on 16.04. I have looked into using systemd but I can’t get it to work. I have tried using network manager to connect on log in, as a compromise, this failed due to ethernet not auto connecting if a VPN is set to always be used. So, in summary, what I want is: My openvpn to automatically connect when I boot up. Thanks for all and any help! xm
3 Answers 3
If you save your configuration as a MY_CONNECTION.conf file in your /etc/openvpn directory, you can do the following:
systemctl enable openvpn@MY_CONNECTION systemctl start openvpn@MY_CONNECTION where MY_CONNECTION is the same from MY_CONNECTION.conf .
So if you have multiple connections, you would have multiple systemctl calls.
systemctl enable openvpn@MY_CONNECTION1 systemctl start openvpn@MY_CONNECTION1 systemctl enable openvpn@MY_CONNECTION2 systemctl start openvpn@MY_CONNECTION2 Hi Matt. Thank you for your answer. systemctl enable openvpn@MY_CONNECTION systemctl start openvpn@MY_CONNECTION This works if I do it manually. It does not work on boot. My VPN does not automatically connect, for some reason.
I think, perhaps, the issue is, when this command is called it request a password via a GUI dialogue box.
So the line in /etc/default/openvpn that reads «WARNING: If you’re running systemd the rest of the options in this file are ignored.» should say «. all of this file is ignored» as clearly AUTOSTART is ignored if favour of this method.
Below you find the steps I did to configure my Private Internet Access (PIA) OpenVPN tunnel. I use Switzerland.ovpn to refer to OpenVPN configuration. Please substitute this with the filename appropriate for your configuration.
I used Ubuntu 18.04, but it should work on any Linux distro using systemd. I only don’t know if the network-manager will override this or not.
Dependencies
OpenVPN Configuration
- sudo mkdir /etc/openvpn/PIA (change PIA to the name of your choice)
- Download your OpenVPN config files, for example:
sudo wget https://www.privateinternetaccess.com/openvpn/openvpn.zip https://www.privateinternetaccess.com/openvpn/openvpn-strong.zip Skip steps 7 to 10 if you do not use a password
- (optional) sudo touch piapass.txt
- (optional) sudo chmod 700 piapass.txt
- (optional) Type sudo nano piapass.txt and put the following content (changing username and password to the values appropriate for your configuration)
Systemd Startup Service Setup
Change piavpn.service for whatever name you would like your startup OpenVPN connection service to have.
- cd /etc/systemd/system/
- sudo touch piavpn.service
- sudo chmod 644 piavpn.service
- Type sudo nano piavpn.service and put the following content (make sure to adapt the line starting with ExecStart to match your configuration):
[Unit] Description=Private Internet Access VPN (Swiss) After=multi-user.target [Service] Type=idle ExecStart=/usr/sbin/openvpn --config /etc/openvpn/PIA/Switzerland.ovpn [Install] WantedBy=multi-user.target After the reboot your OpenVPN connection should be set up automatically on boot.
How to auto start openvpn (client) on Ubuntu CLI?
The openvpn package comes with an init script /etc/init.d/openvpn . This script automatically sets up connection for every .conf (mind the extension) file in /etc/openvpn .
If you install OpenVPN via an RPM or DEB package on Linux, the installer will set up an initscript. When executed, the initscript will scan for .conf configuration files in /etc/openvpn, and if found, will start up a separate OpenVPN daemon for each file.
I got a bit stuck on this and ended up writing out all of the instructions for setting it up with systemd manually.
This worked for me using Ubuntu 16.10 and openvpn 2.3.11
Setting up your vpn to run from bash
These examples use expressvpn but most would work the same way
Download your vpn provider’s ovpn config file e.g. my_express_vpn_amsterdam_2.ovpn
move that to /etc/openvpn/ and rename it to end in .conf
sudo mv ~/Downloads/my_express_vpn_amsterdam_2.ovpn /etc/openvpn/amsterdam-2.conf Your VPN provider will provide you with a username and password for connecting over openvpn. Save the userename and then password each on their own line
sudo vim /etc/openvpn/express-vpn-crednetials.txt # add these lines YOUR_VPN_USERNAME YOUR_VPN_PASSWORD # save the file now edit /etc/openvpn/amsterdam-2.conf look for a line that says auth-user-pass and replace it with the path to your credential file
auth-user-pass /etc/openvpn/express-vpn-crednetials.txt Test your config! Start openvpn like this
sudo openvpn --config /etc/openvpn/amsterdam-2.conf openvpn should connect without asking for username or password
Remove existing (broken) service config for openvpn
sudo rm /etc/systemd/system/multi-user.target.wants/openvpn.service Set up openvpn to run as a systemd service
The config that came with openvpn was broken so I removed it and created a new one based on this answer
Create systemd service for openvpn
sudo vim /usr/lib/systemd/system/openvpn@service [Unit] Description=OpenVPN Robust And Highly Flexible Tunneling Application On %I After=syslog.target network.target [Service] PrivateTmp=true Type=forking PIDFile=/var/run/openvpn/%i.pid ExecStart=/usr/sbin/openvpn --daemon --writepid /var/run/openvpn/%i.pid --cd /etc/openvpn/ --config %i.conf [Install] WantedBy=multi-user.target the %i is used as a wildcard so that this service can be used for multiple vpn configurations. Set it up for the amsterdam-2.conf file that we created earlier
sudo systemctl start openvpn@amsterdam-2.service the systemd service should now be running on the amsterdam vpn. check its status like so
sudo systemctl status openvpn@amsterdam-2.service you should see several lines of output ending in Initialization Sequence Completed and your vpn should be running.
Hope this helps! related reading:
Connect to VPN Automatically on Ubuntu 20.04/18.04

Today, we are going to learn how to connect to VPN automatically on Ubuntu 20.04/18.04. There are various scenarios in which you might want to connect to VPN automatically when system boots. In this guide, you will learn how to connect to VPN automatically on Ubuntu 20.04/Ubuntu 18.04 desktop systems, OpenVPN clients.
Connect to VPN Automatically on Ubuntu 20.04/18.04
One of important assumptions we make before we can proceed is that you already have your VPN client configuration file.
You can see a sample OpenVPN client configuration file in our previous guide by following the link below;
- Running OpenVPN client as a service.
- Configure Network Manager to automatically connect to VPN using specific network connection.
Install Required Packages
The following command installs the packages that we will need to configure automatic VPN connection on Ubuntu 20.04/Ubuntu 18.04.
apt install network-manager-openvpn network-manager-openvpn-gnome openvpn openvpn-systemd-resolved -yRunning OpenVPN Client as Service on Ubuntu 20.04/18.04
When you install openvpn package, it creates a /etc/openvpn/client/ directory into which you can place the OpenVPN client configuration file.
Therefore, copy your OpenVPN configuration file, either .conf or .ovpn , into the OpenVPN client configurations directory.
Note that the configuration files under the /etc/openvpn/client/ directory should have the .conf suffix. Hence, if the original file is .ovpn , rename it in the destination directory to .conf as shown below.
sudo cp ~/gentoo.ovpn /etc/openvpn/client/gentoo.confRun OpenVPN Client as a Service
Once the client configuration file is in place, you then start OpenVPN client service. Note that, it is possible to have multiple OpenVPN client configuration files in this directory.
As such, you can use the service, [email protected].service to start your OpenVPN client service using a specific configuration file placed on the /etc/openvpn/client/ directory.
Replace the with the name of your OpenVPN client configuration file, without the suffix, .conf or .ovpn .
For example, to start OpenVPN client service using the gentoo.ovpn , run the service as follows;
● [email protected] - OpenVPN tunnel for gentoo Loaded: loaded (/lib/systemd/system/[email protected]; indirect; vendor preset: enabled) Active: active (running) since Sun 2020-06-14 12:30:56 EAT; 5s ago Docs: man:openvpn(8) https://community.openvpn.net/openvpn/wiki/Openvpn24ManPage https://community.openvpn.net/openvpn/wiki/HOWTO Main PID: 5556 (openvpn) Status: "Initialization Sequence Completed" Tasks: 1 (limit: 2315) CGroup: /system.slice/system-openvpn\x2dclient.slice/[email protected] └─5556 /usr/sbin/openvpn --suppress-timestamps --nobind --config gentoo.conf Jun 14 12:30:57 amos openvpn[5556]: ROUTE_GATEWAY 10.0.2.2/255.255.255.0 IFACE=enp0s3 HWADDR=08:00:27:4b:ff:18 Jun 14 12:30:57 amos openvpn[5556]: TUN/TAP device tun0 opened Jun 14 12:30:57 amos openvpn[5556]: TUN/TAP TX queue length set to 100 Jun 14 12:30:57 amos openvpn[5556]: do_ifconfig, tt->did_ifconfig_ipv6_setup=0 Jun 14 12:30:57 amos openvpn[5556]: /sbin/ip link set dev tun0 up mtu 1500 Jun 14 12:30:57 amos openvpn[5556]: /sbin/ip addr add dev tun0 10.8.0.2/24 broadcast 10.8.0.255 Jun 14 12:30:57 amos openvpn[5556]: /sbin/ip route add 192.168.57.6/32 via 10.0.2.2 Jun 14 12:30:57 amos openvpn[5556]: /sbin/ip route add 0.0.0.0/1 via 10.8.0.1 Jun 14 12:30:57 amos openvpn[5556]: /sbin/ip route add 128.0.0.0/1 via 10.8.0.1 Jun 14 12:30:57 amos openvpn[5556]: Initialization Sequence CompletedIf you see the line, Initialization Sequence Completed then your vpn connection has been established successfully.
Checking the assigned address;
6: tun0: mtu 1500 qdisc fq_codel state UNKNOWN group default qlen 100 link/none inet 10.8.0.2/24 brd 10.8.0.255 scope global tun0 valid_lft forever preferred_lft forever inet6 fe80::6b22:1d7f:5ef2:1db3/64 scope link stable-privacy valid_lft forever preferred_lft foreverEnable the service to run on system boot to ensure that the VPN connection is initiated automatically on system boot.
Reboot your system and check the status again to confirm.
Automatically Connect to VPN with Network-Manager
To be able to connect to VPN using Network Manager, ensure that you have created a VPN connection profile via Network Manager.
Follow the guide below to learn how to connect to OpenVPN server via the Network Manager;
Open Network Manager Connection Editor
Click on the connection icon at the top right corner on your Ubuntu system and click Edit Connections.
You can as well launch the network manager connection editor by running the command below;
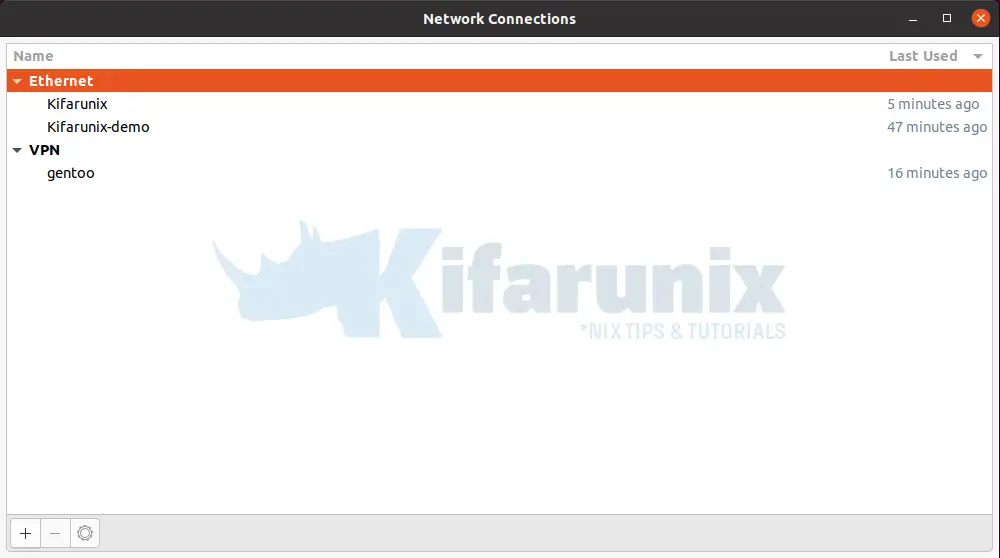
This opens the connection editor wizard.
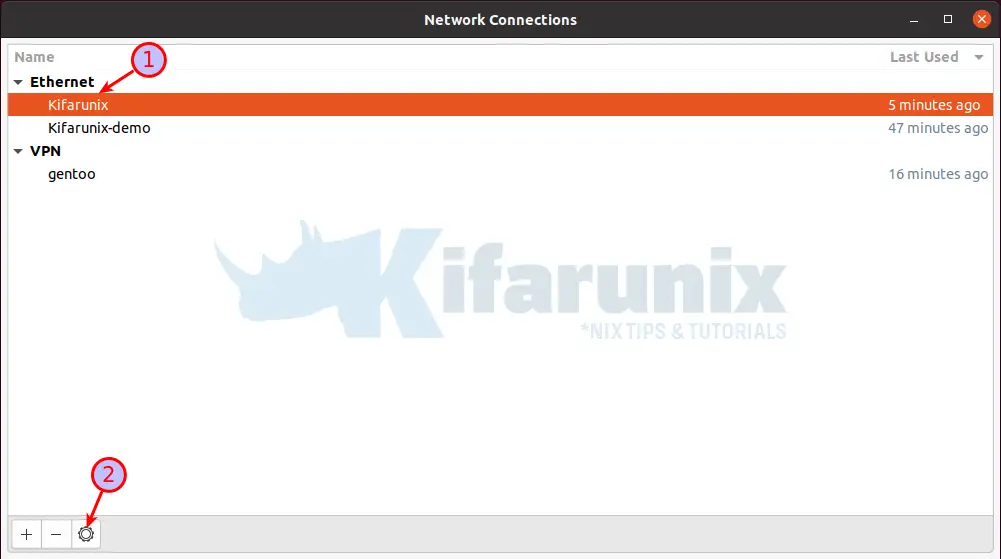
Select the network connection profile under which you want to initiate automatic VPN connection with. For example, in my case, if I want to use the first ethernet connection, Kifarunix, simply select it and click the settings gear at the bottom.
This opens up the specific connection editor. Click on the General tab and select Automatically connect to VPN and choose your VPN connection profile you created before, in our case, it is gentoo.
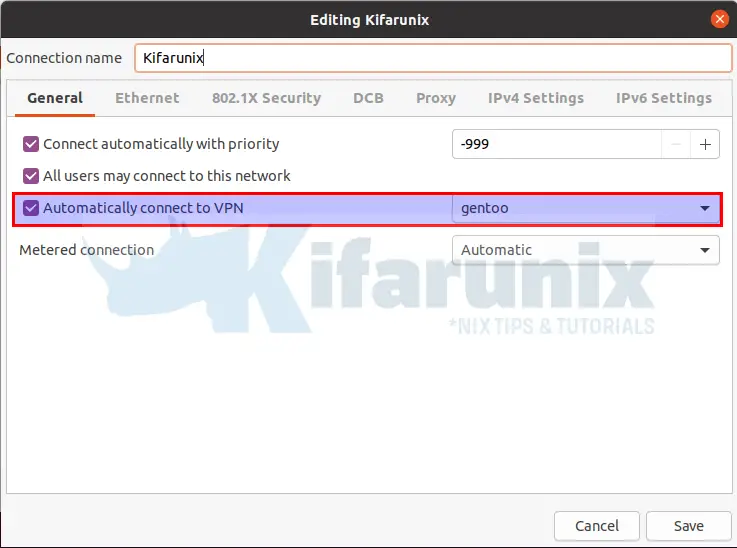
Click Save to update the changes.
Verify this by toggling the connection on and off. Notice that, when you turn on, the VPN connection is also turned on.
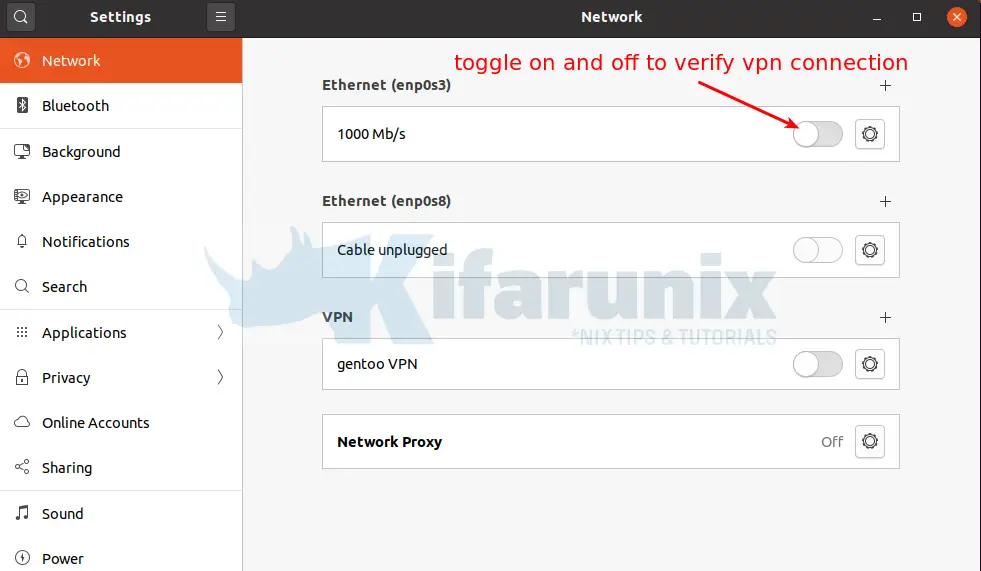
Similarly, you can verify the same by rebooting your system and checking your assigned VPN address.
And that pretty sums it all on how to connect to VPN automatically on Ubuntu 20.04/18.04 .
Related Tutorials
SUPPORT US VIA A VIRTUAL CUP OF COFFEE
We’re passionate about sharing our knowledge and experiences with you through our blog. If you appreciate our efforts, consider buying us a virtual coffee. Your support keeps us motivated and enables us to continually improve, ensuring that we can provide you with the best content possible. Thank you for being a coffee-fueled champion of our work!