- iPad 4 Wi-Fi Wireless Communications Antenna Replacement
- Шаг 2
- Шаг 3
- Шаг 4 Alternate iOpener heating method
- Шаг 5 Front Panel
- Шаг 6
- Шаг 7
- Ремонт Wifi-антенны на планшете iPad 4
- Wi-Fi антенна iPad 3/ iPad 4
- Условия гарантии
- iPad 4 CDMA Wi-Fi Antenna Replacement
- Шаг 2
- Шаг 3
- Шаг 4 Alternate iOpener heating method
- Шаг 5 Front Panel
- Шаг 6
- Шаг 7
iPad 4 Wi-Fi Wireless Communications Antenna Replacement
We recommend that you clean your microwave before proceeding, as any nasty gunk on the bottom may end up stuck to the iOpener.
For carousel microwaves: Make sure the plate spins freely. If your iOpener gets stuck, it may overheat and burn.
Шаг 2
Throughout the repair procedure, as the iOpener cools, reheat it in the microwave for an additional thirty seconds at a time.
Be careful not to overheat the iOpener during the repair. Overheating may cause the iOpener to burst.
If the iOpener is still too hot in the middle to touch, continue using it while waiting for it to cool down some more before reheating. A properly heated iOpener should stay warm for up to 10 minutes.
Шаг 3
Remove the iOpener from the microwave, holding it by one of the two flat ends to avoid the hot center.
Шаг 4 Alternate iOpener heating method
Place an iOpener into the hot water for 2-3 minutes. Make sure the iOpener is fully submerged in the water.
Your iOpener is ready for use! If you need to reheat the iOpener, heat the water to a boil, turn off the heat, and place the iOpener in the water for 2-3 minutes.
Шаг 5 Front Panel
If your display glass is cracked, keep further breakage contained and prevent bodily harm during your repair by taping the glass.
Lay overlapping strips of clear packing tape over the iPad’s display until the whole face is covered.
This will keep glass shards contained and provide structural integrity when prying and lifting the display.
Do your best to follow the rest of the guide as described. However, once the glass is broken, it will likely continue to crack as you work, and you may need to use a metal prying tool to scoop the glass out.
Шаг 6
Again, as you may find yourself working with broken glass during this procedure, we strongly recommend wearing safety glasses for protection from flying shards.
Lay the iOpener flat on the right edge of the iPad, smoothing it out so that there is good contact between the surface of the iPad and the iOpener.
Шаг 7
There is a small gap in the iPad’s adhesive ring in the upper right corner of the iPad, approximately 2.0 inches (~5 cm) from the top of the iPad. You are going to exploit this weakness.
Align the tool with the mute button. Insert the tip of a plastic opening tool into the gap between the front glass and the plastic bezel. Just insert the very tip of the opening tool, just enough to widen the crack.
It may require some force to get the wedged tip of the opening tool between the glass and plastic. Work patiently and carefully, wiggling the plastic opening tool back and forth as necessary.
Ремонт Wifi-антенны на планшете iPad 4
После падения или ремонта стал плохо ловить wifi на планшете? Эта статья для вас, если хотите попробовать самостоятельно вылечить любимый девайс.
Был у меня такой случай — http://www.rf-cheats.ru/forum/showthread.php?t=270623
Упал планшет, потрескался экран, отнёс в сервис, поменяли тачскрин. В общем классика. После замены стал замечать, что wifi стал ловить хуже некуда. К слову, ремонтировался я в конторе WESTER-LAB (wester-lab.ru). Пусть будет антирекламой.
Знакомые меня уверяли, что при замене тачскрина вряд ли возможно как-то повредить wifi-антенну. Позвонив в этот же сервис (а у меня гарантия!), мне ответили похожие вещи, что их хата справа, что я что-то перепутал, что это совпадение или я вовсе пытаюсь их развести. Благо, есть у меня товарищ — реально, инженер от Бога. Может починить всё, что угодно. Что характерно, как раз такие люди не работают в таких мелких сервисах. Ну не будем об этом.
Итак, самое сложное заключалось в том, как снять стекло. Видео-гайдов по этому моменту просто тонны. Берём узкий нож и, начиная с правой стороны планшета, поддеваем стекло, отрывая его от двустороннего скотча. Перед этим стоит пройтись феном по краям планшета. После снятия тачскрина, его можно будет откинуть влево. Для удобства, туда же хорошо бы откинуть и дисплей. Для этого нужно отсоединить шлейф от платы в месте под номером 1:

Под номером 2 мы видим торчащую антенну, которая держалась на трёх шурупах, которые в свою очередь мы уже успели открутить. Приглядываясь к антенне поближе, мы сразу понимаем в чём собственно дело:

4. сама антенна
3. место, к которому она крепится
2-1. отверстия, через которые шурупами антенна прижимается к корпусу.
Невооружённым глазом видно то, что антенна в местах крепежа порвана. Видимо, она была приклеена (или прилипла) к задней стороне дисплея. И в момент смены тачскрина, антенну вырвали из крепежей.
Важным моментом тут является самое нижнее отверстие в антенне, которое больше похоже на огрызок:

Оно в отличие от остальных двух — проводящее. Таким образом корпус планшета — масса для антенны, при условии плотного контакта. Конечно же, когда антенна порвана и практически не прижимается к корпусу, мы имеем то, что имеем. Что решил сделать мой товарищ?
Взял кусок стеклотекстолита, отрезал от него полоску и снял с него слой меди:

Разумеется, сверху она тоже покрыта диэлектриком, который тоже был снят. Далее отрезал от этой полоски маленькую часть и припаял к антенне в том месте, где она должна крепиться к корпусу. Прикрепив антенну двумя шурупами, получили вот такую картину:

1. Прикреплённая антенна
2. Припаянный к антенне кусок, прямо под которым отверстие для шурупа.
Делаем дырку шилом, вставляем шуруп и закручиваем.
Вуаля!

Я уже забыл, когда планшет ловил на полную.
В сервисе бы вам приговорили wifi-модуль вместе с антенной. Резюмирую — всё-таки, такие вещи стоит делать или через рукастых знакомых, или у официалов. Уличные конторы сделают тачскрин, отвалиться вайфай. Сделают вайфай, пропадёт звук. Нафиг вам эти качели?
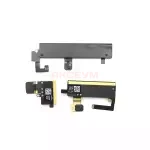
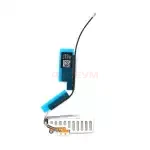
Wi-Fi антенна iPad 3/ iPad 4
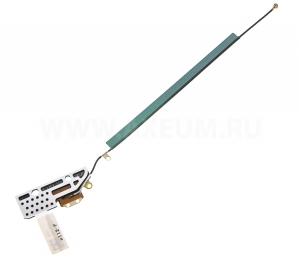

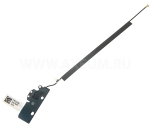
Антенна предназначена для восстановления связи в iPad 3.
Производителем могут быть изменены комплект поставки и страна производства без предварительного уведомления, вследствие чего на момент продажи конкретного товара они могут отличаться от указанных.


Антенна iPad Air 2 Cellular комплект 3 шт. Распродажа 250 руб. -48% 130 руб.

Антенна iPad Air 3G комплект 2 шт. Распродажа 150 руб. -40% 90 руб.
GPS антенна iPad Air Распродажа 70 руб. -29% 50 руб.
Wi-Fi антенна iPad Air 2 Распродажа 390 руб. -46% 209 руб.
Условия гарантии
Мы даем 90 дней гарантии на любую продукцию, приобретенную онлайн с момента получения посылки клиентом и 14 дней, если товар был куплен в офлайн-магазине.
Чтобы не возникло проблем — пожалуйста, соблюдайте простые условия:
- Сохраняйте товарный вид изделия.
- С дисплеев или сенсорных стекол не снимайте защитных пленок. В случае, если пленка или наклейка снята, нарушена целостность или Вы приклеили её обратно, возврат и обмен невозможен.
- Не монтируйте, впаивайте и не разбирайте запчасть прежде, чем удостверитесь, что она в рабочем состоянии.
- Нет механических повреждений.
Более подробную информацию о том, как проверить товар не потеряв гарантию, а также узнать о том каким образом отправить нам его обратно, Вы можете найти по ссылке
По всем спорным вопросам обращайтесь, пожалуйста, по телефону 8 (800) 222-98-57 или на почту brak@axeum.ru
iPad 4 CDMA Wi-Fi Antenna Replacement
We recommend that you clean your microwave before proceeding, as any nasty gunk on the bottom may end up stuck to the iOpener.
For carousel microwaves: Make sure the plate spins freely. If your iOpener gets stuck, it may overheat and burn.
Шаг 2
Throughout the repair procedure, as the iOpener cools, reheat it in the microwave for an additional thirty seconds at a time.
Be careful not to overheat the iOpener during the repair. Overheating may cause the iOpener to burst.
If the iOpener is still too hot in the middle to touch, continue using it while waiting for it to cool down some more before reheating. A properly heated iOpener should stay warm for up to 10 minutes.
Шаг 3
Remove the iOpener from the microwave, holding it by one of the two flat ends to avoid the hot center.
Шаг 4 Alternate iOpener heating method
Place an iOpener into the hot water for 2-3 minutes. Make sure the iOpener is fully submerged in the water.
Your iOpener is ready for use! If you need to reheat the iOpener, heat the water to a boil, turn off the heat, and place the iOpener in the water for 2-3 minutes.
Шаг 5 Front Panel
If your display glass is cracked, keep further breakage contained and prevent bodily harm during your repair by taping the glass.
Lay overlapping strips of clear packing tape over the iPad’s display until the whole face is covered.
This will keep glass shards contained and provide structural integrity when prying and lifting the display.
Do your best to follow the rest of the guide as described. However, once the glass is broken, it will likely continue to crack as you work, and you may need to use a metal prying tool to scoop the glass out.
Шаг 6
Again, as you may find yourself working with broken glass during this procedure, we strongly recommend wearing safety glasses for protection from flying shards.
Lay the iOpener flat on the right edge of the iPad, smoothing it out so that there is good contact between the surface of the iPad and the iOpener.
Шаг 7
There is a small gap in the iPad’s adhesive ring in the upper right corner of the iPad, approximately 2.0 inches (~5 cm) from the top of the iPad. You are going to exploit this weakness.
Align the tool with the mute button. Insert the tip of a plastic opening tool into the gap between the front glass and the plastic bezel. Just insert the very tip of the opening tool, just enough to widen the crack.
It may require some force to get the wedged tip of the opening tool between the glass and plastic. Work patiently and carefully, wiggling the plastic opening tool back and forth as necessary.