- How to back up my entire system?
- 21 Answers 21
- How to Backup Linux Filesystem Using dump Command
- How to Install Dump Utility in Linux
- Linux Dump Command Usage
- How to Backup Linux System using Dump Command
- Backup Linux Home Directory
- Backing Up Data to a Regular File
- How to Restore Linux System using Dump Command
How to back up my entire system?
If I want to make a backup of my entire OS (including but not just my home directory), how do I go about this? Is it as simple as backing up everything in / and then when if I suffer a crash, just copying the files back over?
Will this cover grub, and how do I actually do this when the system is inoperable?
May I ask why you want to do this? In most cases it is your files you will want to backup — the rest of the system is for most people easy to reinstall from the Ubuntu CD.
Because i hate reinstalling all my apps and PPAs, icons and themes. My HD crashes the installer sometime and I just generally hate installing everything from scratch.
21 Answers 21
In simple terms, the backup command is:
sudo tar czf /backup.tar.gz \ --exclude=/backup.tar.gz \ --exclude=/dev \ --exclude=/mnt \ --exclude=/proc \ --exclude=/sys \ --exclude=/tmp \ --exclude=/media \ --exclude=/lost+found \ / Add more —exclude= parameters if you need to.
It will create an archive of all your files at /backup.tar.gz , which should be copied to another computer or drive.
To restore your files when the system goes pear-shaped, use a Live CD. Mount the bad system under /media or /mnt and then run tar xf /path/to/drive/with/backup.tar.gz -C /mnt (or /media ).
This will not cover GRUB, however you can easily reinstall it by following this guide here. You only need to do steps Three and Four.
How big is the tar file usually? For example I have 90GB of data in «/». But the backing up process (making the backup.tar.gz) stopped because of lack of space.. Is there a way to create the backup.tar.gz file in an external drive?
@ArkyaChatterjee: Or course. just mount your external drive and change /backup.tar.gz to whatever is your mount point, like /media/backup//backup.tar.gz
The OP explicitely says «including (. ) my home directory» but you are excluding the home directories of all users (—exclude=/home). Am I missing something here?
tar -cvpzf /backup.tar.gz —exclude=/backup.tar.gz —one-file-system / will do what you want without needing to add all those other —exclude directories
Noone noticed clonezilla. It makes a complete image of your hard drive, so it backups absolutely everything. It’s as easy as burning an iso or creating a bootable flash drive.
The actual backup takes a while, but is the most reliable.
Can not recommend clonezilla. I just tried it and got this error: sourceforge.net/p/clonezilla/discussion/Clonezilla_live/thread/… and seems like nothing is being done about it
Clonezilla is really great! It’s use-case is a bit different tho. I used it to clone my harddrive to an external. However, it is a full clone of the whole disk, including empty space. It is an exact mirror, which is great, but a different use-case for backups.
Clonezilla does not clone empty space. It’s a great tool with the only downside being that you have to boot into it.
To clone your system to another system. Or make a backup. In terminal type:
dpkg --get-selections | grep -v deinstall > ubuntu-files This command makes a file list of all installed packages in your system (and stores it in present working directory). Backup this file in hdd, email, etc. (this file is very small).
In the freshly installed ubuntu system run:
This will install only those packages you had installed (with apt-get ) in the old system.
Alternatively, you could back up all the .deb packages from /var/cache/apt/archives/ and install them manually using:
And after that running an update cycle later.
This indeed an interesting strategy. how to go about the second way under (OR) you proposed. Back them up by copying them?
Here is a solution I use with SquashFS. It is quite similar to TAR.GZ solution proposed earlier, but has some major benefits.
SquashFS is a compressed file system, which is completely stored in one file. This file can be mounted to an existing system and accessed in a usual way, like any other partition. The difference to TAR.GZ is that SquashFS is a full-blown file system with random access to files, while TAR is just one big concatenated file.
This means that if you want to mount some large backup of your whole file system, for TAR.GZ it would take like 5 hours (in my experience) and for SquashFS it would take just minutes/seconds. The same is true also for the compression/backup operation, SquashFS is many times faster.
UPDATE 2017-01-31: It appears that not only can you mount squashfs file, but also open it as a usual archive with familiar apps like File Roller on Linux and 7-Zip on Windows, etc.
So here is a command I use to back up my root folder:
sudo mksquashfs / /path/to/backup/hdd/root-backup.sqsh -e home media dev run mnt proc sys tmp where «-e» switch excludes folders you want to exclude (like virtual and external Linux folders in my example).
After the backup is done, I can now mount it:
sudo mkdir /mnt/root_backup sudo mount /path/to/backup/hdd/root-backup.sqsh /mnt/root_backup -t squashfs -o loop Now just wait couple minutes (depending on size of the archive) and enjoy all your files at /mnt/root_backup folder.
Same can be done for /home/myname folder, e.g.
sudo mksquashfs /home/myname /path/to/backup/hdd/home-backup.sqsh -e Dropbox GoogleDrive I exclude Dropbox and GoogleDrive here to avoid any potential problems in the future, in case I restore those folders from backup and they become messing with the actual files in the cloud.
How to Backup Linux Filesystem Using dump Command
On a Linux operating system environment, mastering how to create and restore backups is a very important skill set. It is easier for well-versed Linux user to attain their data backup goals from the terminal environment without the need for a GUI-oriented application package.
The Linux dump utility is effective in creating filesystem backups on an availed storage device. However, the filesystem supported by this backup utility disregards the likes of ReiserFS and FAT.
The dump command only supports ext4, ext3, and ext2 filesystem and incremental backups. Under incremental backup support, a Linux user can flexibly execute their backup operations on daily, weekly, or monthly time frames.
It makes it easy to decide when and how you want your backups done. You get to decide which files should be involved in the scheduled backup process. Therefore, a Linux user can only focus on backing up files with significant changes or the ones that were recently added to the targeted filesystem.
How to Install Dump Utility in Linux
If you do not have the dump utility installed on your Linux machine, you can install it by executing one of the following installation commands in regards to the Linux operating system distribution you are using.
$ sudo apt-get install dump [On Debian, Ubuntu and Mint] $ sudo yum install dump [On RHEL/CentOS/Fedora and Rocky Linux/AlmaLinux] $ sudo emerge -a sys-apps/dump [On Gentoo Linux] $ sudo pacman -S dump [On Arch Linux] $ sudo zypper install dump [On OpenSUSE]
Linux Dump Command Usage
Once you run the dump backup utility, it first examines your existing Linux filesystem files and points out the ones that are worthy of any backup effort. The dump command needs several parameters for it to execute successfully:
- The targeted dump level.
- The media to host the created filesystem backup.
- The filesystem to backup.
The dump command also accommodates optional parameters pointing to:
- Specific backup media size.
- Next tape request method.
- Times and status of filesystem dump recording.
A typical dump command string adheres to the following syntax:
$ sudo dump options arguments filesystem
The dump command options:
- 0-9 – This range signifies available dump levels. 0 caters for full filesystem backup while a higher number like 9 only prioritizes the backup of modified filesystem files.
- -B records – Highlights how many dump records should exist in a single volume.
- -b kbperdump – Highlights the number of kilobytes within a single dumb record.
- -h level – With this option, a nodump attribute is associated with your backup files.
- -f file – Points to a file or device name that will accommodate the created dump.
- -d destiny – Defines the needed tape density.
- -n – Use to alert operator group users when something like a tape change is required by the dump operation.
- -s feet: Specifies the dump tape length in feet.
- -u – Creates a record of all successful backups under the file /etc/dumpdates.
- -t date – Specifies the date and time values associated with incremental backups.
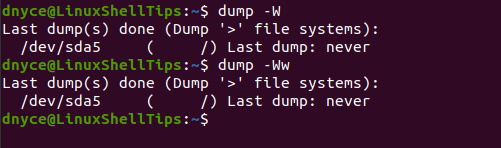
- -W – This option references the /etc/fstab and /etc/dumpdates files and highlights filesystem files that need backup.
- -w – Goes hand in hand with the W option and highlights specific/individual files that need backup.
How to Backup Linux System using Dump Command
To determine the files that need backup on your Linux system, you will run a command similar to the following:
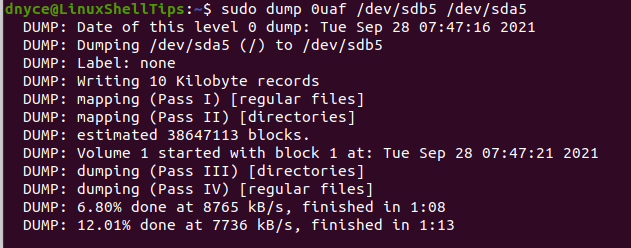
To back up the above filesystem (/dev/sda5) to an external device like /dev/sdb5 (identified by running the command sudo fdisk -l ), I would implement a dump command similar to the following:
$ sudo dump 0uaf /dev/sdb5 /dev/sda5
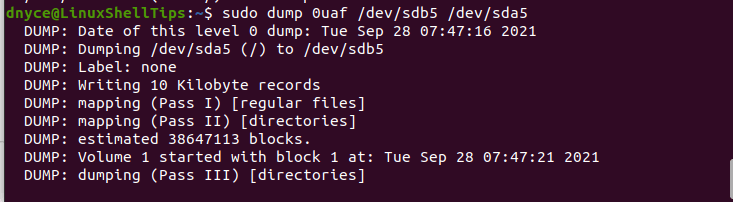
The dump command has the dump option 0 since it’s a first-time backup attempt.
If you need your backup compressed, you would run the above command in the following manner:
$ sudo dump 0ufz /dev/sdb5 /dev/sda5
The created backup will be compressed with the z library. The dump backup command updates the system user as it continues to execute:
Backup Linux Home Directory
To back up the files from a specific filesystem directory like your Home directory:
$ sudo dump 0ufz /dev/sdb5 /home
To back up files to a remote machine named linuxshelltips or identified by an IP address and with the tape device named /dev/sdb5, we will use the rdump command.
$ sudo rdump 0uf linuxshelltips:/dev/sdb5 /home
Backing Up Data to a Regular File
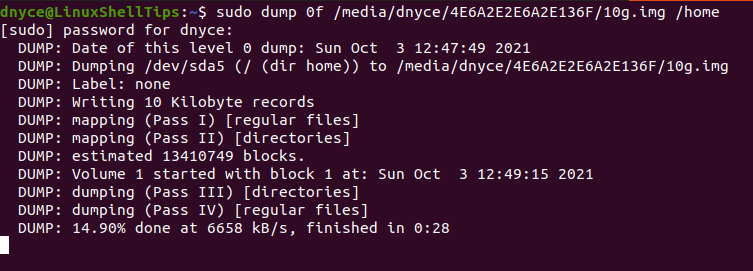
Supposing we want to back up the home directory to an existing regular file called 10g.img, we would implement the needed command in the following manner:
$ sudo dump 0f /media/dnyce/4E6A2E2E6A2E136F/10g.img /home
To create such a writable image file to hold your backup data, run the following command. Also, specify the size of this writable image file.
$ dd if=/dev/zero of=10g.img bs=1 count=0 seek=10G
Afterward, check the created backup file:

The created .img file backup can now be written to a disk device of your choice with this command:
$ sudo dd if=10g.img of=/dev/sdb5 bs=1M
How to Restore Linux System using Dump Command
To fully restore the above-created backup, we would run a command similar to the following:
The restored files will be written on the current directory path of the active Linux system user.
To restore filesystem backups from a remote machine we will use the rrestore command:
$ sudo rrestore tf linuxshelltips:/dev/sdb5
With the dump command, you can easily achieve full and incremental backups of your Linux filesystem files. The restore command reverses or does the opposite of the dump command to successfully re-instate your filesystem backups.
To learn more about these two commands and their usage, run: