- Acronis и Linux — стратегия резервного копирования
- How to Install Acronis Backup 12.5 on a Linux VM
- How to Install Acronis Backup 12.5 on a Linux VM
- Add Ubuntu Linux Server to Acronis Backup 12.5
- Steps to Install Acronis Backup Agent on Ubuntu Linux
- Step 1. Log in to Acronis Backup Console
- Step 2. Download the Linux Agent
- Step 3. Install Acronis Backup Agent
- Conclusion
Acronis и Linux — стратегия резервного копирования
Как вам идея, скрестить носорога с бегемотом, а именно не выходя из Linux, создать загрузочный диск и в случае краха операционной системы, использовать раздел с Acronis в качестве восстановительного.
Испытания начинаются. На этой страничке https://rsload.net/soft/cleaner-disk/9157-acronis-true-image-home.html можно скачать Acronis True Image 2017 v20.0.5534 WinPE Boot ISO и если у вас в системе до сих пор нет редактора разделов GParted https://gparted.org/download.php — установите.
Далее бросаем на амбразуры бесплатный менеджер разделов. Нам всего-то нужно создать новый раздел, файловая система FAT32, ~ 1ГБ, метка Acronis, флаги пока не трогаем. Кликай по картинке:
Переходим к нашему ранее скачанному из интернета, Acronis True Image 2017 v20.0.5534 WinPE Boot ISO (вы вправе использовать другой ISO-образ). Открыть с помощью «Подключение образов дисков» или просто два раза щёлкните по ISO-образу (у меня Linux Mint, если «чё»).
Копируем все файлы в корень диска с меткой Acronis.
Возвращаемся на GParted и настраиваем флаги: boot, esp (у меня ноутбук UEFI, если «чё»). Теперь используя этот загрузочный раздел, мы сможем создать первую резевную копию Linux (Acronis, прекрасно справляется с Ext4 разделами — /, если «чё»).
Далее «ухожу» на перезагрузку и нажимаю клавишу (у меня F9, если «чё») для входа в boot menu. Предположим, вы не знаете, какая клавиша отвечает на вашем устройстве за вход в boot menu, тогда указательным пальцем, как на пианино, проводите по всем клавишам от ESC до F12 или читайте большую компьютерную энциклопедию о методологических критериях и требованиях к вашему гаджету:).
А вот здесь начинается самое интересное. Скорее всего, раньше в boot menu у вас не было такой записи, как EFI HDD Device, то теперь она должна появиться (если, конечно, ваш ноутбук не куплен на планете Меркурий).
Выставляем приоритет загрузки с записи EFI HDD Device и попадаем на многим любимый Acronis. Далее, как в ролике:
Создаём резервную копию системного, служебного, скрытого, загрузочного раздела EFI System Partition 100MB. И отдельно (я так привык, если «чё») корневого раздела Ext4 — / Linux. Да, любого раздела, хоть весь жёсткий диск.
По поводу резервного копирования Linux, ʁ уже высказался в ролике . У кого в этой системе заложена программа минимум (смотреть XXX-ролики, читать Достоевского, слушать музыку и играть в игры ), тому хватит и внутренних средств системы — Time Shift .
У кого в голове постоянно кружат мысли, что-нибудь поломать. ладно. закончу на позитивной ноте. Успехов друзья, здоровья, любви и счастья! Пока, пока!
¡оɹоdƍоɓ wɐʚ оɹǝɔʚ и оƍиɔɐuɔ ǝǝнɐdɐε ¡oıqɯɐɯɔ ǝɯn̯ʎdиɯнǝwwоʞ онʚиɯʞɐ и vɐнɐʞ ɐн qɔǝɯиmиuɓоu ˙хʁɯǝɔ˙ǹоɔ ʚ wоɯɔоu ʁɔqɯиvǝɓоu ǝɯqɓʎƍɐε ǝн
How to Install Acronis Backup 12.5 on a Linux VM

If you’re familiar with Linux or use Linux at work or at home, you may like to test Acronis Backup 12.5 on a Linux server.
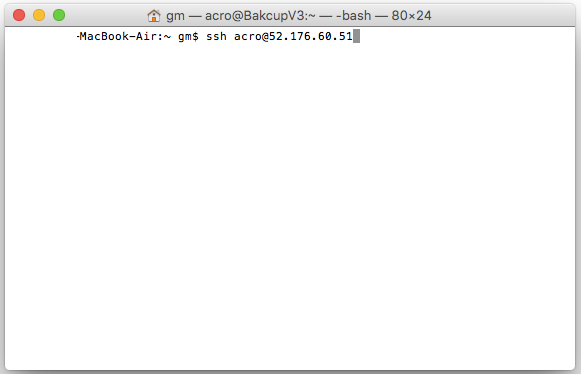
Assuming that you already created a Linux VM, now is the time to log in. You’ll need your VM’s IP, user name and password.
Open your favorite SSH client (e.g., Terminal on a Mac or Putty on Windows), type the following command, substituting “username” with your username and IP-address with your VM’s IP address, and hit Enter.
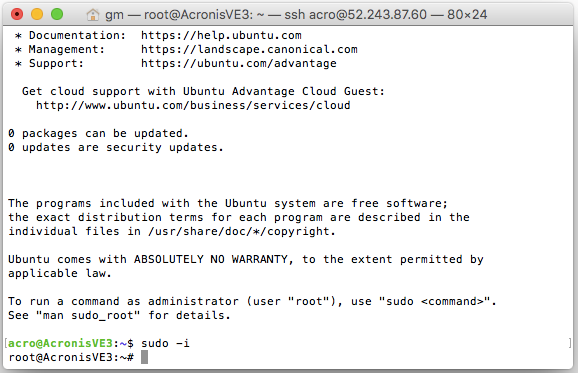
Next, switch to the main “root” user to get full access rights to this server:
Since we’re using Ubuntu, we need to make sure we have all required packages for this backup (See https://dl.managed-protection.com/u/backup/help/12/user/en-US/index.html#22619.html )
Run the following commands to install the required packages:
sudo apt-get install rpm sudo apt-get update sudo apt-get install linux-headers-`uname -r` sudo apt-get install linux-image-`uname -r` sudo apt-get install gcc- sudo apt-get install make sudo apt-get install perl
Now you’re ready to install Acronis client.
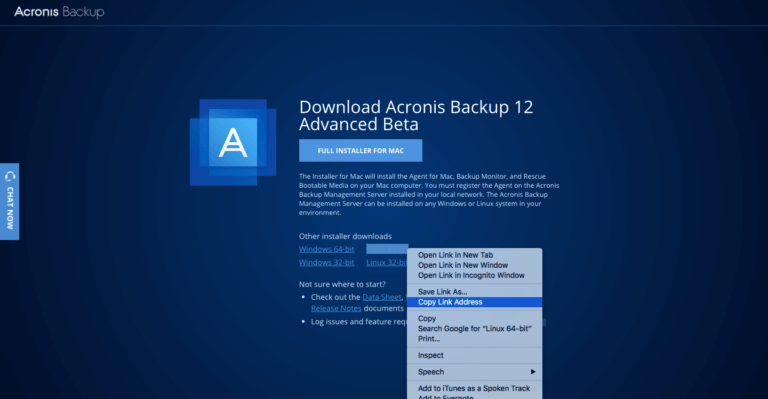
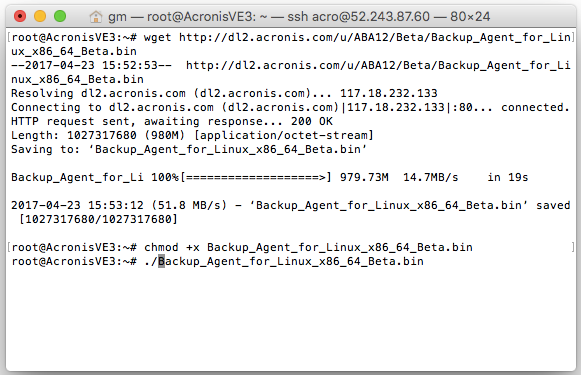
Go back to your Acronis Backup 12.5 Download Beta page and copy the link to download the installation file.
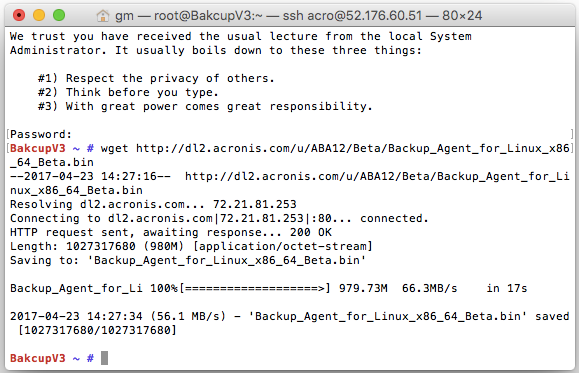
into the terminal window and hit enter to download the file.
Make the downloaded file executable:
chmod +x Backup_Agent_for_Linux_x86_64_Beta.bin
Then run the installer by typing
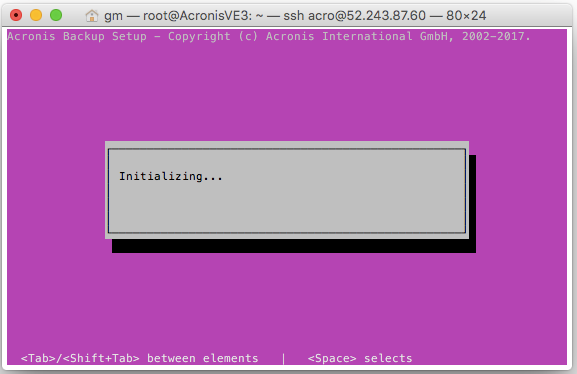
The installation process will start and after a few seconds you’ll see this:
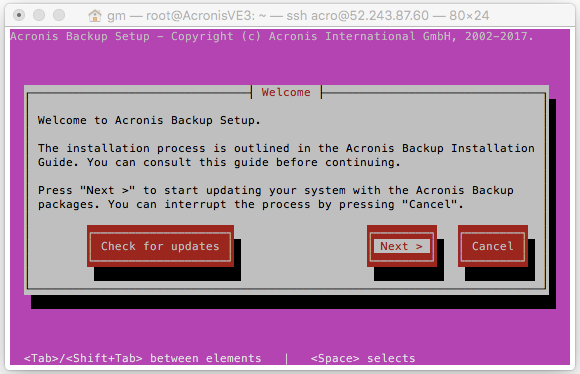
Then follow the prompts. Select “Next>” and hit enter.
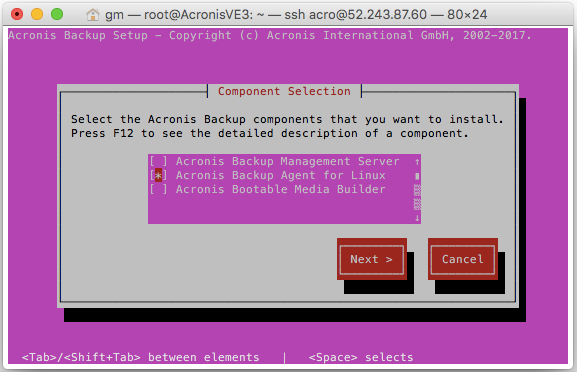
We only need the backup agent, so make sure it’s the only option that is checked (use the arrow keys and space to select). Hit ”Next>”
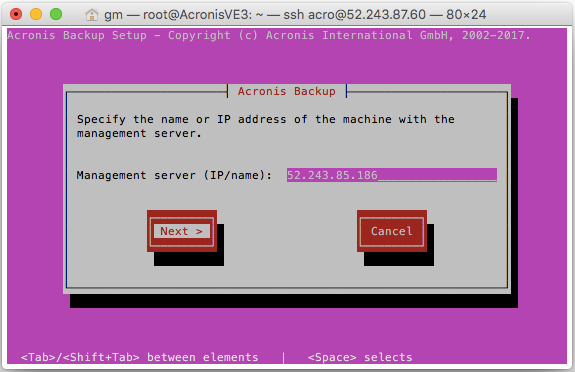
Enter the management server IP (in our case it’s the first Windows VM we created above). Hit “Next>”
When you see the following screen, your installation is complete.
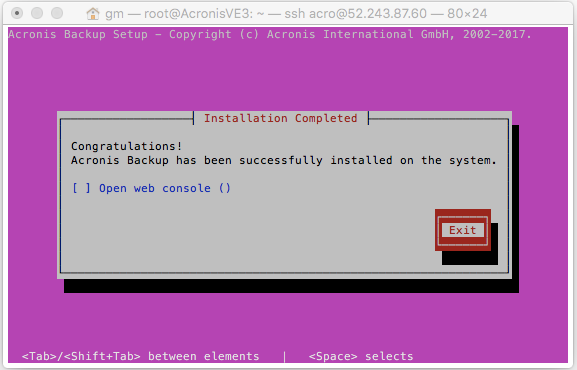
You can now exit the installer and go back to the management console to configure backup plans for this VM.
How to Install Acronis Backup 12.5 on a Linux VM
If you’re familiar with Linux or use Linux at work or at home, you may like to test Acronis Backup 12.5 on a Linux server.
Assuming that you already created a Linux VM, now is the time to log in. You’ll need your VM’s IP, user name and password.
Open your favorite SSH client (e.g., Terminal on a Mac or Putty on Windows), type the following command, substituting “username” with your username and IP-address with your VM’s IP address, and hit Enter.
Next, switch to the main “root” user to get full access rights to this server:
Since we’re using Ubuntu, we need to make sure we have all required packages for this backup (See https://dl.managed-protection.com/u/backup/help/12/user/en-US/index.html#22619.html )
Run the following commands to install the required packages:
sudo apt-get install rpm sudo apt-get update sudo apt-get install linux-headers-`uname -r` sudo apt-get install linux-image-`uname -r` sudo apt-get install gcc- sudo apt-get install make sudo apt-get install perl
Now you’re ready to install Acronis client.
Go back to your Acronis Backup 12.5 Download Beta page and copy the link to download the installation file.
into the terminal window and hit enter to download the file.
Make the downloaded file executable:
chmod +x Backup_Agent_for_Linux_x86_64_Beta.bin
Then run the installer by typing
The installation process will start and after a few seconds you’ll see this:
Then follow the prompts. Select “Next>” and hit enter.
We only need the backup agent, so make sure it’s the only option that is checked (use the arrow keys and space to select). Hit ”Next>”
Enter the management server IP (in our case it’s the first Windows VM we created above). Hit “Next>”
When you see the following screen, your installation is complete.
You can now exit the installer and go back to the management console to configure backup plans for this VM.
Add Ubuntu Linux Server to Acronis Backup 12.5

Hello everyone, welcome to BestBackup.site. Today we are going to show you an interesting way to backup our Linux Server using Acronis Backup 12.5. As you know, Acronis Backup is a powerful backup solution for enterprise or business users. It has all features you need to perform full system backup to Windows and Linux servers. With this tool, we can easily add multiple desktops, servers for backup purpose. Then, we can manage and monitor the backup process from a single console. Below, you can find the easy way to install Acronis Backup Agent on Ubuntu Linux. We are using Ubuntu 17.10 server edition on this tutorial.
On this article I am going to add an Ubuntu server (Ubuntu 17.10) to my Acronis Backup 12.5 backup system. Please read how to install this Acronis Backup 12.5 before you continue to work on this task. Actually, Acronis provides a guide on how to install the Linux agent on this webpage. But I don’t think it’s correctly written. Many Linux commands that did not work.
Steps to Install Acronis Backup Agent on Ubuntu Linux
Step 1. Log in to Acronis Backup Console
Open your web browser and type http://localhost:9877. Now go to Device | All machine

Step 2. Download the Linux Agent
Click Add button on the console and then select Linux from the Servers list.

It will download the Linux Agent file. Please note that the file size is 1.2 GB in size. Make sure you have a good internet connection. You will have the following file:
Step 3. Install Acronis Backup Agent
After the download complete. We are ready to install. But before we install it, we need to make sure our system has all the required packages. Perform these commands on Ubuntu Linux
sudo apt install build-essential rpm
Now make the package executable
sudo chmod +x AcronisBackup_12.5_64-bit.x86_64
Finally Run the installer
Now follow on screen installation wizard
This slideshow requires JavaScript.
Now check if our new Ubuntu Linux is shown on the Acronis backup console

As you can see, now my Ubuntu is there. We can then create backup plan for this Ubuntu server.
Conclusion
Acronis Backup is a great solution for multi computers/servers backup to cloud storage. We can add many desktops and servers to the backup system easily. Thanks for reading this how to install Acronis Linux Agent on Ubuntu Linux. Please share the article if you think this is useful.