- How to Check Hard Drive for Bad Sectors or Blocks in Linux
- Step 1) Use fdisk command to identify hard drive info
- Step 2) Scan hard drive for Bad Sectors or Bad Blocks
- Step 3) Inform OS not to use bad blocks for storing data
- 8 thoughts on “How to Check Hard Drive for Bad Sectors or Blocks in Linux”
- How to Check Bad Sectors or Bad Blocks on Hard Disk in Linux
- Check Bad Sectors in Linux Disks Using badblocks Tool
- Scan Bad Sectors on Linux Disk Using Smartmontools
How to Check Hard Drive for Bad Sectors or Blocks in Linux
Badblocks is the command-line utility in Linux like operating systems which can scan or test the hard disk and external drive for bad sectors. Bad sectors or bad blocks is the space of the disk which can’t be used due to the permanent damage or OS is unable to access it.
Badblocks command will detect all bad blocks(or bad sectors) of a hard disk and save them in a text file. Later we can use it with e2fsck to instruct Operating System(OS) not to store any data on these damaged sectors or blocks.
In this article, we will learn how to check or scan hard drive for bad sectors using badblocks command.
Step 1) Use fdisk command to identify hard drive info
Run fdisk command to list all available hard disks to Linux operating system. Identify the disk which you want to scan for bad blocks.
Step 2) Scan hard drive for Bad Sectors or Bad Blocks
Once you identify the hard disk then run badblocks command. Example is shown below
$ sudo badblocks -v /dev/sdb > /tmp/bad-blocks.txt
Just replace “/dev/sdb” with your own hard disk / partition. When we execute above command a text file “bad-blocks” will be created under /tmp , which will contains all bad blocks.

Step 3) Inform OS not to use bad blocks for storing data
Once the scanning is completed, if the bad sectors are reported then use file “bad-blocks.txt” with e2fsck command and force OS not to use these bad blocks for storing data. Run the following e2fsck command
$ sudo e2fsck -l /tmp/bad-blocks.txt /dev/sdb or $ sudo e2fsck -c /dev/sdb
Note : Before running e2fsck command, you just make sure the drive is not mounted.
For any further help on badblocks & e2fsck command , read their respective man pages
$ man badblocks $ man e2fsck
8 thoughts on “How to Check Hard Drive for Bad Sectors or Blocks in Linux”
Don’t modern harddrives already have all this already — as built in functionality? (access via smartctl) $ apropos smartctl
smartctl (8) – Control and Monitor Utility for SMART Disks Reply
From time to time, it is a good practice to check your hard drive for errors using Windows CHKDSK or Check Disk. Reply
This has given me an idea of creating this script #!/bin/sh
minsize=0
target=”/tmp/bad-blocks.txt”
for disc in `fdisk -l | grep ‘^/’ | awk ‘< print $1 >’`; do
badblocks -v $disc > “$target”
tam=$(du -k “$target” | cut -f 1)
if [ $tam -eq $minsize ]; then
echo “no badblocks on $disc”
else
echo “badblock(s) found(s) on $disc”
fi
done Reply
You don’t need to run badblocks first. That’s a waste of time. Just use the e2fsck executable to run it for you with the -c option… # sudo e2fsck -c /dev/sdb This lets you avoid creating an unnecessary file, especially when you’re booting to an optical drive and don’t want to write to the hard drive you’re testing. Reply
DO NOT DO THIS! The ONLY reason you should ever create a bad blocks table is to send commands to the drivbe to tell it to repair the sectors ATA and scsi drives are supposed to map out bad blocks. You can force the issue by wirting 0x00 to the sector (or use hdparm–repair-sector) Take note of smartctl -A /dev/drive returns – in particular the bad sector (mapped out sectors) and pending sectors (probably bad but not mapped out) values – if the bad sector normalised value (not the raw value) is below the threshold then you need to replace the drive – NOW. If you have large numbers of pending bad sectors then you’ll need to identify them and write zeros to them to allow the drive to fix or map them out (perfectly sectors can get marked as pending due to vibration issues, amongst other things). Badblocks -svn will do this (unmount the partition first!), or if the partition is trashable/part of a raidset, hdparm –repair-sector and then rescan/reformat afterwards. If bad sectors are not being mapped out then the drive needs to be replaced immediately. It’s probably out of spares (you’ll see this with smartctl -A) or about to fail. Reply
What command just to report sectors or drive health.
Using an old pata drive that has not been used in some time to run Linux
peppermint 64x.
From my experience with windows os’s and smart, one bad sector can trash
a program or even the entire drive. Reply
Most filesystems these days use 4096 byte blocks. Using the commands as directed here will make a hash of your filesystem. As advised in the current man page for badblocks
“Important note: If the output of badblocks is going to be fed to the
e2fsck or mke2fs programs, it is important that the block size is prop‐
erly specified, since the block numbers which are generated are very
dependent on the block size in use by the filesystem. For this reason,
it is strongly recommended that users not run badblocks directly, but
rather use the -c option of the e2fsck and mke2fs programs” Following the example on this page the command would be: es2fsck -c /dev/sdb Reply
How to Check Bad Sectors or Bad Blocks on Hard Disk in Linux
Let us start by defining a bad sector/block, it’s a section on a disk drive or flash memory that can not be read from or written to anymore, as a result of a fixed physical damage on the disk surface or failed flash memory transistors.
As bad sectors continue to accumulate, they can undesirably or destructively affect your disk drive or flash memory capacity or even lead to a possible hardware failure.
It is also important to note that the presence of bad blocks should alert you to start thinking of getting a new disk drive or simply mark the bad blocks as unusable.
Therefore, in this article, we will go through the necessary steps that can enable you determine the presence or absence of bad sectors on your Linux disk drive or flash memory using certain disk scanning utilities.
That said, below are the methods:
Check Bad Sectors in Linux Disks Using badblocks Tool
A badblocks program enables users to scan a device for bad sectors or blocks. The device can be a hard disk or an external disk drive, represented by a file such as /dev/sdc.
Firstly, use the fdisk command with superuser privileges to display information about all your disk drives or flash memory plus their partitions:
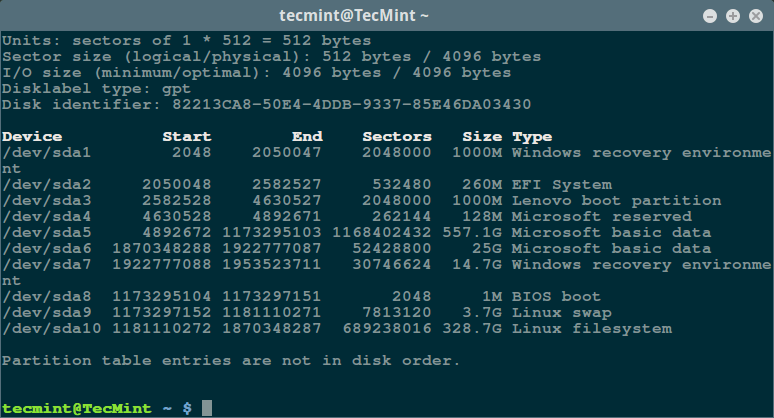
Then scan your Linux disk drive to check for bad sectors/blocks by typing:
$ sudo badblocks -v /dev/sda10 > badsectors.txt
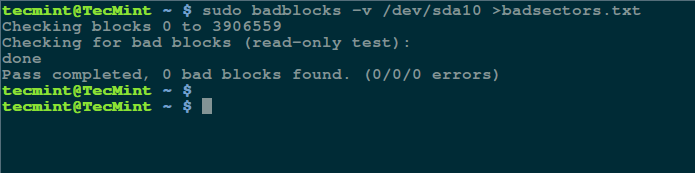
In the command above, badblocks is scanning device /dev/sda10 (remember to specify your actual device) with the -v enabling it to display details of the operation. In addition, the results of the operation are stored in the file badsectors.txt by means of output redirection.
In case you discover any bad sectors on your disk drive, unmount the disk and instruct the operating system not to write to the reported sectors as follows.
You will need to employ e2fsck (for ext2/ext3/ext4 file systems) or fsck command with the badsectors.txt file and the device file as in the command below.
The -l option tells the command to add the block numbers listed in the file specified by filename (badsectors.txt) to the list of bad blocks.
------------ Specifically for ext2/ext3/ext4 file-systems ------------ $ sudo e2fsck -l badsectors.txt /dev/sda10 OR ------------ For other file-systems ------------ $ sudo fsck -l badsectors.txt /dev/sda10
Scan Bad Sectors on Linux Disk Using Smartmontools
This method is more reliable and efficient for modern disks (ATA/SATA and SCSI/SAS hard drives and solid-state drives) which ship in with a S.M.A.R.T (Self-Monitoring, Analysis and Reporting Technology) system that helps detect, report and possibly log their health status, so that you can figure out any impending hardware failures.
You can install smartmontools by running the command below:
------------ On Debian/Ubuntu based systems ------------ $ sudo apt-get install smartmontools ------------ On RHEL/CentOS based systems ------------ $ sudo yum install smartmontools
Once the installation is complete, use smartctl which controls the S.M.A.R.T system integrated into a disk. You can look through its man page or help page as follows:
Now execute the smartctrl command and name your specific device as an argument as in the following command, the flag -H or —health is included to display the SMART overall health self-assessment test result.

The result above indicates that your hard disk is healthy, and may not experience hardware failures any soon.
For an overview of disk information, use the -a or —all option to print out all SMART information concerning a disk and -x or —xall which displays all SMART and non-SMART information about a disk.
In this tutorial, we covered a very important topic concerning disk drive health diagnostics, you can reach us via the feedback section below to share your thoughts or ask any questions and remember to always stay connected to Tecmint.