- systemd Before and After declarations
- 1 Answer 1
- systemd service run before and after other service starts
- 1 Answer 1
- Edit autofs.service
- Drop-in service parameters
- Relationships
- Linux: Using sed to insert lines before or after a match
- Replace a line when match found
- Insert line after match found
- Insert a line before match found
- Insert multiple lines
- Show Lines Before and After Match via Grep
- Example 01: Using ‘-A’ and ‘-B’
- Example 02: Using ‘-A’ and ‘-B’
- Example 03: Using ‘-C’
- Conclusion
- About the author
- Aqsa Yasin
systemd Before and After declarations
If a unit foo.service contains a setting Before=bar.service and both units are being started, bar.service ‘s start-up is delayed until foo.service is started up. [. ] After= is the inverse of Before= , i.e. while After= ensures that the configured unit is started after the listed unit finished starting up, Before= ensures the opposite, that the configured unit is fully started up before the listed unit is started.
- You only need to specify Before=b.service in the a.service unit file
- You only need to specify After=a.service in the b.service unit file
- You need both After=a.service in the b.service unit file and Before=b.service in the a.service unit file
Which do I need to declare dependencies for systemd unit files? Does it matter?
@Ulrich Schwarz I do have Requires as I need a hard fail for b if a hasn’t started. However according to the aforementioned man page: ` If a unit foo.service requires a unit bar.service as configured with Requires= and no ordering is configured with After= or Before=, then both units will be started simultaneously and without any delay between them if foo.service is activated. `
@Stephen Kitt I haven’t tried experimenting yet as I am translating a large project which includes numerous upstart jobs to systemd services and they all have many dependencies. Give me a few weeks and I will get back to you 😉
What I meant was that you could answer your own question with a simple experiment involving your two a and b example units; no need to wait until you’ve finished translating all your upstart jobs!
1 Answer 1
You only need one of After= or Before= in your pair of units. You might prefer this from the man page for systemctl :
—after . any After= dependency is automatically mirrored to create a Before= dependency.
Use this option with list-dependencies to check what you think systemd should be doing. Eg
$ systemctl list-dependencies --after timers.target timers.target * |-sysstat-collect.timer * |-sysstat-summary.timer * |-systemd-tmpfiles-clean.timer * `-unbound-anchor.timer $ systemctl list-dependencies --before sysstat-collect.timer sysstat-collect.timer * |-sysstat-collect.service * |-shutdown.target * `-timers.target If you are converting from upstart you might get some hints from here, and you could read all the blogs listed here under the heading The systemd for Administrators Blog Series.
systemd service run before and after other service starts
I can determine the after/before status in the bmount script, so I can call it without parameter and I could use only one service, but don’t know how. Is it possible?
1 Answer 1
There are a few ways to do this:
Edit autofs.service
By design, service files should be site-maintainable. On Debian-based platforms, vendor-supplied service files are in /lib/systemd/system/ , I think redhat has them in /usr/lib/systemd/system/ but you can override these with site-managed service files in /etc/systemd/system/ .
cp /lib/systemd/system/autofs.service /etc/systemd/system/autofs.service Then in the [Service] section, I’d add:
ExecStartPre=/backup/sw/bmount before ExecStartPost=/backup/sw/bmount after The systemd.service manpage says:
ExecStart= commands are only run after all ExecStartPre= commands exit successfully.
ExecStartPost= commands are only run after the commands specified in ExecStart= have been invoked successfully, as determined by Type= (i.e. the process has been started for Type=simple or Type=idle, the last ExecStart= process exited successfully for Type=oneshot, . ).
Drop-in service parameters
A more elegant way to do the same thing as what’s above is to use a drop-in. Simply create /etc/systemd/system/autofs.service.d/backup.conf with this content:
[Service] ExecStartPre=/backup/sw/bmount before ExecStartPost=/backup/sw/bmount after Relationships
Maybe autofs.service already has ExecStartPre and ExecStartPost commands and you are worried about interferring with that service. In that case, you can use relationships to start/stop your services.
[Unit] Description=Backup mount PartOf=autofs.service Before=autofs.service [Service] Type=oneshot ExecStart=/backup/sw/bmount before [Install] WantedBy=autofs.service [Unit] Description=Backup mount PartOf=autofs.service After=autofs.service [Service] Type=oneshot ExecStart=/backup/sw/bmount after [Install] WantedBy=autofs.service - PartOf=autofs.service means «When systemd stops or restarts autofs.service , the action is propagated to backup.service «
- Before=autofs.service means «If both units are being started, autofs.service ‘s startup is delayed until backup.service has finished starting up.»
- After=autofs.service means «If both units are being started, backup.service ‘s startup is delayed until autofs.service has finished starting up.»
- WantedBy=autofs.service means » backup.service will be started if autofs.service is».
- Type=oneshot means that the service will still be considered as running, even after the ExecStart= process completes.
Be sure to run systemctl daemon-reload so systemd reads the new service. Also run systemctl enable backup.service to ensure that the WantedBy= becomes a Wants= for autofs.service .
I think you were pretty close with your solution.
Linux: Using sed to insert lines before or after a match
The sed utility is a powerful utility for doing text transformations. In this article, I will provide an example of how to insert a line before and after a match using sed, which is a common task for customizing configuration files.
In these examples, we will be dealing with a text file named “text.txt” that contains the following content:
mykey=one anothervalue=two lastvalue=three
Replace a line when match found
The simplest case is replacing an entire line by finding the line that starts with the match.
sed 's/^anothervalue=.*/replace=me/g' test.txt
mykey=one replace=me lastvalue=three
Insert line after match found
Then we have the case where we need to insert a line after the match.
sed '/^anothervalue=.*/a after=me' test.txt
mykey=one anothervalue=two after=me lastvalue=three
Insert a line before match found
Then we have the case where we need to insert a line before the match.
sed '/^anothervalue=.*/i before=me' test.txt
mykey=one before=me anothervalue=two lastvalue=three
Insert multiple lines
And this might have slight variations depending on your POSIX compliance, but if you want to insert multiple lines, you can use ‘\n’ as shown below.
sed '/^anothervalue=.*/i before=me\nbefore2=me2' test.txt
mykey=one before=me before2=me2 anothervalue=two lastvalue=three
Show Lines Before and After Match via Grep
![]()
Grep has been used widely in Linux systems when working on some files, searching for some specific pattern, and many more. This time, we are using the grep command to display the lines before and after the matched keyword used in some specific file. For this purpose, we will be using the “-A”, “-B” and, “-C” flag throughout our tutorial guide. So, you have to perform each step for better understanding. Make sure you have Ubuntu 20.04 Linux system installed.
Firstly, you have to open your Linux command-line terminal to start working on grep. You are currently at the Home directory of your Ubuntu system right after the command-line terminal has been opened. So, try to list all the files and folders in the home directory of your Linux system using the below ls command, and you will get all. You can see, we have some text files and some folders listed in it.

Example 01: Using ‘-A’ and ‘-B’
From the above-shown text files, we will have a look at some of these and try to apply the grep command on them. Let’s open the text file “one.txt” first using the popular “cat” command as underneath:
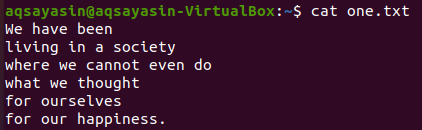
We will first see some specific words matches in this text file using the grep command as below. We are searching for the word “we” in the text file “one.txt” using grep instruction. The output shows two lines from the text file having “we” in them.

So, in this example, we will be showing the lines before and after the specific word match in some text files. So using the same text file “one.txt” we have been matching the word “we” while displaying the 3 lines before it as below. The flag “-B” stands for “Before”. The output shows only 2 lines before the specific word line because the file doesn’t have more lines before the line of a specific word. It also shows those lines having that specific word present in them.

Let’s use the same keyword “we” from this file to display the 3 lines after the line that have the word “we”. The flag “-A” presents “After”. The output again shows only 2 lines because it has not more lines in the file.

So, let us use a new keyword to be matched and display the lines or rows before and after the line in which it lies. So we have been using the word “can” to be matched. The line numbers are the same in this case. The 3 lines after the matched word “can” have been displayed below using the grep command.

You can see the output shows before the lines of a matched word using the keyword “can”. In contrast, it shows only two lines before the line of the matched word because there are no more lines before it.

Example 02: Using ‘-A’ and ‘-B’
Let’s take another text file, “two.txt,” from the home directory and display its contents using the below “cat” command.

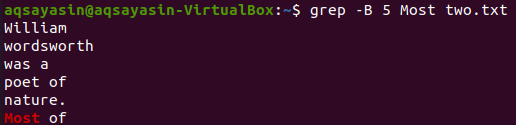
Let’s display 5 lines before the word “Most” from the file “two.txt” using the grep command. The output shows 5 lines before the line contain a specific word.
The grep command to shows the 5 lines after the word “Most” from the text file “two.txt” has been given below.

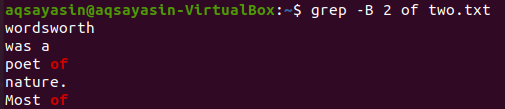
Let’s change the keyword to be searched. We will use “of” as a keyword to be matched this time. Display the 2 lines before the word “of” from the text file “two.txt” can be done by using the below grep command. The output shows two lines for the keyword “of” because it comes twice in the file. Thus the output contains more than 2 lines.
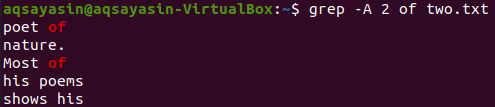
Now displaying the 2 lines of file “two.txt” after the line that contains the keyword “of” can be done using the below command. The output again displays more than 2 lines.
Example 03: Using ‘-C’
Another flag, “-C” has been used to display the lines before and after the matched word. Let’s display the contents of the file “one.txt” using the cat command.

We choose “society” as a keyword to be matched. The below grep command will display the 2 lines before and 2 lines after the line that contains the word “society” in it. The output shows one line before the specific word line and 2 lines after it.

Let’s see the contents of file “two.txt” using the below cat command.
In this illustration, we are using “poems” as a keyword to match. So, execute the below command for this. The output shows two lines before and two lines after the matched word.

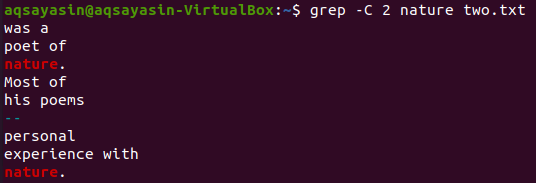
Let’s use one more keyword from the file “two.txt” to be matched. We are consuming “nature” as a keyword this time. So, try the below command while using “-C” as a flag having the keyword “nature” from the file “two.txt”. This time, the output has more than two lines in the output. As the file contains the word “nature” more than once, that’s the reason behind it. The keyword “nature,” which comes first, has two lines before and two lines after it. While the second matched the same keyword, “nature” has two lines before it, but there are no lines after it because it is at the last line of the file.
Conclusion
We are successful in displaying the lines before and after the specific word while using the grep instruction.
About the author
Aqsa Yasin
I am a self-motivated information technology professional with a passion for writing. I am a technical writer and love to write for all Linux flavors and Windows.