- When to install Bitvise SSH Client?
- Where to install the SSH Client?
- Download the SSH Client
- Run the installer
- Advanced installation
- Running the SSH Client
- Notification area icon
- Command line clients
- PowerShell scripting
- Sysadminium
- Подготовка к подключению
- Подключение с Windows
- Подключение используя «Bitvise SSH Client»
- Подключение используя «PowerShell»
- Подключение с Десктопного Linux
- Подключение с Android
- Различные приглашения ввода команды
When to install Bitvise SSH Client?
The SSH Client runs on desktop and server versions of Windows:
- We target all x86 and x64 desktop and server editions of Windows that are in support by Microsoft.
- We additionally support Windows XP and Windows Server 2003.
The focus of this guide is to demonstrate use of Bitvise SSH Client as part of setting up and accessing Bitvise SSH Server. Aspects of this guide may also apply to use of the SSH Client with other servers.
Where to install the SSH Client?
If you are installing the SSH Client as part of setting up Bitvise SSH Server:
- Install it first on the same computer where the SSH Server is installed. It normally does not make sense to connect to an SSH server on the same computer. However, if you are setting up an SSH server, ensuring that it can be accessed from the same computer is an important step in verifying that it works.
- Subsequently, install the SSH Client on another computer in the same LAN. Use this installation to verify that the SSH Server can be accessed from another computer in its local area network.
- Finally, install the SSH Client on the computer from which you want to access the SSH Server. This can be a computer across the internet.
Download the SSH Client
To install the SSH Client, you first need to download it. We recommend always downloading the latest version of the SSH Client from our website, as follows:
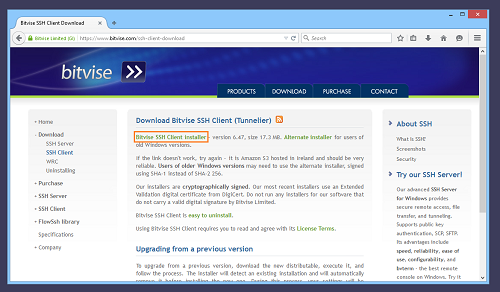
Open the SSH Client download page and download the installer.
Do not use older versions if you can avoid it. They may contain known security, compatibility, and reliability issues fixed in later versions.
For information about changes in SSH Client versions, consult the SSH Client version history.
Run the installer
The process of downloading and starting the SSH Client installer is largely identical as when installing Bitvise SSH Server:
- You will need to be logged into Windows with administrative permissions to run the SSH Client installer.
- Before approving it to run, verify Bitvise’s signature on the SSH Client installer.

If you have approved to run the installer, the installer interface will appear.
- Review the End User License Agreement. You must accept the agreement to continue installation.
- No other action is required at this step.
- The black console window will show technical details of the installation, including information about any problems if they occur.
Advanced installation
The SSH Client installer can also be run from the command line, to perform an installation unattended. Run the installer with suitable command line parameters in this case. For help with supported parameters, run the installer as follows:
Running the SSH Client
After installation, you can run the graphical SSH Client as follows:
- From the Windows Start menu.
- By double-clicking its desktop icon (if you chose to create one during installation).
- By double-clicking an SSH Client profile: a file with a .tlp or .bscp extension.
Once you start it, you can of course also pin the SSH Client to your Windows task bar.
Notification area icon
When you close the graphical SSH Client via the X icon when it is connected, it will by default not exit, but instead minimize to the notification area in your task bar:
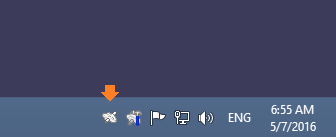
If your notification area icons are hidden, you may not notice that you already have numerous SSH Client sessions active.
If you prefer, you can change this behavior by setting Closing behavior differently:

Command line clients
After installation, you can also use a Windows Command Prompt or PowerShell window to invoke a number of command line clients included with Bitvise SSH Client:
- Use sftpc for command-line file transfers.
- Use sexec for remote command execution.
- Use stnlc for unattended port forwarding/tunneling.
- Use stermc for a command-line SSH terminal client.
- Use spksc for command-line management of authentication keypairs configured for a user at an SSH server.
PowerShell scripting
Bitvise SSH Client includes FlowSshNet, our SSH library for .NET, which can be used to initiate SSH sessions and SFTP file transfers from PowerShell or .NET. In the SSH Client installation directory, look for a subdirectory named FlowSshNetSamples to find sample PowerShell scripts. The usual location is:
C:\Program Files (x86)\Bitvise SSH Client\FlowSshNetSamples
Sysadminium
Работать с сервером используя физический доступ не удобно, а иногда не возможно. Намного удобнее подключаться к консоли сервера по ssh.
Подготовка к подключению
Подключаемся мы по сети, для этого нам нужно знать ip адрес нашего сервера. Посмотреть его можно командой:
Команда ip предназначена для работы с сетью, подкоманда addr указывает что идет работа с адресами, а подкоманда show показывает список ip адресов сервера. Команда работает в Ubuntu и Debian одинаково:
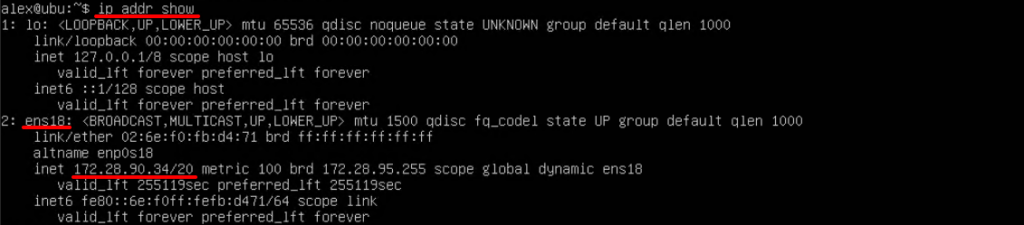
Мы видим два сетевых интерфейса:
- lo — это локальный сетевой интерфейс, с адресом 127.0.0.1, по этому адресу сервер может обращаться сам к себе. Например одна служба этого сервера сможет обратиться к другой службе этого сервера.
- ens18 — это сетевой интерфейс, который нам и нужен, его ip адрес 172.30.90.34.
SSH служба по умолчанию работает на 22 порту TCP, устанавливать ssh сервер уже не нужно. Мы установили его при установки и в Debian и в Ubuntu.
Подключение с Windows
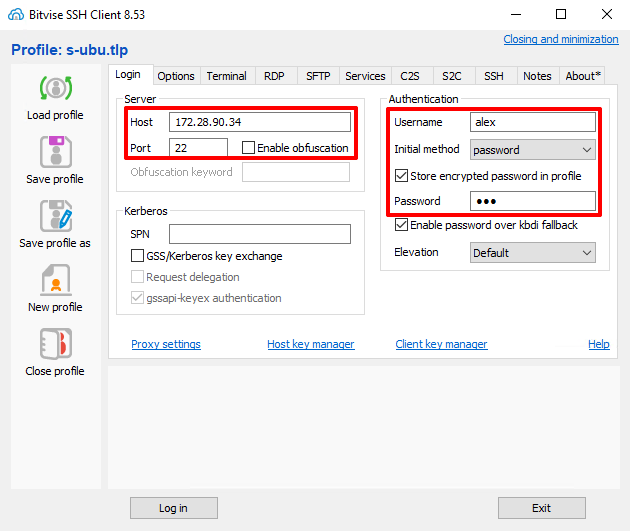
Подключение используя «Bitvise SSH Client»
Для того чтобы подключаться по ssh с Windows компьютера к Linux серверу можно использовать разные приложения. Например мне нравиться приложение «Bitvise SSH Client«, скачать его можно от сюда.
Для подключения нужно ввести адрес сервера, порт на котором работает служба ssh, логин и пароль, после чего нажать кнопку «Log in»:
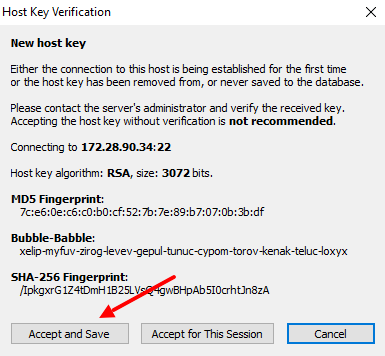
Дальше соглашаемся с отпечатком сервера (host key):
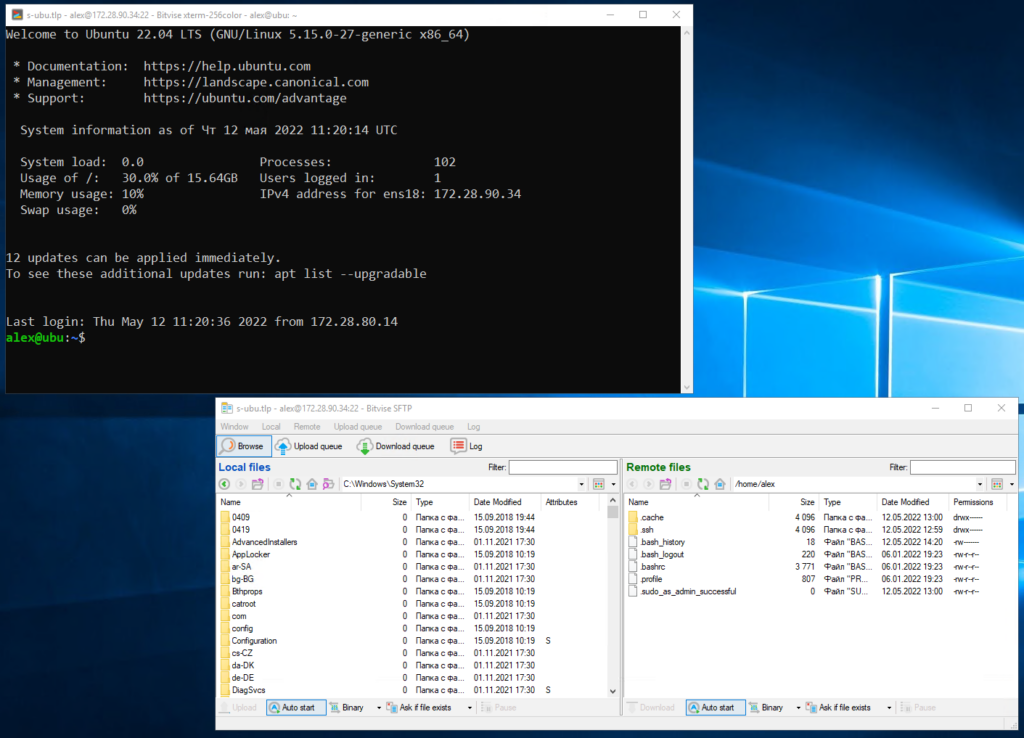
После подключения, откроется сразу два окошка. Первое с терминалом для ввода команд. И второе с локальной и удалённой файловыми системами для удобного переноса файлов на сервер по протоколу SFTP:
Подключение используя «PowerShell»
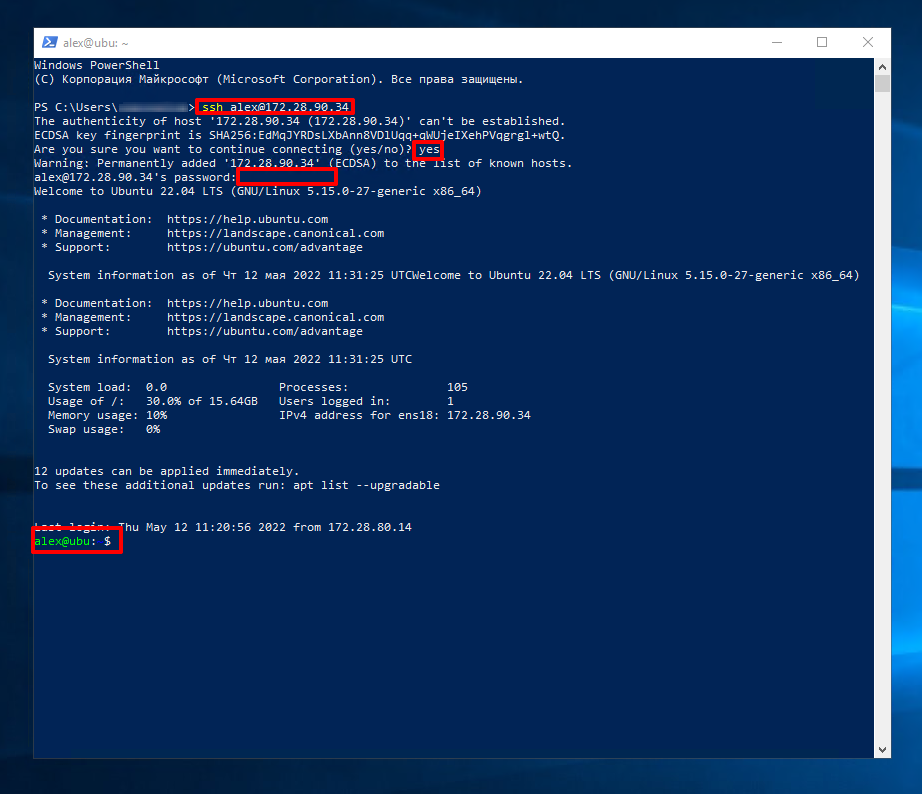
Кроме сторонних программ, таких как «Bitvise SSH Client» из Windows вы можете подключаться по SSH к Linux серверам прямо из PowerShell. Такая возможность появилась с Windows 10 и Windows Server 2016.
Для этого вы должны ввести следующую команду:
Затем вам также нужно будет согласиться с отпечатком сервера (host key) и ввести пароль:
Подключение с Десктопного Linux
Если у вас Десктопный Linux, и вы хотите управлять сервером по ssh, то просто запустите эмулятор терминала и воспользуйтесь командой:
В выводе увидите примерно следующее:
The authenticity of host '172.30.90.34 (172.30.90.34)' can't be established. ECDSA key fingerprint is SHA256:VrlVJg28+LrVa69peUUTNYVL/a53XOhLqMwkwTdPGmo. Are you sure you want to continue connecting (yes/no)? yes Warning: Permanently added '172.30.90.34' (ECDSA) to the list of known hosts. alex@172.30.90.34's password: alex@ubu:~$
Здесь вам тоже придется подтвердить отпечаток сервера введя «yes«. Затем ввести пароль от пользователя alex и приглашение ввода команды изменится на alex@ubu:~$, что означает что теперь все команды будут выполнены на сервере ubu, от пользователя alex.
Подключение с Android
SSH клиенты есть на Android, например JuiceSSH. Так что с телефона вы тоже можете управлять сервером:

Различные приглашения ввода команды
С суперпользователем root будем разбираться позже, но уже сейчас нужно запомнить следующее. Когда вы работаете под обычным пользователем то приглашение ввода команды оканчивается на $. А если вы работаете под суперпользователем root то на #: