- How to Block Websites on Home WiFi Router?
- Method 1: Block A Website on Router Interface
- Method 2: Block A Website with OpenDNS
- Change Router Default DNS
- Create an Open DNS Account
- Add Home Network in OpenDNS
- Set Website Content Filtering
- Block Individual Website
- Flush DNS on PCs
- Check the Blocked Website
- How to set up Access Control for website blocking on TP-Link 11N Wireless Router (new logo)
How to Block Websites on Home WiFi Router?
When you want to block individual websites, you can do that right from your home WiFi router. Most of the router firmware allows adding individual websites to the blacklist and whitelist. The user can edit those lists to control access to particular websites effectively.
However, there are some WiFi routers are not coming with this feature to block individual websites. These routers will offer web filtering to filter the explicit control, but not providing a granular control to block selected websites.
Method 1: Block A Website on Router Interface
This is a secure and reliable solution to block a website. We have already covered the article to block website direct on browser or PC. To block a website on Router level, you have to login Router backend and add the websites you want to block in Blacklist. You have to enter the Router Gateway address on the browser to get backend access. Please see the list of most used router gateway address to get the backend access.
- ASUS:- http://192.168.50.1/
- AT&T U-verse:- http://192.168.1.254
- Belkin:- http://192.168.2.1
- Comcast:- http://10.0.0.1
- D-Link:- http://192.168.0.1
- Linksys:- http://192.168.1.1
- Netgear:- http://192.168.0.1
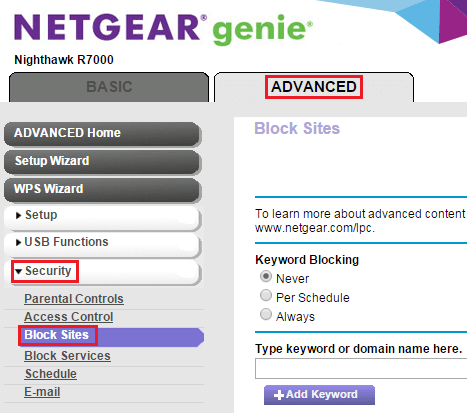
As long as your router supports website blocking in the backend interface, you are good. Here is a complete guideline to block a website with Netgear Genie interface.
Most of the router interface is almost look the same way and you can block the website by adding them to the Blacklist. But some routers do not have the option to block website form backend. We have to depend on the public DNS services to block the website in those cases.
Method 2: Block A Website with OpenDNS
There are some WiFi routers those are offering any inbuilt option to block the website. In those cases, you have to depend on any third-party services. We are going to use OpenDNS to block a website, a free DNS service from Cisco.
This is a free DNS service, and Open DNS is offering a free account for personal use, which use to filter out the website and block individual sites. Google WiFi Router users, please use this dedicated article to Block Websites on Google WiFi Router.
Change Router Default DNS
Forst of all, you have to divert all network traffic to Open DNS server to effectively control the websites. To do that you have to change the default DNS IP address on your router to OpenDNS server IP address. You have to log in to your router backend with the Admin Username and password to proceed.
Once you are into the backend, select the Internet Tab to change the default DNS address. For those who are doing this first time, please see an article from Netgear to change DNS IP. Most of the available routers in the market follow the same steps to change the DNS IP on the WiFi router. Based on the router manufactures, there may have slight differences in these steps.
Now you have to set these router IPs to OpenDNS Server IPs. Please use the Primary and Secondary Server IP provided by Open DNS 208.67.222.222 , 208.67.220.220 respectively. Once you set these DNS IPs, save the settings on the router and exit from the Router interface.
Create an Open DNS Account
Now you have to create a free account on OpenDNS (OpenDNS Free Account Link) and login to the dashboard. The next step is to set up a personal Network using OpenDNS free service.
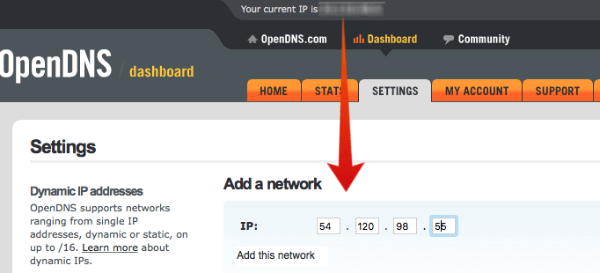
After you log in to the OpenDNS Dashboard, go to Settings tab and add your Wireless IP address over there as per the screenshot. The OpenDNS dashboard will show your IP address on the top bar in the masked area. You can enter the same IP address to add a network.
The static IP address is depending on your ISP provider. Some of the providers are giving dynamic IP for home WiFi. In that case, the IP address will change after a certain period.
Add Home Network in OpenDNS
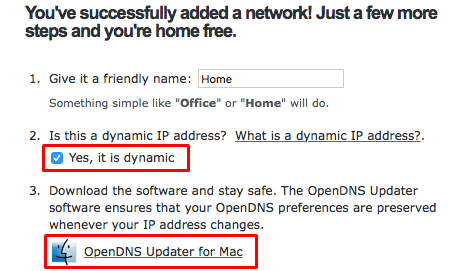
Open DNS is providing a software tool for Mac and Windows users who have a dynamic IP address. If you have a dynamic IP, you have to check the box stating that “Yes, it is dynamic.”
Open DNS will offer the link to download the tool to your Mac or Windows machine. You have to install this tool on PC to proceed further. This software tool will update the home IP address with the OpenDNS account whenever your ISP provider changes the Intenet IP address. (We recommend to install this tool on your Desktop machine that kept on most of the time).
Set Website Content Filtering
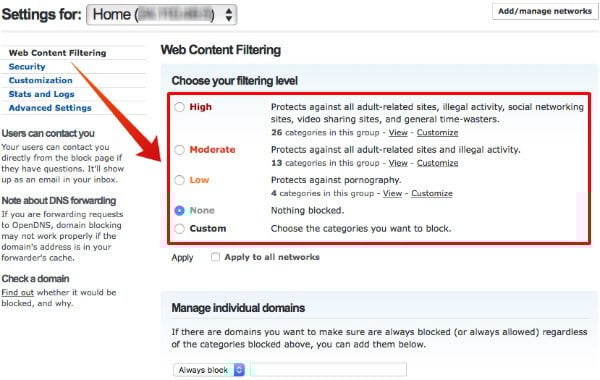
Once you set up the network successfully on OpenDNS, then you can see the above screen under settings to chose the web filtering level. Make sure to select the “Settings for: Home Network” before selecting the Web Content Filtering.
This website content filtering option is to block Adult websites from your network. You can choose the level of blocking from High/Moderate/Low/Custom. You don’t have much control here other than just selecting the level of block.
Block Individual Website
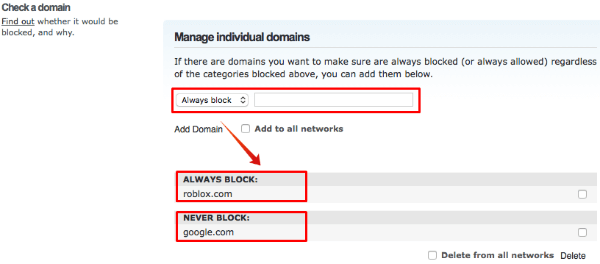
Now scroll down to the Settings page to get the option for Manage Individual Domains. This would be the most interesting part for us to get more granular control on a website that can block from reaching your Home Router.
You have a drop-down option to select Always Block or Never Block to add websites. Here you can add individual websites that you want to block. Finally, you have to save those settings and quit from the Open DNS dashboard.
Flush DNS on PCs
Once you add this website to the block list, your PCs may still allow these websites for a while from the cache. To get the immediate effect of this website blocking, you have to flush DNS on the PCs connected to the network.
For Windows users, type ipconfig /flushdns in the DOS window. For Mac users, open the terminal and type dscacheutil -flushcache . For Linux computers, type the code sudo /etc/init.d/nscd restart on Terminal.
If you have a different OS or PC that is not covered here, please see the complete list of commands to flush DNS here. Please be aware that the DNS cache clearing is not mandatory, the system clears the cache automatically after a while.
Check the Blocked Website
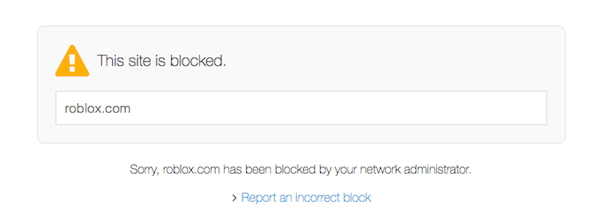
Once you successfully go through these steps, you see the Open DNS servers start to block the websites that you entered on the Always Block list.
Here is a sample screenshot from the browser that we already blocked a website just for the demonstration purpose. You will get a message like This site is blocked on all the computers that connected to the same network when they try to open the website.
Those who want to block individual websites from home or small office WiFi network, this workaround is a reliable solution to block individual websites. However, in every solution, there is a workaround to unblock these websites. We are not covering that here for the save of this article. So far, this is a free open source solution to block websites on the WiFi network.
Disclosure: Mashtips is supported by its audience. As an Amazon Associate I earn from qualifying purchases.
How to set up Access Control for website blocking on TP-Link 11N Wireless Router (new logo)
Updated 06-28-2022 02:29:27 AM 373627
TL-WR841N( V12 V13 V14 ) , TL-WR850N( V1 ) , TL-WR740N( V7 ) , TL-WR840N( V3 V4 V5 V6 ) , TL-WR940N( V5 V6 ) , TL-WR845N( V3 V4 ) , TL-WR945N( V1 ) , TL-WR843N( V3 ) , TL-WR844N( V1 )
This document will show how to set up website blocking on our wireless routers. We will use a TL-WR841N V13 as an example.
Open the web browser and type the IP address of the router (default is 192.168.0.1) or http://tplinkwifi.net into the address bar and then Press Enter. When you are prompted, enter your login credentials. The default username and password is ’admin’.
Go to Access Control > Host, then click Add New…
Select ‘IP Address’, then enter a short description for the host rule you want to define in the ‘Host Description’ box. Enter the IP address range on your network that you want to block access to.
In this example, the router TL-WR841N’s LAN IP address is 192.168.0.1, IP Range is 192.168.0.100~192.168.0.199.We are going to set up rules to allow all the devices in the network to access www.tp-link.com only, and restrict access to all other websites.
Click Save — the new Host rule will now show up on the «Host Settings» page
Go to Access Control ->Target, then click Add New.
Select Domain Name as the mode type. Create a unique description (e.g. target_1) for the target in the Target Description field and enter the domain name, either the full name or the keywords (for example TP-LINK) in the Domain Name field.
Go to Access Control > Schedule and configure the schedule settings. Click ‘Add New’.
Create a unique description (e.g. schedule_1) for the schedule in the Schedule Description field and set the day(s) and time period, and click Save.
Note: Make sure the time on the router is set the same as that on your computers. To check the router’s time, please go to System Tools->Time Settings.
Go to Access Control ->Rule. On the page displayed, tick «Enable Internet Access Control«, then select Allow the packets specified by any enabled access control policy to pass through the Router as the default filter, then click Save.
Click Add New, then enter a brief description of the rule in the «Rule Name:» box
In the «Host:» box, select the Host rule you defined in Step 2
In the «Target:» box, select the target rule you defined in Step 3
In the «Schedule:» box, select «Anytime» (this will make the rule always active)
In the «Action:» box, select «Deny«
In the «Status:» box, select «Enabled«
Click Save — the new Access Control rule will now show up on the «Access Control Rule Management» page.
Now specified host(s) can only visit the target(s) within the scheduled time period.
Get to know more details of each function and configuration please go to Download Center to download the manual of your product.
Is this faq useful?
Your feedback helps improve this site.
What’s your concern with this article?
- Dissatisfied with product
- Too Complicated
- Confusing Title
- Does not apply to me
- Too Vague
- Other
We’d love to get your feedback, please let us know how we can improve this content.
We appreciate your feedback.
Click here to contact TP-Link technical support.
