Интернет-Фильтр Яндекс DNS На Роутере Asus
В современное ПО роутеров Asus поддержка серверов Yandex DNS была включена по умолчанию. Это сделало функцию настройки фильтрации контента в сети очень удобной и гибкой. Если раньше для блокировки рекламы и вредных ресурсов нужно было прописывать сервера вручную, то сегодня это можно сделать буквально в два клика в панели управления маршрутизатора Асус. Вообще, приятно, что все больше производителей сетевого оборудования начинают создавать для своих устройств прошивки, максимально адаптированные для начинающего пользователя. В этой статье рассмотрим функцию фильтрации сайтов в интернете через сервера Яндекс DNS повнимательнее.
Как включить фильтр Яндекс DNS на маршрутизаторе Asus
Настройка интернет-фильтра Яндекс ДНС в роутере Asus находится в разделе «Родительский контроль» во вкладке «Яндекс DNS». Для активации необходимо перевести виртуальный тумблер во включенное состояние, после чего выбрать из столбика «Клиентские устройства» тот компьютер, к которому мы хотим применить тот или иной режим фильтрации.
- Базовый — без каких-либо ограничений, но с пропиской DNS серверов от Яндекс для обеспечения стабильного выхода в интернет
- Семейный — для запрета просмотра страниц с содержанием для взрослых
- Безопасный — для блокировки потенциально опасных сайтов мошенников, занимающихся воровством личных данных или распространяющих вирусы.
Задать это самое правило нужно из предложенного списка «Режим защиты», после чего нажать на значок «+» и сохранить настройки.
Новый компьютер, к которому применено ограничение появится в общем списке.
Настройка Yandex DNS на маршрутизаторе Asus без встроенной поддержки
В более ранних версиях Яндекс DNS не был встроен в официальную прошивку. Например, имеющийся у меня Asus RT-N10U так и завис на версии 2015 года и обновлений не предвидится. Но это не значит, что этот сервис нельзя на нем использовать — просто нужно прописать адреса серверов вручную в настройках интернет-подключения.
Для этого следует зайти в админку роутера в раздел с настройками DNS серверов — этот способ актуален абсолютно для любого маршрутизатора с или без встроенной поддержки Yandex DNS. В роутерах Asus она находится в разделе «Интернет», вкладка «Подключение». Здесь нам надо установить галочку «Нет» в разделе «Подключаться к DNS-серверу автоматически»
И в графе «DNS-сервер 1» и «DNS-сервер 2» указать два из предложенных сервисом адресов.
- 77.88.8.8 и 77.88.8.1 — без фильтрации
- 77.88.8.88 и 77.88.8.2 — фильтрация опасных сайтов
- 77.88.8.7 и 77.88.8.3 — фильтрация опасных сайтов и сайтов для взрослых
После этого сохраняем настройки и роутер начнет блокировать опасные сайты защищая сразу всю локальную сеть, то есть ни с одного устройства, будь то компьютер, ТВ или смартфон, вы не сможете попасть на сайты, попавшие под раздачу ограничения. В этом кроется главный недостаток использования второго способа, так как нет возможности сконфигурировать правила только для какого-либо одного устройства, например, компьютера ребенка, — только для всех одновременно.
Как заблокировать рекламу на роутере
Мы уже давно пользуемся блокировщиками рекламы, но при этом терпим некоторые неудобства, самое основное из которых — не блокируется реклама в играх на смартфонах. Кроме этого, модуль Adblock, устанавливаемый в Chrome, сильно тормозит загрузку сайтов, а Яндекс Директ и вовсе не блокирует. Недавно Adguard, второй крупнейший сервис по блокировке интернет-рекламы, предложил лёгкое решение от назойливых баннеров — антирекламные DNS серверы.
Суть этой технологии в следующем: реклама вырезается не в момент загрузки web-страниц, проходя через прокси, а в момент обработки DNS-запросов, то есть когда браузер пытается достучаться до сервера с именем вроде an.yandex.ru. Образно говоря, когда интернет-браузер пытается вызвать адрес рекламного блока, сервер Adguard говорит: «вот он я», и выдаёт нули вместо баннеров. Конечно, сама технология намного сложнее, она учитывает дизайн рекламы, чтобы не рушить разметку веб-страниц, но смысл тот же: в отличии от Adblock, антирекламные DNS-серверы Adguard не тратят ресурсы клиентского устройства и работают значительно быстрее.
Преимущества Adguard DNS:
Не определяется скриптами на сайтах (вы не увидите просьбу владельцев сайта отключить блокировку рекламы)
Недостатки Adguard DNS:
Иногда на месте рекламных баннеров возникают пустые вставки с ошибкой «не удаётся отобразить страницу».
Модель бизнеса Adblock понятна — они продают рекламным сетям «исключения» из бан-списков. На чём зарабатывает Adguard DNS, не понятно.
Самое главное — Adguard DNS можно использовать вместе с Adblock по принципу двойной обороны. Друг другу эти две технологии не мешают, а скорее даже дополняют, ведь на момент подготовки статьи, Adguard DNS даже умел блокировать Яндекс Директ. Давайте посмотрим, как меняется интернет при использовании блокировщиков рекламы.
Как включить
Если у вас роутер Keenetic, считайте, что вам повезло. Вам нужно зайти в админ.панель роутера (если не знаете его адрес — вбивайте в адресной строке my.keenetic.net или 192.168.1.1), в панели управления выбираете пункт «Интернет-фильтр» и в списке фильтров выбираете Adguard DNS.
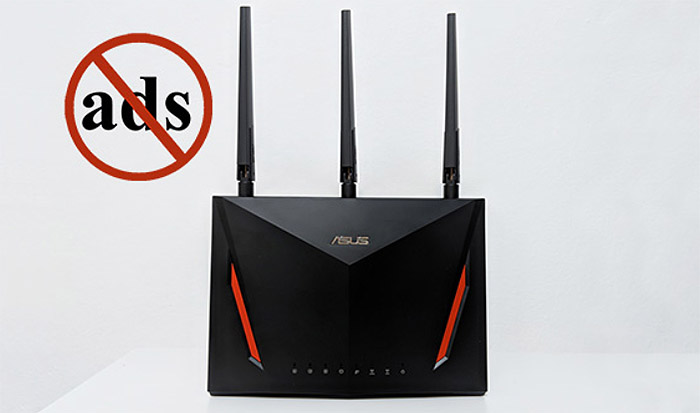
How to Block Ads Using Asus Routers (RT-AC86U)
Adblockers have become very popular and are now an indispensable tool to keep your sanity while navigating the web. Pop-up windows, multiple flashing ads, the list goes on and really, every person that surfs the web has encountered at least a single occurrence when they had to close multiple small windows to actually manage to read the content. So, when Google announced that it wants to block generic adblockers on the Google Chrome browser in favour of implementing its own filters, I thought why not block ads at a router level across all your devices and fix the problem in its infancy.
Don’t get me wrong, I do think that ads are important and if nobody would watch them, then I doubt many blogs would survive, but some websites have gone overboard with ad placement and I do think that users should have the control over which websites get their ads blocked and which do not. That being said, I have already explored a specific option using the Linksys WRT3200ACM and OpenWRT (along with the adblock addon), which has delivered some interesting results (YouTube ads have proven to be tricky, but that was to be expected), so I decided to see what do the Asus routers have to offer in this regard.
Similarly to the Linksys WRT3200ACM, you’re going to need to use a third-party firmware and in this case, it’s ASUSWRT-Merlin, a software that keeps the look and the feel of the original firmware, but it further enhances its capabilities by adding a lot more advanced features (usually suitable for professionals). Furthermore, the ASUSWRT-Merlin can’t block ads by default, so you’re going to have to install a nifty tool called Diversion (previously known as AB-Solution) and install it via SSH. As can be seen in the title, I am going to use the ASUS RT-AC86U, but this method should work with any Asus routers that are compatible with ASUSWRT-Merlin (sorry, RT-ACRH17 and RT-ACRH13).
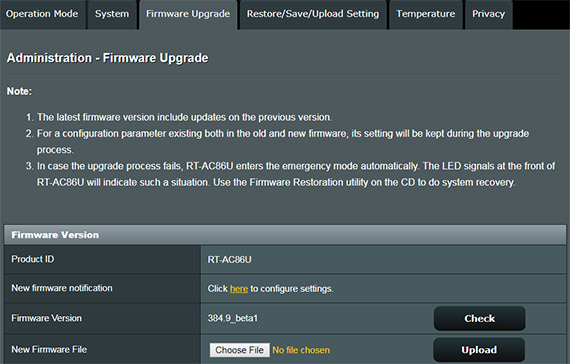
To install the Merlin firmware, you need to go to the official website, download the suitable software release and simply add it manually as you would with any other regular firmware (Administration > Firmware Upgrade > Upload) and wait until it gets successfully installed (at the end, you will be asked to manually restart the router).
Afterwards, go to the Diversion tool official website and read the requirements. The ASUSWRT-Merlin and the JFFS custom scripts enabled are supported by the RT-AC86U, so the next requirement is a USB drive (formatted with ext2, ext3 or ext4 file system – the latter for ARM devices) that has to be permanently plugged into the router. While the WRT3200ACM didn’t require external drives, I have seen a similar system with the Synology RT2600ac, so it is not that uncommon.
Obviously, most USB drives aren’t ext formatted and you will need a third-party tool to do it (Windows OS doesn’t seem to have anything built-in for this job), but you can use the amtm software to format the disk (also available on the Diversion website) or, if you’re not that familiar with the SSH terminal, there are a number of free tools available on the web that will quickly do the job (I used the MiniTool Partition Wizard). After inserting the USB drive, you’ll have to install the Diversion software and to do so, you’re going to have to use the SSH terminal – to access it, there are several programs that you can use, but I chose PuTTY for Windows.
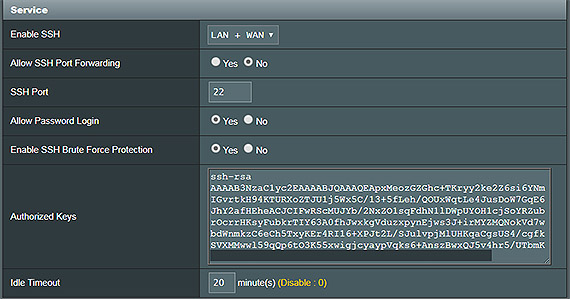
Before accessing the terminal, you need to enter the router’s interface, then go to Administration, System and under Service, you need to enable SSH (I chose LAN + WAN), use the SSH service port 22 (the default, but you can choose any other unused port), set Allow SSH password login to Yes and Enable SSH Brute Force Protection to Yes; at the Authorized Keys section, you can generate a public key using PuTTY Key generator tool (comes along with the PuTTY bundle): after you opened the tool, press Generate and simply copy the Public key and paste it in the router interface. After that, click Apply and wait for the changes to take effect.
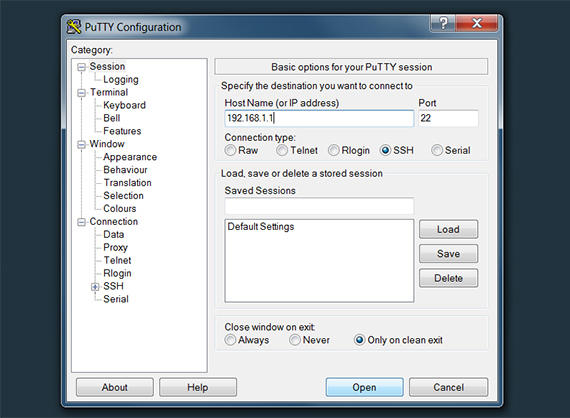
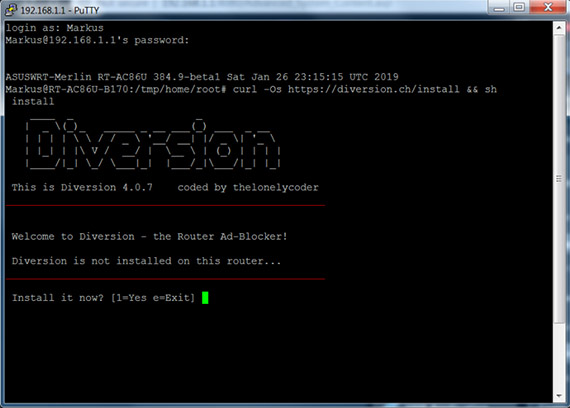
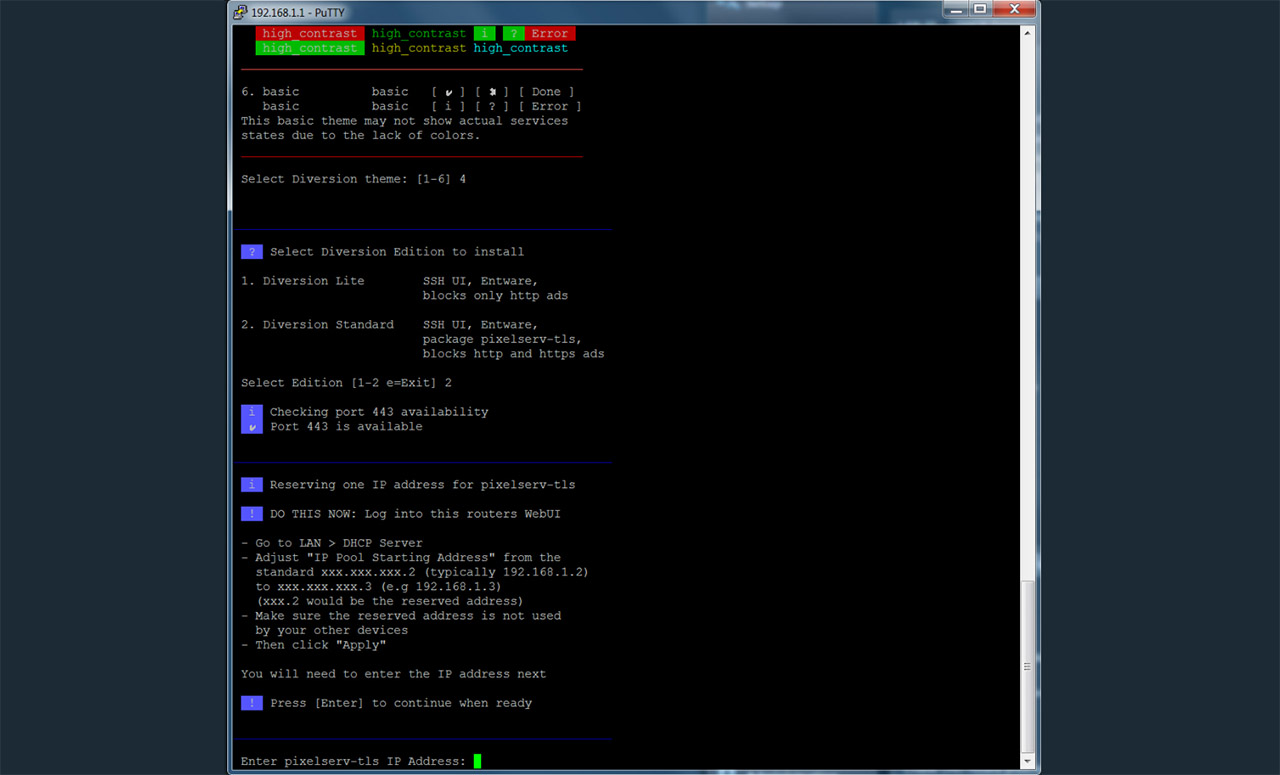
On the next step, open PuTTY and at the Host Name, insert the IP address of the router (in my case, it was 192.168.1.1), check if the Port is correct (it should be 22) and click open. This will summon a new window, where you’ll have to login using the router’s credentials and, afterwards, simply insert curl -0s https://diversion.ch/install && sh install and press Enter to start the installation process, which will guide you through configuring the way the software will work: you can choose the preferred theme, the Diversion Edition (it can be Lite or Standard – I prefer the latter since it is a lot more comprehensive) and you have to reserve an IP address for the pixelserv-tls (I chose 192.168.1.2 and I had to adjust the IP Pool Starting Address to start from 192.168.1.3 – can be done in LAN > DHCP Server).
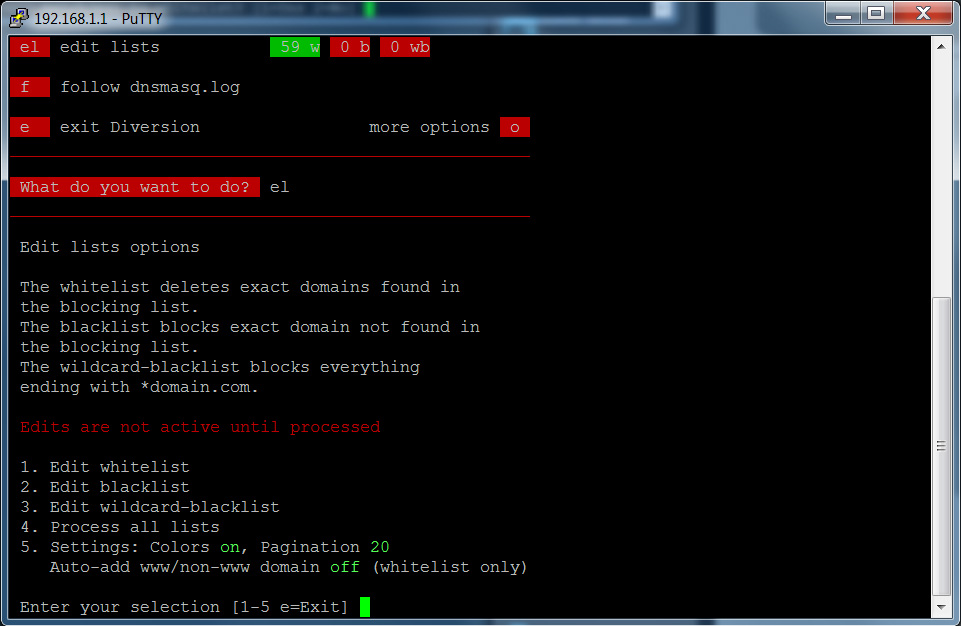
After that, I also enabled the Logs, I acknowledged that some domains deserve to be whitelisted (SmallNetBuilder.com) and I installed Entware (64-bit). And that’s all, you have successfully installed Diversion on your Asus RT-AC86U router (if you close the terminal, you can easily regain access to the program commands by opening PuTTY, going to the router IP and simply inserting diversion in the terminal). Obviously, you may want to add some new websites on the Whitelist (for example, Google Analytics will be blocked by default) and, to do so, after accessing the Diversion tool, you need to insert el command (edit lists) and select 1.
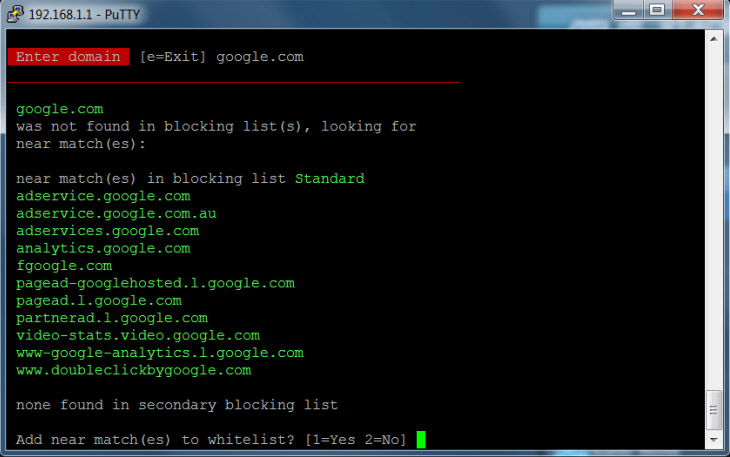
Here, you’ll be able to see all the added domains and you can edit the list: Add or Delete domain, Process the whitelist, Sort and verify it, Restore whitelist from backup or Set domain to active or inactive. We’re going to choose 1 and enter the preferred domain – I like that if you don’t know which are all the related domains, you can simply insert the general website (such as google.com) and the software will display them automatically, allowing you to add all of the domains in one go. After you’re done adding the domains, you have to process it (insert 3 at the whitelist menu). The same steps need to be followed if you want to add a specific domain to the blocklist.
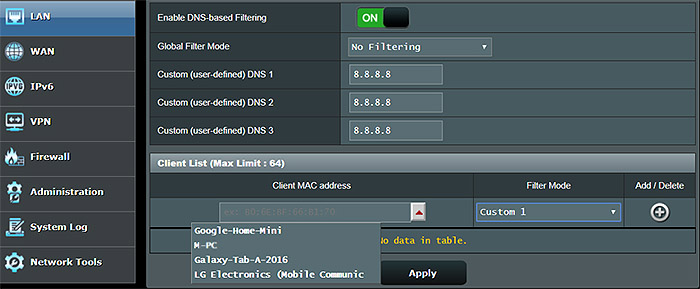
The Diversion adblock tool will work for all the connected clients, but what if you want some of your devices to still display ads? You’re going to have to change the DNS server of that specific client. To accomplish this, head back to the Asus router UI and, under the Advanced Settings, go to LAN > DNSFilter to Enable the DNS-based Filtering. Next, leave the Global Filter Mode to No Filtering and configure one of the Custom (user-defined) DNS profiles (can be the default 8.8.8.8 – Google DNS). Under Client List and Client MAC address, select the device you want to not be filtered by the Diversion and, under the Filter Mode, select the Custom profile that you previously configured. Lastly, press Apply and you should be done.
OK, I’m not going to sugarcoat it, the installation is not simple and it requires a bit more steps than the OpenWRT, but in the end it is worth it because the developers did a great job at making the commands as intuitive as possible. At the same time, once again, I have to acknowledge that there are awesome routers out there (such as the pcWRT), which can easily do all these things (and more) with only a few clicks, but, if you already have an Asus router flashed with the ASUSWRT-Merlin firmware, then this is a great way to block some of the most obnoxious ads out there.
Mark is a graduate in Computer Science, having gathered valuable experience over the years working in IT as a programmer. Mark is also the main tech writer for MBReviews.com, covering not only his passion, the networking devices, but also other cool electronic gadgets that you may find useful for your every day life.
