- Bluetooth Controlled Car using ESP32 and Android phone
- Components required:
- Circuit diagram of Bluetooth controlled car:
- Working of Bluetooth controlled RC car:
- Code for Bluetooth Controlled Car using ESP32 :
- Share this:
- Bluetooth car controlled by android
- Arduino Bluetooth RC Car (Android Controlled)
- Introduction: Arduino Bluetooth RC Car (Android Controlled)
- Step 1: Remove the Existing Rc Circuit
- Step 2: Breadboard Schematic
- Step 3: Code
- Attachments
- Step 4: Android Bluetooth Controller
- Step 5: Video of My BT ArduiCar
- 13 People Made This Project!
- Recommendations
- Metal Contest
- Make It Bridge
- Wear It Contest
- 192 Comments
- Silverlit RC 1:16 Enzo Ferrari
Bluetooth Controlled Car using ESP32 and Android phone
In this project, we are making a Bluetooth Controlled Car using ESP32 Dev module. There is a reason why we have chosen ESP32 instead of any other board like Arduino.
here is the reason why we have chosen it. ESP32 is now becoming more famous due to its great features like inbuilt Bluetooth and Wi-Fi modules. Also, it has a more powerful CPU more RAM and ROM which is a great advantage over Arduino or any other development board of IOT-based projects which requires an active internet connection or features like Bluetooth. hence we have chosen ESP32 for our project.

Components required:
Components required to make Bluetooth controlled robot car.
- Geared DC motor
- L293D motor driver or N298 MOSFET driver
- chaises for housing component
- ESP32 dev module (development board)
- Jumper wires
- Android smartphone with Blynk App installed on it
- Mini Breadboard
- Battery pack (lithium-ion x 3)
Circuit diagram of Bluetooth controlled car:
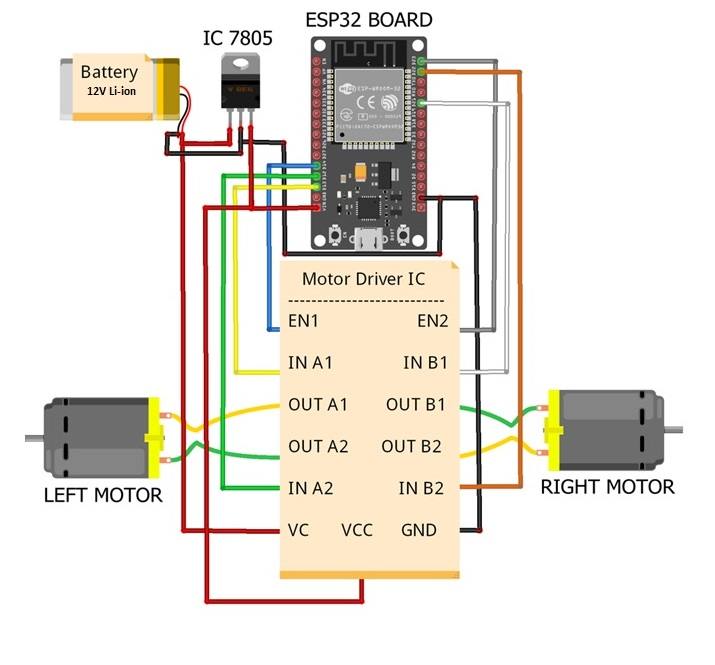
From the above circuit diagram, you can see that 2 motors are interfaced with the L293D driver IC(for more details you can also refer to our blog on IC L293D). This IC is controlled by ESP32 Dev Module. The IC 7805 is a voltage regulator IC which provides a constant 5V to the ESP32.
A 12V power supply is required to drive the IC and motors. LM7805 voltage regulator gives a constant 5V to the ESP32 module.
Working of Bluetooth controlled RC car:
As we power the ESP32’s the Bluetooth module starts working and gets connected to a smartphone when you start Dabble App installed on it. In that application, there is a gamepad. By using that gamepad you can control the Bluetooth car. You can move your car in three different modes. Know more about dabble.
Joystick mode:
In this mode, you can control the car using a single joystick easy to control.
Button mode:
In this mode, there are four buttons(i.e. forward, backward, left, and right) using the theme you can control your car, but you have to use more buttons.
Accelerometer mode:
In this mode, you can control your car just by moving and tilting your smartphone. it’s very easy and funny.
Code for Bluetooth Controlled Car using ESP32 :
Let’s understand the working of car by code:
// Here we have defined pins for motor A
int motor1Pin1 = 27;
int motor1Pin2 = 26;
int enable1Pin = 14;
// Here we have defined pins for motor B
int motor2Pin1 = 32;
int motor2Pin2 = 33;
int enable2Pin = 25;
//defining custom settings, you need to install dabble library in your program
#define CUSTOM_SETTINGS
#define INCLUDE_GAMEPAD_MODULE
#include
void setup() Dabble.begin(«MyEsp32»);
//* setting the pins for motor1 as outputs:
pinMode(motor1Pin1, OUTPUT);
pinMode(motor1Pin2, OUTPUT);
pinMode(enable1Pin, OUTPUT);
// sets the pins for motor2 as outputs:
pinMode(motor2Pin1, OUTPUT);
pinMode(motor2Pin2, OUTPUT);
pinMode(enable2Pin, OUTPUT);
digitalWrite(enable1Pin, HIGH);
digitalWrite(enable2Pin, HIGH);
>
// It will be checking which button is pressed or not? Depending upon the button pressed, output pins of the microcontroller will be set to high or low. We are using else if statement.
boolean a = GamePad.isUpPressed();
boolean b = GamePad.isDownPressed();
boolean c = GamePad.isLeftPressed();
boolean d = GamePad.isRightPressed();
boolean e = GamePad.isTrianglePressed();
boolean f = GamePad.isCirclePressed();
boolean g = GamePad.isCrossPressed();
boolean h = GamePad.isSquarePressed();
// boolean i = GamePad.isStartPressed();
// boolean j = GamePad.isSelectPressed();
if (a || e) digitalWrite(motor1Pin1, LOW);
digitalWrite(motor1Pin2, HIGH);
digitalWrite(motor2Pin1, HIGH);
digitalWrite(motor2Pin2, LOW);
>
// Go Left condition
else if(d || f) digitalWrite(motor1Pin1, LOW);
digitalWrite(motor1Pin2, HIGH);
digitalWrite(motor2Pin1, LOW);
digitalWrite(motor2Pin2, LOW);
>
//* Rights condition
else if(c || h) digitalWrite(motor1Pin1, LOW);
digitalWrite(motor1Pin2, LOW);
digitalWrite(motor2Pin1, HIGH);
digitalWrite(motor2Pin2, LOW);
>
else if(b || g) digitalWrite(motor1Pin1, HIGH);
digitalWrite(motor1Pin2, LOW);
digitalWrite(motor2Pin1, LOW);
digitalWrite(motor2Pin2, HIGH);
>
//stop condition
else digitalWrite(motor1Pin1, LOW);
digitalWrite(motor1Pin2, LOW);
digitalWrite(motor2Pin1, LOW);
digitalWrite(motor2Pin2, LOW);
>
>

This is how the Bluetooth-controlled car using ESP32 works by our Android smartphone using Dabble App.
For joystick mode just you need to upload the following code on your ESP32 Dev Module and it will work for you we are making another blog in which you find detailed explanation of code
#define l1 27 //left motor 1
#define l2 26 //left motor 2
#define r1 33 //right motor 1
#define r2 32 //right motor 2
#define e1 14 //left enable pin for left motor
#define e2 25 //right enable pin for right motor
int lm = 0; //speed of left motor
int rm = 0; //speed of right motor
#define CUSTOM_SETTINGS
#define INCLUDE_GAMEPAD_MODULE
#include
const int freq = 30000;
const int pwmChannel = 0;
const int pwmChannel2 = 1;
const int resolution = 8;
int dutyCycle = 200;
pinMode(l1, OUTPUT);
pinMode(l2, OUTPUT);
pinMode(r1, OUTPUT);
pinMode(r2, OUTPUT);
pinMode(e1, OUTPUT);
pinMode(e2, OUTPUT);
ledcSetup(pwmChannel, freq, resolution);
ledcAttachPin(e1, pwmChannel);
ledcAttachPin(e2, pwmChannel2);
>
void loop() Dabble.processInput();
ledcWrite(pwmChannel, lm);
ledcWrite(pwmChannel2, rm);
float xval = GamePad.getXaxisData();
float yval = GamePad.getYaxisData();
if(yval < 0)digitalWrite(l1, HIGH);
digitalWrite(l2, LOW);
digitalWrite(r1, HIGH);
digitalWrite(r2, LOW);
lm = map(yval, 0, -7, 0, 200);
rm = map(yval, 0, -7, 0, 200);
>
else if(yval > 0) digitalWrite(l1, LOW);
digitalWrite(l2, HIGH);
digitalWrite(r1, LOW);
digitalWrite(r2, HIGH);
lm = map(yval, 0, 7, 0, 200);
rm = map(yval, 0, 7, 0, 200);
>
else lm = 0;
rm = 0;
>
if(xval < 0) int xMapped = map(xval, 0, -7, 0, 200);
lm = lm – xMapped;
rm = rm + xMapped;
if(lm < 0) lm = 0;
>
if(rm > 200) rm = 200;
>
>
if(xval > 0) int xMapped = map(xval, 0, 7, 0, 200);
lm = lm + xMapped;
rm = rm – xMapped;
Now by uploading this code you will able to control your car with all three-mode (i.e. Digital Mode, Joystick Mode, and Accelerometer mode)of the gamepad on your Dabble App.
Share this:
Bluetooth car controlled by android


Rather than buying something, make it.
Browse thousands of projects created by the Arduino community
794026 views • 605 comments • 415 respects

Arduino Based Mini CNC 2D Plotter
165086 views • 40 comments • 214 respects
212454 views • 90 comments • 57 respects

Ultrasonic Security System
162758 views • 142 comments • 188 respects
157049 views • 63 comments • 60 respects
Measure Heart Rate and SpO2 with MAX30102
321673 views • 154 comments • 244 respects

Share and Compete in Project of the Month!
Unlock amazing rewards by submitting your project today.


Create projects fast, with no coding
Import, use and customize ready-made templates for your IoT projects
Dream big, we will take care of the rest
See what you can create with Arduino Cloud
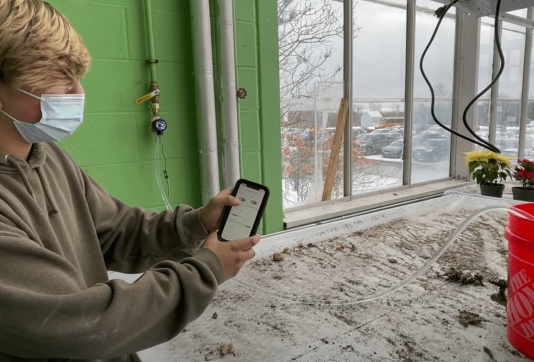
White Mountains Regional High School
Discover how this school is working with remote sensing applications that allow them to do things like automate lighting, regulate temperature, adjust humidity, and check on the greenhouse from their phones.
Smart ovens take a leap into the future
How a strong partnership and the Arduino Portenta Machine Control led historical company Rinaldi Superforni to revolutionize their business


The new Portenta X8 and Max Carrier
Industrial Arduino and Linux combined to get the best of both worlds
Arduino Bluetooth RC Car (Android Controlled)


Introduction: Arduino Bluetooth RC Car (Android Controlled)


Hello, in this project I will show you how to transform an RC toy car to Bluetooth controlled through your Android smartphone!
Before starting, make sure that you have:
- Arduino uno board
- L293D motor driver
- HC-06 Bluetooth module
- RC Car that can fit all the above !
- 1M & 100K resistor for battery level
- 4x leds for lights
- 1x speaker/buzzer for horn sound
For power, you can use the existing batteries (4x 1.5V AA), or replace them with a LiOn rechargeable battery pack.
(I used 12V LiOn rechargeable battery pack)

Step 1: Remove the Existing Rc Circuit
Before starting, remove the existing rc circuit. You will not need it any more. you will make a better one from the beginning with Arduino uno 😉
Now, with one battery AA 1.5V you must find the polarity of 2 c motors.
- For movement motor (back side) the positive polarity cable will be that moves the car forward.
- For direction motor (front side) the positive polarity cable will be that moves the wheels left.
Step 2: Breadboard Schematic
Ι suggest you to build your circuit on (small) breadboard first.
You can use on/off switch of car like this:
If you have a «big» rc car it will need more power so you can use L298 module board. L293D motor driver will give max 0.5A per channel and it will be come very hot after while. L298 module board has a heat sink and can give 1A per channel, but is bigger than L293D.
Step 3: Code
Download and open file with Arduino ide. Read every line of code (+comments) to understand how it’s working and then upload it to your Arduino uno board!
(for programming arduino uno board you must disconnect first the RX & TX pins of Bluetooth module)
Attachments
Step 4: Android Bluetooth Controller
To control your new Bluetooth car, download and install this android application:
First enable Bluetooth and establish connection with BT module.
(ex. HC-06, password 1234)
Use «Help & info» button if you can not understand how it is working.
Accelelometer function is under developing, use with attention!
If you have problem with this app on your android device you can also use this one.
Step 5: Video of My BT ArduiCar
Video is in Greek language but I believe that you can understand it.
Remember that Bluetooth technology will give you max 15-20 meters of control.

13 People Made This Project!


Did you make this project? Share it with us!
Recommendations


Metal Contest

Make It Bridge

Wear It Contest

192 Comments

bro i want to add a ultrea sonic [distance sensoer] to the same code that is the car will stop automatically when objects come naear 2meters,plz pm me harinadh.38@gmail.com

could you kindly send this also to me? i am also planning to add the ultrasonic sensor 🙂 thank you, my email is jmangubat528@gmail.com
IM SOORY I DID NOT SEE YOUR MESSAGE
PING ME AT harinadh.38@gmail.com
if isuccess i will send u

Hey I have an HC-05 can I use it.

I made it, but changed it, but used lighter weight materials. I created another branch of instructables at https://www.instructables.com/id/Bluetooth-RC-Car-With-STM32F103C-and-L293D-Inexpen/.
Thank you, Vasilakis Michalis!

Hello, I have made this project and run well. But when I press forward or other button continuously, the system became hang and not respond to any command from android. After I press reset button on Arduino, it back to normal again. At first I think arduino deficient power because I use 1 battery source. So I try to separate battery for arduino and for motor DC and configure the jumper on L293D motor driver shield. But it still hang when I run the car with continuous pressing. What should I do? anybody have the same problem like me? thanks in advance.


The Bluetooth module must be configured otherwise it will NOT work! https://www.youtube.com/watch?v=ZdvKh3c_yoQ . . That’s why my module doesn’t give life signs.
How much mah battery we have to use ?

I was using this app for a while and now it sends only S on any button can you help me?
I made rc car that is a bit bigger than it’s shown. My problem is that there is too low voltage to turn front wheels. I don’t know what to add or change to put more voltage. I think that arduino puts out too low voltage. 10V battery sould be enough. Could you help me out?


You can use L298N motor driver and add additional battery to use the motor.

Can i use l298n in this programing
Hello, can I change my iOS Bluetooth controlled car to Remote Control? I have
Silverlit RC 1:16 Enzo Ferrari

Can I use HC-05 bluetooth module instead of 06 and is there any AT mode settings in this project

Can i have the android apps code.
Can I use here 10000mah 5V powerbank instead of 12v LiOn battery; and instead of bluetooth module can I use wifi module instead? thanks!