- Android Bluetooth COM port
- 1 Answer 1
- COM порт на Android
- SerialPortUtil 3.0.+
- characteristic
- QQ Technology Communication Group
- Latest version v3.0.0-beta3
- Open source warehouse address
- Start
- Install
- gradle
- use
- Quick start
- Connection equipment
- Disconnect
- Set the received data format
- Set the send data type
- send data
- Receive message listening
- Connection status
- Hexadecimal string to convert into strings
- Custom search page
- Search equipment
- How to receive serial data using android bluetooth
- 5 Answers 5
Android Bluetooth COM port
I have spent some time researching Android’s ability to communicate with bluetooth devices that are designed to communicate over a Bluetooth COM port on a PC. I haven’t been able to find a definitive answer, so I thought I’d ask here. I want to make sure that this is possible with Android. I am new to Bluetooth communications, but the research I’ve done so far lead me to RFCOMM which somewhat sounded like what I wanted. Unfortunately, I’m still unable to confirm that this is in fact possible. Any help/resources on this would be greatly appreciated.
How is it designed to communicate over a bluetooth COM port? The com port is on the PC, the bluetooth device I assume is not, but connecting to the PC.
So I’m not entirely sure, the instructions for the bluetooth device says to pair it over a bluetooth COM port. Is there something specific I should be looking for? Like I said, still trying to wrap my head around this stuff.
1 Answer 1
Yes, Android can connect to Bluetooth COM ports on PC’s. I am currently developing such an application. Here is a code example (Ite requires the bluetooth permissions te be set in the Manifest.xml file):
BluetoothAdapter adapter = BluetoothAdapter.getDefaultAdapter(); if (adapter == null) < // Device does not support Bluetooth finish(); //exit >if (!adapter.isEnabled()) < //make sure the device's bluetooth is enabled Intent enableBluetooth = new Intent(BluetoothAdapter.ACTION_REQUEST_ENABLE); startActivityForResult(enableBluetooth, REQUEST_ENABLE_BT); >final UUID SERIAL_UUID = UUID.fromString("00001101-0000-1000-8000-00805F9B34FB"); //UUID for serial connection mac = "00:15:83:3D:0A:57"; //my laptop's mac adress device = adapter.getRemoteDevice(mac); //get remote device by mac, we assume these two devices are already paired // Get a BluetoothSocket to connect with the given BluetoothDevice BluetoothSocket socket = null; OutputStream out = null; try < socket = device.createRfcommSocketToServiceRecord(SERIAL_UUID); >catch (IOException e) <> try < socket.connect(); out = socket.getOutputStream(); //now you can use out to send output via out.write >catch (IOException e) <> COM порт на Android
Сейчас я расскажу, как, имея в наличии совершенно стандартное устройство на Android с поддержкой USB Host (в моем случае Nexus 7), совершенно стандартный USB Host переходник на полноразмерный разъем «мама», совершенно стандартный USB serial контроллер на чипе PL2303 (они почти все работают именно на этом чипе) и не менее стандартный цискин голубой шнурок, зайти на консоль сетевого оборудования и без всяких ограничений работать с ней. Хотя никто не мешает подключать к планшету/телефону и любое другое оборудование, работающее с командной строкой поверх RS-232.
Первым делом получаем на планшете рут-права. Иначе никак.
Вторым делом ставим Busybox. Кто не знает — это отличный комплект утилит, одна из которых нам потребуется. После установки надо запустить его и нажать в самой программе «Install», когда программа спросит про метод установки — сказать «Normal».
Затем понадобится любой приличный эмулятор терминала. Мне нравится Irssi ConnectBot.
Ну и напоследок — штатные клавиатуры плохо годятся для работы с консолью. Нам ведь нужны клавиши Tab, ctrl и прочие, верно? Да и цифры хочется иметь в верхнем ряду, над буквами, а не где-то еще. Потому — Hacker’s Keyboard. Лучше, конечно, подключить внешнюю клавиатуру, но мы пока не собираемся набивать вручную многоэкранные конфиги.
Всё готово для подключения.
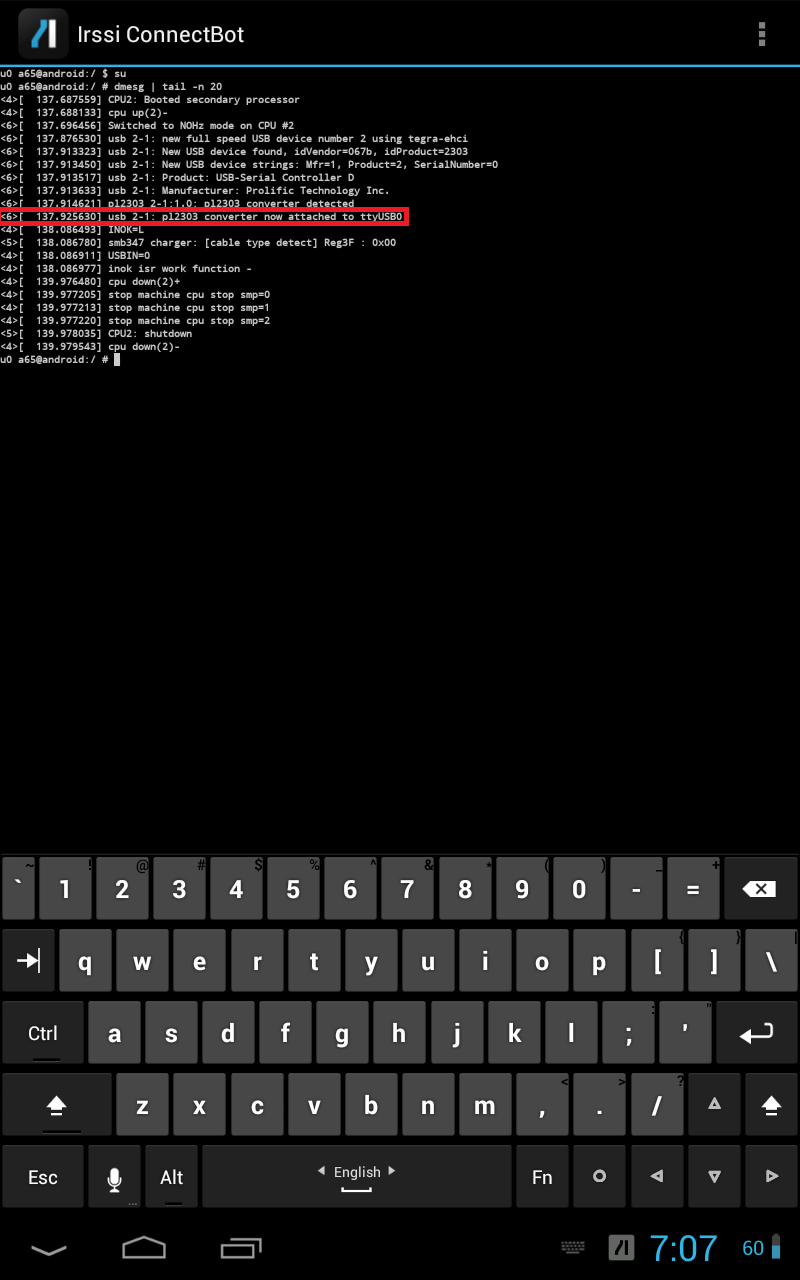
Запускаем терминальный клиент, выбираем локальное подключение, и подключаем к планшету контроллер. Нужно убедиться, что он определился, хотя тут проблем не ожидается, драйвера для PL2303 уже много лет как включены в ядро Linux. Под рутом запускаем dmesg.
(если кому мелковато — кликните на картинку)
Нужно запомнить, куда смонтировало контроллер. В моем случае это всегда был /dev/ttyUSB0.
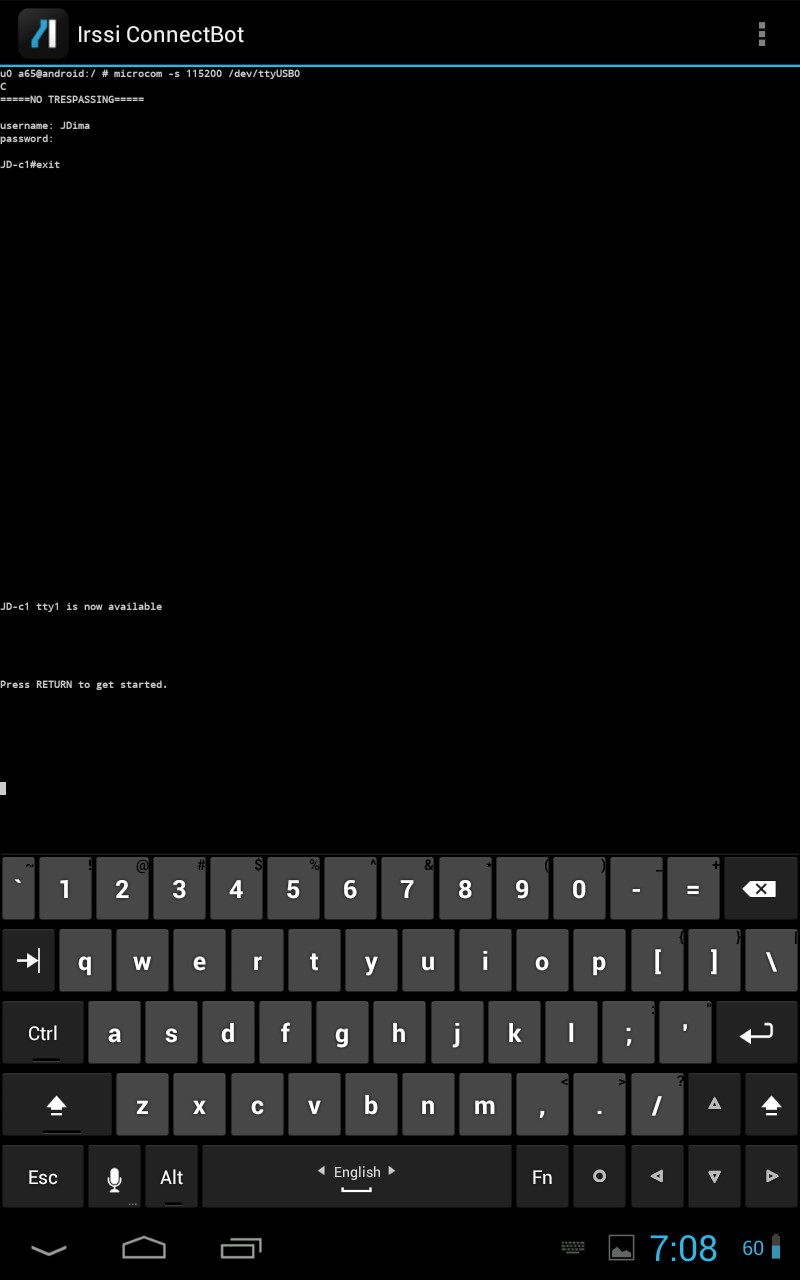
Осталось установить соединение. В комплект Busybox входит программа «microcom», она-то нам и пригодится.
Набираем в консоли «microcom -s [скорость порта] [точка монтирования устройства]».
Выход из microcom по ctrl+x. Break должен посылаться по ctrl+b (пока не проверял). Другие горячие клавиши передаются корректно.
Альтернативы?
Можно купить один из многих «Bluetooth Serial» адаптеров. Вот только такие адаптеры и стоят дороже (>$50), и требуют внешнего питания. Ни одного на аккумуляторах не видел. В лучшем случае батарейку надо самому прикрутить.
Для пользователей техники Apple есть проводное решение за те же >$50.
SerialPortUtil 3.0.+
SerialPort is an open source to the lightweight package library for Android Bluetooth serial port, which is easy to solve the complexity of building your own serial debug app, let people focus on the design of their own design, without considering the configuration of the Bluetooth serial.
From 3.0.0 Start new chain calls, update a large number of APIs, and upload to jcenter, making the use easier.
- Integrate search Activity, don’t have your own labor
- Receive data by callback processing
- Asynchronous processing
- Acceptance and sending can use hexadecimal and strings
characteristic
- Internal integrated search page
- Automatically reinstall the last connected device
- You can choose to send the received data format
QQ Technology Communication Group

Latest version v3.0.0-beta3
- V3.0.0-beta3 new features
- Newly increasing 16 credit string automatically converts into a normal string
- New can be sent to custom search page
- V3.0.0-beta0 new features:
- Chain call
- API updates, see the instructions below for details
- Upload to jcenter, optimize reference
- New DEBUG mode
- New automatic reinable function
- Delete the monitoring of the input box
- Support Android 5.0 and above
- repair:
- Repair multi-activity jump error
- Fix the problem that the search page is not disappeared after entering the search page
Open source warehouse address
Start
Install
gradle
allprojects repositories //. maven url 'https://jitpack.io' > > > dependencies implementation 'com.github.Shanyaliux:SerialPortSample:3.0.0-beta3' > dependencies implementation 'com.gitee.Shanya:SerialPortSample:3.0.0-beta3' > use
All code blocks, the first block is Kotlin, the second block is Java
Quick start
val serialPort = SerialPortBuilder / / Whether to open Debug mode (Debug mode prints some information in logcat, easy to debug) .isDebug(true) / / Do you turn on an automatic connection? .autoConnect(true) // Set the received data format (serialport.read_hex is hexadecimal, serialport.read_string is a string) .setReadDataType(SerialPort.READ_HEX) // Set the received data format (serialport.send_hex is a hexadecimal, serialport.send_string is a string) .setSendDataType(SerialPort.SEND_HEX) // Set the reception message to listen .setReceivedDataListener Log.d("SerialPortDebug", "received: $ it>") > / / Set the connection status monitor (status is a connection status, Device is the current connection device) .setConnectStatusCallback status, device -> if (status) Log.d("SerialPortDebug", "connect: $ device.address>") > else Log.d("SerialPortDebug", "disconnect") > > // Create an instance (need to get in the context) .build(this) SerialPort serialPort = SerialPortBuilder.INSTANCE / / Whether to open Debug mode (Debug mode prints some information in logcat, easy to debug) .isDebug(true) / / Do you turn on an automatic connection? .autoConnect(true) // Set the received data format (serialport.read_hex is hexadecimal, serialport.read_string is a string) .setReadDataType(SerialPort.READ_HEX) // Set the received data format (serialport.send_hex is a hexadecimal, serialport.send_string is a string) .setSendDataType(SerialPort.SEND_HEX) // Set the reception message to listen .setReceivedDataListener(new Function1() < @Override public Unit invoke(String s) < return null; >>) / / Set the connection status monitor (status is a connection status, Device is the current connection device) .setConnectStatusCallback(new Function2() < @Override public Unit invoke(Boolean aBoolean, Device device) < return null; >>) // Create an instance (need to get in the context) .build(this); The above is just getting it. SerialPort Instance, want to start using SerialPort Please connect the device first. Methods as below:
Connection equipment
serialPort.openDiscoveryActivity() serialPort.openDiscoveryActivity(); serialPort.connectDevice("98:D3:32:21:67:D0") serialPort.connectDevice("98:D3:32:21:67:D0"); Disconnect
Set the received data format
| Optional parameter (default is a character type) | |
|---|---|
| SerialPort.READ_STRING | Character type |
| SerialPort.READ_HEX | Hexadecimal |
serialPort.setReadDataType(SerialPort.READ_HEX) serialPort.setReadDataType(SerialPort.READ_HEX); Set the send data type
| Optional parameter (default is a character type) | |
|---|---|
| SerialPort.SEND_STRING | Character type |
| SerialPort.SEND_HEX | Hexadecimal |
serialPort.setSendDataType(SerialPort.SEND_HEX) serialPort.setSendDataType(SerialPort.SEND_HEX); send data
If the send data format is set to 16, the input data needs to be an even number, only one data needs to be added in front.
For example: 0x0a needs to be written into 0A, serialPort.sendData(«0A»)
Receive message listening
serialPort.setReceivedDataListener it // IT is receiving data Log.d("SerialPortDebug", "received: $ it>") > serialPort.setReceivedDataListener(new Function1String, Unit>() @Override public Unit invoke(String s) return null; > >); Receive data callback If you call multiple places, only the last thing is taken.
Connection status
serialPort.setConnectStatusCallback status, device -> if (status) Log.d("SerialPortDebug", "connect: $ device.address>") > else Log.d("SerialPortDebug", "disconnect") > > serialPort.setConnectStatusCallback(new Function2Boolean, Device, Unit>() @Override public Unit invoke(Boolean aBoolean, Device device) return null; > >) Connection status callback If you call multiple places, only the last thing is taken effect.
Hexadecimal string to convert into strings
Take 3.0.0-beta2 version and above
The receiving data format at this time is a hexadecimal
serialPort.hexStringToString(hexString) serialPort.hexStringToString(hexString); val serialPort = SerialPortBuilder .autoHexStringToString(true) .build(this) SerialPort serialPort = SerialPortBuilder.INSTANCE .autoHexStringToString(true) .build(this); Custom search page
3.0.0-beta3 version and above
serialPort.openDiscoveryActivity(Intent(this,DiscoveryActivity::class.java)) serialPort.openDiscoveryActivity(new Intent(this, DiscoveryActivity.class)); Search equipment
3.0.0-beta3 version and above
serialPort.doDiscovery(this) serialPort.doDiscovery(this); How to receive serial data using android bluetooth
I am new to android. I am designing an android application that receives serial data from a hardware device through bluetooth. I am working on Htc desire S. I used the sample Bluetooth chat code to receive data. But the data received is incorrect. It misses some values. Can anyone please provide me any other sample code to receive large amount of data through bluetooth and save it in a file.
5 Answers 5
package Android.Arduino.Bluetooth; import android.app.Activity; import android.bluetooth.BluetoothAdapter; import android.bluetooth.BluetoothDevice; import android.bluetooth.BluetoothSocket; import android.content.Intent; import android.os.Bundle; import android.os.Handler; import android.view.View; import android.widget.TextView; import android.widget.EditText; import android.widget.Button; import java.io.IOException; import java.io.InputStream; import java.io.OutputStream; import java.util.Set; import java.util.UUID; public class MainActivity extends Activity < TextView myLabel; EditText myTextbox; BluetoothAdapter mBluetoothAdapter; BluetoothSocket mmSocket; BluetoothDevice mmDevice; OutputStream mmOutputStream; InputStream mmInputStream; Thread workerThread; byte[] readBuffer; int readBufferPosition; int counter; volatile boolean stopWorker; @Override public void onCreate(Bundle savedInstanceState) < super.onCreate(savedInstanceState); setContentView(R.layout.main); Button openButton = (Button)findViewById(R.id.open); Button sendButton = (Button)findViewById(R.id.send); Button closeButton = (Button)findViewById(R.id.close); myLabel = (TextView)findViewById(R.id.label); myTextbox = (EditText)findViewById(R.id.entry); //Open Button openButton.setOnClickListener(new View.OnClickListener() < public void onClick(View v) < try < findBT(); openBT(); >catch (IOException ex) < >> >); //Send Button sendButton.setOnClickListener(new View.OnClickListener() < public void onClick(View v) < try < sendData(); >catch (IOException ex) < >> >); //Close button closeButton.setOnClickListener(new View.OnClickListener() < public void onClick(View v) < try < closeBT(); >catch (IOException ex) < >> >); > void findBT() < mBluetoothAdapter = BluetoothAdapter.getDefaultAdapter(); if(mBluetoothAdapter == null) < myLabel.setText("No bluetooth adapter available"); >if(!mBluetoothAdapter.isEnabled()) < Intent enableBluetooth = new Intent(BluetoothAdapter.ACTION_REQUEST_ENABLE); startActivityForResult(enableBluetooth, 0); >Set pairedDevices = mBluetoothAdapter.getBondedDevices(); if(pairedDevices.size() > 0) < for(BluetoothDevice device : pairedDevices) < if(device.getName().equals("MattsBlueTooth")) < mmDevice = device; break; >> > myLabel.setText("Bluetooth Device Found"); > void openBT() throws IOException < UUID uuid = UUID.fromString("00001101-0000-1000-8000-00805F9B34FB"); //Standard SerialPortService ID mmSocket = mmDevice.createRfcommSocketToServiceRecord(uuid); mmSocket.connect(); mmOutputStream = mmSocket.getOutputStream(); mmInputStream = mmSocket.getInputStream(); beginListenForData(); myLabel.setText("Bluetooth Opened"); >void beginListenForData() < final Handler handler = new Handler(); final byte delimiter = 10; //This is the ASCII code for a newline character stopWorker = false; readBufferPosition = 0; readBuffer = new byte[1024]; workerThread = new Thread(new Runnable() < public void run() < while(!Thread.currentThread().isInterrupted() && !stopWorker) < try < int bytesAvailable = mmInputStream.available(); if(bytesAvailable >0) < byte[] packetBytes = new byte[bytesAvailable]; mmInputStream.read(packetBytes); for(int i=0;i>); > else < readBuffer[readBufferPosition++] = b; >> > > catch (IOException ex) < stopWorker = true; >> > >); workerThread.start(); > void sendData() throws IOException < String msg = myTextbox.getText().toString(); msg += "\n"; mmOutputStream.write(msg.getBytes()); myLabel.setText("Data Sent"); >void closeBT() throws IOException < stopWorker = true; mmOutputStream.close(); mmInputStream.close(); mmSocket.close(); myLabel.setText("Bluetooth Closed"); >> Here for Manifest: add to Application
// permission must be enabled complete