- Bluetooth Serial Communication Between Linux & Android
- HC06 Serial Console via Bluetooth on Arch Linux
- Tl;dr
- Configuring the Baudrate
- Connecting via Bluetooth
- How to I connect a raw serial terminal to a bluetooth connection?
- 3 Answers 3
- First step : pair the device and provide the PIN
- Provide a usable file /dev/rfcomm0
- Third and last step : write into the /dev/rfcomm0
- First option : connect using screen
- Second option : connect using minicom
- Third option : python script miniterm
- Write directly into the file
Bluetooth Serial Communication Between Linux & Android
Most laptops and smart phones(Android/iPhone) have builtin Bluetooth modules. We can use this bluetooth module to communicate with other devices or with other bluetooth modules like HC-05 or HM-10.
In this article, we will learn how to send data between laptop and android bluetooth.
First, we need to pair with a bluetooth device to send information. From Ubuntu, we can pair to a Bluetooth device from Bluetooth settings. Alternatively, we can also use CLI to do the same.
$ bluetoothctl [NEW] Controller 24:0A:64:D7:99:AC asus [default] [NEW] Device 94:E9:79:BB:F8:3A DESKTOP-C4ECO3K [NEW] Device 88:79:7E:7B:4C:87 athene [NEW] Device 94:65:2D:8C:2E:10 OnePlus 5 [NEW] Device 98:0C:A5:61:D5:64 Lenovo VIBE K5 Plus [NEW] Device AC:C3:3A:A0:CE:EF Galaxy J2 [NEW] Device 98:D3:35:71:02:B3 HC-05 [bluetooth]# power on Changing power on succeeded [bluetooth]# agent on Agent registered [bluetooth]# default-agent Default agent request successful [bluetooth]# scan on Discovery started [CHG] Controller 24:0A:64:D7:99:AC Discovering: yes [CHG] Device 94:E9:79:BB:F8:3A RSSI: -88 [CHG] Device 88:79:7E:7B:4C:87 RSSI: -66 [bluetooth]# pair 88:79:7E:7B:4C:87 Attempting to pair with 88:79:7E:7B:4C:87 [CHG] Device 88:79:7E:7B:4C:87 Paired: yes Pairing successful
To communicate with paired devices, we will use RFCOMM protocol. RFCOMM is just a serial port emulation and provides reliable data tranfer like TCP.
From ubuntu, lets open a port for communication.
$ sudo rfcomm listen /dev/rfcomm0 3 From Android, we have to connect to ubuntu. For this, we can use Roboremo app which supports RFCOMM.
$ sudo rfcomm listen /dev/rfcomm0 3 Waiting for connection on channel 3 Connection from 88:79:7E:7B:4C:87 to /dev/rfcomm0 Press CTRL-C for hangup
Once the connection is established, we can communicate between devices.
In Unix like systems, OS provides a device file as an interface for device driver. To send and read messages from Linux or Mac is as easy as reading and writing to a file.
# to send message to bluetooth $ echo 'hello from ubuntu' > /dev/rfcomm0
We can see the received messages on Android

We can also send messages from android and read from ubuntu.
# to read messages from bluetooth $ cat /dev/rfcomm0 hello from android This way, we can communicate with any bluetooth module using a laptop or a smart phone.

Chillar Anand
A blog about python, careers & life.
To contact me, send a message here.
HC06 Serial Console via Bluetooth on Arch Linux
The HC06 is a bluetooth-serial-adapter that you can get very cheaply at Ali Express & co. It looks something like this:
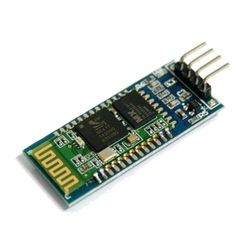
It took me a while to get this to work on Arch Linux though.
Tl;dr
Summary: Configure the baudrate via AT commands, then pair the device and bind a new RFCOMM device to your bluetooth module with sudo rfcomm bind 0 .
Configuring the Baudrate
The HC06 modules I got were shipped with baudrate 9600. I wanted to change it to 115200, in order to be able to talk with a MicroPython board. For that, connect to the module with an USB-Serial adapter (e.g. an FTDI). It’s important that the serial terminal has newlines disabled and that you send the entire command at once. I used the Arduino Serial Monitor for that.
Now send the command AT to ensure that the connection is working:
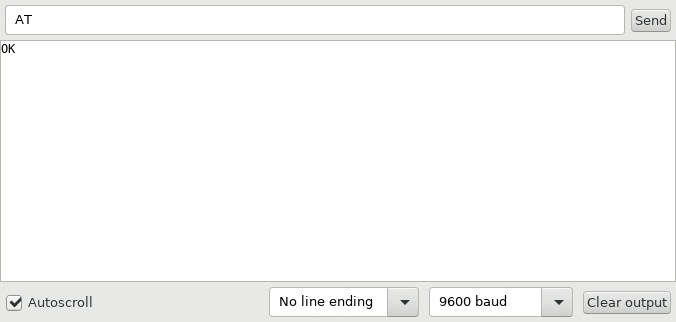
If everything works, you should now see OK as answer after a short moment.
Next, set the baudrate to your desired value. To set it to 115200 baud, use the command AT+BAUD8.
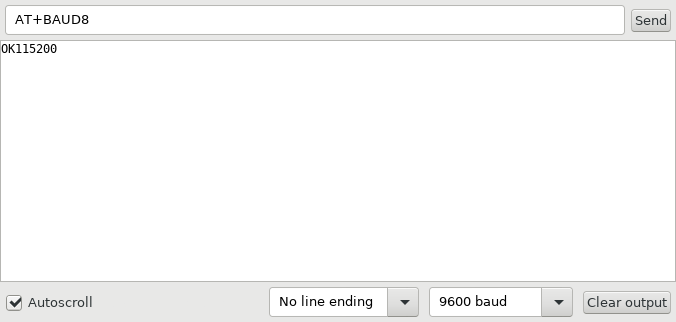
Finally change the baudrate of your terminal to 115200 and retry the AT command to make sure everything is working.
You can find a full list of supported AT commands here.
Connecting via Bluetooth
Now connect the dongle to your target device. It should blink red to show that it’s ready to pair.
First, install the required dependencies:
$ sudo pacman -S bluez $ yaourt -S bluez-utils-compat
Next, start the bluetooth daemon.
$ sudo systemctl start bluetooth.service
Now we need to pair the device. First, enable the bluetooth adapter and search for devices:
$ bluetoothctl Agent registered [bluetooth]# power on [CHG] Controller 00:1A:7D:DA:71:11 Class: 0x000104 Changing power on succeeded [CHG] Controller 00:1A:7D:DA:71:11 Powered: yes [bluetooth]# scan on . lots of output . [bluetooth]# scan off Discovery stopped [bluetooth]# devices Device 98:D3:37:90:BD:DF
If you have a module from the same manufacturer, it probably starts with 98:D3:37 too. Now pair the device. The default pin code is 1234.
[bluetooth]# pair 98:D3:37:90:BD:DF Attempting to pair with 98:D3:37:90:BD:DF [CHG] Device 98:D3:37:90:BD:DF Connected: yes Request PIN code [agent] Enter PIN code: 1234 [CHG] Device 98:D3:37:90:BD:DF UUIDs: 00001101-0000-1000-8000-00805f9b34fb [CHG] Device 98:D3:37:90:BD:DF ServicesResolved: yes [CHG] Device 98:D3:37:90:BD:DF Paired: yes Pairing successful [CHG] Device 98:D3:37:90:BD:DF ServicesResolved: no [CHG] Device 98:D3:37:90:BD:DF Connected: no
Now you can quit the bluetoothctl terminal. Next, we’ll create the virtual terminal device. This is easy:
$ sudo rfcomm bind 0 98:D3:37:90:BD:DF
Now you should have a new device called /dev/rfcomm0. Connect to it through your favorite terminal emulator and the correct baudrate and you should be in!
$ miniterm.py /dev/rfcomm0 115200 --raw --- Miniterm on /dev/rfcomm0 115200,8,N,1 --- --- Quit: Ctrl+] | Menu: Ctrl+T | Help: Ctrl+T followed by Ctrl+H --- >>> print('Connected to a MicroPython board via Bluetooth!') Connected to a MicroPython board via Bluetooth! This entry was tagged archlinux, bluetooth and linux
How to I connect a raw serial terminal to a bluetooth connection?
I’m trying to connect to a Totalstation that doesn’t offer bluetooth drivers. As I am doing this for purely diagnostic reasons, I’d like to see the raw output from the established serial connection. What do I have to do to pipe all output from a bluetooth connection to a terminal?
Totalstation Bluetooth<->Ubuntu Bluetooth. Given that the totalstation has the standard serial configuration over USB, I suspect it is establishing a serial connection over Bluetooth. Of course, I could be completely wrong, at which point the answer that I’m wrong and the bluetooth uses XYZ is completely permissible.
In terms of the two-way proof, I have managed to establish a blank serial connection via «screen» that causes an error beep on the device when I hit a key on the keyboard. So I suspect that I’m half-way there, I just don’t know which half.
Can you draw up a quick diagram? I can’t understand whether it’s serial over or bluetooth over serial, as well as who’s passing on the data to where. Just do it in GIMP or something and upload it here
Works very well but I run into some glitches with RFCOMM. When I connecting with SCREEN, some AT-Sequences is typed automatically «ATE1 E0»
3 Answers 3
Here is my way to proceed to connect to a HC-05 bluetooth device plugged on my arduino. It does not need to write a file like in Brian’s answer, but the idea is similar. I’ve tested it with a baud 9600 rate setup on the HC-05 device.
First step : pair the device and provide the PIN
I tried to setup from GUI the pairing, but it wasn’t working. Here is the command line way to proceed that worked for me. First, let us pair the device from command line. Run :
Be sure that the bluetooth device is started :
We now start the agent that will «remember the pin» for rfcomm :
Now we enable the scan mode to find our device and be able to pair it :
After a few seconds the MAC of your device should appear. We will denote it as after. Then, you just need to pair the device like this :
You will be asked to type a PIN, by default it’s 1234 on my HC-05 device. You can note that it’s possible that you device connect then disconnect with a message like that :
[CHG] Device 20:16:10:24:29:77 UUIDs: 00001101-0000-1000-8000-00805f9b34fb [CHG] Device 20:16:10:24:29:77 ServicesResolved: yes [CHG] Device 20:16:10:24:29:77 Paired: yes Pairing successful [CHG] Device 20:16:10:24:29:77 ServicesResolved: no [CHG] Device 20:16:10:24:29:77 Connected: no but it’s not a problem. You do not need to connect, so you can now quit bluetoothctl by typing Ctrl + D .
Provide a usable file /dev/rfcomm0
Firstly, be sure that you didn’t run any rfcomm command before. Indeed, even if you close with Ctrl+C the program, it still run in background.
sudo rfcomm connect /dev/rfcomm0 20:16:10:24:29:77 1 & Note that if you try to write on the input of rfcom, nothing happened. You need to use another program.
Third and last step : write into the /dev/rfcomm0
There are several ways to write on the file, but note that all ways to proceed involve root. I describe here several programs that can do that (so that you can choose depending on your need or on what is installed on your system for example). If you forget to run the program as root, you may have an error :
stty: /dev/rfcomm0: Device or resource busy First option : connect using screen
Screen is a very powerfull tool. You can install it (it’s always usefull anymore) by using :
sudo apt-get install screen If you forget to run it as root, you will get an error like Aleksander got :
To quit it, type «(CTRL + A) + :quit»
Second option : connect using minicom
sudo apt-get install minicom sudo minicom -D /dev/rfcomm0 If you forget to run it as root, you will have an error like
minicom: cannot open /dev/rfcomm0: Device or resource busy To quit it, type «Ctrl + A X».
Third option : python script miniterm
chmod +x miniterm.py sudo ./miniterm.py /dev/rfcomm0 Write directly into the file
Firstly run the following command (9600 is the baud rate) :
sudo stty -F /dev/rfcomm0 cs8 9600 ignbrk -brkint -icrnl -imaxbel -opost -onlcr -isig -icanon -iexten -echo -echoe -echok -echoctl -echoke noflsh -ixon -crtscts Now you can write in this file like in a classic file :
sudo su -c "echo 'message' > /dev/rfcomm0" and in theory read from it using
But I don’t know read does not work, if any of you have an idea.