- ESP32 Arduino: Serial communication over Bluetooth Hello World
- Introduction
- The code
- Testing the code
- Related posts
- ESP32 Serial Communication over Bluetooth Using Arduino IDE
- Introduction to ESP32 Bluetooth Serial Communication Using Arduino IDE
- Initializing ESP32 Bluetooth
- Connecting ESP32 Bluetooth with PC
- Reading Serial Data over Bluetooth Communication
- Conclusion
- About the author
- Kashif
ESP32 Arduino: Serial communication over Bluetooth Hello World
The objective of this post is to explain how to get started with the BluetoothSerial ESP32 library, in order to send data to a emulated Serial connection, operating over Bluetooth classic. The tests of this ESP32 tutorial were performed using a DFRobot’s ESP-WROOM-32 device integrated in a ESP32 FireBeetle board.
Introduction
The objective of this post is to explain how to get started with the BluetoothSerial ESP32 library, in order to send data to a emulated Serial connection, operating over Bluetooth classic.
At the time of writing, the mentioned library had just been added to the ESP32 Arduino core. So, you may need to update to the latest version of the Arduino core. You can check here how to do it.
One important thing to mentioned is that this is a very high level library that will hide from us most of the Bluetooth implementation details, which is why the code we are going to develop is very simple and small.
In terms of API, it will be very similar to the regular Serial communication functions we use on the Arduino environment.
Note that the example provided here is based on the library example available on the Arduino core, which I encourage you to try.
The tests of this ESP32 tutorial were performed using a DFRobot’s ESP-WROOM-32 device integrated in a ESP32 FireBeetle board.
If you prefer, you can check the video tutorial at my Youtube channel.

The code
The first thing we need to do is including the BluetoothSerial.h library, which will expose the functionalities needed to work with serial over Bluetooth.
Next we will need an object of class BluetoothSerial, which is the one we will use to initialize the Bluetooth stack on the ESP32 and to send the data.
You can check the implementation file for this class here. Under the hood, this class makes use of IDF’s Bluetooth classic API, which we have been covering in previous posts.
Now that we have our Bluetooth object, we need to initialize the Bluetooth stack, so other devices can see our ESP32 and pair with it, before initializing the serial communication.
To do so, we simply need to call the begin method of the BluetoothSerial object, which will handle all of the lower level initialization for us.
This method receives as input a string with the name we want to assign to the device, which will be seen by other Bluetooth enabled devices that will discover it.
As output, it returns a Boolean value indicating if the initialization was successful or not. For now we will not look into that value, but for a robust code you should always include error checks.
We will do the mentioned initialization in the Arduino Setup function.
Now that we have initialized the device, we will periodically send a “Hello World” message on the Arduino main loop.
As can be seen in the header file of the BluetoothSerial class, it inherits from the Stream class. The Stream class inherits from the Print class, which means that we can use the println method to write to the Bluetooth serial port.
SerialBT.println("Hello World"); Between each iteration of the main loop, we will do a small 1 second delay. The full source code can be seen below.
#include «BluetoothSerial.h» BluetoothSerial SerialBT; void setup() < SerialBT.begin("ESP32"); >void loop()
Testing the code
To test the code, simply compile it and upload it to your ESP32 using the Arduino IDE. Once it finishes, go to your computer’s Bluetooth devices and start a scan. The ESP32 should get detected, as shown in figure 1.

Figure 1 – ESP32 detected as Bluetooth device on Windows 8 (menus in Portuguese).
In my case, I already had the device paired. If you haven’t yet, pair with it. Once it is paired, you should get a new COM port available on your computer. On Windows 8, you can check it at the device manager, as can be seen in figure 2.

Figure 2 – New Bluetooth over serial COM port detected in Windows 8.
You can now go back to the Arduino IDE and this COM port should be on the list of the available COM ports that we can connect to using the Serial Monitor. Choose it and open the Serial Monitor. You can check the expected result at figure 3, which shows the message we defined in the code getting printed.

Figure 3 – Output of the program on the Arduino IDE serial monitor.
Related posts
ESP32 Serial Communication over Bluetooth Using Arduino IDE
![]()
ESP32 is a microcontroller board that has dual support for WiFi and Bluetooth. It comes with dual Bluetooth classic and Bluetooth Low Energy. Using Bluetooth, we can transfer data from different sensors to ESP32 or can create a mesh network of ESP32 Bluetooth inside our project.
This tutorial covers how we can communicate serially using the Bluetooth of ESP32 with a PC. Here we will transmit a string to the Arduino IDE serial monitor while connecting the ESP32 to the PC not serially but using the Bluetooth connection.
Introduction to ESP32 Bluetooth Serial Communication Using Arduino IDE
Serial communication is important when it comes to microcontrollers as it allows devices to exchange data between them. ESP32 comes with UART and multiple other communication protocols that allows it to exchange data with a PC and if required print it on a serial monitor.
ESP32 features Bluetooth support which means we can configure its Bluetooth in such a way that ESP32 communicates serially, and we can print the received data over Bluetooth on the serial monitor.
For this we will be calling the SerialBT() function from the Arduino BluetoothSerial.h library.
Initializing ESP32 Bluetooth
Before we can communicate over Bluetooth, we have to initialize it first for that the steps will be helpful.
Step 1: Connect ESP32 board with PC using the Micro USB cable. After connecting check, the COM port at which the ESP32 board is connected. Open device manager and here we can see ESP32 is connected at COM3:
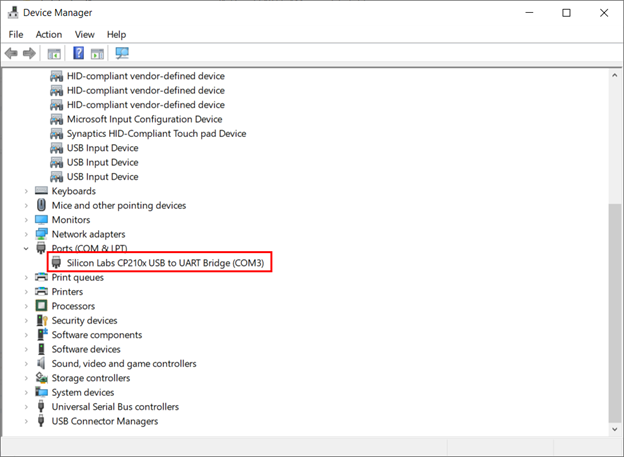
Step 2: Now open Arduino IDE and select the ESP32 board along with the same COM port:
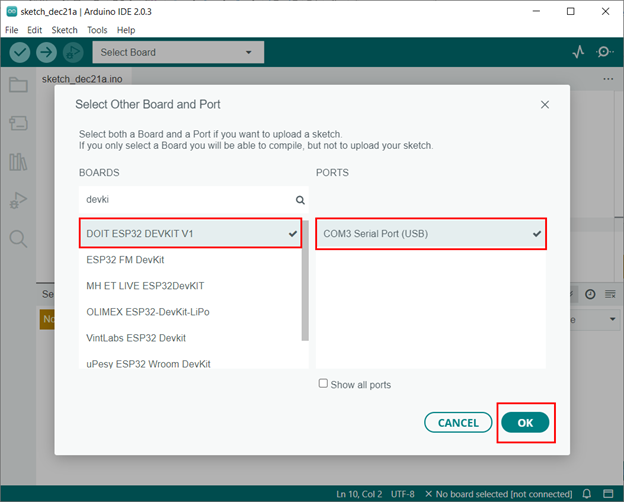
Step 3: Now upload the given code to the ESP32 board:
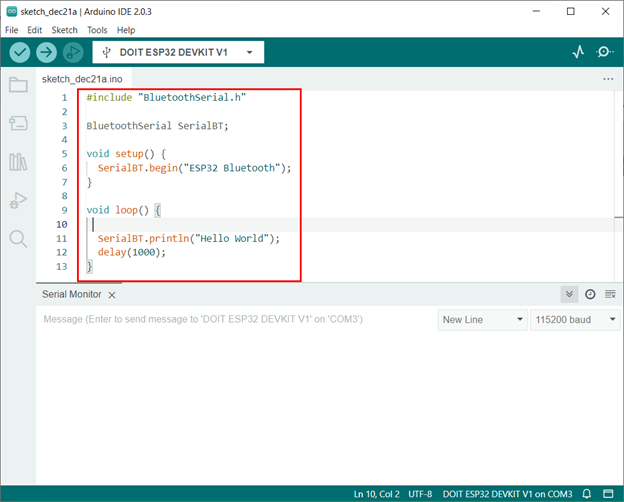
This code started by initializing the Bluetooth Serial library by including the “BluetoothSerial.h”.
After that Bluetooth SSID/Name is initialized using the command SerialBT.begin().
In the end inside the loop part a string Hello World will constantly print over the serial monitor using the ESP32 Bluetooth connection.
#include «BluetoothSerial.h»
BluetoothSerial SerialBT;
void setup ( ) {
SerialBT.begin ( «ESP32 Bluetooth» ) ;
}
void loop ( ) {
SerialBT.println ( «Hello World» ) ;
delay ( 1000 ) ;
}
Now we have successfully configured the ESP32 Bluetooth.
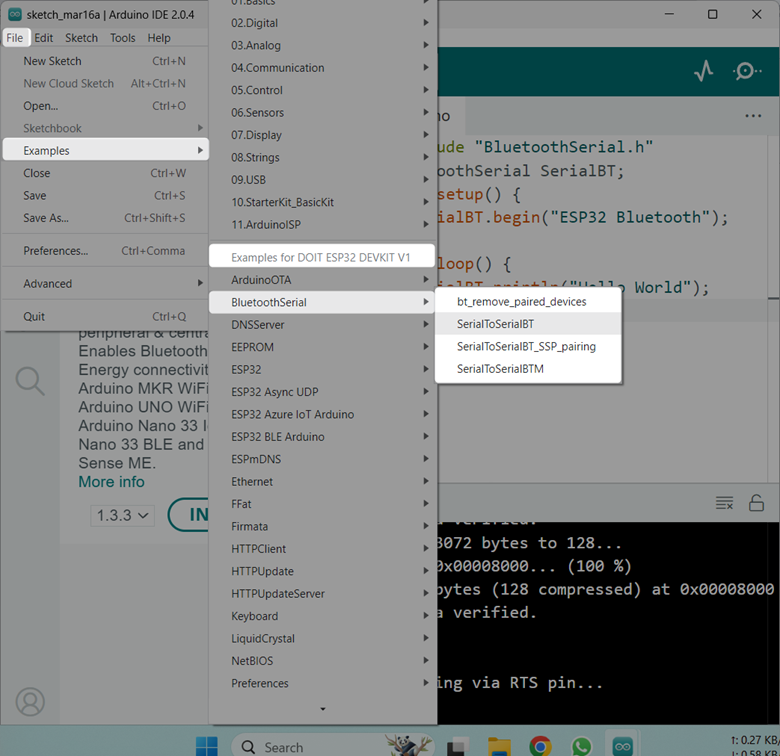
Note: The BluetoothSerial.h is by default installed in Arduino IDE once we add the ESP32 board core. We don’t need to separately install this library. You can also try different examples related to BluetoothSerial.h library by going to: to File>Examples>Bluetooth Serial
Before you can use this Library make sure the ESP32 board is added in Arduino IDE. Read the article Installing the ESP32 Board in Arduino IDE for more information on installation.
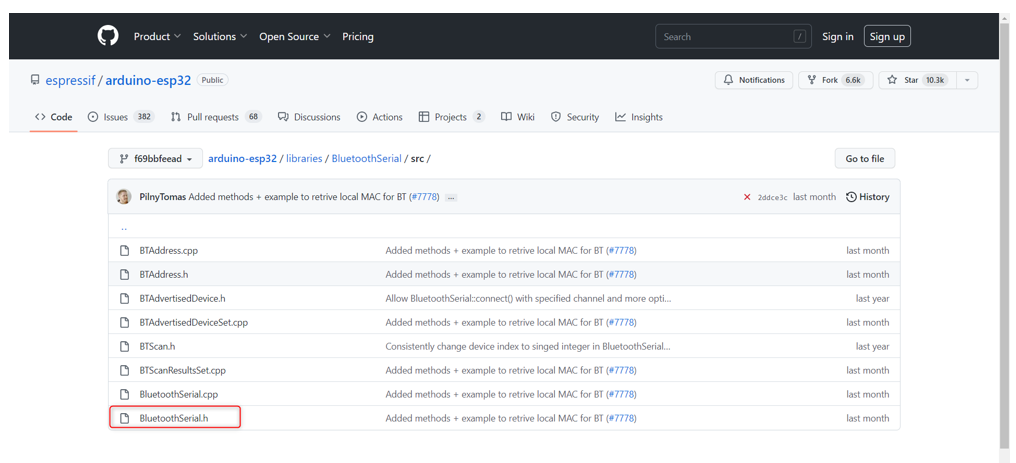
Visit the following Espressif Systems ESP32 GitHub repository to learn more about BluetoothSerial.h library: [GitHub Arduino-ESP32/BluetoothSerial].
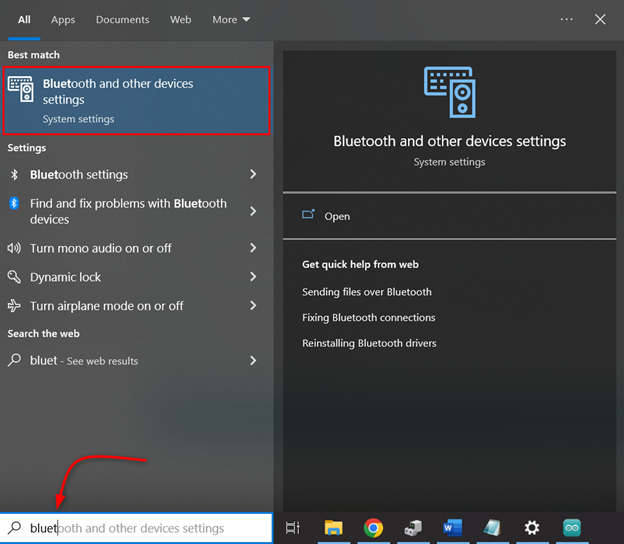
Connecting ESP32 Bluetooth with PC
As ESP32 Bluetooth is configured follow the steps to connect ESP32 Bluetooth with PC.
Step 1: Open Bluetooth settings in Windows:
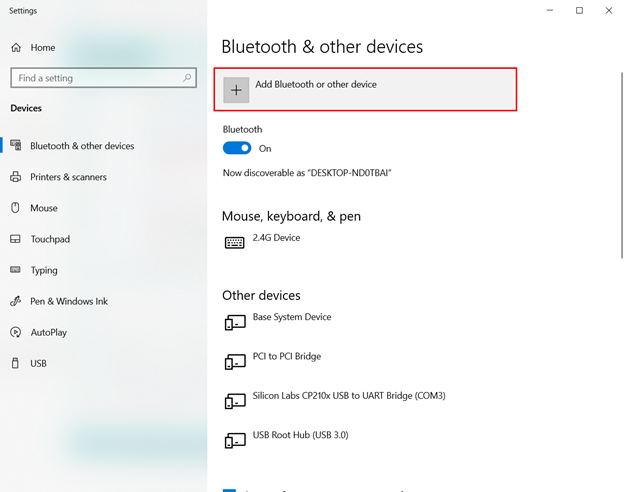
Step 2: Click Add a Bluetooth Device:
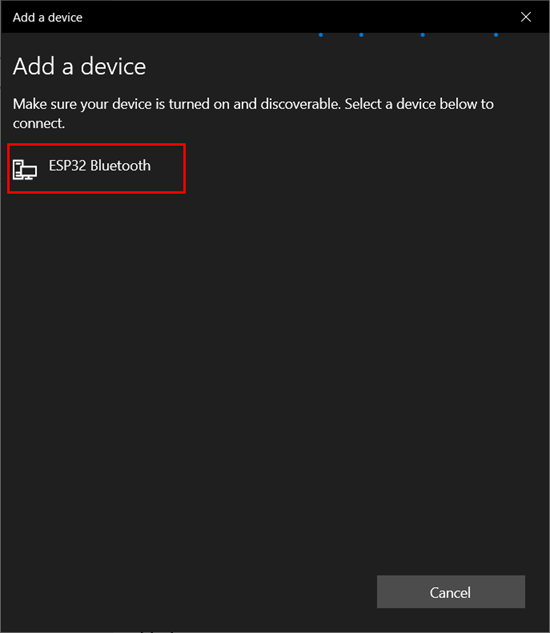
Step 3: Select Bluetooth device:

Step 4: Click ESP32 Bluetooth. Here you will see any name of ESP32 which you defined inside the Arduino code:
Step 5: Once the ESP32 Bluetooth is successfully connected below a message will appear:
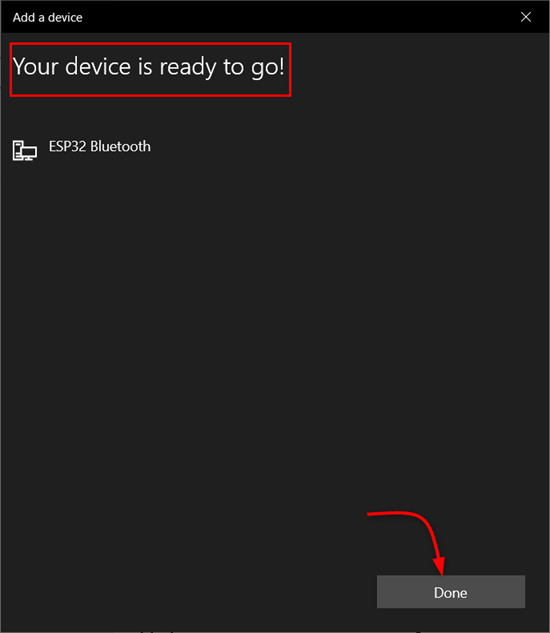
Step 6: In device manager we can see COM port for ESP32 Bluetooth. Knowing this COM port is important as it will help us to receive the data over the serial monitor in the Arduino IDE:
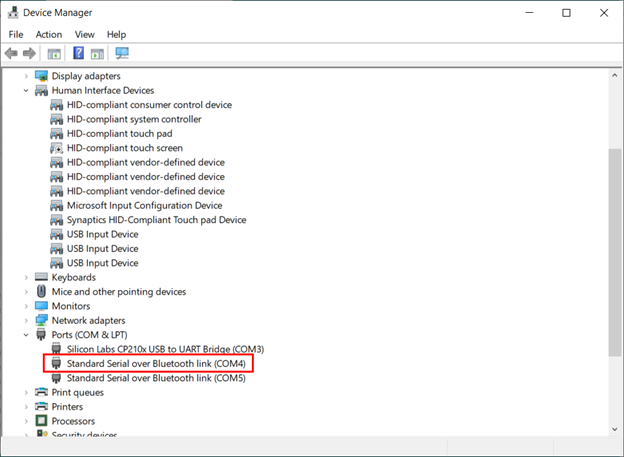
Now we have successfully connected ESP32 with PC over Bluetooth communication.
Reading Serial Data over Bluetooth Communication
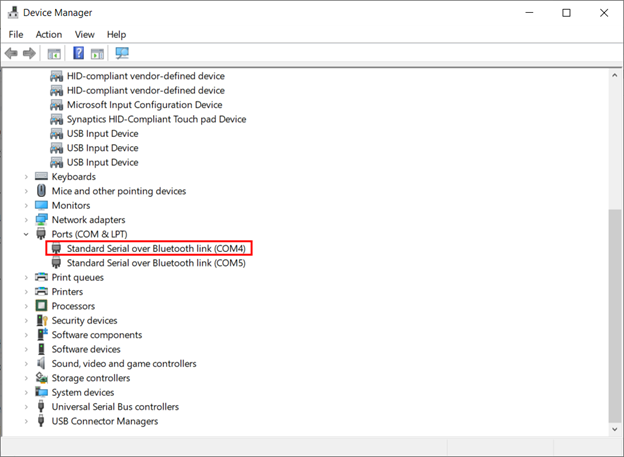
To read serial data over Bluetooth first we have to disconnect the ESP32 from the PC so it will not establish any UART serial communication. After disconnecting we can verify it from the Device Manager.
The image shows ESP32 is disconnected from the PC.
Note: Remember to power ESP32 from any other PC or using the power adapter. This will help to remain ESP32 Bluetooth turned on.
After disconnecting the ESP32 from the PC, open the Arduino IDE and select the COM port at which ESP32 Bluetooth is connected.
After selecting the right port, we can see the ESP32 is continuously transmitting the Hello World string over the serial monitor using Bluetooth communication.
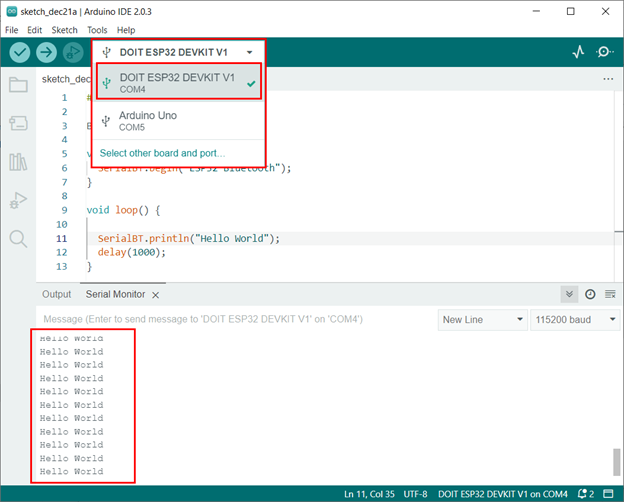
We have successfully received data using the Serial Bluetooth of ESP32.
Conclusion
ESP32 is a versatile programming microcontroller board. It gives users multiple methods for communication like Bluetooth WiFi or using the UART, SPI or any other communication protocol. Here we have covered how ESP32 Bluetooth can be configured for serial communication. For a complete step by step process read the tutorial.
About the author
Kashif
I am an Electrical Engineer. I love to write about electronics. I am passionate about writing and sharing new ideas related to emerging technologies in the field of electronics.