- Bluetooth speaker with arduino
- A DIY hexagonal Bluetooth speaker with sound-reactive LEDs
- 4 Responses to “A DIY hexagonal Bluetooth speaker with sound-reactive LEDs”
- Bluetooth Speaker With a Beat-Synced LED
- Introduction: Bluetooth Speaker With a Beat-Synced LED
- Supplies
- Attachments
- Step 1: Laser Cut the Case
- Attachments
- Step 2: Build the Circuit and Write the Arduino Code
- Attachments
- Step 3: Mount the Circuit to the Bottom Layer
- Step 4: Create the Case, Side Panels
- Step 5: Install the Circuit Switch, Solder the Wires
- Step 6: Attach the Top Part With the Switch and the Back Panel
- Step 7: Place and Solder the Speaker to the Case
- Step 8: Assemble the Entire Case and Use Screws
- Be the First to Share
- How to Build a Bluetooth Speaker Using an Arduino
- Building a speaker using an Arduino
- What is an Arduino
- A brief introduction to Arduino
- The basics of the Arduino
- Basic Arduino features
- Frequently Asked Questions Bluetooth Speaker
- Top 3 Myths About Bluetooth Speakers
- Conclusion
Bluetooth speaker with arduino
Hack your Teddy Ruxpin with Arduino, Raspberry Pi and Alexa
New IDE for all Arduino boards!
A DIY hexagonal Bluetooth speaker with sound-reactive LEDs
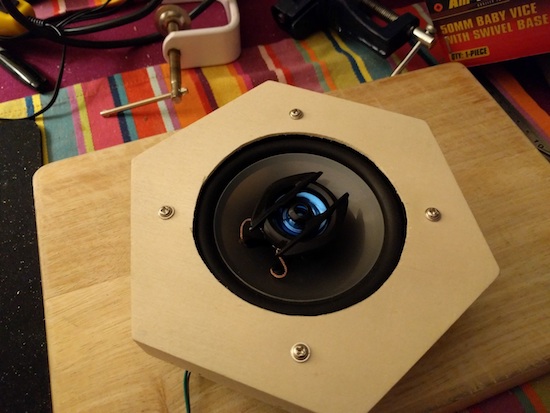
Imgur user Peter Clough recently created his own colorful “Magic Box” Bluetooth speaker assembly with a NeoPixel visual display.
If you need a speaker (or rather a speaker with an enclosure) the easiest way is usually to just buy one. On the other hand, if you want something really awesome and unique, why not build it yourself? Clough did just that using an Arduino Pro Mini and a Bluetooth receiver along with a strip of programmable LEDs that react to the emitted sounds–made possible by an electret microphone amp.
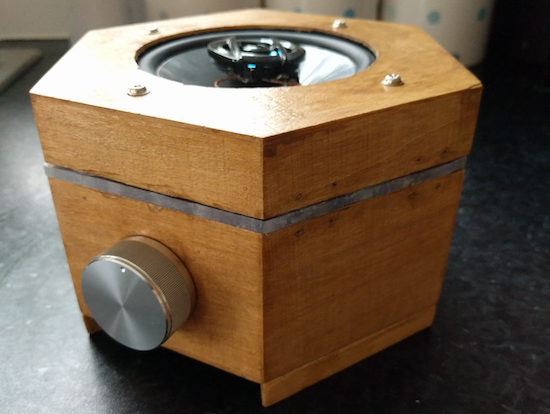
Cleverly, the case was sourced from a hobby supplies store, while neodymium magnets were used to keep the lid in place. Clough also employed a “really beefy” 20W 4Ohm speaker, as well as a rotary encoder with push button for volume and play/pause control.
You can find more details, including a schematic, on the project’s Imgur page.
You can follow any responses to this entry through the RSS 2.0 feed. You can leave a response, or trackback from your own site.
4 Responses to “A DIY hexagonal Bluetooth speaker with sound-reactive LEDs”
- Stefano05 Says:
December 31st, 2016 at 20:48:48 this is very beautifoll! You are very good.
STEFANO and GIUSEPPE - divito Says:
May 6th, 2017 at 22:49:53 Wow this is really cool - Bolt0Lightning Says:
August 10th, 2017 at 04:57:32 all parts plz - jkearns21 Says:
April 18th, 2018 at 10:29:15 Is the code available for this project? Thanks.
Bluetooth Speaker With a Beat-Synced LED


Introduction: Bluetooth Speaker With a Beat-Synced LED
The Arduino Bluetooth Speaker with Beat-Synced LED is an exciting DIY project that combines the versatility of Arduino programming with the enjoyment of music and visual effects. This project allows you to create a portable speaker system that wirelessly connects to your Bluetooth-enabled devices, providing an immersive audio experience. With the addition of a beat-synced LED, the speaker visually responds to the rhythm and beats of the music, adding a dynamic and captivating element to your listening experience. By following the step-by-step instructions, you’ll have the opportunity to build a personalized and interactive speaker system that brings your favorite music to life.
Supplies
Before you begin building the Arduino Bluetooth speaker with a beat-synced LED, gather all the necessary materials and components. Here’s a bills of materials you will need.
Attachments
Step 1: Laser Cut the Case
Use a laser cutting machine to cut the case for your Bluetooth speaker. I shared the laser cut file, you can look the scaled version of the outline below. The case will house all the components of the speaker and provide protection and aesthetics.
Attachments
Step 2: Build the Circuit and Write the Arduino Code
Build the circuit by connecting the components, including the Arduino board, Bluetooth module, LED, and speaker. Ensure all connections are secure and properly soldered. Open a new sketch in the Arduino IDE and write the code I shared below to control the Bluetooth module, LED, and audio output. This involves initializing the Bluetooth module, configuring it for audio streaming, reading the audio input, analyzing the beats or audio levels, and controlling the LED based on the audio input. Utilize libraries and code examples to simplify the programming process.
Attachments
Step 3: Mount the Circuit to the Bottom Layer
Securely attach the built circuit to the bottom layer of the case. Use adhesive, or any suitable method to fix the circuit in place. Don’t forget to place the led in the hole. Make sure it is aligned properly and doesn’t move within the case.
Step 4: Create the Case, Side Panels
Construct the case by assembling the side panels of the enclosure. Ensure they fit together snugly, and consider any openings required for buttons, ports, or the LED.
Step 5: Install the Circuit Switch, Solder the Wires
Install the circuit switch, which will control the power supply to the entire circuit. Connect the necessary wires to the switch and solder them securely. Make sure the switch is easily accessible and functions correctly.
Step 6: Attach the Top Part With the Switch and the Back Panel
Adhere the top part of the case, which includes the switch, to the rest of the enclosure. Use appropriate adhesive to securely attach the top part to the side panels. Additionally, attach the back panel to complete the construction of the case.
Step 7: Place and Solder the Speaker to the Case
Position the speaker inside the case. Ensure it fits properly and aligns with any speaker openings on the front panel. Solder the necessary connections between the speaker and the circuit board to establish the audio connection.
Step 8: Assemble the Entire Case and Use Screws
Bring together all the components of the case, including the side panels, top part, back panel, and speaker. Align them correctly and use screws or other appropriate fasteners to securely assemble the case. Ensure all connections and components are well-secured and the case is stable.

Be the First to Share
Did you make this project? Share it with us!
How to Build a Bluetooth Speaker Using an Arduino

Have you ever wanted to make your Bluetooth speaker? We’ll show you how to make a cheap yet effective Bluetooth speaker for your home using an Arduino. It’s reasonable to make and easy to build, so this project is perfect if you want to learn about electronics and get a hands-on experience with Arduino. But you were too intimidated even to try?
Are you looking for a way to build your wireless speaker that doesn’t cost a fortune? If so, then this tutorial is for you. We will teach you how to make a Bluetooth speaker using an Arduino, a microcontroller board that’s affordable, easy to use, and fun to experiment with. We will walk through the steps to make your Bluetooth speaker using an Arduino.
This project uses an Arduino board, an HC-05 BlueTooth module, and a speaker to create a basic speaker. It has two ways to connect the HC-05: through a USB port or Bluetooth. In the first option, you’ll need to use an Android phone or computer with a USB OTG adapter to connect. In the second one, you need to open the Bluetooth Manager application on your computer to connect the Bluetooth module to your device.

Building a speaker using an Arduino
Are you ready to learn how to build a Bluetooth speaker using Arduino? Let’s begin! First off, you’ll need to get your hands on an Arduino. You can buy an Arduino starter kit on Amazon for around $20. Many online stores sell Arduinos, such as Adafruit. You’ll also need to connect your Arduino to a computer using a USB cable. If you’re using Windows, you can follow our guide here. On MacOS, you can use the instructions here.
After you’ve connected your Arduino to your computer, you’ll need to download the Arduino IDE. You can do this by clicking the “Downloads” tab on the Arduino website. Once you’ve downloaded the Arduino IDE, you’ll need to install it on your computer.
Once the Arduino IDE has been installed, you can upload your code to your Arduino by clicking the “Upload” button on the top left.
What is an Arduino
An Arduino is a small microcontroller board that can be programmed to perform a series of functions, such as controlling lights, motors, and music. It’s one of the most popular boards worldwide and very easy to use. The best part is that it’s super cheap, so you can afford to buy a few and have fun building your projects.
A brief introduction to Arduino
Arduino is a microcontroller board that’s affordable, easy to use, and fun to experiment with. It can be used to control simple electronic circuits and can even be programmed to run the software and connect to the internet. Arduino is a great tool for beginners, and this tutorial is designed to give you a crash course on what Arduino is, how to install it, and how to program it.
The basics of the Arduino
Arduino is an open-source hardware and software platform. It’s based on a microcontroller board that makes it easy to control small projects with code. It’s a low-cost alternative to an FPGA, but its limitations mean you can’t do everything an FPGA can.
We will be building a speaker using an Arduino, and we will also be using a Raspberry Pi for some extra features. If you’ve never worked with an Arduino before, don’t worry. It’s pretty straightforward, and once you’re done, you’ll be able to implement similar projects on your own easily.
Here are the parts you will need:
Basic Arduino features
Arduinos are a class of microcontrollers that are easy to use, inexpensive, and very powerful. They can be programmed using C++, Python, or even Java. They can easily be connected to your computer and communicate wirelessly using radio frequency (RF) or infrared (IR) technology. An Arduino can be programmed to perform many tasks, such as controlling motors, lighting an LED, reading sensors, and much more.
It will teach us how to use Arduino to create a Bluetooth speaker.
Frequently Asked Questions Bluetooth Speaker
Q: What’s the best part about building a speaker using Arduino?
A: There are so many different ways to make your speakers, and they can be used for many things. For example, you could make a Bluetooth speaker or an FM radio.
Q: What’s the best part about building a Bluetooth speaker using an Arduino?
A: There are so many different ways to make your speakers, and they can be used for many things. For example, you could make a Bluetooth speaker or an FM radio.
Q: How does a Bluetooth speaker differ from a traditional speaker?
A: A Bluetooth speaker has more features. It can play music wirelessly from your phone or another device. You can control it with your smartphone. You can connect your speaker to the Internet. You can use it in your car. And you can set it to a certain volume.
Q: What challenges did you face in building this speaker?
A: I had to learn how to program Arduino, which wasn’t easy since I am not a computer person. I also had to figure out how to put all the components together. But it was really fun, and I was proud when it turned out how I wanted it.
Q: What’s the best part about building a Bluetooth speaker using an Arduino?
A: There are so many different ways to make your speakers, and they can be used for many things. For example, you could make a Bluetooth speaker or an FM radio.
Top 3 Myths About Bluetooth Speakers
1. A Bluetooth speaker is a new invention and is not easy to use.
2. I can’t build a Bluetooth speaker using an Arduino board.
3. Bluetooth speakers are expensive.
Conclusion
I will show you how to build a Bluetooth speaker using Arduino. This project is fairly easy to accomplish. It requires minimal soldering, and you can complete the entire project in less than an hour. You can choose to make the speaker small enough to fit in your pocket or big enough to fill up your room. I decided to make it big enough to fill up a space. The size of the speaker will depend on the type of music you want to play. If you’re going to listen to just one song, I suggest using headphones.