- Добавляем поддержку BLE (bluetooth) устройств в Home Assistant
- Docker часть 10: Bluetooth
- Установка зависимостей Bluetooth
- Настройка Home Assistant
- Список всех частей
- Xiaomi BLE
- Configuration
- Supported device classes
- Encryption
- Devices
- Plant sensor: Flower Care / MiFlora (HHCCJCY01)
- Help us to improve our documentation
- Categories
- On this page
- Bluetooth LE Tracker
- Setup
- Configuration
- Configuration Variables
- Help us to improve our documentation
- Categories
Добавляем поддержку BLE (bluetooth) устройств в Home Assistant
В последней публикации из своей трилогии я расскажу, как добавить поддержку Bluetooth устройств в умный дом на Home Assistant, а также напомню способ установки кастомных компонентов.
Translation to English is here . Также основной канал в telegram .
Первая часть заключалась в том, что я описал купленный стик:
Во второй части я описал как добавить поддержку сервисов Bluetooth в Linux, если таковой у Вас еще нет:
И вот — настало время все соединить воедино. Как я уже объяснил в прошлой статье, на сайте Home Assistant есть как минимум три интеграции, но они нам не нужны. Мы будем использовать интеграцию Passive BLE Monitor integration . Она себя зарекомендовала и множество (тысячи) пользователей установили ее себе и отметили ее на GitHub звездой.
Есть 2 способа установить эту интеграцию: а) Через HACS: писал про это тут:
б) Создаем рядом с файлом конфигурации Home Assistant папку custom_components и копируем в него интеграцию прямо с GItHub из этой папки .
Для копирования файлов на сервер очень удобно использовать ftp. Как его настроить, например, на Windows — писал тут:
1. Копируем файлы в папку или ставим из HACS (↑ описано выше ↑).
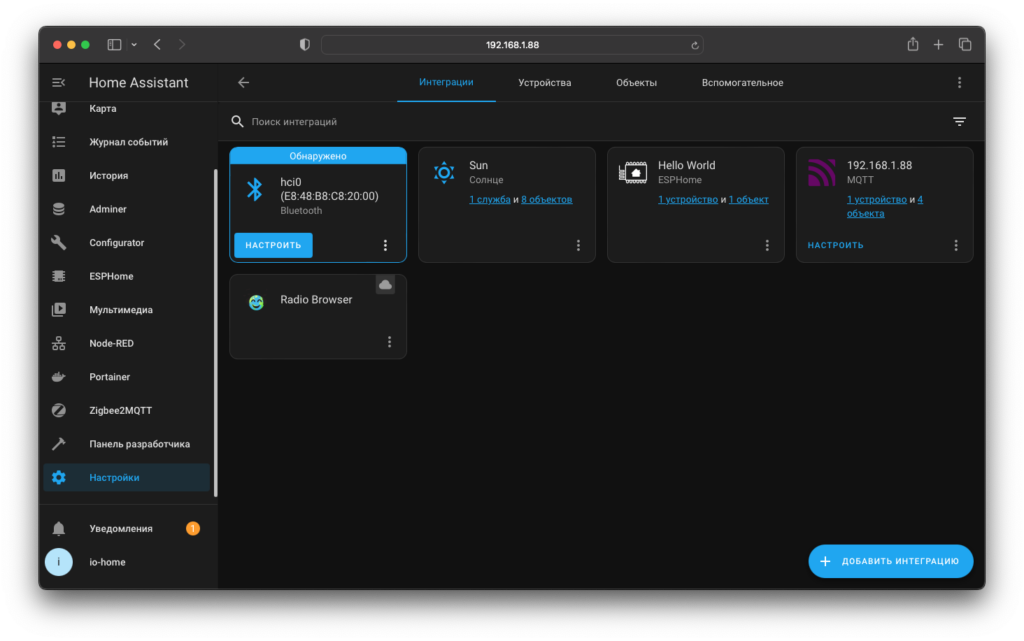
2. Далее перезагружаем HA и переходим в интеграции и набираем в поиске BLE. Если пункт №1 выполнен правильно, то найдется интеграция Passive BLE monitor
3. Выберем ее и нажмем «установить»
4. Как только установка закончится, появится менюшка. Если Bluetooth адаптер настроен верно, то мы увидим его в списке ниже(hcl0). Проверим что на нем стоит галка.
4. Я дополнительно установил галку на пункте «авто рестарт», но не уверен, что это требуется — скорее перестраховался.
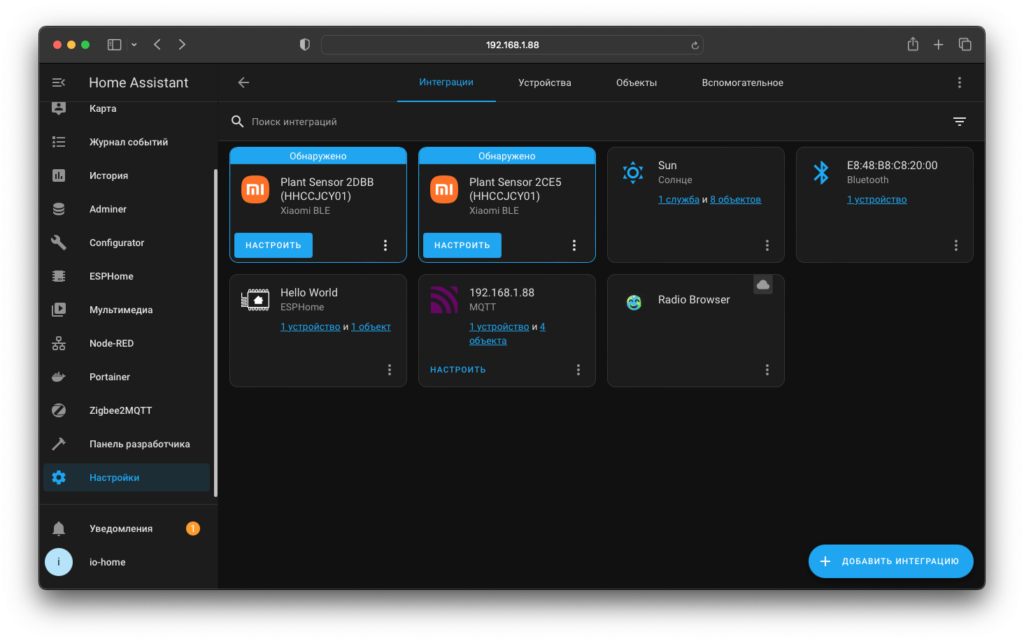
5. После того, как я нажал кнопку «ок», в квартире мгновенно нашлись 4 устройства. Все устройства были от Xiaomi.
6. Нажимаем «финиш». Интеграция отображается в общем списке. Также показываются устройства и сущности.
7. Давайте нажмем на «устройства»:
8. Давайте нажмем на сущности:
Устройства заведенные в HA таким образом работают точно также как и WiFi или ZigBee устройства. За 2 недели у меня не было пока никаких проблем ни с одним из них. Не требуются никакие сопряжения устройств и прочие танцы с бубном, что я нахожу очень удобным. Всем добра!
Подпишитесь , чтобы не пропускать следующий контент.
Нажмите лайк , если интересно, так я пойму какие публикации больше нужны моей публике.
Также публикации можно найти на других площадках: Instagram , telegram ( RU , EN , DE ), Medium , LiveJournal , YouTube .
Мой блог является некоммерческим, поэтому позитивный комментарий, лайк или репост поможет публикациям выходить чаще ☺.
Docker часть 10: Bluetooth

Этот метод полезен, когда система, в которой вы используете Home Assistant, имеет встроенный чип или вы используете USB-приемник Bluetooth. Если отсутствует встроенный приемник, то можно использовать ESPHome в качестве Bluetooth Proxy.
Если вы хотите использовать приемник, обязательно ознакомьтесь с документацией интеграции для получения списка известных работающих адаптеров. Но как правило работаю почти все адаптеры представленные на рынке. В примере будет работа с адаптером TP-Link UB500.
Устройств умного дома, которые передают данные через Bluetooth большое количество. И иметь у себя в системе этот протокол просто необходимо.
Установка зависимостей Bluetooth
- Установите пакет брокера DBus sudo apt install dbus-broker
- Включить системную службу sudo systemctl enable dbus-broker.service
- Установите пакет BlueZ sudo apt install bluez
Настройка Home Assistant
Перейдите в docker-compese.yaml и в секции homeassistant добавьте новое хранилище
volumes: - ./homeassistant/config:/config - /etc/localtime:/etc/localtime:ro - /run/dbus:/run/dbus:ro # После чего перенастройте контейнер с Home Assistant, запустив обновление контейнера
docker compose up -d homeassistant

Если у вас есть устройства с Bluetooth, то после настройки интеграции они начнут появляться в Home Assistant. На это потребуется определенное время. Важным фактором является поддержка самим HA. Если по какой-то причине то или иное устройство не захочет подключаться, то всегда можно сделать свой BLE адаптер с помощью ESPHome.
Список всех частей
- Часть 1: Установка Debian
- Часть 2: Docker и Portainer
- Часть 3: Home Assistant Container
- Часть 4: File Editor
- Часть 5: MariaDB
- Часть 6: Mosquitto MQTT
- Часть 7: Zigbee2MQTT
- Часть 8: ESPHome
- Часть 9: Node Red
- Часть 10: Bluetooth
Xiaomi BLE
Integrates devices that implement the Xiaomi Mijia BLE MiBeacon protocol and other Xiaomi BLE devices that support passive collection. It listens to Bluetooth broadcasts that the device makes by itself, allowing us to track the latest sensor values without needing to wake it up from deep sleep to poll and conserving its battery power.
The integration will automatically discover devices once the Bluetooth integration is enabled and functional.
Configuration
Adding Xiaomi BLE to your Home Assistant instance can be done via the user interface, by using this My button:
If the above My button doesn’t work, you can also perform the following steps manually:
- Browse to your Home Assistant instance.
- Go to Settings > Devices & Services.
- In the bottom right corner, select the Add Integration button.
- From the list, select Xiaomi BLE.
- Follow the instructions on screen to complete the setup.
Supported device classes
It is possible that we detect your device because it uses the MiBeacon protocol but don’t yet support any or all of its sensors. We currently actively test devices with the following sensor classes.
- Temperature
- Humidity
- Moisture
- Illumination
- Conductivity
- Formaldehyde
- Consumable
- Voltage
- Battery
It also supports the following classes of binary sensors:
The entities for the sensor classes are added after the values are first received. This means entities for values that are broadcasted at a lower interval (e.g., battery) might show up later.
Encryption
Some devices use AES encryption to protect the sensor values they are broadcasting.
- MiBeacon v2/v3 use unauthenticated AES with a 24 character hexadecimal (12 byte) key
- MiBeacon v4/v5 use authenticated AES with a 32 character hexadecimal (16 byte) key
This key is called the bindkey or beaconkey.
There are a few ways to obtain a bindkey for your device:
- Set your own. The Telink Flasher allows you to generate new bindkeys for devices it supports. The new bind key will work with Home Assistant, but the Mi Home app will not recognize the sensor anymore once the device has been activated by the TeLink flasher application. To use the sensor again with the Xiaomi Mi Home app, the device needs to be removed and then re-added inside the Mi Home app.
- Extract the keys from Xiaomi Cloud using a token extractor tool.
Devices
Plant sensor: Flower Care / MiFlora (HHCCJCY01)
HHCCJCY01, also known as MiFlora or “Flower Care”, should be automatically discovered. However, if the firmware is too old, it won’t send the right BLE beacons and an update via the app is required. The lowest confirmed working firmware version is 3.2.1 (a lower 3.x version could also be alright).
Flower Care firmware update steps:
- Install the official “Flower Care” app by HHCC:
- Google Play (requires location and storage permission)
- Apple App Store
Help us to improve our documentation
The Xiaomi BLE integration was introduced in Home Assistant 2022.8, and it's used by 5.8% of the active installations. Its IoT class is Local Push.
Categories
On this page
Bluetooth LE Tracker
This tracker discovers new devices on boot and in regular intervals and tracks Bluetooth low-energy devices periodically based on interval_seconds value. It is not required to pair the devices with each other.
Devices discovered are stored with ‘BLE_’ as the prefix for device mac addresses in known_devices.yaml .
Setup
This integration requires the Bluetooth integration to be enabled and functional.
Configuration
To use the Bluetooth tracker in your installation, add the following to your configuration.yaml file:
# Example configuration.yaml entry device_tracker: - platform: bluetooth_le_tracker
Configuration Variables
If new discovered devices are tracked by default.
Whether the integration should try to read the battery status for tracked devices.
Minimum interval to ask the device for its battery status. The battery status will be checked at most once every interval. If track_battery is false, this will be ignored.
Seconds between each scan for new devices.
As some BT LE devices change their MAC address regularly, a new device is only discovered when it has been seen 5 times. Some BTLE devices (e.g., fitness trackers) are only visible to the devices that they are paired with. In this case, the BTLE tracker won’t see this device.
Enabling the battery tracking might slightly decrease the duration of the battery, but since this is only done at most once a day, this shouldn’t be noticeable. Not all devices offer battery status information; if the information is not available, the integration will only try once at startup.
For additional configuration variables check the Device tracker page.
Help us to improve our documentation
The Bluetooth LE Tracker integration was introduced in Home Assistant 0.27, and it's used by 236 active installations. Its IoT class is Local Push.
Categories