- Display Text on an LCD with Bluetooth Using IOS and Android
- What you need to get started:
- Hardware:
- Software
- Step 1: Connect your Modules
- Step 2: Upload the Code
- Step 3: The Result
- For Android apps:
- For IOS apps:
- 1 Comment(s)
- Universal Bluetooth receiver with LCD display.
- Display Text on an LCD with Bluetooth Using IOS and Android
- What you need to get started:
- Hardware:
- Software
- Step 1: Connect your Modules
- Step 2: Upload the Code
- Step 3: The Result
- For Android apps:
- For IOS apps:
- 1 Comment(s)
- Bluetooth control led with lcd led status display real time.
- Things used in this project
- Hardware components
- Software apps and online services
- Story
- Step#1: Connection.
- Step#2: LCD Connection
- Step#3: connect the smartphone or the laptop with Bluetooth .
- Step#4: The Arduino code.
- bluetooth_led.ino
- Schematics
- bluetooth-setup2.png
- untitled.png
- Code
- bluetooth_led.ino
Display Text on an LCD with Bluetooth Using IOS and Android
This HC- 08 module is a very good module for those who are used to Serial Port Profile (SPP) in addition to UART and who begin to explore more about BLE technology. BLE is less power hungry and will prolong the battery life (as it is only sending data as needed). But the drawback is that the data rate is smaller and the transmission distance is slightly reduced.
We will use this HC-08 in a simple project. In this project, we are going to update the text on a 16×2 LCD wirelessly via the HC-08 Bluetooth module, using either Android/IOS devices. The goal is to get you started easily with this BLE module without prior knowledge in BLE protocol. Once you follow through the tutorial, it will be a great kick-starter for you to explore more about the BLE protocol and creating more fun and cool projects using this module!
What you need to get started:
Hardware:
Software
Step 1: Connect your Modules
| HC-08 | Arduino |
| VCC | 3.3V |
| GND | GND |
| TX | 2 |
| RX | 3 |
| LCD | Arduino |
| Pin 1 (VSS) | GND |
| Pin 2 (VDD) | 5V |
| Pin 3 (VO) | Middle pin of Pot |
| Pin 4 (RS) | 12 |
| Pin 5 (RW) | GND |
| Pin 6 (E) | 11 |
| Pin 7-10 (D0-D3) | Not Connected |
| Pin 11 (D4) | 9 |
| Pin 12 (D5) | 8 |
| Pin 13 (D6) | 7 |
| Pin 14 (D7) | 6 |
| Pin 15 (A) | 5V |
| Pin 16 (K) | GND |
Step 2: Upload the Code
Make sure you have selected the correct COM PORT and BOARD under the tools header. Next, proceed to upload the code to your Arduino.
Step 3: The Result
Our maker friend, Vincent, made this video demonstration. It shows how to control the LCD from your Android/IOS devices.

The characteristic and service UUID is fixed and you are not able to create your own characteristic and service UUID like those with more advanced BLE modules (i.e. Nordic based). Supported services: Central and Peripheral UUID FFE0, FFE1 (You need to know this when controlling with IOS apps)
For Android apps:
1) When you open the app, this is the interface you’ll be seeing.
2) Click on the top left hamburger menu icon and select the devices tab.
4) Click on the connect button on the top right to pair your HC-08 device. Don’t forget to turn on your device’s Bluetooth
5) Type in the text that you want to display on the LCD. In our case, it’s «HC08 BLE Module».
6) Submit it and watch the LCD screen update to show your text.
For IOS apps:
1) Once you download the Bluetooth Terminal Apps, launch it. It will start to scan for your surrounding BLE devices. Click on connect to connect to your HC-08 Module.
2) Select the correct characteristic, FFE1, at the top. Then, select ASCII as we are sending text to the LCD.
3) Type in the text you want to display on the LCD and click SEND. In our case, it’s HC08 BLE Module.
4) Check out your LCD, the text should be updated to «HC08 BLE Module»
5) Check out the LCD screen to make sure it updated with the new text
There you have it, just 5 easy steps on either Android or IOS and you’re ready to use a Bluetooth module/app with your projects.
What project are you doing with Bluetooth? Let us know in the comments below!
1 Comment(s)
Hey there, this is a great tutorial. I am pretty new to Arduino and am working on this for a wearable cosplay project. Would the Arduino Metro Mini work for this? Thanks!
Universal Bluetooth receiver with LCD display.


This project uses an Arduino UNO to act as a remote receiver for data sent via Bluetooth from a remote location. The data is displayed on an LCD display and although Bluetooth is used here it could just as easily be Infra Red (for short range communication) or radio (for long range communication). A suitable transmitter will be described in part 2.
Blogs for the Bluetooth unit can be found here and the Liquid Crystal display here.
The wiring for the Bluetooth unit is here, note a logic level shifting board is needed as the HC06 Tx/Rx pins are 3 volt logic. Only connect 3.3 volts to the Logic level shit board if it does not have a 3 volt regulator, otherwise you will burn out the regulator.

The wiring for the LCD display is here

All the components could be mounted on a single breadboard. After the circuit has been built upload the sketch below:
/*
Universal Bluetooth receiver with LCD Display
Uses a 1602a 2 line by 16 character display
and a HC06 Bluetooth Slave
The LCD circuit:
* LCD RS pin to digital pin 12
* LCD Enable pin to digital pin 11
* LCD D4 pin to digital pin 5
* LCD D5 pin to digital pin 4
* LCD D6 pin to digital pin 3
* LCD D7 pin to digital pin 2
* LCD R/W pin to ground
* 10K variable resistor:
* ends to +5V and ground
* wiper to LCD VO pin (pin 3)
The Bluetooth circuit:
* Vcc and Gnd on HC06 to Arduino +5volts and Gnd
* HC06 Tx to Arduino pin 6, through a logic level convertor
* HC06 Rx to Arduino pin 7, through a logic level convertor
*/
// include the libraries:
#include
SoftwareSerial mySerial(6,7); // RX, TX
#include
// Initialize the LCD library with the interface pins
LiquidCrystal lcd(12, 11, 5, 4, 3, 2);
void setup() Serial.begin(9600); // used to debug
// set up the LCD’s number of columns and rows
lcd.begin(16, 2);
mySerial.begin(9600); // default baudrate for the HC06
lcd.setCursor(0,0); // set cursor at the start of the first line
lcd.print(«Universal»);
lcd.setCursor(0,1); // set cursor at the start of the first line
lcd.print(«Serial Receiver»);
>
void loop() if (mySerial.available()) // wait a bit for the entire message to arrive
delay(100);
// clear the screen
lcd.clear();
// Print a message to the LCD
lcd.setCursor(0,0); // set cursor at the start of the first line
lcd.print(«Remote Temp:»);
lcd.setCursor(0, 1); // first character line 2
// read all the available characters
while (mySerial.available() > 0) // display each character to the LCD
lcd.write(mySerial.read());
>
>
>
The sketch prints a string on the first line, in this case Remote Temp: and data sent via Bluetooth on the second line.
I normally use BlueTerm on my Android phone to connect to the HC06, but it sends characters one at a time as they are typed in. I use BlueSerial that allows a sentance to be typed in, then sent. Connect your device to the HC06, you should find it listed as linvor unles you have changed it. Send a sentance of less than 16 characters and it will appear on the second line.
Display Text on an LCD with Bluetooth Using IOS and Android
This HC- 08 module is a very good module for those who are used to Serial Port Profile (SPP) in addition to UART and who begin to explore more about BLE technology. BLE is less power hungry and will prolong the battery life (as it is only sending data as needed). But the drawback is that the data rate is smaller and the transmission distance is slightly reduced.
We will use this HC-08 in a simple project. In this project, we are going to update the text on a 16×2 LCD wirelessly via the HC-08 Bluetooth module, using either Android/IOS devices. The goal is to get you started easily with this BLE module without prior knowledge in BLE protocol. Once you follow through the tutorial, it will be a great kick-starter for you to explore more about the BLE protocol and creating more fun and cool projects using this module!
What you need to get started:
Hardware:
Software
Step 1: Connect your Modules
| HC-08 | Arduino |
| VCC | 3.3V |
| GND | GND |
| TX | 2 |
| RX | 3 |
| LCD | Arduino |
| Pin 1 (VSS) | GND |
| Pin 2 (VDD) | 5V |
| Pin 3 (VO) | Middle pin of Pot |
| Pin 4 (RS) | 12 |
| Pin 5 (RW) | GND |
| Pin 6 (E) | 11 |
| Pin 7-10 (D0-D3) | Not Connected |
| Pin 11 (D4) | 9 |
| Pin 12 (D5) | 8 |
| Pin 13 (D6) | 7 |
| Pin 14 (D7) | 6 |
| Pin 15 (A) | 5V |
| Pin 16 (K) | GND |
Step 2: Upload the Code
Make sure you have selected the correct COM PORT and BOARD under the tools header. Next, proceed to upload the code to your Arduino.
Step 3: The Result
Our maker friend, Vincent, made this video demonstration. It shows how to control the LCD from your Android/IOS devices.
The characteristic and service UUID is fixed and you are not able to create your own characteristic and service UUID like those with more advanced BLE modules (i.e. Nordic based). Supported services: Central and Peripheral UUID FFE0, FFE1 (You need to know this when controlling with IOS apps)
For Android apps:
1) When you open the app, this is the interface you’ll be seeing.
2) Click on the top left hamburger menu icon and select the devices tab.
4) Click on the connect button on the top right to pair your HC-08 device. Don’t forget to turn on your device’s Bluetooth
5) Type in the text that you want to display on the LCD. In our case, it’s «HC08 BLE Module».
6) Submit it and watch the LCD screen update to show your text.
For IOS apps:
1) Once you download the Bluetooth Terminal Apps, launch it. It will start to scan for your surrounding BLE devices. Click on connect to connect to your HC-08 Module.
2) Select the correct characteristic, FFE1, at the top. Then, select ASCII as we are sending text to the LCD.
3) Type in the text you want to display on the LCD and click SEND. In our case, it’s HC08 BLE Module.
4) Check out your LCD, the text should be updated to «HC08 BLE Module»
5) Check out the LCD screen to make sure it updated with the new text
There you have it, just 5 easy steps on either Android or IOS and you’re ready to use a Bluetooth module/app with your projects.
What project are you doing with Bluetooth? Let us know in the comments below!
1 Comment(s)
Hey there, this is a great tutorial. I am pretty new to Arduino and am working on this for a wearable cosplay project. Would the Arduino Metro Mini work for this? Thanks!
Bluetooth control led with lcd led status display real time.
Tthis project is going to show you how to make Bluetooth led control with lcd beside the Arduino sowing the new led status.
Things used in this project
Hardware components
Software apps and online services
Story
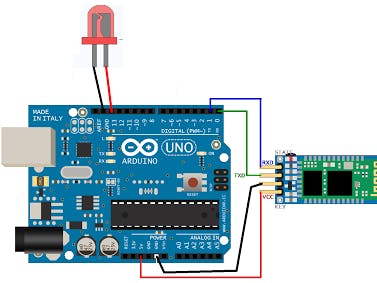
Step#1: Connection.
Connect the TX and RX from the Bluetooth moduel to the Arduino and the VCC and GND.
Then connect the long pin of the led to pin 13 and the short one to GND.
Step#2: LCD Connection
connect the lcd to the Arduino as showed in the pic.
Step#3: connect the smartphone or the laptop with Bluetooth .
for laptop all you need is to connect the Bluetooth then open the serial on the Arduino IDE.
But for the smatphone you need to download an app from play store called ArduDroid or SENA BTerm
Step#4: The Arduino code.
bluetooth_led.ino
when you send 0 the led turn OFF and when you send 1 the led turn ON
Schematics
bluetooth-setup2.png

untitled.png

Code
bluetooth_led.ino
#include LiquidCrystal lcd(12, 11, 5, 4, 3, 2); int ledPin = 13; int state = 0; int flag = 0; void setup() pinMode(ledPin, OUTPUT); digitalWrite(ledPin, LOW); lcd.begin(16, 2); Serial.begin(9600); // Default connection rate for my BT module lcd.setCursor(0, 1); lcd.print("By: Youssef Emad"); > void loop() if(Serial.available()) state = Serial.read(); flag=0; > if (state == '0') digitalWrite(ledPin, LOW); if(flag == 0) lcd.print("LED: off"); delay(1000); lcd.clear(); Serial.println("LED: off"); flag = 1; >> else if (state == '1') digitalWrite(ledPin, HIGH); if(flag == 0) lcd.print("LED: on"); delay(1000); lcd.clear(); Serial.println("LED: on"); flag = 1; >> >