- Связываем две Arduino между собой с помощью блютуз модулей
- Arduino — Bluetooth
- Hardware Required
- About HC-05 Bluetooth Module
- Pinout
- How It Works
- HC-05 Default Settings
- About Bluetooth Serial Monitor App
- Wiring Diagram
- How To Program For Bluetooth
- Arduino sends data to Bluetooth App on Smartphone
- Quick Steps
- Bluetooth App Send data To Arduino
- Quick Steps
- Arduino Code — Control LED with smartphone App via Bluetooth
- Arduino Code — Control Servo Motor with smartphone App via Bluetooth
- Video Tutorial
- Arduino to Arduino Bluetooth Communication using Master Slave Configuration
- Materials Required
- Circuit Diagram
- Initial Configuration of the HC05 modules
Связываем две Arduino между собой с помощью блютуз модулей
Всем привет! Сегодня я покажу вам как связать две Arduino между собой с помощью блютуз модулей.
1. Два модуля HC-05(или один HC-05 и один HC-06)
2. Две платы Arduino(в моём случае это две Arduino Uno)
3. Соединительные провода: в моём случае 8 проводов типа папа-мама, 6 проводов типа папа-папа
5. Светодиод и резистор на 220Ом
7. Компьютер с установленной программой Arduino IDE и драйверами для плат
И так, начнём подготовку наших модулей к прошивке. Чтобы блютуз модули могли связаться между собой, нужно прошить их с помощью AT-команд. Один модуль будет играть роль мастера(пульт управления), а другой — подчинённого(например, робот). Модуль HC-05 можно использовать и в роли мастера, и в роли подчинённого. А модуль HC-06 может играть только роль подчинённого.
Прошить модули можно с помощью USB-переходника.
Но т.к. у меня его нет, я буду использовать в качестве него плату Arduino. Чтобы проверить, может ли плата играть роль такого проводника, нужно:
1. Залить в плату пустой скетч и замкнуть между собой контакты TX и RX
2. Открыть монитор порта, ввести любой символ и нажать Enter. Тот символ, что мы отослали, плата должна вернуть обратно в монитор порта. Если всё именно так, то плату можно использовать в роли переходника.
И так, преступим к прошивке наших модулей. Модуль HС-05 у меня прошивался через Arduino IDE, а HC-06 не хотел. Поэтому чтобы посылать модулю HC-06 AT-команды я буду использовать программу Termite.
Подключаем сначала мастер-модуль HC-05.
Gnd(плата Arduino) — Gnd(HC-05)
Чтобы перевести модуль в режим AT-команд, отключаем питание от модуля, зажимаем кнопку на модуле и подаём питание при зажатой кнопке.
Arduino — Bluetooth
Arduino exchanges data with the smartphone app. The communication between two Arduino via Bluetooth will be presented in another tutorial.
You can use any Android/iOS app. This tutorial will use Bluetooth Serial Monitor App on Android for demonstration.
You can control anything connected to Arduino from the smartphone app. This tutorial will take LED and servo motor as examples.
This tutorial is about using Classic Bluetooth (Bluetooth 2.0). If you are looking for a Bluetooth Low Energy — BLE (Bluetooth 4.0), See this similar tutorial: Arduino — Bluetooth Low Energy
Hardware Required
Or you can buy the following sensor kit:
Please note: These are affiliate links. If you buy the components through these links, We may get a commission at no extra cost to you. We appreciate it.
About HC-05 Bluetooth Module
HC-05 is a Serial Bluetooth module. It works as a Serial to Bluetooth Converter. It does:
Receive data from the Serial RX pin and transmit the data to the paired device (such as a smartphone) via Bluetooth
More specifically, In the context of Arduino communicates with smartphone App (Android/iOS):
Pinout
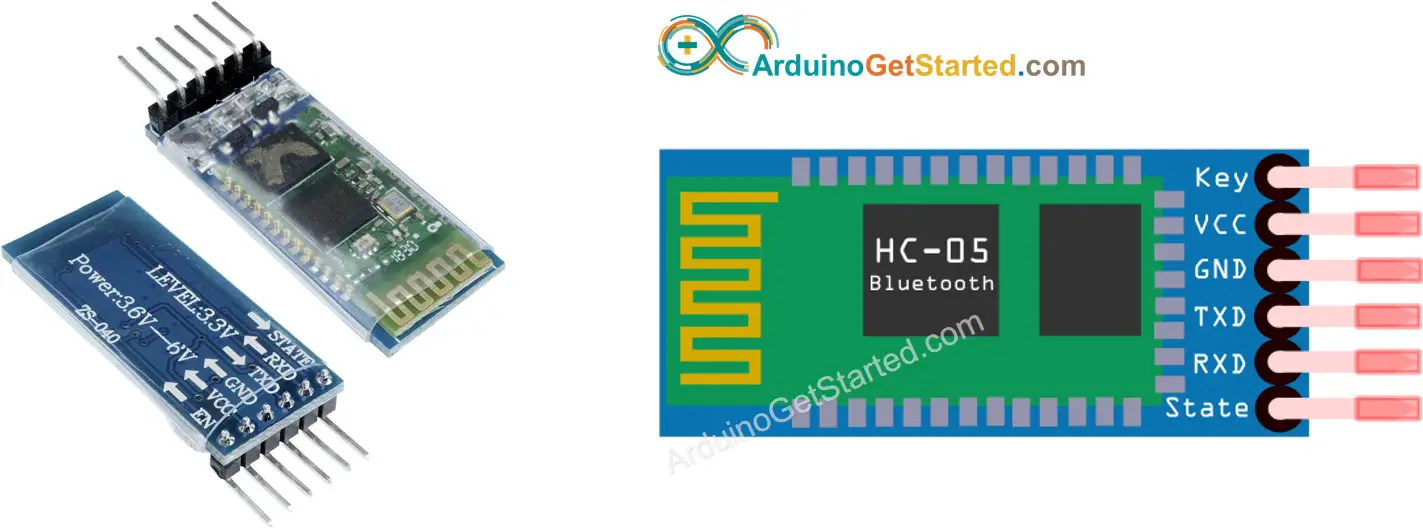
The HC-05 Bluetooth Module has 6 pins:
Enable/Key pin: This pin is used to toggle between Data Mode (set LOW ) and Command mode (set HIGH ). If not connected, it is in Data mode by default
TX pin: Serial data pin, connect this pin to the RX pin of Arduino. The data received via Bluetooth will be sent to this pin as serial data.
RX pin: Serial data pin, connect this pin to the TX pin of Arduino. The data received from this pin will be sent to Bluetooth
State: The state pin is connected to the onboard LED, it can be used as feedback to check if Bluetooth is working properly.
However, for basic functions, we just need to use 4 pins of The HC-05 Bluetooth Module to connect to Arduino.
The HC-05 Bluetooth Module also has two built-in components:
Button: can be used to control the Key/Enable pin to select the operation mode (Data or Command Mode)
How It Works
The HC-05 Bluetooth module has two operation modes:
Fortunately, The HC-05 Bluetooth module can work with Arduino by using the default setting without configuration.
HC-05 Default Settings
| Default Bluetooth Name | “HC-05” |
|---|---|
| Default Password | 1234 or 0000 |
| Default Communication | Slave |
| Default Mode | Data Mode |
| Default Data Mode Baud Rate | 9600, 8, N, 1 |
| Default Command Mode Baud Rate | 38400, 8, N, 1 |
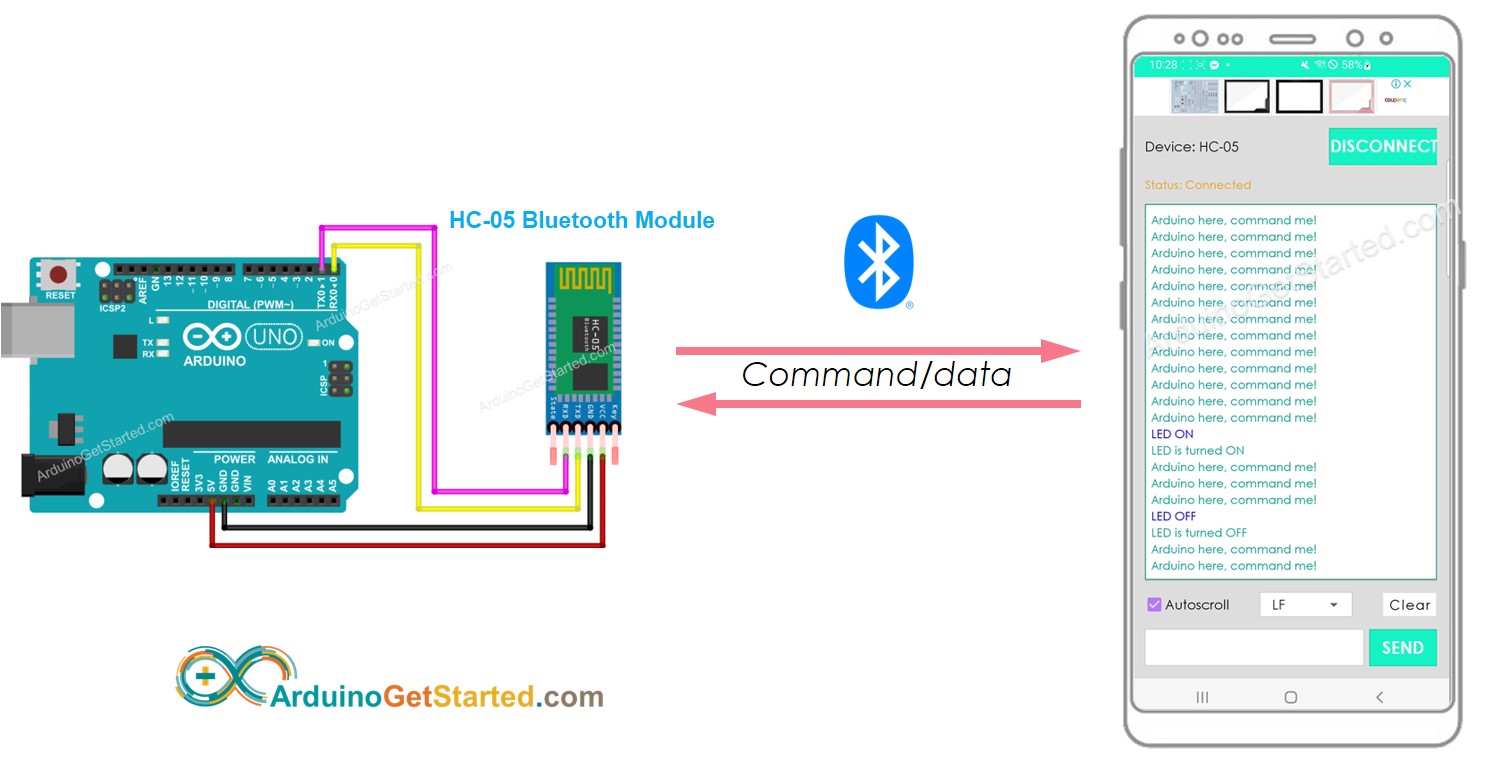
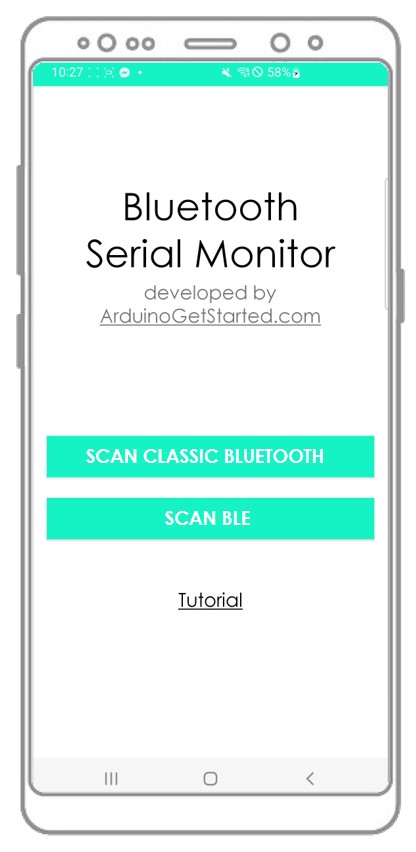
About Bluetooth Serial Monitor App
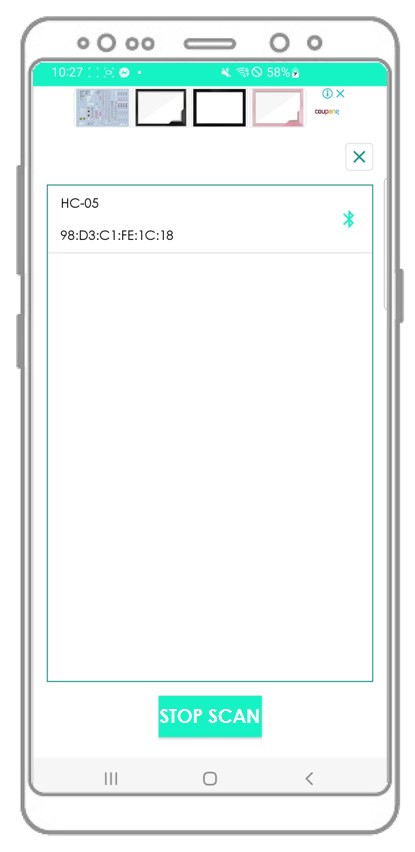
The Bluetooth Serial Monitor App is a mobile app that has the User Interface that looks like the Serial Monitor of Arduino IDE. It communicates with Arduino via Bluetooth. You can interact with Arduino via this app as if Serial Monitor on your PC, without adding any special code for the Bluetooth module in your Arduino code, by doing the following step:
And now you can send/receive data from Arduino just like the Serial Monitor of Arduino IDE. You do not need to modify the existing Arduino code or do not need to add any Bluetooth code to the new Arduino code.
Wiring Diagram
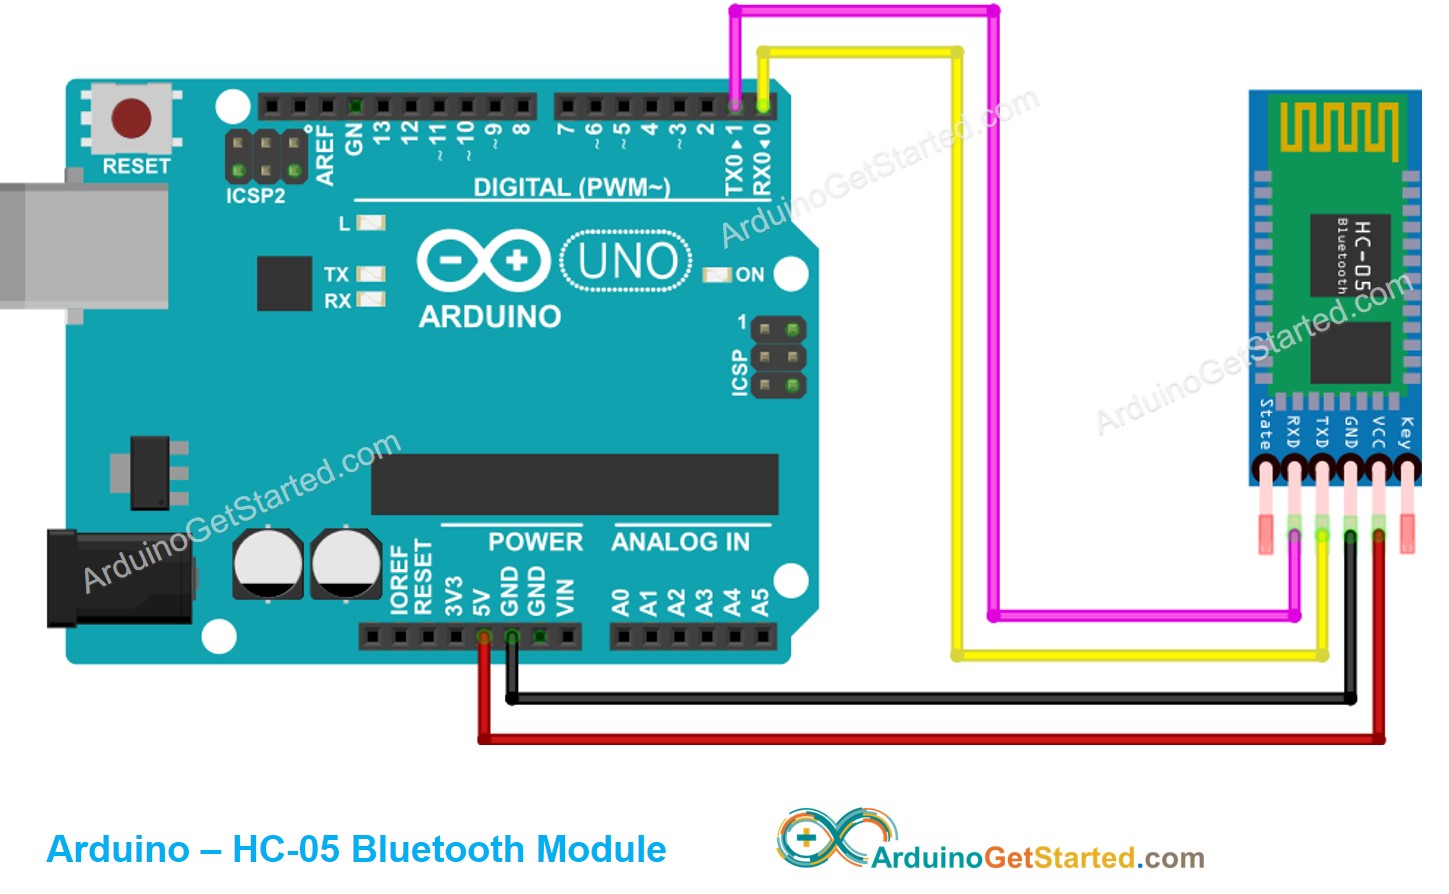
This image is created using Fritzing. Click to enlarge image
| Arduino Pins | HC-05 Bluetooth Pins |
|---|---|
| RX (Pin 0) | TX |
| TX (Pin 1) | RX |
| 5V | VCC |
| GND | GND |
| Enable/Key (NOT connected) | |
| State (NOT connected) |
You can use other Arduino pins by changing the Serial object in the Arduino code to another Serial1, Serial2. or SoftwareSerial if available.
How To Program For Bluetooth
No Bluetooth-dedicated code is required. We just need to use the Serial code.
Arduino sends data to Bluetooth App on Smartphone
To send data from Arduino to Bluetooth App on Smartphone, we need to use the following Arduino code:
In this example, we will send the “Arduino here, command me!” from Arduino to Bluetooth App on Smartphone every second
/* * Created by ArduinoGetStarted.com * * This example code is in the public domain * * Tutorial page: https://arduinogetstarted.com/tutorials/arduino-bluetooth */ void setup () < Serial . begin (9600); >void loop () < Serial . println ( "Arduino here, command me!" ); delay (1000); >
Quick Steps
Click Upload button on Arduino IDE to upload code to Arduino. You may be failed to upload the code to Arduino. If so, disconnect TX and RX pins from Bluetooth module, upload the code, and then reconnect RX/TX pin again.
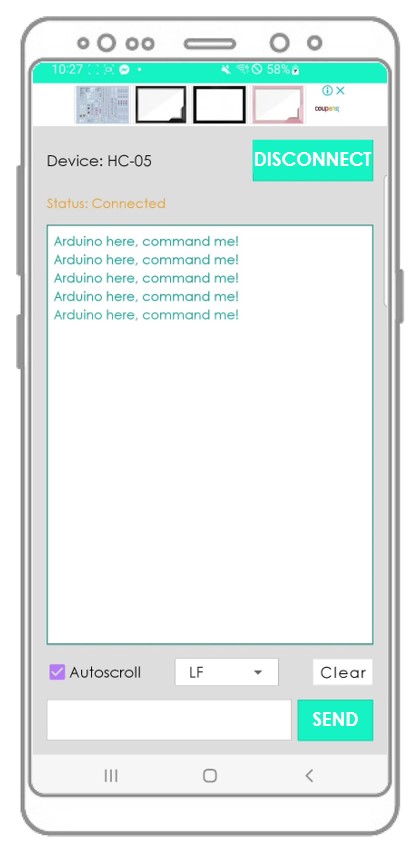
Arduino here, command me! Arduino here, command me! Arduino here, command me! Arduino here, command me! Arduino here, command me!
You will see that the data on the Serial Monitor of Arduino IDE and on the Android App are identical
Bluetooth App Send data To Arduino
Quick Steps
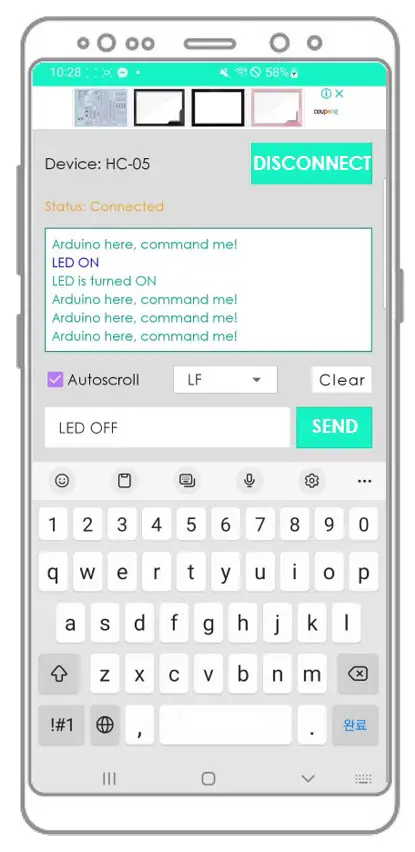
Arduino receives the data and prints the response to the Serial port. This data will be sent to the Bluetooth app
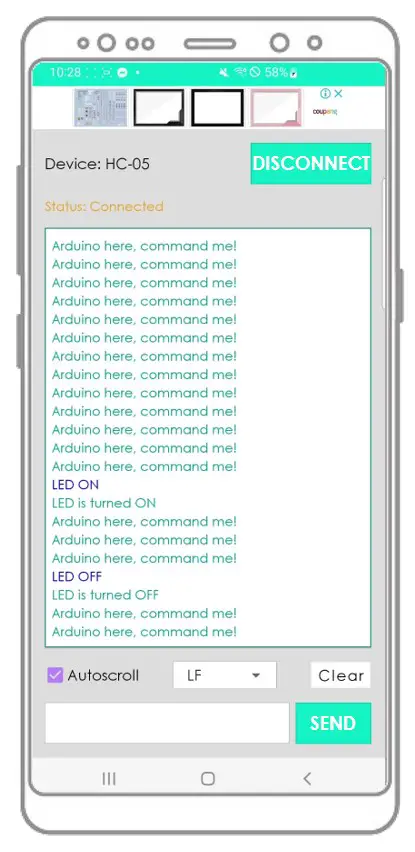
Arduino here, command me! Arduino here, command me! Arduino here, command me! Arduino here, command me! Arduino here, command me! Arduino here, command me! LED ON LED is turned ON Arduino here, command me! Arduino here, command me! Arduino here, command me! LED OFF LED is turned OFF Arduino here, command me! Arduino here, command me!
You will see that the data on the Serial Monitor of Arduino IDE and on the Android App are identical
Arduino Code — Control LED with smartphone App via Bluetooth
The below Arduino example code accepts two commands ( “ON” and “OFF” ) from Bluetooth Serial Monitor App to turn on/off a built-in LED.
You can see the instructions in more detail in Arduino controls LED via Bluetooth/BLE tutorial
Arduino Code — Control Servo Motor with smartphone App via Bluetooth
The below Arduino code received the angle value from Bluetooth Serial Monitor App to control the angle of the servo motor.
/* * Created by ArduinoGetStarted.com * * This example code is in the public domain * * Tutorial page: https://arduinogetstarted.com/tutorials/arduino-bluetooth */ // NOTE: change the Serial to other Serial/Software Serial if you connects Bluetooth module to other pins # include < Servo .h>Servo servo; // create servo object to control a servo int pos = 0; // variable to store the servo position void setup () < Serial . begin (9600); servo. attach (11); // attaches the servo on pin 11 to the servo object >void loop () < if ( Serial . available ()) < // if there is data comming int angle = Serial . parseInt (); if (angle >= 0 && angle <= 180) < servo. write (angle); // rotate servo Serial . print ( "Rotated servo to angle: " ); // reports action to smartphone app Serial . println (angle); >else < Serial . print ( "Invalid angle: " ); // reports invalid value to smartphone app Serial . println (angle); >> >
You can see the instructions in more detail in Arduino controls Servo Motor via Bluetooth/BLE tutorial
If the Bluetooth Serial Monitor app is useful for you, please give it a 5-star rating on Play Store. Thank you!
Video Tutorial
We are considering to make the video tutorials. If you think the video tutorials are essential, please subscribe to our YouTube channel to give us motivation for making the videos.
Arduino to Arduino Bluetooth Communication using Master Slave Configuration

HC-05 Bluetooth Modules are the go-to Bluetooth modules for any Arduino project! It’s easy to hook up and code in the Arduino IDE. In most projects, we usually connect to HC05 to an Arduino and use it to wirelessly communicate with another smart device like a mobile phone. This is fairly simple and we have built many interesting projects with it like Bluetooth Controlled Robot, Bluetooth Voice Control, Bluetooth Home Automation, etc. However, have you ever needed to connect two HC-05s together? It’s not as straightforward connecting an HC05 to a smartphone, there are some additional steps involved. This tutorial will guide you through this process. Let’s jump right in!

Materials Required
- 2x Arduino (Any model will do; I’m using an Arduino Uno R3 and an Arduino Nano)
- 2x HC05 Bluetooth Modules
- Breadboard
- Jumper Wires
- 2x 1kΩ resistor
- 2x 2.2kΩ resistor
Circuit Diagram
This is the basic circuit diagram. Wire up 2 of these circuits, one for master and one for the slave. For the connections, all we are doing here is connecting the HC05 to the Arduino. The Receiver (Rx) pin of the HC05 operates at the 0V to 3.3V range and the Arduino operates at the 0V to 5V range. So, we will use resistors (R1 and R2) to create a voltage divider to reduce the 5V output of the Arduino to 3.3V, so as to not damage the HC05 module.


I’m using 1kΩ for R1 and 2.2KΩ for R2 but you can use any resistor value as long as the R2 is approximately double the value of R1 (R2 ≈ 2R1). Similarly, repeat the circuit for both master and slave, the Arduino Master Bluetooth Circuit and Arduino Slave Bluetooth Circuit are shown below.


Initial Configuration of the HC05 modules
This is the additional step required to connect two HC05 modules together. We need to change some settings inside the HC05 Bluetooth Module, to do this, we have to go into the HC05 module’s AT Command Mode and send commands to it through the Arduino IDE’s serial monitor. To do this, we need to write an Arduino code to send commands through the serial monitor to the HC05.
The code to configure the HC05 module can be found at the bottom of this page, the explanation of the code is as follows
Add the SoftwareSerial library to this code.
Define the transmit (Tx) and Receive (Rx) pin numbers. I’m using pin 2 for Tx and pin 3 for Rx.
Give the Bluetooth connection some name (here I am using configBt), then tell the SoftwareSerial library which pin is Tx and which pin is Rx. The syntax is bluetoothName(Rx, Tx);
SoftwareSerial configBt(rx, tx); // RX, TX
In order to configure the Bluetooth module, the Arduino needs to send commands to it at a baud rate of 38400 baud. Similarly, we set the baud rate of the Bluetooth connection as well to 38400 baud. Set the Transmit (Tx) to the output pin and Receive (Rx) to the input pin
Inside the forever loop, we have the main chunk of the code. The idea here is to send whatever is typed in the textbox in the serial monitor to the HC05 through the Arduino’s Tx pin. Then display whatever is output by the HC05 in the serial monitor.
void loop() < if(configBt.available()) // if the HC05 is sending something… < Serial.print(configBt.readString()); // print in serial monitor > if(Serial.available()) // if serial monitor is outputting something… < configBt.write(Serial.read()); // write to Arduino’s Tx pin > >
Upload this code into the Arduino connected to the master HC05 module first. After uploading the code, plug out the Arduino power cable. Press and hold the button on the HC05. Now plug in the Arduino power cable while still holding the button on the HC05. Alright, now you can release the button on the HC05. This is how you go into the AT mode of the HC05. To check if you have done this right, make sure the red light on the HC05 is blinking approximately every one second (slow blinking!). Normally before the HC05 is connected to any Bluetooth device, it’s red light blinks at a very high frequency (fast blinking!).
Next, open the serial monitor (the serial monitor button is at the top right of the Arduino IDE). At the bottom right corner of the Serial monitor window, if you haven’t already done so, make sure that you set the line ending setting to “Both NL and CL” and baud rate to 38400. Now, type in AT in the serial monitor, if all goes well, you’ll get an “OK” from the HC05 displayed in the serial monitor window. Congratulations! You are have successfully logged into the HC05 module’s AT command mode.
Now, enter the following commands in the table below to configure the master HC05 module:
COMMAND (enter this in the serial monitor and press enter)
RESPONSE (reply from HC05, displayed in the serial monitor)
Function (What does this command do?)