- How to Pair a Logitech Mouse
- In This Article
- What to Know
- How to Pair a Logitech Wireless Mouse With Your PC
- Note:
- How to Pair a Logitech Bluetooth Mouse With Your PC
- Can I Pair Logitech Mouse With Another Receiver?
- Use the Logitech Unifying Software
- Use the Logitech Connection Utility
- Bluetooth vs. Wireless Mice
- Connect your Logitech Bluetooth device
- Make the Most of your warranty
- Frequently Asked Questions
- Select Operating System to show Downloads.
- There are no Downloads for this Version.
- Compatible Product
- Product Specific Phone Numbers
- Main Phone Numbers
- STILL NEED HELP?
- Bluetooth Setup for Mouse
- The LED should be blinking fast
- Complete the pairing to your computer
- Install Logi Options+
- Connect the MX Master mouse to a Bluetooth device
How to Pair a Logitech Mouse
Saikat has been a technology writer for 12+ years. His writing has appeared at MakeUseOf, OnlineTechTips, GoSkills, and many others.
Ryan Perian is a certified IT specialist who holds numerous IT certifications and has 12+ years’ experience working in the IT industry support and management positions.
In This Article
What to Know
- Wireless (non-Bluetooth): Connect the wireless receiver to the USB port on the PC and switch on the mouse.
- Bluetooth: Go to Settings >Bluetooth & other devices >Add device >Bluetooth.
- A Logitech mouse pairs with one wireless receiver at a time, though there are workarounds.
This article covers how to pair a Logitech mouse with your computer, including using Bluetooth for the pairing and how to pair with the Logitech Unifying software or Connection Utility software.
How to Pair a Logitech Wireless Mouse With Your PC
Unpack the Logitech mouse from its box and insert a battery into the mouse. Always make sure you align the batteries in the right direction. Misalignment with the positive and negative contacts is a simple mistake.
:max_bytes(150000):strip_icc()/001_pair-with-logitech-mouse-5184314-39d6544931294e63ae8a7f6b09a480ff.jpg)
- The mouse comes with a small Bluetooth receiver. Take the USB receiver and plug it into one of your computer’s open USB slots.
:max_bytes(150000):strip_icc()/001_pair-with-logitech-mouse-5184314-4605bf6e19a8496392a718879a75f3e3.jpg)
The mouse will connect automatically. The wireless receiver is displayed as USB Receiver in the list of Bluetooth devices.
:max_bytes(150000):strip_icc()/002_pair-with-logitech-mouse-5184314-8df193eb4d24464cb5d12a260d752be4.jpg)
Slide the power switch on the body of the mouse to turn it on.
Note:
Some wireless Logitech mice can have a small Connect button on the base. Switch it on after plugging in the wireless receiver.
How to Pair a Logitech Bluetooth Mouse With Your PC
A Bluetooth mouse doesn’t come with a wireless receiver. The setup for this type of mouse is like pairing any other Bluetooth device with your Bluetooth-enabled PC.
Unpack the Logitech Bluetooth mouse and insert the battery. Use the switch on the mouse to turn it on.
The instructions below apply specifically to Windows 11, but the steps are similar for all versions of Windows.
:max_bytes(150000):strip_icc()/003_pair-with-logitech-mouse-5184314-28806aa57149495fa2b9d5a4ac7dd13d.jpg)
- Go to the Start Menu and select Settings. Alternatively, press Windows key + I to open Settings with the keyboard shortcut.
In Windows 10, go to Devices > Bluetooth & other devices > Add Bluetooth or other device.
:max_bytes(150000):strip_icc()/004_pair-with-logitech-mouse-5184314-bc8da38e57724a0a818242dd4e9b8430.jpg)
:max_bytes(150000):strip_icc()/005_pair-with-logitech-mouse-5184314-caf9ad2a9ff64cddb00eadf5b74f9be0.jpg)
Select Bluetooth in the Add a device window.
Can I Pair Logitech Mouse With Another Receiver?
A Logitech wireless mouse can pair with one receiver at a time. So, you cannot pair a Logitech wireless mouse with another receiver if you lose one of these tiny plugs. But there are two workarounds offered by Logitech if you lose the original receiver.
Use the Logitech Unifying Software
Purchase the Unifying USB receiver from Logitech. The dongle gives you the benefit of connecting six wireless devices to one receiver. The wireless devices from Logitech should support the Unifying technology. Look for the orange Unifying logo.
Do note that a mouse works with one receiver at a time. So, it will no longer work with its original receiver if you pair it with a Logitech Unifying receiver.
Use the Logitech Connection Utility
The Logitech Connection Utility is a simple executable software that can help you pair a Logitech mouse with another receiver. Follow the simple on-screen instructions—switch the slider off and on to sync the Logitech wireless mouse with a different receiver.
The Logitech Connection Utility is Windows-only software. Do note it might not work with all Logitech mouse models.
Bluetooth vs. Wireless Mice
A Bluetooth mouse and a wireless mouse are both “wireless.” But they differ in the way they connect with the computer. A wireless mouse uses a dedicated receiver that plugs into the USB port on the computer, while a Bluetooth mouse uses the computer’s Bluetooth antenna to pair with the mouse.
Locate the Bluetooth pairing button on your mouse, which is typically a toggle button on the bottom of the device. Turn the switch on and make sure the mouse is on before pairing with a compatible computer or another device.
On Bluetooth mice, make sure the device and Bluetooth pairing modes are on. Try disabling and enabling Bluetooth on your mouse and computer to see if that clears up the issue. If your device uses a Unifying Receiver and the Unifying Receiver Software can’t find your mouse, turn it off and on again to restart the receiver pairing process.
Connect your Logitech Bluetooth device
The following steps show you how to prepare your Logitech device for Bluetooth pairing and then how to pair it to computers or devices running:
Prepare your Logitech device for Bluetooth pairing
Most Logitech products are equipped with a Connect button and will have a Bluetooth Status LED. Usually the pairing sequence is started by holding down the Connect button until the LED starts blinking rapidly. This indicates that the device is ready for pairing.
NOTE: If you’re having trouble starting the pairing process, please refer to the user documentation that came with your device, or visit the support page for your product at support.logitech.com.
Windows
Select the version of Windows you’re running and then follow the steps to pair your device.
- Open the Control Panel.
- Select Hardware and Sound.
- Select Devices and Printers.
- Select Bluetooth Devices.
- Select Add a device.
- In the list of Bluetooth devices, select the Logitech device you want to connect to and click Next.
- Follow the onscreen instructions to finish pairing.
- Go to Apps, then find and select Control Panel.
- Select Devices and Printers.
- Select Add a device.
- In the list of Bluetooth devices, select the Logitech device you want to connect to and select Next.
- Follow the onscreen instructions to finish pairing.
- Select the Windows icon, then select Settings.
- Select Devices, then Bluetooth in the left pane.
- In the list of Bluetooth devices, select the Logitech device you want to connect to and select Pair.
- Follow the onscreen instructions to finish pairing.
NOTE: It may take up to five minutes for Windows to download and enable all drivers, depending on your computer’s specifications and your internet speed. If you have not been able to connect your device, repeat the pairing steps and wait a while before you test the connection.
- Open System Preferences and click Bluetooth.
- Select the Logitech device you want to connect to from the Devices list and click Pair.
- Follow the onscreen instructions to finish pairing.
Upon pairing, the LED light on your Logitech device stops blinking and glows steady for 5 seconds. The light then turns off to save energy.
- Click the status area in the lower right corner of your desktop.
- Click Bluetooth enabled or Bluetooth disabled in the pop-up menu.
NOTE: If you had to click on Bluetooth disabled, that means the Bluetooth connection on your Chrome device needs to first be enabled. - Select Manage devices. and click Add Bluetooth device.
- Select the name of the Logitech device you want to connect to from the list of available devices and click Connect.
- Follow the onscreen instructions to finish pairing.
Upon pairing, the LED light on your Logitech device stops blinking and glows steady for 5 seconds. The light then turns off to save energy.
- Go to Settings and Networks and select Bluetooth.
- Select name of the Logitech device you want to connect from the list of available devices and click Pair.
- Follow the onscreen instructions to finish pairing.
Upon pairing, the LED light on the Logitech device stops blinking and glows steady for 5 seconds. The light then turns off to save energy.
- Open Settings and click Bluetooth.
- Tap on the Logitech device you want to connect to from the Other Devices list.
- The Logitech device will be listed under My Devices when paired successfully.
Upon pairing, the LED light on the Logitech device stops blinking and glows steady for 5 seconds. The light then turns off to save energy.
Make the Most of your warranty
Frequently Asked Questions
Onboard Memory Manager is out of date. Please update to the most recent release.
Select Operating System to show Downloads.
There are no Downloads for Operating Systems not listed.
There are no Downloads for this Version.
Compatible Product
Product Specific Phone Numbers
Main Phone Numbers
STILL NEED HELP?
Want to ask other users with the same product a question? Join the conversation.
webcontent=productfaq webproduct=b8a1ac56-7db0-11e9-b911-714ff9e68ca5 webproduct=d7f7d4e2-7db0-11e9-b911-d93001d5ce16 webproduct=0c6c2cd1-7db1-11e9-bada-61947558b086 webproduct=31cad2d7-7db1-11e9-aa7f-790ecf88cee6 webproduct=447718f1-7db1-11e9-b911-6f73f4bd7235 productfaq webproduct=b8658e43-7db0-11e9-bada-c300954f794e webproduct=c9a8a71e-7db0-11e9-b911-132d64b4f414 webproduct=d7bceebe-7db0-11e9-b911-cf0c2eceafa3 webproduct=051e0e67-7db1-11e9-aa7f-5d52912120ab webproduct=12ba4013-7db1-11e9-bada-7159e9fbfca2 webproduct=15260fff-7db1-11e9-bada-253c82757be5 webproduct=24117cc4-7db1-11e9-bada-3f845b332bd7 webproduct=26822f1d-7db1-11e9-b911-efc6f3bea27a webproduct=29376467-7db1-11e9-aa7f-3d1e1009da0f webproduct=445930fd-7db1-11e9-aa7f-413acd83506d webproduct=ca07de6d-7db0-11e9-aa7f-bf43a2dcd9e1 webproduct=8f99caf6-3691-11ea-9bc6-a19f7ceaf618 webproduct=28642a7b-838a-11ea-a170-f1905b49277c webproduct=367fde0e-c01f-11ea-bec4-43206c54cfdc webproduct=9332824e-fbd8-11ea-8cd7-f5f119a88f6e webcontent=needs_translating webproduct=94919da3-fbd8-11ea-8fca-d79d15495b4d webcontentid=2daf6985-a8f0-11eb-96f2-0fbdb7c09546 webproduct=29c6346c-51d2-11ec-a124-1b783df1ac49 webproduct=e6af8b73-51b4-11ec-a124-2148ee759dbb webproduct=f482acdd-51f3-11ec-b39d-1bf9ea108e8f webproduct=eb6c1883-51f5-11ec-bf63-a344b07e9eb7 webproduct=5b57913e-51f7-11ec-ab59-f5ee15fee349 webproduct=b1884a56-9371-11ed-a410-874d4cc98b43
Bluetooth Setup for Mouse

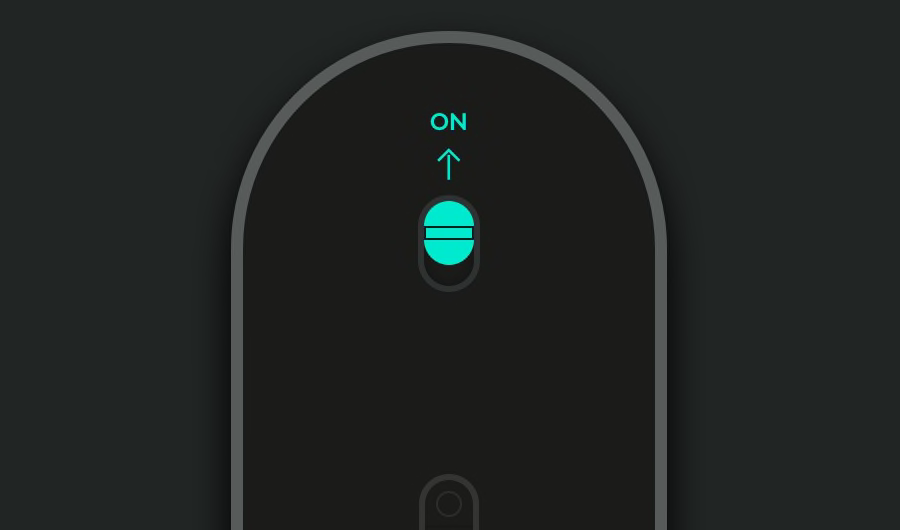
Find the switch on the bottom of your mouse and switch it to the ON position.
If there is no power, try plugging the mouse in with the cable provided.

The LED should be blinking fast
If not, press and hold the Easy-Switch™ button (on bottom of mouse) for 3 seconds. When the light begins blinking, the mouse is ready to pair with your computer.

Complete the pairing to your computer
On your computer find the Bluetooth ® settings menu and connect your mouse from there.
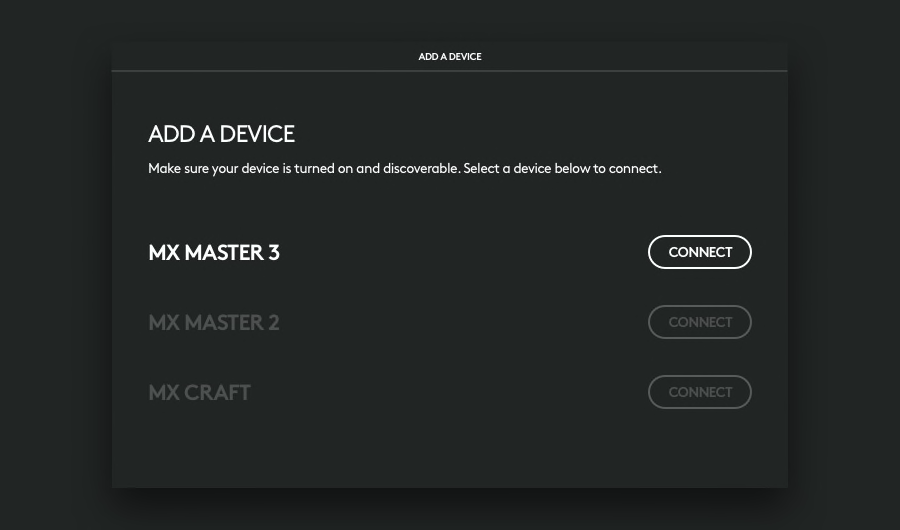

Install Logi Options+
Logi Options+ is a powerful and easy-to-use application that enhances your experience using Logitech mice and keyboards by enabling you to customize them to work how you want.
Connect the MX Master mouse to a Bluetooth device
To connect your mouse to a computer running Windows 8:
- Turn the mouse on by sliding the power switch on the bottom of the mouse up.
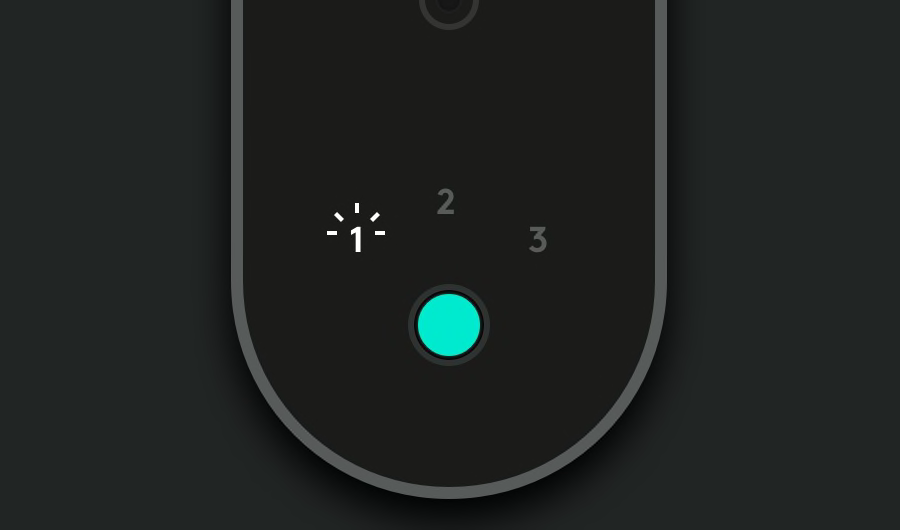
- Using the device selector button, select 1, 2, or 3. You can save up to three devices to memory on the mouse.
NOTE: If the number blinks rapidly when you first select it, it’s ready to connect. If so, go to step 4. Otherwise, continue to step 3. - Press and hold the connect button on the mouse until the number you selected starts blinking rapidly.
- Add the mouse to your computer:
- On the Start screen, right-click in an empty space, and then select All apps >Control Panel >Devices and Printers
NOTE: If you can’t locate «Devices and Printers», set the Control Panel to «View by: Small icons». You should then be able to see all Control Panel items.
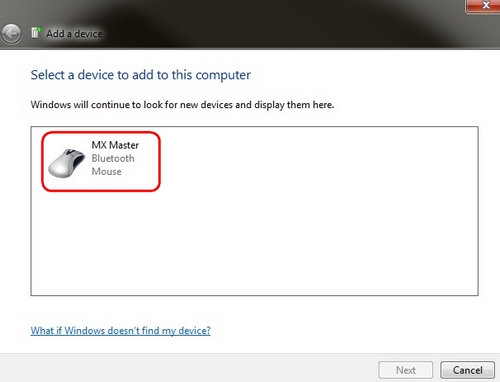
- In the Devices and Printers window, click Add a device.
- Choose “MX Master” from the device list and then click Next.
 A status screen will appear while the connection is configured.
 - When the pairing is complete, you’ll see a confirmation screen. Click Close to exit.
 A status screen will appear while the connection is configured.
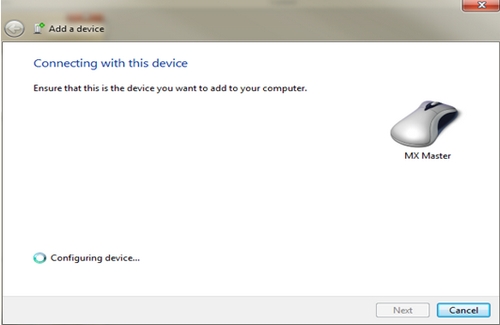

NOTE: If the MX Master is already paired but having a problem connecting, remove it from the device list and then follow the instructions above to re-connect it.
Connect to Mac OS X 10.10 or later
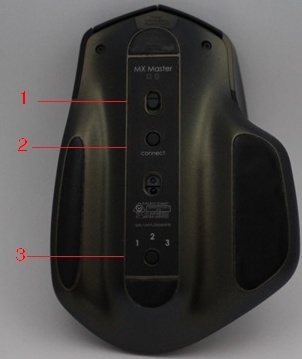
1 — Power switch
2 — Connect button
3 — Device selector button
To connect your mouse to a Mac:
- From the Apple menu, select System Preferences.
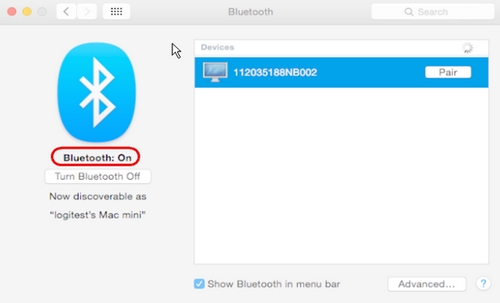
- In System Preferences, click the Bluetooth icon.
- In the Bluetooth pane, make sure that Bluetooth is On.
- Turn the mouse on by sliding the power switch on the bottom of the mouse up.
- Using the device selector button, select 1, 2, or 3. You can save up to three devices to memory on the mouse.
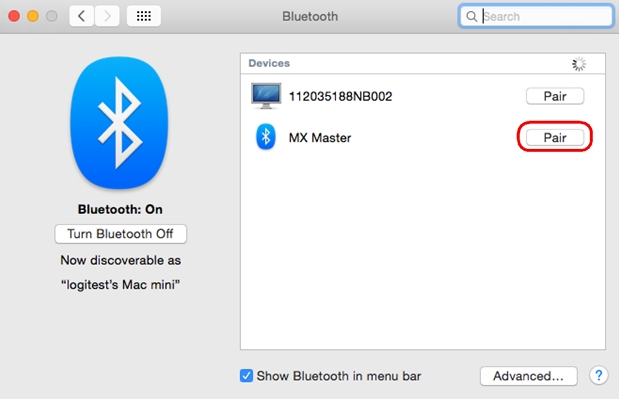
- Press the connect button on your mouse to start pairing.
- In the Bluetooth window on your Mac, click Pair to complete pairing.
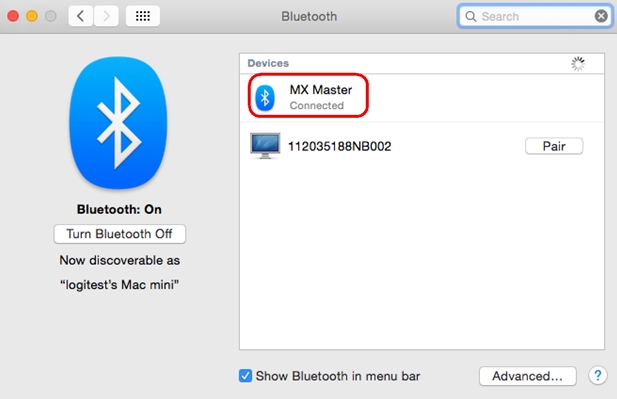
- Once the pairing is complete, MX Master will show as “Connected”.