- How to Boot Debian 11 into Rescue / Emergency Mode
- Boot Debian 11 Into Rescue Mode
- Boot Debian 11 into Emergency Mode
- 1 thought on “How to Boot Debian 11 into Rescue / Emergency Mode”
- Leave a Comment Cancel reply
- Recent Posts
- Pages
- Ubuntu Wiki
- Booting into recovery mode
- See also
- How to Boot into Rescue Mode Or Emergency Mode In Ubuntu 20.04 / 18.04
- On this page
- Booting Ubuntu 20.04 in Rescue Mode
- Booting Ubuntu 20.04 in Emergency Mode
How to Boot Debian 11 into Rescue / Emergency Mode
Booting a Linux system into rescue mode or single user mode is one of the important troubleshooting for Linux admins. Rescue mode is also known as single user mode. Generally Linux system is booted into rescue mode in order to recover forgotten root password and to repair and fix corrupted file system.
Apart from the rescue mode, Linux system can be booted into emergency mode, the main difference between them is that rescue mode loads a minimal environment with read only root file system whereas emergency mode doesn’t mount root file system.
In this guide, we will learn how to boot Debian 11 (Bullseye) into Rescue (or Single User Mode) and emergency mode.
Boot Debian 11 Into Rescue Mode
Reboot Debian 11 system and go to boot loader (Grub) screen and select “Debian GNU/Linux”.
Note: If the system is booting up using default BIOS settings, then hold down the Shift key to go boot loader screen. In case of UEFI booting, press ESC key couple of time to go to bootloader screen.
The Grub (boot loader) screen would look like below,

Press “e” and then go the end of line which starts with word “linux” and append “init=/bin/bash” .
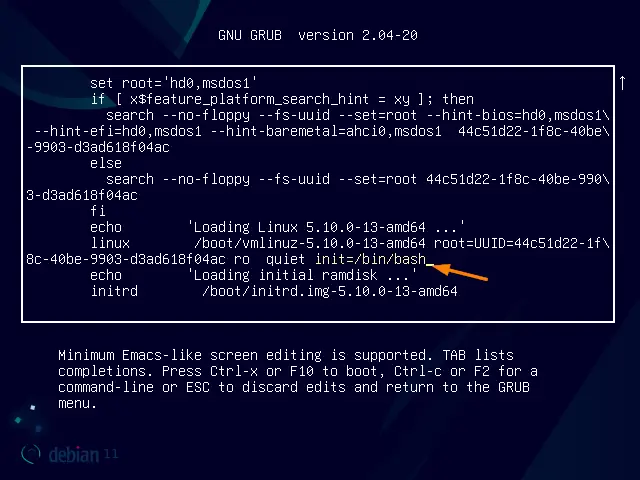
Now Press Ctrl-x or F10 to boot, we will get the following screen
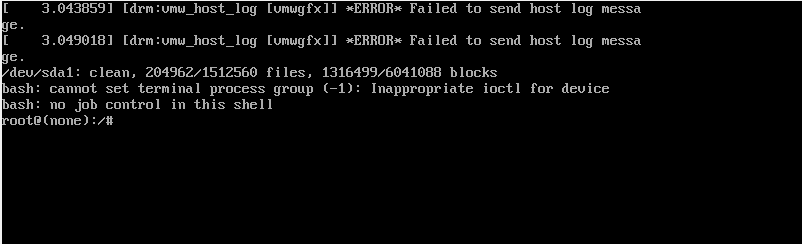
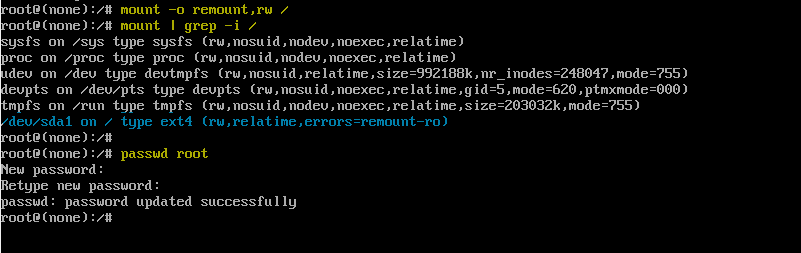
Mount the root file system in read-write mode, run
Once the file system is mounted in rw mode then we can execute admin like resetting root password.
Once you are done with all troubleshooting, reboot the system by pressing Ctrl + Alt + Del
Boot Debian 11 into Emergency Mode
Reboot your Debian 11 system and go to grub (boot loader) screen
Press “e” and go to end of line which starts with word linux and append “systemd.unit=emergency.target”.
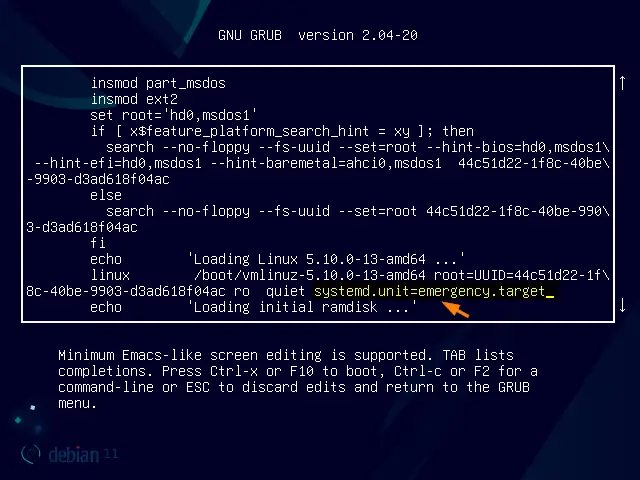
Now press Ctrl-x or F10 to boot into emergency mode.
Note: In case root password is already set in your Debian 11 system then you must enter root password to enter in emergency mode. So, in my case I have already set the root password.
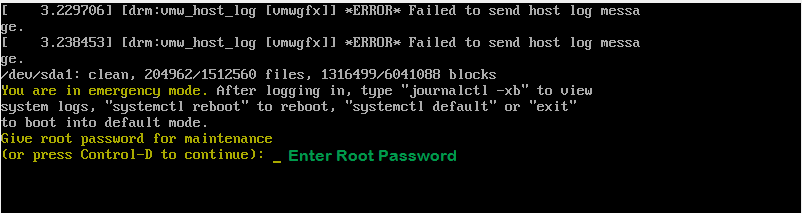
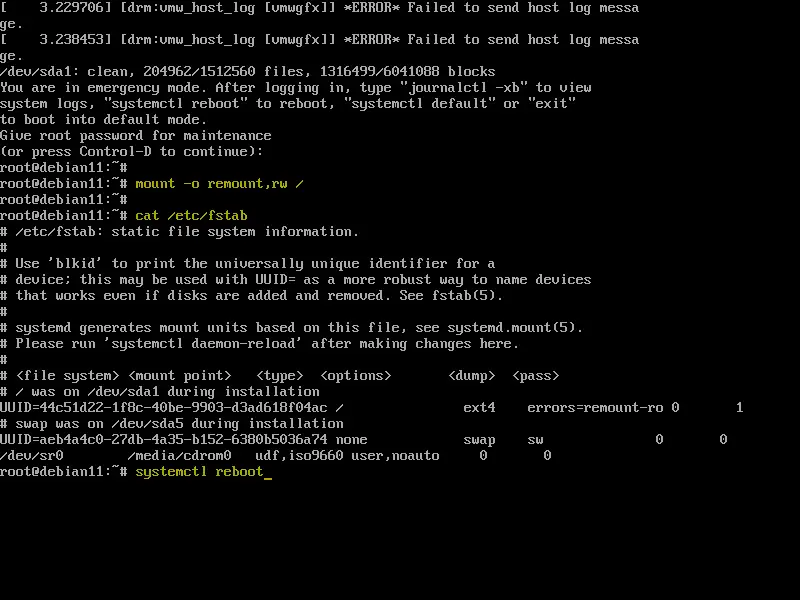
Enter root user password to get the shell and use “ mount -o remount,rw /” command to mount the root file system in read-write mode.
Perform the troubleshooting steps and type ‘ systemctl reboot ’ to reboot the system.
That’s all from this guide, I hope you have found it informative. Kindly do share your feedback and queries in below comments section.
1 thought on “How to Boot Debian 11 into Rescue / Emergency Mode”
Hi In the first section: Reboot your server and go to boot loader (Grub) screen How do we get to this GRUB screen, if the system always boots to the login screen (even with or without pressing SHIFT key)? Thanks Reply
Leave a Comment Cancel reply
Recent Posts

- How to Install PHP 8 on RHEL 8 / Rocky Linux 8 / CentOS 8
- How to Install and Use Wireshark in Ubuntu 22.04
- Top 10 Things to Do After Installing Debian 12 (Bookworm)
- How to Install Debian 12 (Bookworm) Step-by-Step
- How to Upgrade Debian 11 to Debian 12 (Bookworm) via CLI
- How to Setup Dynamic NFS Provisioning in Kubernetes Cluster
- How to Install Nagios on Rocky Linux 9 / Alma Linux 9
- How to Install Ansible AWX on Kubernetes Cluster
- How to Install Docker on Fedora 38/37 Step-by-Step
- How to Setup High Availability Apache (HTTP) Cluster on RHEL 9/8
Pages
Ubuntu Wiki
If your system fails to boot for whatever reason, it may be useful to boot it into recovery mode. This mode just loads some basic services and drops you into command line mode. You are then logged in as root (the superuser) and can repair your system using command line tools. If booting into recovery mode does not work you can still use your installation CD (if it is a live cd) as described in LivecdRecovery.
Booting into recovery mode
- Switch on your computer.
- Wait until the UEFI/BIOS has finished loading, or has almost finished. (During this time you will probably see a logo of your computer manufacturer.) Note: UEFI fast boot may be too fast to give time to press any key.
- With BIOS, quickly press and hold the Shift key, which will bring up the GNU GRUB menu. (If you see the Ubuntu logo, you’ve missed the point where you can enter the GRUB menu.) With UEFI press (perhaps several times) the Escape key to get grub menu.
- Select the line which starts with «Advanced options«.
- Select the line ending with «(recovery mode)«, probably the second line, something like:
Ubuntu GNU/Linux, with Linux 3.8.0-26-generic (recovery mode)
NOTE 1: If you have Ubuntu Quantal (12.10) or earlier, omit step 4 (the recovery mode menu items are displayed on the top-level menu).
NOTE 2: If you reboot, there is no need to hold the Shift key in step 3. The GNU GRUB menu will continue to be displayed automatically on each boot until a normal startup of Ubuntu completes. To configure GRUB so the menu is always displayed, even after a normal startup, see https://help.ubuntu.com/community/Grub2/Setup.
See also
How to Boot into Rescue Mode Or Emergency Mode In Ubuntu 20.04 / 18.04
It’s not uncommon for users to forget their login passwords or have their system suffer a corrupt filesystem. When that happens, the recommended solution is to boot into rescue or emergency mode and apply the required fixes.
The rescue mode is also referred to as the single-user mode. As the name suggests, the rescue mode is used when you want to salvage your system from a system failure, for example, boot failure or reset a password. In rescue mode, all the local filesystems are mounted. However, only salient services are started. Normal services such as network services will not be started.
Emergency mode provides a minimal bootable environment and enables you to repair your Linux system even when rescue mode is not available. In emergency mode, only the root file system is mounted, and in read-only mode. Just as with rescue mode, only the essential services are activated in emergency mode.
In this guide, you will learn how to boot into rescue mode or emergency mode in Ubuntu 20.04 / 18.04.
On this page
Booting Ubuntu 20.04 in Rescue Mode
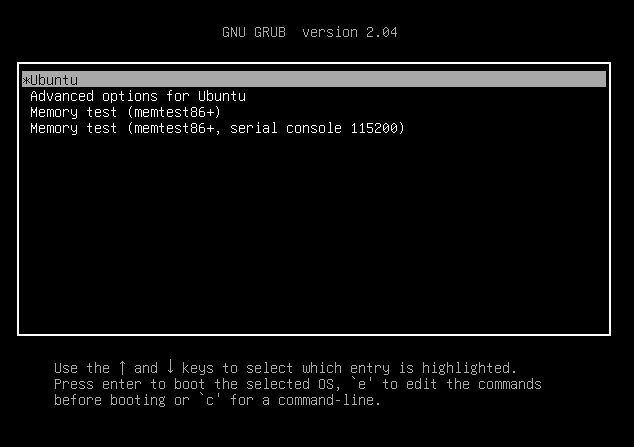
To get started, boot, or reboot your system. You will get the grub menu with options listed as shown. If you are running Ubuntu as a VM in VirtualBox, press the ESC button.
By default, the first option is selected. With the first option selected, press the ‘e’ key on the keyboard to access the grub parameters.
Scroll and locate the line that starts with ‘linux’ . Go to the very end of the line by pressing ctrl + e and delete the string “$vt_handoff” .
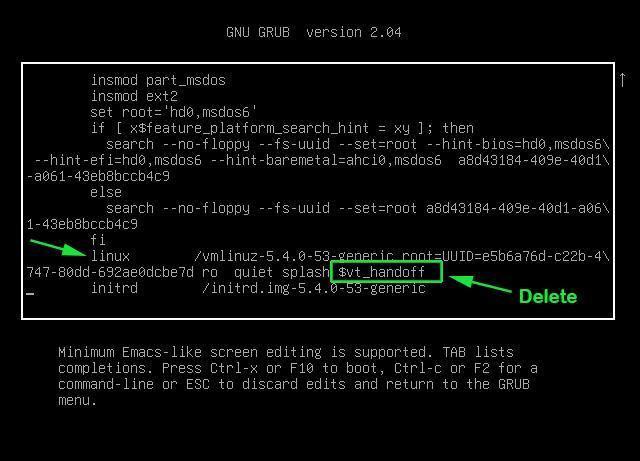
Next, append ‘systemd.unit=rescue.target’ at the end of the line.
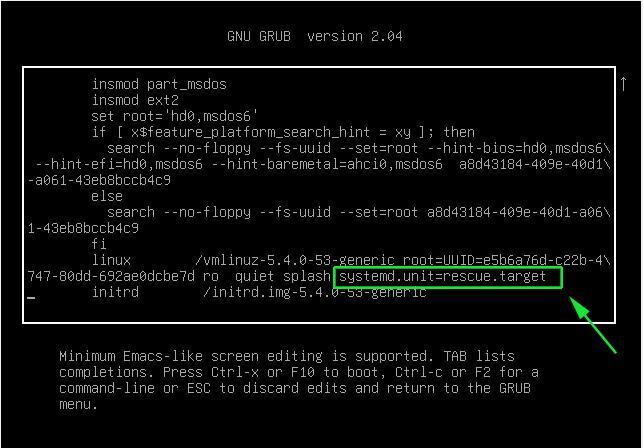
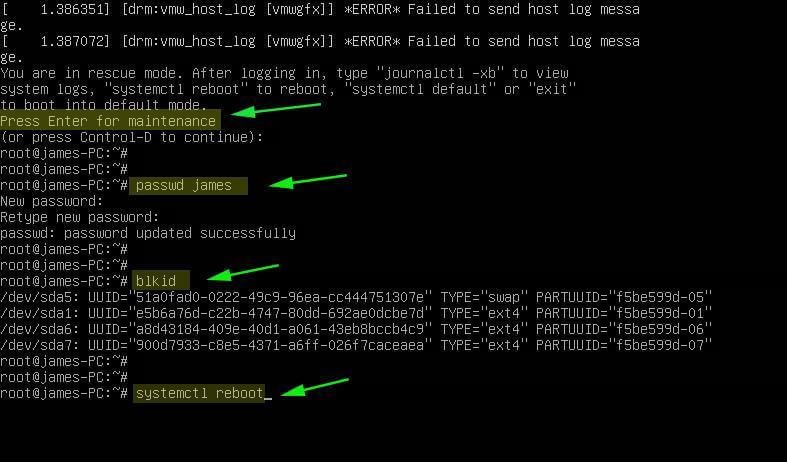
To boot the system into rescue mode, press ctrl + x . Proceed and press ENTER on your keyboard to gain access to the rescue mode. From there you can perform operations such as changing a user’s password. In the example below, I have managed to reset my password.
In rescue mode, all filesystems are mounted in read & write mode and you can run almost any commands just as you would in a normal session. Once you are done, reboot the system to save the changes using the command:
# passwd james # blkid # systemctl reboot
Booting Ubuntu 20.04 in Emergency Mode
As we mentioned earlier, in emergency mode, all files are mounted in read-only mode. The emergency mode comes in handy especially when it’s not possible to boot into rescue mode due to file system corruption.
To boot into emergency mode, reboot or boot your system. On the grub menu, ensure that the first option is highlighted and press the ‘e’ key on the keyboard to access the grub parameters.
Once again, navigate to the end of the line by pressing ctrl + e and delete the string “$vt_handoff” .
Next, append the ‘systemd.unit=emergency.target’ string at the end of the line.
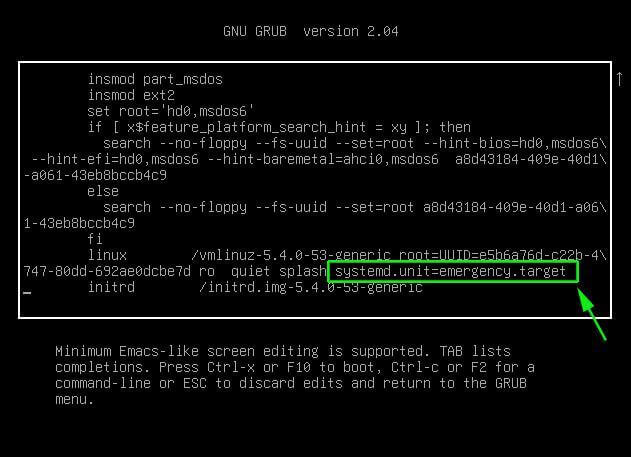
Thereafter, press ctrl + x to reboot into emergency mode. Hit ENTER to access the root filesystem. From here you can view various files on your Linux system. In this example, we are viewing the contents of the /etc/fstab to see the mount points that are defined.
# cat /etc/fstab # mount -o remount,rw / # passwd root # systemctl reboot
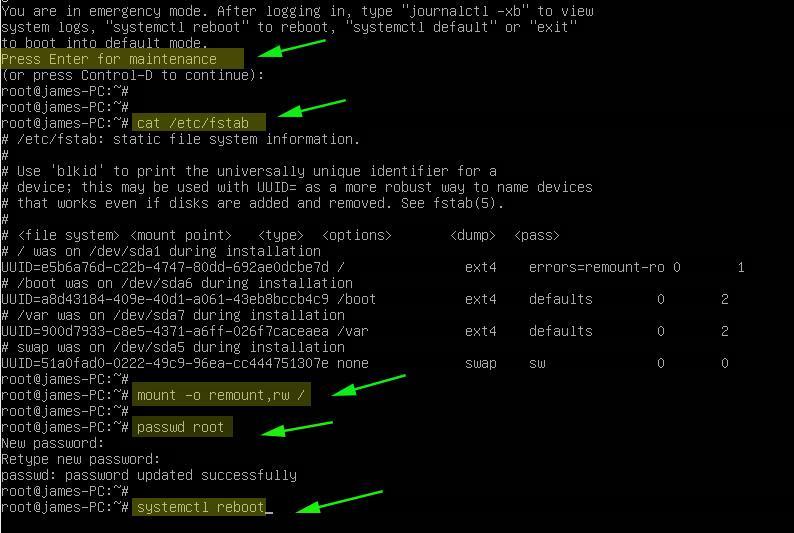
To make any changes to the system, you need to mount it in read and write mode as shown.
From here, you can perform any troubleshooting tasks such as changing the root password as shown. Once you are done, reboot for the changes to come into effect.
This draws the curtain on this article. Hopefully, you can now access both the rescue and emergency mode and fix system issues in the Ubuntu system.