- Boot linux iso in windows
- What You’ll Need
- Creating a Bootable Kali USB Drive on Windows (Etcher)
- Creating a Bootable Kali USB Drive on Windows (Rufus)
- Booting A USB Drive In Windows
- Как создать загрузочную флешку с Linux (при работе в Windows). Cкрины настроек из бесплатных программ
- Подготовка установочной флешки (с Linux)
- Ventoy
- Rufus
- Etcher
Boot linux iso in windows
One of the fastest method, for getting up and running with Kali Linux is to run it “live” from a USB drive. This method has several advantages:
- It’s non-destructive — it makes no changes to the host system’s hard drive or installed OS, and to go back to normal operations, you simply remove the Kali Live USB drive and restart the system
- It’s portable — you can carry Kali Linux in your pocket and have it running in minutes on an available system
- It’s customizable — you can roll your own custom Kali Linux ISO image and put it onto a USB drive using the same procedures
- It’s potentially persistent — with a bit of extra effort, you can configure your Kali Linux “live” USB drive to have persistent storage, so the data you collect is saved across reboots
In order to do this, we first need to create a bootable USB drive which has been set up from an ISO image of Kali Linux.
The specifics of this procedure will vary depending on whether you’re doing it on a Linux, macOS/OS X, or Windows system.
What You’ll Need
- A verified copy of the appropriate ISO image of the latest Kali build image for the system you’ll be running it on.
- If you’re running under Windows, there is not one tool that is considered the overall best for imaging. We recommend Etcher(installer or portable) as it is simpler to use, however Rufus is another popular option with its advance options. If one does not work for you, consider the other.
- A USB drive, 8GB or larger (Systems with a direct SD card slot can use an SD card with similar capacity. The procedure is identical.)
During this procedure, you might see some warnings telling you that Kali Linux contains malware, trojan, virus or whatever. This message usually comes from Windows Defender or USB Defender, or a third-party antivirus. Those warnings are expected: Kali Linux is packed with pentesting tools that are likely to be flagged as malware. Just ignore the warnings.
Creating a Bootable Kali USB Drive on Windows (Etcher)
- Plug your USB drive into an available USB port on your Windows PC, note which drive designator (e.g. “ G:\ ”) it uses once it mounts, and launch Etcher.
- Click Flash from file, and locate the Kali Linux ISO file to be imaged with.
- Click Select target and choose the USB drive you want to make bootable.
- Click the Flash! button once ready.
Note: You may get a UAC prompt asking for administrator privileges that you will need to accept.

5. Once Etcher alerts you that the image has been flashed, you can safely remove the USB drive and proceed to boot into Kali with it.
At the time of writing, Etcher will use MBR. This is to allow for the most hardware compatibility.
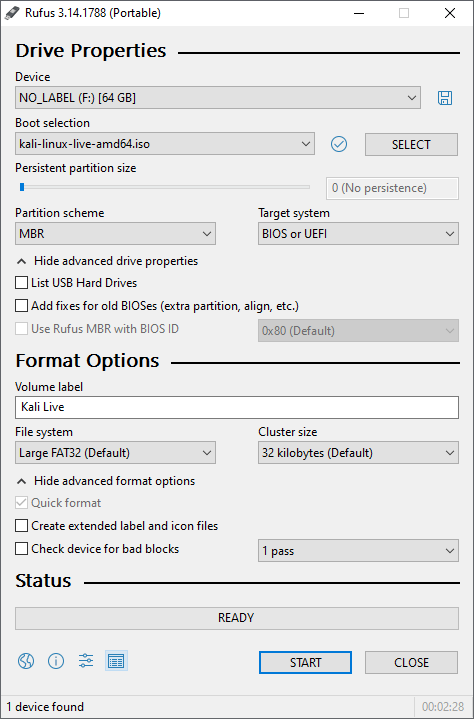
Creating a Bootable Kali USB Drive on Windows (Rufus)
- Plug your USB drive into an available USB port on your Windows PC, note which drive designator (e.g. “ G:\ ”) it uses once it mounts, and launch Rufus.
- With Device, check the dropdown list of options for the USB drive (e.g. “ G:\ ” and size).
- Boot selection needs to point to point to the Kali Linux ISO file, which can be done by clicking the SELECT button
- Depending on your configuration, you can set the Partition scheme, as well as Target system. If you are not sure, leave it as the default values.
While you can easily create a persistent live usb with the integrated options in Rufus by increasing the persistence slider, this is not the officially supported method (check Adding Persistence to a Kali Linux Live USB Drive), as it doesn’t work for all images, like the Kali Everything Live ISO introduced in release 2022.1.
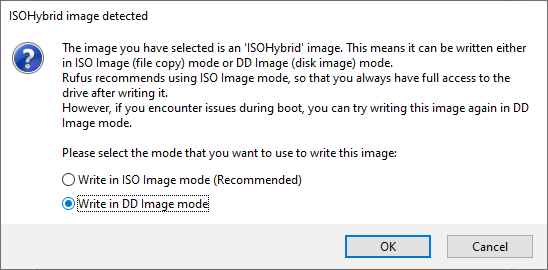
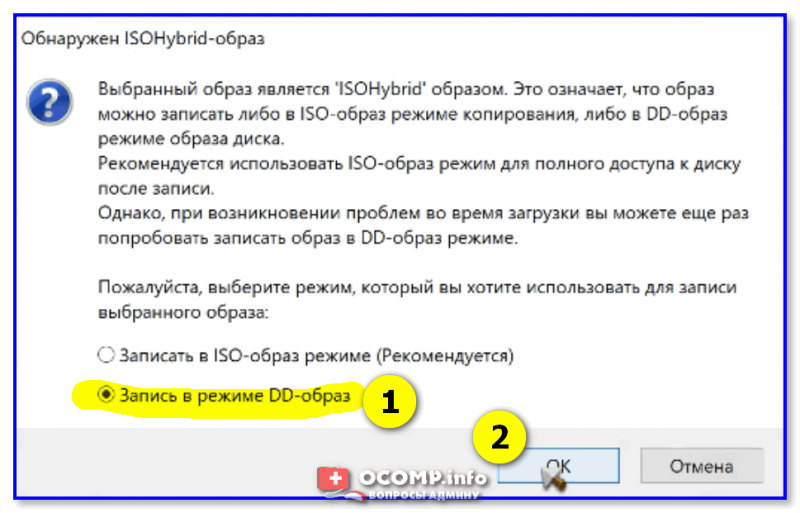
6. You may get a prompt saying about ISOHybird image. Selecting ISO image, will allow you to edit the files from the Kali Linux ISO, but at the potential lose of hardware compatibility. As a result, we recommend selecting DD Image.
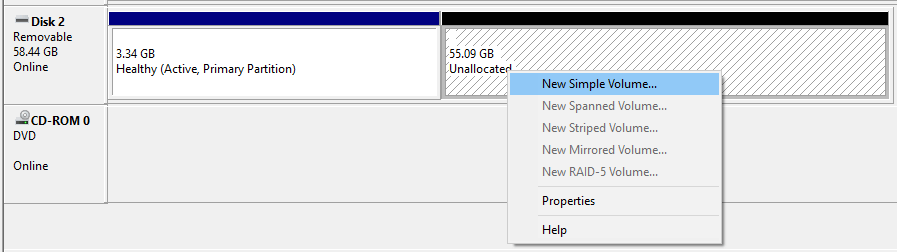
Note: If you select “DD Image” option, you can create another partition on the USB drive, allowing you to use the rest of the space. Start -> Run (Windows + R) -> diskmgmt.msc -> Locate the USB drive -> Right-click in “Unallocated” -> New Simple Volume -> Follow the rest of the wizard with next, next, next…
Booting A USB Drive In Windows
Depending on the system (such as BIOS or UEFI), as well as the version of Windows, and how they are each configured, you may need to re-image the USB drive.
- Master Boot Record (MBR) is often used on legacy systems that use BIOS as well as UEFI which has Compatibility Support Module (CSM) enabled
- GUID Partition Table (GPT) is required where UEFI has CSM disabled, forcing to use the modern standard
After writing the image to the USB drive, reboot Windows with the USB inserted. Depending on the motherboard manufacture, will also depend on the next stage. Some motherboard’s support a “temporary” boot menu, allowing for a one off selection. Others you need to enter BIOS/UEFI to configure it to try and boot from USB first. Entering either location, also depends on the motherboard. You can look up on the manufactures website and read the manual, try and read the screen when booting (however the text may be shown too quick or full logos used), or try common key combinations (such as ESC , F1 , F2 , F3 , F4 , F8 , F10 , F11 , F12 or DEL ).
Updated on: 2023-May-18
Author: g0tmi1k
Как создать загрузочную флешку с Linux (при работе в Windows). Cкрины настроек из бесплатных программ

Всем доброго времени!
Сегодня хочу рассмотреть довольно типичную ситуацию : на вашем ПК установлена ОС Windows (работает), но появилось желание (необходимость) попробовать также и Linux (так сказать, сравнить их собственноручно 😉) .
Разумеется, одним из первых действий будет подготовка загрузочного носителя (как правило флешки). Однако, здесь могут быть «нюансы», т.к. не все утилиты для создания загрузочных флешек с Windows подойдут и для текущей задачи.
Собственно, именно поэтому в этой заметке я выделил несколько утилит (и показать скрины настроек записи) , которые позволяют решить этот вопрос (также отмечу, что приложения я отобрал бесплатные, макс. простые в работе, и совместимые с большинством дистрибутивов Linux).
👉 В тему!
Установка Linux Mint «рядом» с Windows 10 (без потери данных!). Пошаговая инструкция для начинающих
Подготовка установочной флешки (с Linux)
Ventoy
Эта утилита хороша тем, что она позволяет легко и макс. быстро создавать универсальные мультизагрузочные флешки сразу с несколькими ISO-образами (на моей флешке, например, есть и Windows 10, и LiveCD, и Linux Mint, и пр.).
1) после ее загрузки и запуска, выберите тип разметки (для современных ПК*, обычно, GPT) и установите флажок на пункт «Secure Boot Support» (защищенная загрузка, актуально также для новых устройств). Вот здесь подробнее о GPT, MBR.
2) После нажмите по кнопке «Install» — через несколько минут флешка будет специальным образом подготовлена (все данные с нее будут удалены!).
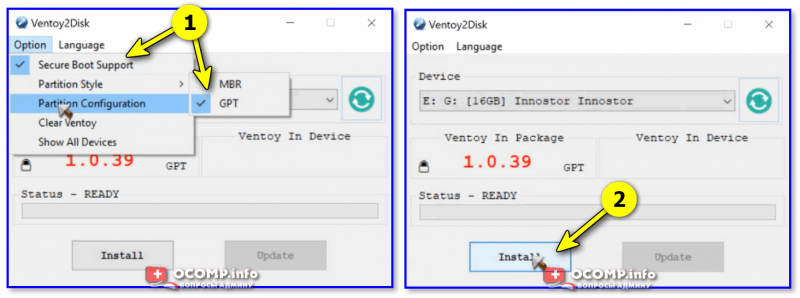
Ventoy — подготовка флешки (настройки)
3) Ну и последний штрих : на эту флешку нужно просто скопировать все нужные ISO-образы (никак не меняя их и не извлекая!). В своем примере ниже — я через проводник «отправил» нужный ISO на флешку.
Примечание : разумеется, скопировать можно столько ISO, сколько поместиться на вашу флешку!
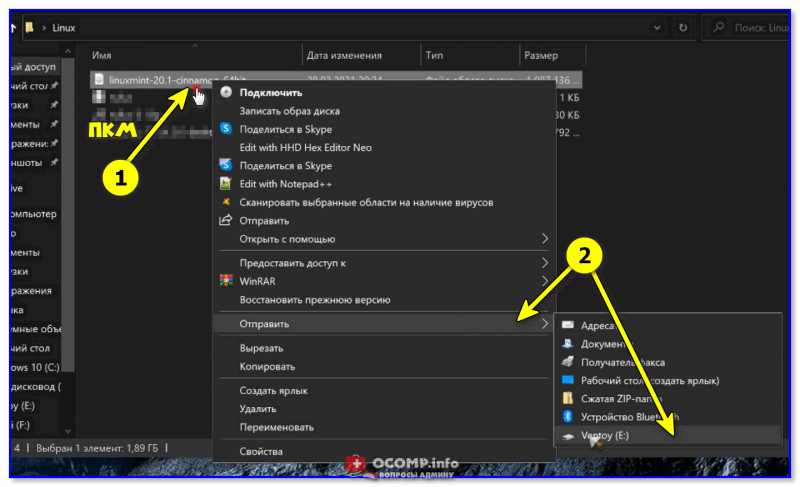
Отправить файл ISO на флешку (Ventoy)
Важно: флешки, подготовленные в Ventoy, могут не работать с некоторыми ноутбуками и моноблоками. Например, я с таким сталкивался на ноутбуках HP и Dell (само собой, не со всеми моделями. ).
Rufus
Эта утилита отличается от предыдущей своей функциональностью : здесь гораздо больше настроек и всяких флажков (что может запутать). Однако с ее помощью можно подготовить загрузочный носитель для любого «капризного» ноутбука/ПК/моноблока!
1) подключите флешку к USB-порту (предварительно скопировав всё нужное с неё) и запустите Rufus.
2) Далее в окне Rufus выберите флешку и образ ISO, который хотите записать (стрелки 1, 2 на скрине ниже 👇).
3) Задайте схему раздела и прошивку (GPT / UEFI для новых ПК*) и нажмите «Start».
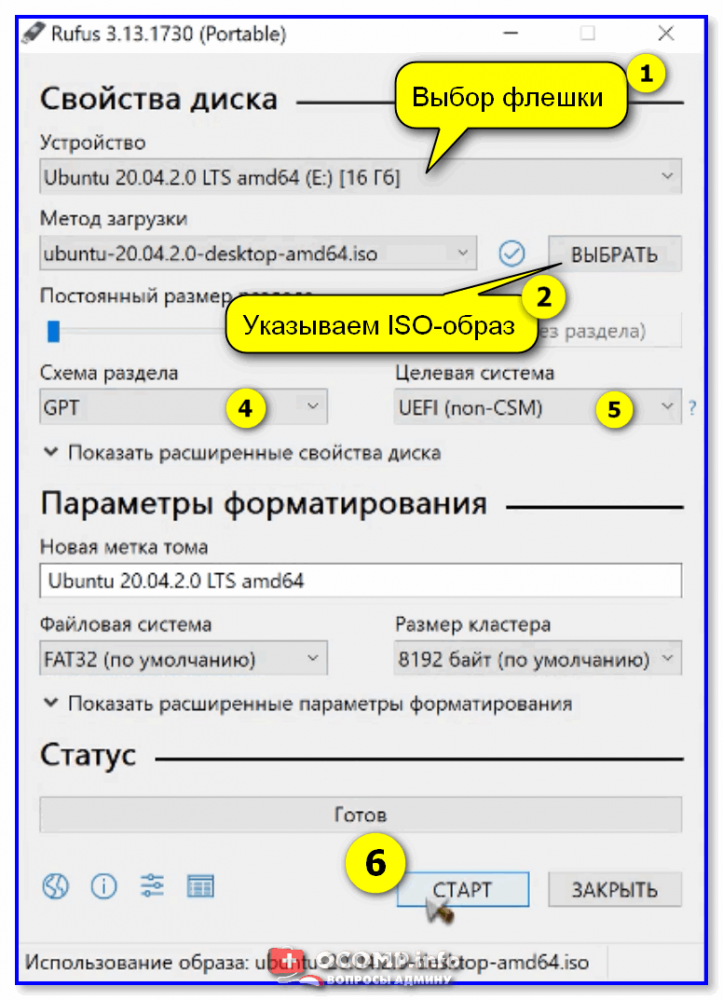
Rufus — настройки записи Ubuntu
Если появится сообщение о «гибридном» ISO — рекомендую выбрать вариант «Записать в режим DD-образа» . 👇
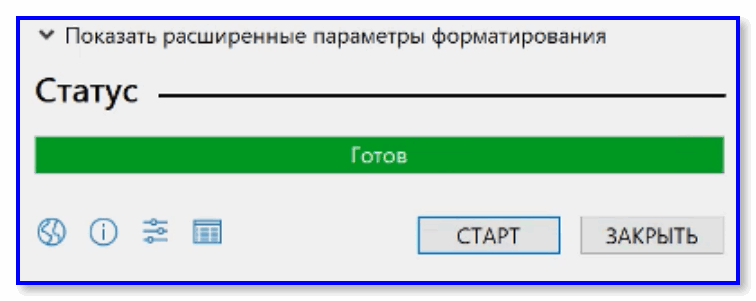
Когда статус записи дойдет до 100% и появится сообщение «Готов» — утилиту можно закрыть и приступить к использованию флешки.
Etcher
Etcher — приложение хорошо тем, что все «параметры» записи оно определяет автоматически (вам же останется только выбрать ISO, флешку и нажать «Старт»). С одной стороны — такой подход хорош, с другой — не дает гибкости.
Кстати, Etcher можно использовать в Windows, Linux, macOS.
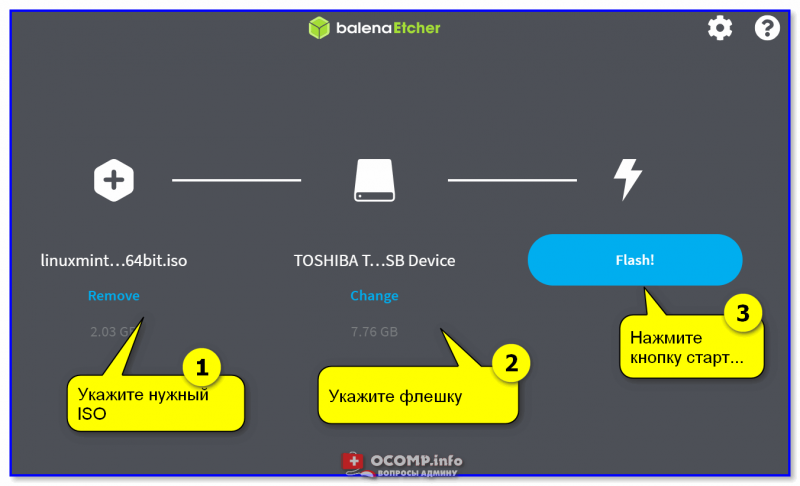
Etcher — всего три действия!
Процесс записи отображается в меню слева: при достижении 100% флешка будет готова!
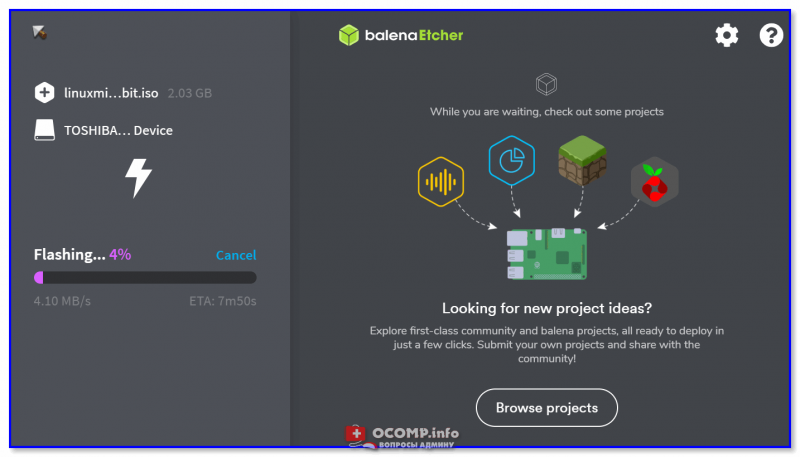
Процесс подготовки флешки в Etcher
Дополнения по теме — приветствуются!