- Using recovery modes
- System mode selection menu
- Recovery modes from snap reboot
- Using recovery keys
- How to Boot Ubuntu into Recovery Mode
- How to Boot Ubuntu into Recovery Mode
- Resume:
- Clean:
- Dpkg:
- Fsck:
- Grub:
- Network:
- Root:
- Conclusion:
- About the author
- Syeda Wardah Batool
- Ubuntu Wiki
- Booting into recovery mode
- See also
- Linux: Как зайти в Recovery Mode (Режим восстановления)
- Загрузка в режим восстановления через меню Grub
- Ручная правка загрузчика Grub для загрузки в режим восстановления
- Использование режима восстановления
Using recovery modes
Ubuntu Core is inherently robust. But if data corruption issues do occur, even on boot or data partitions, it can still access a recovery mode to help repair, restore or reinstall an impaired device.
These recovery modes can be accessed in three different ways:
- Boot into the system mode selection menu
Start or reboot the device with the ‘1’ key held on a connected keyboard - Snap reboot
Run snap reboot on the device with either —recover or —install arguments. - Snapd REST API
Use the REST API to call either the recover , install , factory-reset or reboot functions.
Recovery modes are only available on Ubuntu Core 20 and Ubuntu Core 22
Device manufacturers may choose to implement alternative methods to access recovery functionality. These will be specific to those devices.
See Recovery modes for more details on each supported recovery mode, what they do, and how they can be used.
System mode selection menu
To access the system mode selection menu, start or reboot the device with the ‘1’ key held on a connected keyboard. If the chooser fails to launch, try pressing 1 repeatedly from boot. It needs to be captured by Ubuntu Core boot process.
After the initial boot process completes, a status screen will appear showing “System mode selection triggered. Proceed to select one of the available systems and actions.”

The menu system requires that you tab or cursor to highlight your chosen option. Ensure ‘OK’ is highlighted and press Enter to continue, after which you’ll be presented first with the recovery chooser and the option to either run normally, enter recovering mode, or reinstall.
Selecting an option followed by ‘Confirm’ will reboot the device into the selected mode (see below).
Recovery modes from snap reboot
Alongside using sudo snap reboot to reboot the system, the following arguments can be added to select a recovery mode with or without an additional system label for the target system:
The recover and run modes are only available for the current system.
When called without a system label, reboot will use the current system to enter the given mode. System labels are listed with the snap recovery command:
$ sudo snap recovery Label Brand Model Notes 20201117 ubuntu-core-20-amd64 current To reboot the above system into recover mode, for example, enter the following:
$ sudo snap reboot --recover 20201117 Broadcast message from root@ubuntu (Wed 2020-11-25 13:15:51 UTC): reboot scheduled to update the system The system is going down for reboot at Wed 2020-11-25 13:25:51 UTC! Reboot into "20201117" "recover" mode. Using recovery keys
When using Full Disk Encryption, a device’s Trusted Platform Module (TPM) stores the encryption keys necessary to decrypt and boot the device.
These keys can be retrieved with the snap recovery —show-keys command:
$ sudo snap recovery --show-keys recovery: 55055-39320-64491-48436-47667-15525-36879-32875 If a TPM becomes reinitialised or reconfigured, the TPM-stored keys will be lost and Ubuntu Core will not be able to decrypt and boot the device.
During boot, Ubuntu Core will instead ask for the recovery key for specific encrypted partitions. The same keys recovered with snap recovery —show-keys can then be entered to restore the device:
🔐 Please enter the recovery key for disk /dev/disk/by-partuuid/c7f7971b: (press TAB for no echo) After entering a valid key, Ubuntu Core will decrypt the device, proceed with the boot, and restore the TPM from the recovered key. The recovery keys will remain the same and do not need to be retrieved again.
How to Boot Ubuntu into Recovery Mode
![]()
Every device comes up with the “Recovery Mode” feature which has the capability to perform different operations. These operations include cleaning the junk data, update installation, data restoration, back up or device reset.
Similarly, in Linux distributions, we also have the accessibility of the “Recovery Mode” feature. It allows the user to reboot the system and get it with a new setup.
We may need “recovery mode” at any time in the system. There could be many possibilities, i.e when the system slows down, it fails to start up for any reason, or if you find any glitches, then it means your system needs to recover. You can also recover broken files and test if the memory is working correctly or not.
How to Boot Ubuntu into Recovery Mode
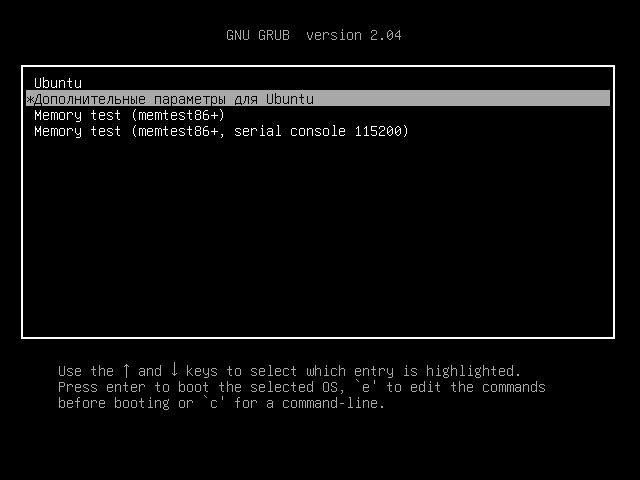
To get the recovery mode option, you need to access the Grub boot-loader. Reboot the system to have the Grub menu.
For this, you can either restart the Ubuntu machine or use the following command in the terminal:

After typing the password, the system will restart. To get the Grub menu, press the “Esc” button quickly; when BIOS loading has finished, a Grub menu window will come with few options as shown in the image below:

From the menu, select the “Advanced options for Ubuntu” by using the down arrow key and press “Enter”.

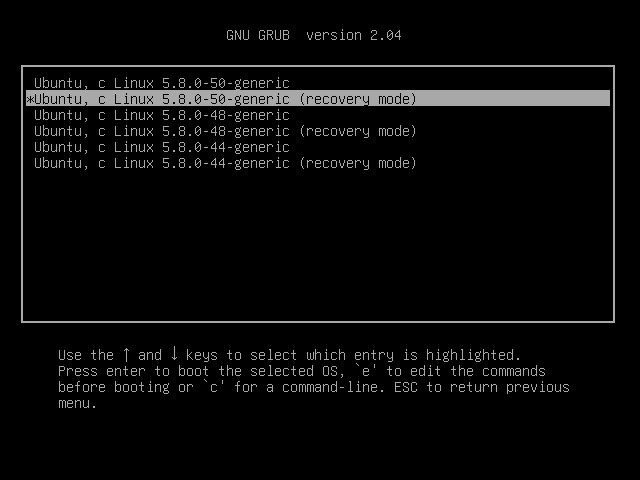
After selecting, you will get the sub-menu window of the “Advanced options for Ubuntu” entry.
Use the down arrow key to navigate towards “Ubuntu, with Linux 5.8.0-50-generic (recovery mode)” and hit Enter.
This recovery mode allows the user to convert the boot system into recovery mode to resolve quickly.
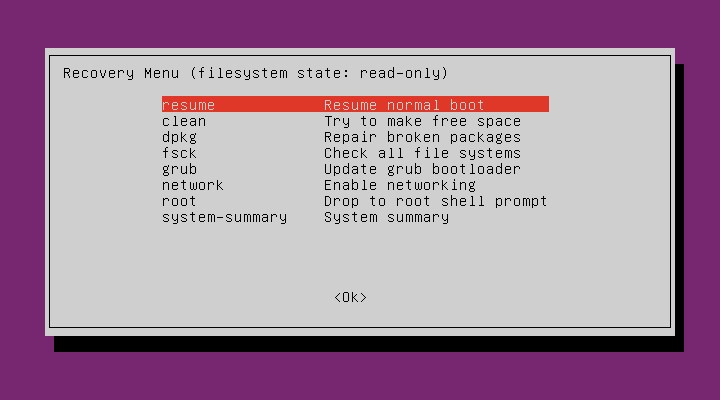
In the Recovery mode, you will find multiple options. Select according to the issue you are facing:
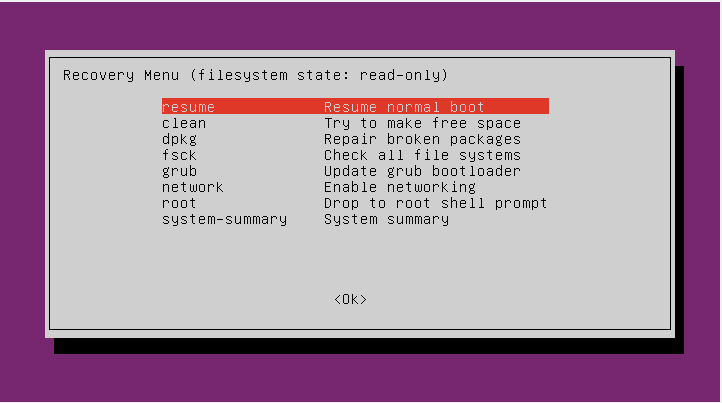
Let’s define each of the option that might help you to select.
Resume:
The resume option will end the recovery mode and allow the system to boot again.
Clean:
The clean option will help you to free up space from the system. If the system’s storage is about to end, it will help to get free space.
Dpkg:
Select the “dpkg” category if the package you installed fails and won’t allow the system to work properly. Moreover, if you have broken packages in the system, the “dpkg” option will help resolve this.
Fsck:
The “fsck” option is used for the configuration of graphics drivers, or if your hard drive is corrupted, it might help.
Grub:
Use the “grub” option to update the Grub boot loader. It will scan the system and upgrade the Grub boot loader automatically.
Network:
The “network” option helps to enable networking which is disabled by default in the system.
Root:
Sometimes, the system fails to boot due to some errors. For this purpose, “root” entry is used; it allows the system to open write mode and resolve the issues using commands.
If all the above options are not resolving the errors, there would be some significant complications with your operating system. In this case, the best chance to restore the system is to reinstall it.
Conclusion:
We have learned how to use the “Recovery Mode” feature to resolve Ubuntu machine errors. You can get recovery mode by restarting the machine and pressing the “Esc” key repeatedly.
The Grub boot-loader menu has multiple choices and can be selected according to need. Follow the guide carefully to get the “recovery mode” menu list. There are several options, i.e., clean, dbkg, fsck, network, grub, and root. We can fix most of the issues using these options.
About the author
Syeda Wardah Batool
I am a Software Engineer Graduate and Self Motivated Linux writer. I also love to read latest Linux books. Moreover, in my free time, i love to read books on Personal development.
Ubuntu Wiki
If your system fails to boot for whatever reason, it may be useful to boot it into recovery mode. This mode just loads some basic services and drops you into command line mode. You are then logged in as root (the superuser) and can repair your system using command line tools. If booting into recovery mode does not work you can still use your installation CD (if it is a live cd) as described in LivecdRecovery.
Booting into recovery mode
- Switch on your computer.
- Wait until the UEFI/BIOS has finished loading, or has almost finished. (During this time you will probably see a logo of your computer manufacturer.) Note: UEFI fast boot may be too fast to give time to press any key.
- With BIOS, quickly press and hold the Shift key, which will bring up the GNU GRUB menu. (If you see the Ubuntu logo, you’ve missed the point where you can enter the GRUB menu.) With UEFI press (perhaps several times) the Escape key to get grub menu.
- Select the line which starts with «Advanced options«.
- Select the line ending with «(recovery mode)«, probably the second line, something like:
Ubuntu GNU/Linux, with Linux 3.8.0-26-generic (recovery mode)
NOTE 1: If you have Ubuntu Quantal (12.10) or earlier, omit step 4 (the recovery mode menu items are displayed on the top-level menu).
NOTE 2: If you reboot, there is no need to hold the Shift key in step 3. The GNU GRUB menu will continue to be displayed automatically on each boot until a normal startup of Ubuntu completes. To configure GRUB so the menu is always displayed, even after a normal startup, see https://help.ubuntu.com/community/Grub2/Setup.
See also
Linux: Как зайти в Recovery Mode (Режим восстановления)
Режим восстановления — это особый режим загрузки операционной системы Linux, который предназначен для решения проблем с загрузкой и работой системы в штатном режиме. Специально для этого, в режиме восстановления загружается и работает минимум необходимых сервисов (например, по умолчанию не работает сеть, звук и т. д.), и вся работа происходит в консольном режиме. По сути, данный режим является своеобразным аналогом «безопасного режима» из Windows.
Загрузка в режим восстановления через меню Grub
Во всех современных дистрибутивах, для загрузки в режим восстановления Linux, необходимо перезагрузить компьютер и выбрать соответствующий раздел меню Grub. Для дистрибутивов Linux, таких как Debian, Linux Mint, Ubuntu и многих других, алгоритм загрузки в режим восстановления следующий:
- Перезагружаем компьютер, и ждем загрузки меню Grub. Если меню Grub не отображается, то следует снова перезагрузить компьютер, и многократно нажать на клавишу ESC после прохождения загрузки BIOS.
- В меню загрузчика Grub, выбираем пункт «Дополнительные параметры для . «.

- Здесь выбираем строку, которая содержит надпись «(recovery mode)». Если таких строк несколько — скорее всего там отображаются варианты загрузки с разными версиями ядра. В таком случае, лучше выбрать строку с наиболее свежей версией ядра.
- После этого начнется загрузка Linux в режиме восстановления.
Ручная правка загрузчика Grub для загрузки в режим восстановления
Однако, может случится и так, что в меню Grub отсутствует пункт загрузки в режиме восстановления. В таком случае, придется самостоятельно изменить параметры загрузки Grub. Для этого:
- В меню Grub выбираем строку, соответствующую загрузке Linux в нормальном режиме (должна быть самой первой в списке), и нажимаем клавишу e .
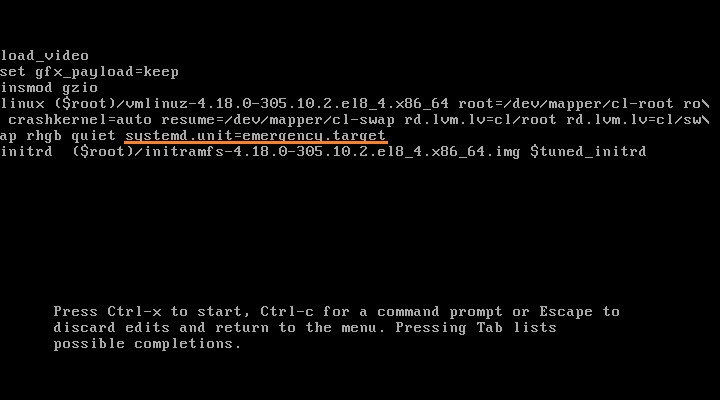
- Откроется редактирование параметров загрузки дистрибутива Linux. Здесь нужно найти строку, начинающуюся с linux , после чего перейти в её конец — сделать это проще всего с помощью клавиши End или комбинации клавиш Ctrl + E . Затем, в эту строку следует вписать вписать systemd.unit=emergency.target .
- После этого нажать комбинацию Ctrl + X для загрузки системы — и если предыдущая команда была написано верно и в нужном месте, то система загрузится в режим восстановления.
Использование режима восстановления
В дистрибутивах Linux, построенных на основе Debian (Linux Mint, Ubuntu и т. д.), после завершения загрузки режима восстановления загрузится окно, в котором будет предложен список действий на выбор.
Разберем каждый из этих пунктов:
- resume — выйти из режима восстановления и продолжить нормальную загрузку системы.
- clean — автоматическая очистка накопителя, может быть полезна при отсутствии свободного места на жестком диске.
- dpkg — исправление ошибок в пакетах dpkg (может потребоваться включение сети).
- failsafeX* — включение графической оболочки
- fsck — проверка на наличие ошибок смонтированных файловых систем.
- grub — обновление конфигурации загрузчика grub.
- network — включить работу сети.
- root — перейти к консоли, запущенной под пользователем root. Для выполнения различных консольных команд в режиме восстановления, следует выбрать именно этот пункт.
- system-summary — общая информация о системе.