- Как настроить функцию фильтрации по IP адресам на беспроводном маршрутизаторе TP-Link
- How to Set Access Control of the Internet with Firewall on modem router (self-developed UI)
- How to Set Access Control of the Internet with Firewall on modem router (self-developed UI)
- Как установить ограничение для портов на беспроводном маршрутизаторе TP-Link
Как настроить функцию фильтрации по IP адресам на беспроводном маршрутизаторе TP-Link
![]()
Дата последнего обновления: 08-31-2011 14:38:25 PM 209649
Если вы хотите ограничить число компьютеров, имеющих доступ в Интернет, вы можете воспользоваться функцией IP Address Filtering (Фильтрация по IP адресам).
Чтобы настроить фильтр, вам необходимо использовать статический IP адрес для вашего компьютера.
Откройте браузер и введите в адресную строку IP адрес маршрутизатора (по умолчанию 192.168.1.1 ). Нажмите Enter (Ввод).
Введите логин и пароль для входа в web -интерфейс, по умолчанию и логин, и пароль admin .
Нажмите Security -> Firewall (Безопасность -> Брандмауэр) в левой части страницы.
Выберите Enable Firewall (Включить брандмауэр), затем укажите Enable IP Address Filtering (Включить фильтрацию по IP адресам).
Если вы хотите разрешить доступ в Интернет только нескольким компьютерам, выберите Deny the packets not specified by any filtering rules to pass through the router (Отклонить пакеты, не указанные в правилах фильтрации). Те компьютеры, IP адреса которых указаны в правилах, будут иметь доступ в Интернет. Если вы хотите запретить доступ указанным компьютерам, выберите Deny these PCs with enabled rules to access the Internet (Запретить компьютерам, указанным в правилах, доступ в Интернет).
Нажмите Save (Сохранить), чтобы сохранить настройки.
Нажмите Security -> IP Address Filtering (Безопасность -> Фильтрация по IP адресам) в левой части страницы.
Нажмите Add New (Добавить), чтобы создать и настроить правило.
Введите IP адрес компьютера, которому вы хотите разрешить доступ в Интернет, в соответствующее поле. Активируйте правило.
Если вы хотите разрешить доступ в Интернет другим компьютерам, нажмите Add New (Добавить), чтобы создать новое правило. Если IP адреса компьютеров идут по порядку, вы можете указать эти IP адреса в виде массива, например 192.168.1.10-192.168.1.20 .
Если вы хотите, чтобы на данном компьютере только открывались Интернет-страницы и сервисы, установите номер порта в графе WAN Port ( WAN Порт). Например, вы хотите сделать так, чтобы компьютер с IP адресом 192.168.1.10 мог открывать web -страницы, установите 80 в поле WAN Port , поскольку номер порта для просмотра web – 80.
Нажмите Save (Сохранить), чтобы сохранить настройки.
Теперь компьютерам, IP адреса которых прописаны в правилах, будет предоставлен доступ в Интернет. Если вы указали номер порта WAN , компьютер будет иметь доступ только к тем сервисам, для которых установлены порты.
Был ли этот FAQ полезен?
Ваш отзыв поможет нам улучшить работу сайта.
Что вам не понравилось в этой статье?
- Недоволен продуктом
- Слишком сложно
- Неверный заголовок
- Не относится к моей проблеме
- Слишком туманное объяснение
- Другое
Как мы можем это улучшить?
Спасибо за обращение
Нажмите здесь, чтобы связаться с технической поддержкой TP-Link.
Подписаться на рассылку Мы с ответственностью относимся к вашим персональным данным. Полный текст положения об обработке персональных данных доступен здесь. С нашими условиями использования и программой улучшения пользовательского опыта можно ознакомиться здесь.
How to Set Access Control of the Internet with Firewall on modem router (self-developed UI)
![]()
Дата последнего обновления: 06-29-2022 01:53:51 AM 188528
TD-W9980B , Archer D2 , Archer D5 , TD-W8968 , TD-W9970 , TD-W8980 , TD-W9980 , TD-W8970 , TD-W8970B , TD-W8980B , TD-VG5612 , Archer D9 , Archer D7
Note: This article applies to TD-W8968 V1/V2,not TD-W8968 V3 if it ’s V2, We will take TD-W8968 V1 as example in this article.The steps are the same for other listed models.
Firewall can be used to control user’s access to the Internet. This FAQ explains how to configure it, by an example given below
Block a computer whose IP is 192.168.1.100 to access the Internet from 00:00 to 06:00
According to the purpose above, some necessary Parameters should be needed and clarified during the whole configuration process. They are:
Rule Type: Block
LAN Host: 192.168.1.100
Target : Internet
Schedule: 00:00~06:00
After having the above information, you can start the configuration on TD-W8968.
Login to Modem Router’s configuration page.
Open your web browser and type the LAN IP address of the router in the address bar (the default IP address of TP-Link Modem router is http: //192.168.1.1.), then press Enter.

When you are prompted, enter the router´s username and password (the default username and password are both admin).
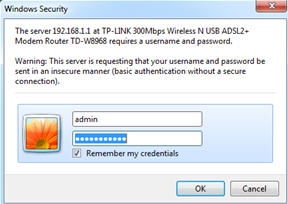
If you cannot open this page, please click here for more instruction.
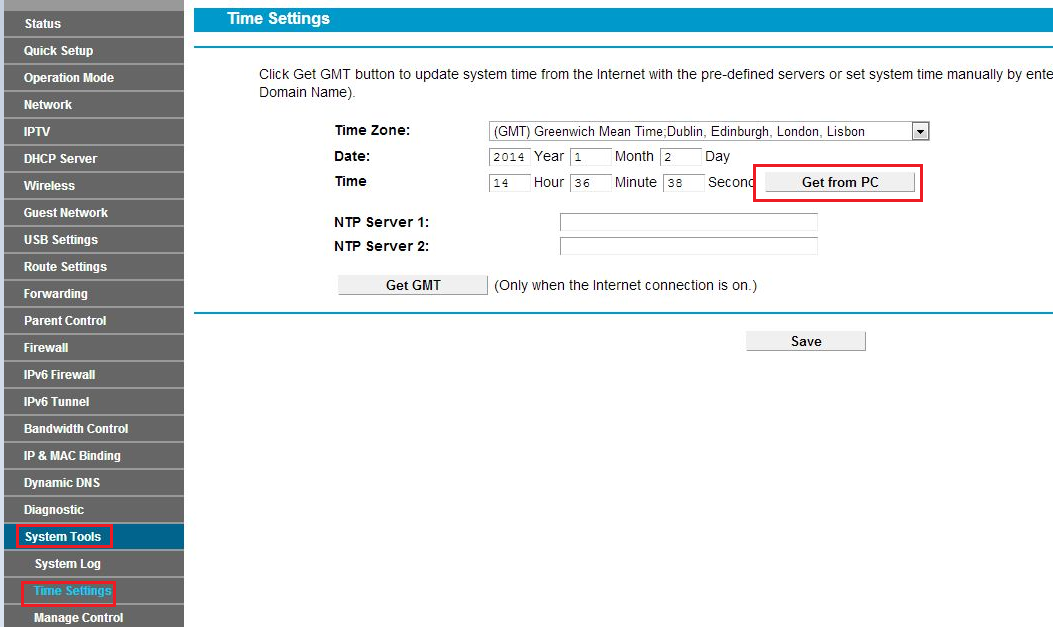
The Firewall settings are based on the modem’s time, rather than PC’s, so firstly we should adjust the modem’s time consisting with the PC’s. Go to System Tools-> Time Settings-> Get from PC-> Save.
Go to Firewall -> LAN Host and click Add New.
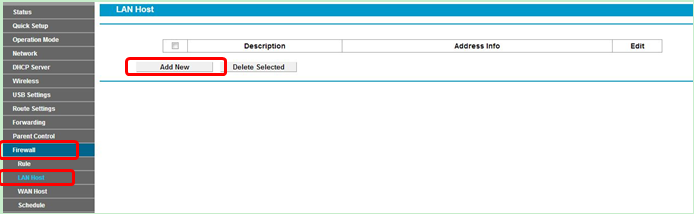
Select the IP Address in Mode field, then enter a brief description of the rule you are setting up, here we take LAN as example. And type the IP range or specific one which you want to block in IP Address bar.
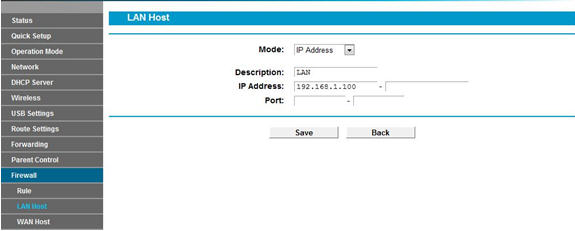
Note: Leave the Port blank.
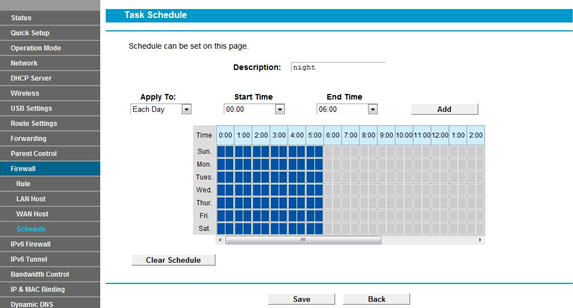
Go to Firewall -> Schedule and click Add New.
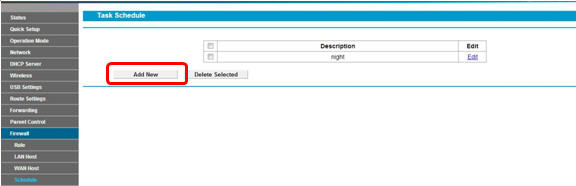
Select the Day mode, then enter a brief description of the rule you are setting up. You can select the certain day (s), or choose Each day. What’s more, you can also select the certain time to get onto the Internet, specify the Start Time and Stop Time yourself, here we set the period as 00:00~06:00. And Click Save to save the settings.
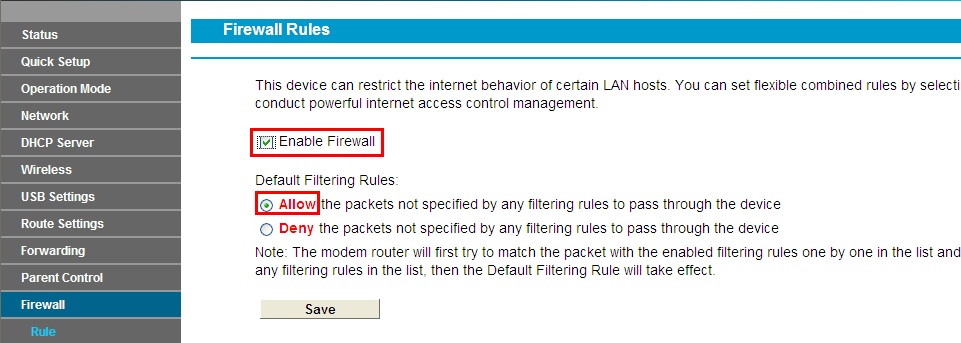
Go to Firewall -> Rule select Enable Firewall and tick Allow then click Save.
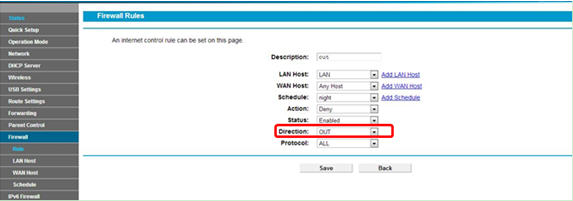
Click Add New.
a . Type in a name for the rule in the Description.
b . Select a host from the LAN Host drop-down list or choose “Add LAN Host”.
c . Select Any Host from the WAN Host drop-down list.
d . Select a schedule from the Schedule drop-down list or choose “Add Schedule”.
e . In the Action field, select Deny to deny your entry. This means the Internet is denied.( If you choose Allow, that means the Internet is allow to access)
f . In the Status field, select Enabled to enable your entry.
g . In the Direction field, select OUT from the drop-down list for the direction.
h . In the Protocol field, here are four options, All, TCP, UDP, and ICMP. Generally we choose ALL. (You can select a specified option if you know which one to choose).
i . Click Save.
When all done, you can get the settings as below:

Now the computer with IP address: 192.168.1.100 can’t go to the Internet from 0:00 to 6:00 every day.
Get to know more details of each function and configuration please go to Download Center to download the manual of your product.
Был ли этот FAQ полезен?
Ваш отзыв поможет нам улучшить работу сайта.
Что вам не понравилось в этой статье?
- Недоволен продуктом
- Слишком сложно
- Неверный заголовок
- Не относится к моей проблеме
- Слишком туманное объяснение
- Другое
Как мы можем это улучшить?
Спасибо за обращение
Нажмите здесь, чтобы связаться с технической поддержкой TP-Link.
Подписаться на рассылку Мы с ответственностью относимся к вашим персональным данным. Полный текст положения об обработке персональных данных доступен здесь. С нашими условиями использования и программой улучшения пользовательского опыта можно ознакомиться здесь.
How to Set Access Control of the Internet with Firewall on modem router (self-developed UI)
![]()
Updated 06-29-2022 01:53:51 AM 188529
TD-W9980B , Archer D2 , Archer D5 , TD-W8968 , TD-W9970 , TD-W8980 , TD-W9980 , TD-W8970 , TD-W8970B , TD-W8980B , TD-VG5612 , Archer D9 , Archer D7
Note: This article applies to TD-W8968 V1/V2,not TD-W8968 V3 if it ’s V2, We will take TD-W8968 V1 as example in this article.The steps are the same for other listed models.
Firewall can be used to control user’s access to the Internet. This FAQ explains how to configure it, by an example given below
Block a computer whose IP is 192.168.1.100 to access the Internet from 00:00 to 06:00
According to the purpose above, some necessary Parameters should be needed and clarified during the whole configuration process. They are:
Rule Type: Block
LAN Host: 192.168.1.100
Target : Internet
Schedule: 00:00~06:00
After having the above information, you can start the configuration on TD-W8968.
Login to Modem Router’s configuration page.
Open your web browser and type the LAN IP address of the router in the address bar (the default IP address of TP-Link Modem router is http: //192.168.1.1.), then press Enter.
When you are prompted, enter the router´s username and password (the default username and password are both admin).
If you cannot open this page, please click here for more instruction.
The Firewall settings are based on the modem’s time, rather than PC’s, so firstly we should adjust the modem’s time consisting with the PC’s. Go to System Tools-> Time Settings-> Get from PC-> Save.
Go to Firewall -> LAN Host and click Add New.
Select the IP Address in Mode field, then enter a brief description of the rule you are setting up, here we take LAN as example. And type the IP range or specific one which you want to block in IP Address bar.
Note: Leave the Port blank.
Go to Firewall -> Schedule and click Add New.
Select the Day mode, then enter a brief description of the rule you are setting up. You can select the certain day (s), or choose Each day. What’s more, you can also select the certain time to get onto the Internet, specify the Start Time and Stop Time yourself, here we set the period as 00:00~06:00. And Click Save to save the settings.
Go to Firewall -> Rule select Enable Firewall and tick Allow then click Save.
Click Add New.
a . Type in a name for the rule in the Description.
b . Select a host from the LAN Host drop-down list or choose “Add LAN Host”.
c . Select Any Host from the WAN Host drop-down list.
d . Select a schedule from the Schedule drop-down list or choose “Add Schedule”.
e . In the Action field, select Deny to deny your entry. This means the Internet is denied.( If you choose Allow, that means the Internet is allow to access)
f . In the Status field, select Enabled to enable your entry.
g . In the Direction field, select OUT from the drop-down list for the direction.
h . In the Protocol field, here are four options, All, TCP, UDP, and ICMP. Generally we choose ALL. (You can select a specified option if you know which one to choose).
i . Click Save.
When all done, you can get the settings as below:
Now the computer with IP address: 192.168.1.100 can’t go to the Internet from 0:00 to 6:00 every day.
Get to know more details of each function and configuration please go to Download Center to download the manual of your product.
Is this faq useful?
Your feedback helps improve this site.
What’s your concern with this article?
- Dissatisfied with product
- Too Complicated
- Confusing Title
- Does not apply to me
- Too Vague
- Other
We’d love to get your feedback, please let us know how we can improve this content.
We appreciate your feedback.
Click here to contact TP-Link technical support.
Subscribe TP-Link takes your privacy seriously. For further details on TP-Link’s privacy practices, see TP-Link’s Privacy Policy.
Be The First To Get Exclusive Deals & News
Как установить ограничение для портов на беспроводном маршрутизаторе TP-Link
![]()
Дата последнего обновления: 08-31-2011 14:38:25 PM 113147
Откройте браузер и в адресной строке введите сетевой IP адрес маршрутизатора (по умолчанию 192.168.1.1), затем нажмите Enter (Ввод).
Введите логин и пароль для входа в web -интерфейс, по умолчанию и логин, и пароль admin .
Нажмите Security -> Firewall (Безопасность -> Брандмауэр) в левой части страницы.
Активируйте Firewall (Брандмауэр) и функцию IP Address Filtering (Фильтрация по IP адресам), выберите Allow the packets not specified by any filtering rules to pass through the router (Разрешить пакеты, не указанные в правилах фильтрации).
Нажмите Save (Сохранить), чтобы сохранить настройки.
Нажмите IP Address Filtering (Фильтрация по IP адресам) в левой части страницы.
Нажмите Add New (Добавить), чтобы создать и настроить правило фильтрации.
Введите IP-адрес и порт сервиса, который вы хотите ограничить. Затем выберите Deny (Отклонить) в выпадающем меню Action (Действие).
Нажмите Save (Сохранить), чтобы сохранить настройки.
Был ли этот FAQ полезен?
Ваш отзыв поможет нам улучшить работу сайта.
Что вам не понравилось в этой статье?
- Недоволен продуктом
- Слишком сложно
- Неверный заголовок
- Не относится к моей проблеме
- Слишком туманное объяснение
- Другое
Как мы можем это улучшить?
Спасибо за обращение
Нажмите здесь, чтобы связаться с технической поддержкой TP-Link.
Подписаться на рассылку Мы с ответственностью относимся к вашим персональным данным. Полный текст положения об обработке персональных данных доступен здесь. С нашими условиями использования и программой улучшения пользовательского опыта можно ознакомиться здесь.