Getting Started
This page explains how to get started using TC (Tiny Core Linux) and applications.
These brief instructions are intended for users who are new to Linux as well as Tiny Core.
Getting TC running
Tiny Core starts from a CD called a “LiveCD”. This runs on the system without needing to be installed (handy if your version of MS Windows isn’t working)! Actually one of the core tenets of Tiny Core is that it doesn’t expect anything to be installed.
Download the Live CD image
The image of the CD is an .iso file (about 12MB) which can be downloaded from downloads page.
— Your CD burning software needs to have an option (menu item) to burn an ISO image file or bootable ISO file. Use the bootable if both choices are available. Don’t burn the ISO file as regular file, or an audio track.
— After burning the CD, re insert it and open it in a file browser. If your see “tinycore-current.iso” … it won’t boot. You must see a folder called “boot”. If you have trouble, search for notes on your software. Generic notes on common platforms: Linux — burn iso, Mac — burn iso, Windows — burn iso
Boot the CD
The BIOS setting on your computer must be set so the CD drive is booted before other media(like the Hard Disk). Different manufactures use different keys to enter the utility to modify the BIOS settings. Watch intently when your system boots for a message like: “Press F10 to change system settings” or “Press DEL to enter setup”. If you see the MS windows logo it you missed it. Try holding down the Ctrl key while the system boots.
in 2-3 seconds you will see:
Simply press enter or add special options as shown by pressing F2 F3 F4
as described at bootcodes
For example to boot tiny core and avoid the timezone from defaulting to GMT you might use something like:
tc tz=US/Eastern hostname=DG12S-TESTBOX
Just a few screen blinks and 20 seconds later and you will see the Tiny Core Desktop!
The TC Desktop
The TC desktop will appear after about 30 seconds(or less!). It will look something like:
Four icons float at the bottom of the screen in an area referred to as wbar.

The monitor : a Linux terminal ( aterm). You can type *nix-style commands in this text-only window. Sometimes, If you know *nix commands, the Terminal window is the fastest way to get things done.
The screwdriver : Control Panel. The Control Panel gives buttons to access basic Tiny Core utilities.
The Desktop Menu appears when you mouse click the desktop.
Base/stock Tiny Core intentionally includes no applications. Typical applications (like a web browser, word-processor, music player, etc.) must be selected by you, downloaded and installed. Fortunately, this is fairly easy thanks to … Appbrowser!
The Internet
(but I thought I was going to learn about Appbrowser!?)
First you need to connect your computer to the Internet. Tiny Core includes only a few modules (drivers), so your wireless connection may not work. Tiny Core does auto-magically connect just about every wired Ethernet cable connections, though.
If you only have a wireless connection (or if that is the only one that works), you will have to do some other configuration first. Read Setting up Wifi.
If you’re one of the few that Tiny Core didn’t set up right away, you can troubleshoot your network connection:
Reboot, ideally without cycling the power. Some network cards act funny on a cold boot, but will work fine after a reboot.
If you know about command-line arguments to the kernel … try waitusb=5 (about 5 seconds). Some network cards don’t boot up as fast as Tiny Core does. This will give them time to do that.
Getting Applications
Tiny Core uses the Appbrowser to install “application extensions.” Briefly called “extensions”, these are the applications you want to use.
Appbrowser requires an internet connection (or at least having the extensions available locally). When you’re set, check out the Appbrowser tutorial.
The Appbrowser gives users access to a lot of apps. Hundreds of apps, going on thousands. Each one is contributed by users just like you. The Appbrowser repository is generously hosted offsite (by ibiblio.org as of 2009/2010 — thanks, UNCCH!).
Is the repository missing something you want or need? Here are the current guidelines — submit it for a Tiny share of fame, glory, and honor.
Where now?
If your LiveCD worked (and especially if not), the next stop is the Tiny Core forum. You can learn about the people on the project, and become a contributor yourself.
You can also contribute by:
Thanks from the Tiny Core Team — thanks for checking out Tiny Core, and for joining the project.
If your LiveCD did not work, it might with a different boot code? See http://distro.ibiblio.org/tinycorelinux/faq.html#bootcodes
Please check out the other wiki pages Index
Браузер tiny core linux
The first step before you install any operating system such as Tiny Core is to back up everything on your computer before starting.
Before making the commitment to perform a frugal install you should consider our Quick and Easy Overview. It covers the basics of running Tiny Core from CDROM and/or USB pendrive. Most will find learning Tiny Core the quick and easy way a better starting point.
But for those who are ready to take the plunge to frugal, this guide shows step by step information on how to install TC via the installer. The older instructions for a manual install are still available, but using the installer is recommended.
The guide assumes you’ve either booted the CorePlus CD, or have installed the tc-install extension (tc-install.tcz)
Keep in mind that this guide is basic and that the user may choose to adapt, remove and/or add parts as desired.
The installer is also applicable to USB sticks and other external media.
Note: If you already have a Linux System booting, then you do not need to make a partition for Tiny Core! Tiny Core can run in a single directory in your existing Linux installation. To do so, at step 1, uncheck the option to «Install boot loader». At step 2, select an existing partition, and at Step 3, do not format it. Upon completion you will need to manually configure your existing boot loader.
1. Start the installation

It can also be started via the shell or Run icon by typing «tc-install».
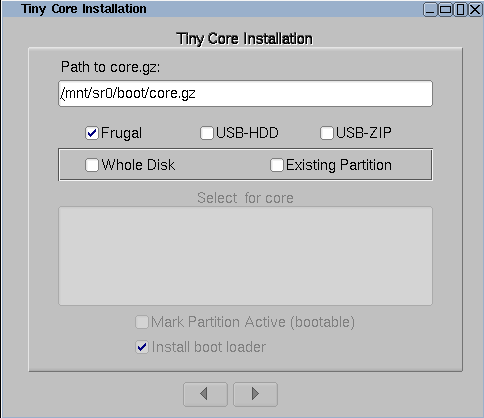
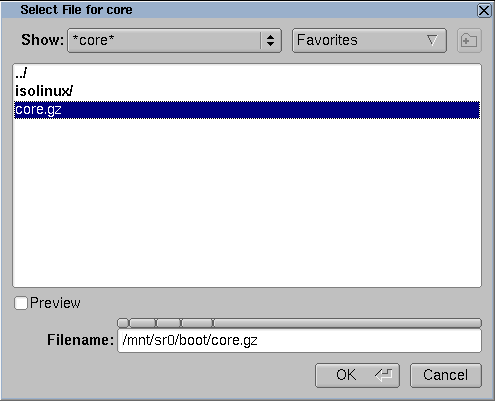
2. Browse to the install files
Browse to /mnt/device/boot and select the core.gz file.
With the source selected, pick the desired install type and target. We’re going to install to an empty hard drive.
If using an existing partition, tick the box to mark it active to have it bootable.

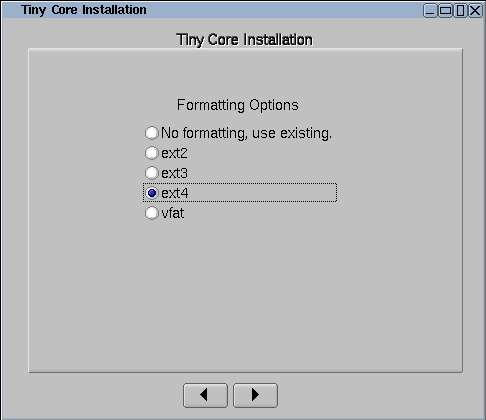
3. Formatting
Format the new partition. It’s recommended to pick one of the ext* options to support linux permissions.
4. Bootcodes
If you want to use additional bootcodes, enter them now. Otherwise leave this blank.
The example bootcodes set a framebuffer resolution and disable wbar icons.
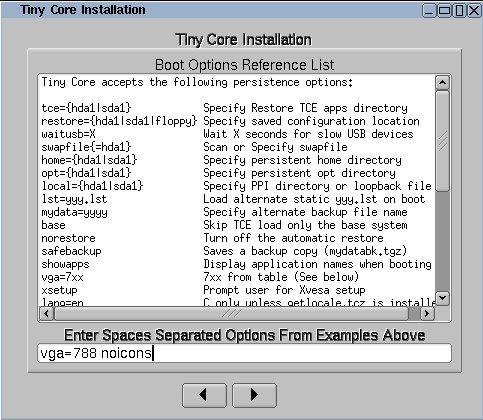
Note that you can edit them any time after the install in the bootloader’s config file, usually extlinux.conf.
5. CorePlus installation options
If you are installing from the CorePlus CD you will see an additional screen asking which extensions from CorePlus you would like to install. Note that you will only see this screen if running the installer from a CorePlus CD.
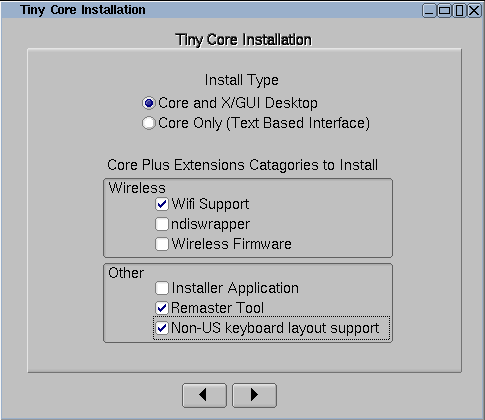
The selected extensions will be installed.
6. Tiny Core installation options
If you are installing from the Tiny Core CD you will see an additional screen asking which directory extensions should be installed from. You should select the cde or tce directory that contains the extensions that you would like installed. For example, if the Tiny Core CD is mounted on /mnt/sr0 you should select /mnt/sr0/cde
Note that you will not see this screen if installing from CorePlus.
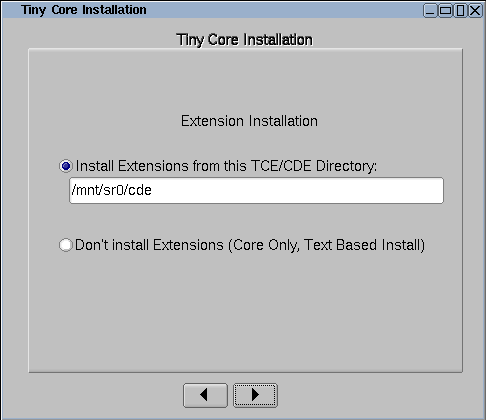
All extensions from selected directory will be installed.
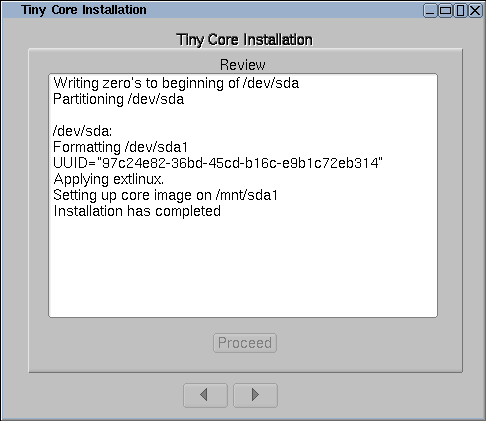
7. Install
If everything’s OK, click on proceed:
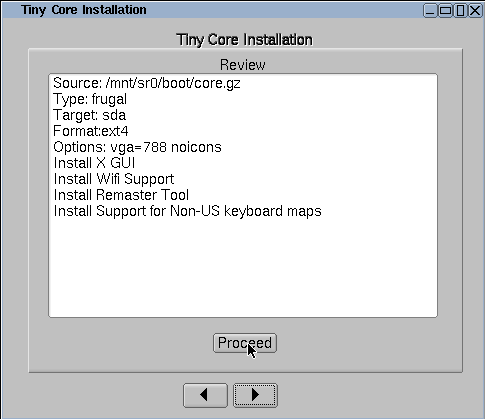
The time required will depend on the size of your hard drive.
8. Testing
Remove the original CD boot media and reboot.
Note: the system may need to be configured to boot hdX first in the BIOS.