- Customizing the Linux kernel
- Downloading toolchain
- Downloading the Linux kernel
- Customizing the Linux kernel
- Building the Linux kernel
- Installing new Linux kernel
- Сборка ядра Linux
- Подготовка сборочной машины
- Получение исходного кода
- Сборка
- Сборка deb-пакета
- Разные модели контроллеров
- Настройка ядра
- Сборка вручную
Customizing the Linux kernel
This tutorial shows how to download, patch, modify and update the Linux kernel in the existing system on VisionSOM module. It was tested on the PC with Ubuntu 18.04 host system.
Downloading toolchain
For the kernel compilation we need an appropriate compiler that will generate kernel image for the ARM architecture. We will use the ready toolchain from Linaro. It can be download from the Linaro website using wget command:
wget https://releases.linaro.org/components/toolchain/binaries/7.4-2019.02/arm-linux-gnueabihf/gcc-linaro-7.4.1-2019.02-x86_64_arm-linux-gnueabihf.tar.xz
and extracted using tar:
tar -xf gcc-linaro-7.4.1-2019.02-x86_64_arm-linux-gnueabihf.tar.xz
Now the toolchain is ready to use.
Downloading the Linux kernel
The iMX6ULL processor is fully supported by the Linux kernel version maintained by the NXP company. We will use the kernel released under version 5.4.24. The sources of the NXP kernel patched by SoMLabs can be downloaded from the Github repositories using git command:
git clone https://github.com/SoMLabs/somlabs-linux-imx.git linux-imx
The original NXP kernel is available in the repository (branch imx_5.4.24_2.1.0):
https://source.codeaurora.org/external/imx/linux-imx
Customizing the Linux kernel
The kernel configuration tools require two environmental variables describing the chosen architecture and toolchain. We can set them in the current terminal with the following commands:
export ARCH=arm export CROSS_COMPILE=/gcc-linaro-7.4.1-2019.02-x86_64_arm-linux-gnueabihf/bin/arm-linux-gnueabihf-
Now we can create the default configuration from the SoMLabs kernel patch:
make visionsom_6ull_defconfig
This configuration may be used as a base for further customization. Alternatively one of the configuration files provided by NXP may also be used — they can be found in the arch/arm/configs/ directory.
To modify the kernel we can use some graphical tools. The examples are:
- make menuconfig — based on ncurses library
- make nconfig — based on ncurses library
- make xconfig — based on qt library
Each of these tools displays all of the possible configuration options of the kernel.
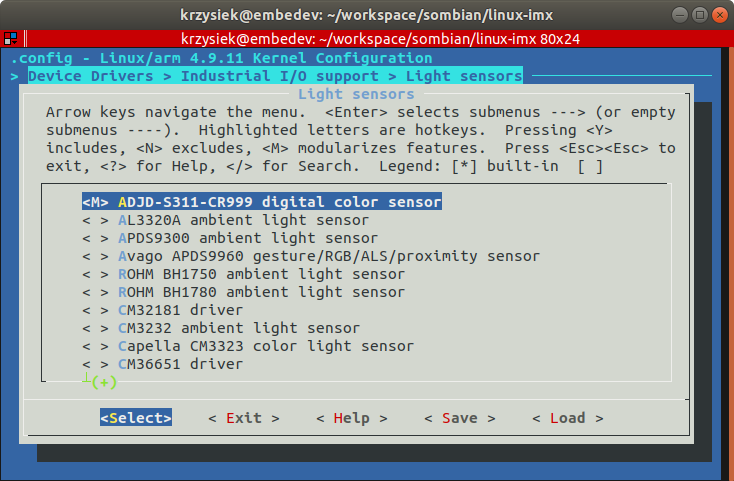
For example, in order to add the support for a luminosity sensor using the menuconfig tool we need to go to Device Drivers > Industrial I/O support > Light sensors section and select one of the supported devices (pressing Y adds the driver to kernel, M configures it as a kernel module, N removes the driver):
After all changes the we need to save them and the selected tool will generate a new configuration file (.config in the kernel source directory).
Building the Linux kernel
When the configuration is ready, the kernel can be built using the command:
called from the base kernel directory. It is important to remember also about the ARCH and CROSS_COMPILE variables:
export ARCH=arm export CROSS_COMPILE=/gcc-linaro-7.4.1-2019.02-x86_64_arm-linux-gnueabihf/bin/arm-linux-gnueabihf-
In order to compile the kernel in multi-core environment, the -j option can be added to define the number of cores for the compilation, for example:
This command will build the entire kernel, modules and the device tree. it is also possible to build selected parts by choosing one or more targets:
- zImage — kernel image
- modules — kernel modules
- dtbs — device tree
The new kernel image is located in the arch/arm/boot/zImage file and the device tree blobs can be found in the arch/arm/boot/dts/ directory. For the VisionCB-STD-6ULL there are four hardware configurations available:
- visioncb-6ull-std-sd.dtb — for SD card module version without wireless modem
- visioncb-6ull-std-sd-btwifi.dtb — for SD card module version with wireless modem
- visioncb-6ull-std-emmc.dtb — for eMMC card module version without wireless modem
- visioncb-6ull-std-sd-btwifi.dtb — for eMMC card module version with wireless modem
Finally the modules can be installed using the following command:
make modules_install INSTALL_MOD_PATH=
We need to specify the installation path of the modules in place of MODULES_INSTALL_PATH. It can be any local directory — all modules will be collected from the kernel source directory and copied there.
If we need the kernel headers we can collect them in a similar way:
make headers_install INSTALL_HDR_PATH=
Installing new Linux kernel
Now, when we have all kernel components we can install the to our VisionSOM system. The original kernel (zImage) and the device tree files (*.dtb) are located in the /boot directory on SD card or eMMC memory, so we can just backup the old versions and replace them. If the /boot directory is empty we need to mount the boot partition using the command:
The built device tree files should be renamed according to the original ones recognized by u-boot:
The kernel modules needs to be copied to the /lib/modules directory and the headers to /usr/include.
Mozilla Cavendish Theme based on Cavendish style by Gabriel Wicke modified by DaSch for the Web Community Wiki
github Projectpage – Report Bug – Skin-Version: 2.3.5
Сборка ядра Linux
Сборка ядра Linux вручную может понадобиться, например, если нужно включить в ядро модули, отсутствующие в стандартной поставке Wiren Board. Если вы не знаете, для чего вам это нужно, то, скорее всего, вам не нужно собирать ядро вручную.
Начиная с 8 апреля 2021 года, скрипты для сборки deb-пакетов ядра Linux для Wiren Board добавлены в репозиторий с кодом ядра: http://github.com/wirenboard/linux.
Подготовка сборочной машины
Сборка ядра должна производиться на настольном компьютере, ноутбуке или сервере под управлением Linux. Собирать ядро на самом Wiren Board не стоит — у контроллера не хватит дискового пространства для получения репозитория, а также вычислительной мощности. Даже на настольном компьютере сборка ядра может занять десятки минут.
Сборочные скрипты писались с расчётом на дистрибутивы Debian и Ubuntu, инструкции в этой статье приводятся также из расчёта использования этих дистрибутивов. Инструкция была проверена в Ubuntu 18.04.
Для сборки ядра понадобится установить пакеты с необходимым для сборки ПО:
$ sudo apt update && sudo apt install build-essential libncurses5-dev fakeroot lzop bc git bison flex libssl-dev Если вы собираете ядро для Wiren Board 6 и новее, нужно установить компилятор для arm-linux-gnueabihf:
$ sudo apt install gcc-arm-linux-gnueabihf
Для Wiren Board 5 и более старых понадобится другой компилятор:
$ sudo apt install gcc-arm-linux-gnueabi
Получение исходного кода
Исходный код ядра Linux с правками от команды Wiren Board хранится в репозитории на Github. Чтобы получить его на свой компьютер, выполните команды:
$ git clone https://github.com/wirenboard/linux $ cd linux $ git submodule update --init --recursive Сборка
Все промежуточные и конечные артефакты сборки — объектные файлы, dtb, модули ядра .ko, zImage и т.д. — будут находится в поддиректории .build-wbX, где X зависит от модели контроллера. В этой же директории находится конфигурация ядра (см. ниже).
Чаще всего для использования на контроллере удобней всего собрать deb-пакет с файлами ядра.
Если вам нужны только некоторые бинарные файлы (zImage, модули и dtbs), то после успешной сборки deb-пакета их можно будет найти в сборочной поддиректории .build-wbX.
Сборка deb-пакета
$ make mrproper $ KERNEL_FLAVOUR=wb6 VERSION_SUFFIX="~my~test~kernel" ./scripts/package/wb/do_build_deb.sh # Wiren Board 6
Можно поменять значение VERSION_SUFFIX на свой вкус согласно правилам оформления версий пакетов в Debian. Это значение будет добавлено в конец номера версии пакета и поможет отличить собранное вручную ядро от ядра из репозитория Wiren Board.
После сборки в корне появятся файлы пакетов (пример для Wiren Board 6):
- linux-image-wb6_4.9.22-wb1~my~test~kernel_armhf.deb — образ ядра, модули и dtbs;
- linux-headers-wb6_4.9.22-wb1~my~test~kernel_armhf.deb — нужен для разработки
- linux-libc-dev_4.9.22-wb1~my~test~kernel_armhf.deb — нужен для разработки
На контроллер достаточно скопировать файл пакета linux-image-wb6, в нём уже содержится всё необходимое.
Разные модели контроллеров
| Модель контроллера | KERNEL_FLAVOUR | файл defconfig | сборочная директория | переменная CROSS_COMPILE | файлы dts и dtb |
|---|---|---|---|---|---|
| Wiren Board 6 | wb6 | imx6_wirenboard_defconfig | .build-wb6 | CROSS_COMPILE=arm-linux-gnueabihf- | imx6ul-wirenboard6* |
| Wiren Board 5 и ниже | wb2 | mxs_wirenboard_defconfig | .build-wb2 | CROSS_COMPILE=arm-linux-gnueabi- | imx28-wirenboard5* |
| Wiren Board 7 | wb7 | wirenboard7_defconfig | .build-wb7 | CROSS_COMPILE=arm-linux-gnueabihf- | sun8i-r40-wirenboard7* |
Настройка ядра
При запуске скрипт сборки deb-пакета спрашивает, использовать ли конфигурацию по-умолчанию:
$ KERNEL_FLAVOUR=wb7 scripts/package/wb/do_build_deb.sh Building kernel packages for wb7 (Wiren Board 7) Revision: -wb100 Architecture: armhf Config: wirenboard7_defconfig .config already present Use wirenboard7_defconfig instead? (y/N)
Конфигурация по-умолчанюи при этом берётся из файлов в arch/arm/configs/, например imx6_wirenboard_defconfig.
Чтобы поменять конфигурацию, запустите make с необходимыми параметрами:
$ make KBUILD_OUTPUT=.build-wb6 ARCH=arm CROSS_COMPILE=arm-linux-gnueabihf- menuconfig # для Wiren Board 6
вместо menuconfig можно использовать графический xconfig.
После сохранения, конфигурация заишется в сборочную директорию: .build-wbX/.config.
Теперь вы можете собрать ядро с новой конфигурацией, выполнив обычную команду
$ KERNEL_FLAVOUR=wb7 scripts/package/wb/do_build_deb.sh
и ответив N, чтобы использовать новую конфигурацию, вместо конфигурации по-умолчанию:
Use wirenboard7_defconfig instead? (y/N)
Когда вы полностью довольны результатом, можно посмотреть изменения относительно исходной версии:
# для Wiren Board 6 $ make KBUILD_OUTPUT=.build-wb6 ARCH=arm CROSS_COMPILE=arm-linux-gnueabihf- savedefconfig # приводит конфигурацию к стандартному виду и записывает в .build-wb6/defconfig $ diff -u arch/arm/configs/imx6_wirenboard_defconfig .build-wb6/defconfig # посмотреть её отличия от исходной конфигурации
Чтобы заменить исходную версию настроек своей (например, при подготовке патча или pull request):
# для Wiren Board 6 $ make KBUILD_OUTPUT=.build-wb6 ARCH=arm CROSS_COMPILE=arm-linux-gnueabihf- savedefconfig $ cp .build-wb6/defconfig arch/arm/configs/imx6_wirenboard_defconfig
После этого скрипт do_build_deb.sh будет использовать обновлённую конфигуацию при ответе «y».
Сборка вручную
Этот этап не требуется для стандартных задач. Если вы хотите выполнить вручную какой-либо этап сборки, то можно запустить make вручную.
# для Wiren Board 6 $ make KBUILD_OUTPUT=.build-wb6 ARCH=arm CROSS_COMPILE=arm-linux-gnueabihf- zImage dtbs modules -j4
(-j4 запускает сборку в 4 потока, можно это убрать или поменять значение на более подходящее вашему компьютеру, идеальное значение — количество ядер CPU)
В результате появятся нужные нам файлы:
- .build-wb6/arch/arm/boot/zImage — образ ядра, который нужно скопировать в /boot/zImage на контроллере;
- .build-wb6/arch/arm/boot/dtb/* — файлы device tree, используемые для настройки оборудования при запуске, копируются в директорию /boot/dtbs/.
Файлы модулей можно найти с помощью команды:
Далее файлы модулей копируются на контроллер в директорию /lib/modules//kernel/ с сохранением исходного пути, как было при сборке.