How to Build Linux Kernel From Scratch
The Linux Kernel is the foundation of all the Linux distributions. The kernel is responsible for communication between hardware and software and the allocation of available resources.
All Linux distributions are based on a predefined kernel. But, if you want to disable certain options and drivers or try experimental patches, you need to compile your own Linux kernel.
In this step-by-step guide, you will learn how to build and compile a Linux kernel from scratch.

- A system running Linux
- Access to the terminal/command line
- A user account with sudo/root privileges
- 12GB of available space on the hard drive
- Building Linux Kernel
- Step 1: Download the Source Code
- Step 2: Extract the Source Code
- Step 3: Install Required Packages
- Step 4: Configure Kernel
- Step 5: Build the Kernel
- Step 6: Update the Bootloader (Optional)
- Step 7: Reboot and Verify Kernel Version
- How to build and install the latest Linux kernel from source
- Why build the kernel from source?
- What you’ll need
- Downloading and extracting the latest kernel source
- Configuring and Compiling:
- Final steps
- An important note
Building Linux Kernel
The process of building a Linux kernel can be performed in seven easy steps. However, the procedure may require a significant amount of time to complete, depending on the system speed.
Follow the steps below to build the latest Linux kernel.
Note: If the latest kernel version on the official website does not match the one mentioned in the steps below, replace the version number in the commands with the current latest version.
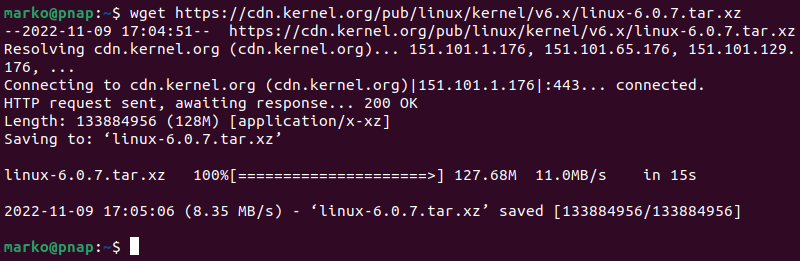
Step 1: Download the Source Code
1. Visit the official kernel website and download the latest kernel version. The downloaded file contains a compressed source code.

2. Open the terminal and use the wget command to download the Linux kernel source code:
wget https://cdn.kernel.org/pub/linux/kernel/v6.x/linux-6.0.7.tar.xzThe output shows the “saved” message when the download completes.
Note: Learn what to do when you get wget: command not found error.
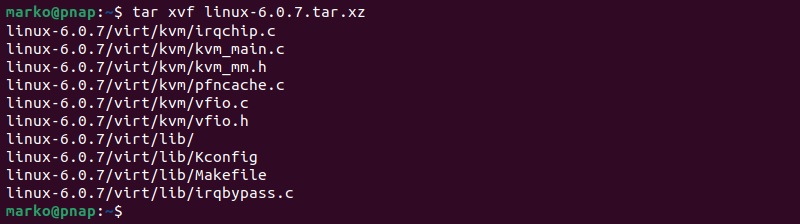
Step 2: Extract the Source Code
When the file is ready, run the tar command to extract the source code:
The output displays the extracted kernel source code:
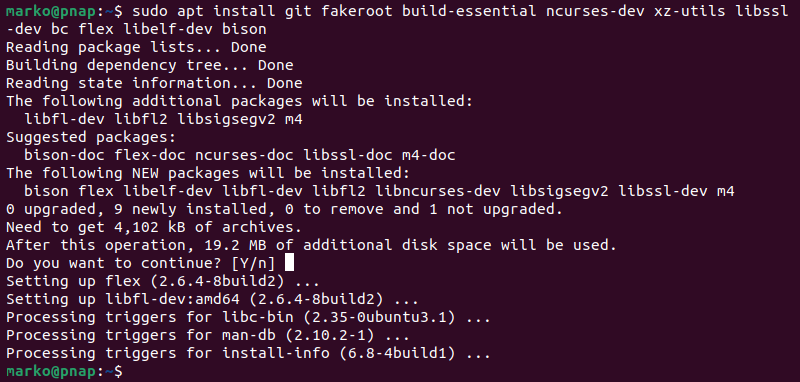
Step 3: Install Required Packages
Install additional packages before building a kernel. To do so, run this command:
sudo apt-get install git fakeroot build-essential ncurses-dev xz-utils libssl-dev bc flex libelf-dev bisonThe command we used above installs the following packages:
| Package | Package description |
| git | Tracks and makes a record of all changes during development in the source code. It also allows reverting the changes. |
| fakeroot | Creates the fake root environment. |
| build-essential | Installs development tools such as C, C++, gcc, and g++. |
| ncurses-dev | Provides API for the text-based terminals. |
| xz-utils | Provides fast file compression and decompression. |
| libssl-dev | Supports SSL and TSL that encrypt data and make the internet connection secure. |
| bc (Basic Calculator) | Supports the interactive execution of statements. |
| flex (Fast Lexical Analyzer Generator) | Generates lexical analyzers that convert characters into tokens. |
| libelf-dev | Issues a shared library for managing ELF files (executable files, core dumps and object code) |
| bison | Converts grammar description to a C program. |
Step 4: Configure Kernel
The Linux kernel source code comes with the default configuration. However, you can adjust it to your needs. To do so, follow the steps below:
1. Navigate to the linux-6.0.7 directory using the cd command:
2. Copy the existing configuration file using the cp command:
cp -v /boot/config-$(uname -r) .config
3. To make changes to the configuration file, run the make command:
The command launches several scripts that open the configuration menu:
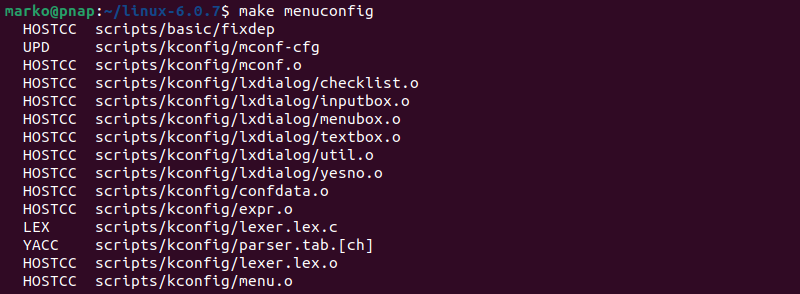
4. The configuration menu includes options such as firmware, file system, network, and memory settings. Use the arrows to make a selection or choose Help to learn more about the options. When you finish making the changes, select Save, and then exit the menu.
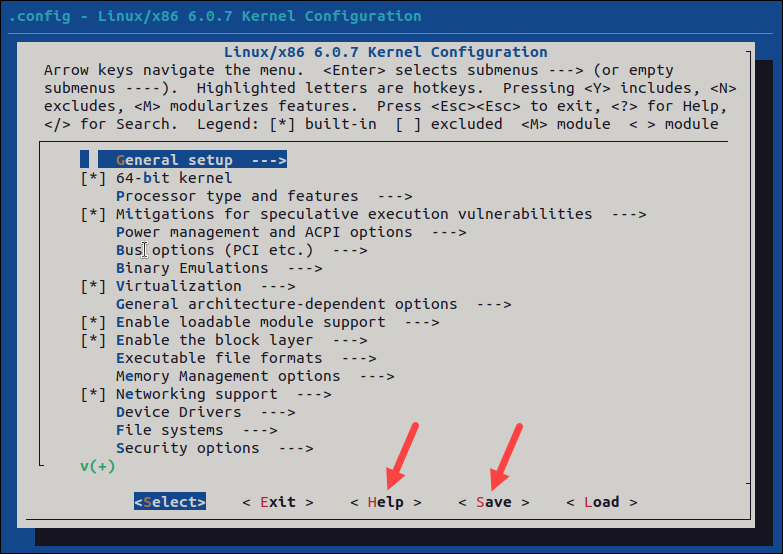
Note: Changing settings for some options can lead to a non-functional kernel. If you are unsure what to change, leave the default settings.
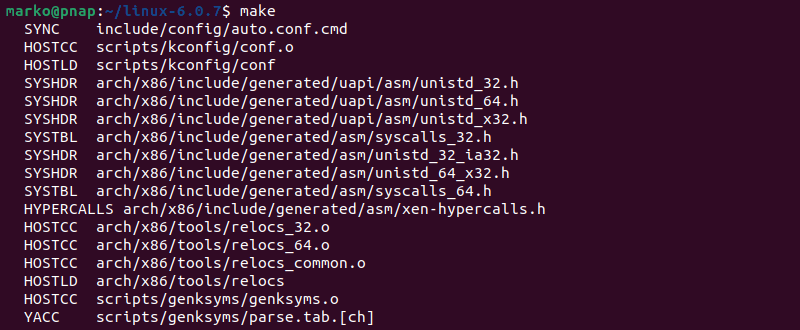
Step 5: Build the Kernel
1. Start building the kernel by running the following command:
The process of building and compiling the Linux kernel takes some time to complete.
The terminal lists all Linux kernel components: memory management, hardware device drivers, filesystem drivers, network drivers, and process management.
If you are compiling the kernel on Ubuntu, you may receive the following error that interrupts the building process:
No rule to make target 'debian/canonical-certs.pemDisable the conflicting security certificates by executing the two commands below:
scripts/config --disable SYSTEM_TRUSTED_KEYSscripts/config --disable SYSTEM_REVOCATION_KEYSThe commands return no output. Start the building process again with make , and press Enter repeatedly to confirm the default options for the generation of new certificates.
2. Install the required modules with this command:
sudo make modules_install
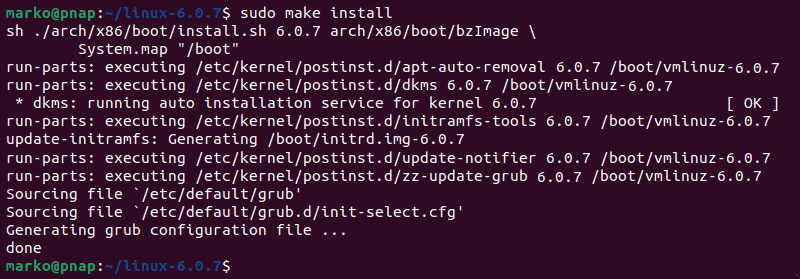
3. Finally, install the kernel by typing:
The output shows done when finished:
Step 6: Update the Bootloader (Optional)
The GRUB bootloader is the first program that runs when the system powers on.
The make install command performs this process automatically, but you can also do it manually.
1. Update the initramfs to the installed kernel version:
sudo update-initramfs -c -k 6.0.72. Update the GRUB bootloader with this command:
The terminal prints out the process and confirmation message:

Step 7: Reboot and Verify Kernel Version
When you complete the steps above, reboot the machine.
When the system boots up, verify the kernel version using the uname command:
The terminal prints out the current Linux kernel version.

In this step-by-step guide, you learned how to build a Linux kernel from scratch and install the required packages.
If you follow the instructions carefully, the process will complete successfully on your Linux machine.
The Linux kernel has a modular design. Functionality is extendible with modules or drivers. Learn how to use the modprobe command to add or remove modules on Linux.
Goran combines his leadership skills and passion for research, writing, and technology as a Technical Writing Team Lead at phoenixNAP. Working with multiple departments and on various projects, he has developed an extraordinary understanding of cloud and virtualization technology trends and best practices.
There are several methods to remove old or unused kernels. It’s also considered good system hygiene practice.
The Linux kernel is the underlying software architecture of each Linux distribution. It provides and defines.
How to build and install the latest Linux kernel from source

I just finished my first assignment for a course on Advanced Operating Systems. And I decided to document my approach for building the Linux kernel from source and implementing my own system call.
There are a number of blogs that already tell you how to go about doing this, but some of them are outdated, and some seem unnecessarily complicated. My goal is to present a straightforward approach for doing this, which should hopefully help you save a lot of time.
Compiling the Linux Kernel from source can seem like a daunting task, even to someone who’s pretty comfortable with computers in general. It can also get really irritating if you aren’t following the right instructions.
So, here’s a guide to help you through the process of building the kernel from source, and it’s a guide that works! You will not have to worry about messing up your system or wasting your time.
Why build the kernel from source?
If you plan to work on the internals of the Linux kernel or change its behavior, you’ll need to recompile the kernel on your system.
Here are a few specific cases where you’ll need to know how to work with the kernel’s source code:
- You want to write a really cool ‘Hello world’ program. (Each time you implement your own system call or modify kernel source code, you will need to recompile the kernel to implement the changes)
- You want to enable experimental features on your kernel that are not enabled by default (or, disable default features that you don’t want)
- You want to debug kernel source code, enable support for a new piece of hardware, or make modifications to its existing configurations
- You’re doing a course on Advanced Operating Systems and have no choice but to do this!
In each of the above situations, learning how to build the kernel from source will come in handy.
What you’ll need
A Linux based Operating System (I tried this on Ubuntu 14.04 LTS and the instructions written here are for the same).
You will need to install a few packages before you can get started. Use the following commands for the same.
sudo apt-get install git fakeroot build-essential ncurses-dev xz-utils libssl-dev bcYou will also need up to at least 12 GB of free space on disk, an internet connection to download the source code, and a lot of time (about 45 to 90 minutes).
Downloading and extracting the latest kernel source
To check your current kernel version, open the terminal and type:
Go to kernel.org and download the latest stable version. At the time of writing this, the latest stable kernel version was 4.7.1, and I will refer to the same in this article. (Note: Try to avoid downloading source from other websites)
Change to the directory where the file was downloaded and extract using:
Change to the extracted linux-4.7.1 directory.
It should contain folders called arch, fs, crypto, etc.
Configuring and Compiling:
Before compiling the kernel, we need to configure which modules are to be included and which ones are to be left out.
There are many ways to go about doing this.
An easy and straightforward way to do this is to first copy your existing kernel config file and then use ‘menuconfig’ to make changes (if necessary). This is the fastest way to do it and probably, the safest.
cp /boot/config-$(uname -r) .config This is the part where you could end up removing support for a device driver or do something of the sort which will eventually result in a broken kernel. If you are unsure about making changes, just save and exit.
Note: One of the alternatives to menuconfig is an interactive command line interface accessible using ‘make config’. This helps you configure everything from scratch. Do not use this. You will be asked over a thousand yes/no questions about enabling or disabling modules, which I promise is no fun whatsoever. I did try this out once and somehow managed to mess up the display driver configurations.
gconfig and xconfig are alternate GUI based configuration tools that you could use. I haven’t tried these myself. For this, you’ll need to use make gconfig (or make xconfig) instead of make menuconfig.
To compile the kernel and its modules, we use the make command.
This is followed by using make modules_install to install the kernel modules.
Finally, we use make install to copy the kernel and the .config file to the /boot folder and to generate the system.map file (which is a symbol table used by the kernel).
These three steps put together usually take up a lot of time. Use the following command to perform the above tasks:
sudo make -j 4 && sudo make modules_install -j 4 && sudo make install -j 4Note: I have used the -j option to specify the number of cores to be used. This tends to speed up the process considerably. You can use nproc to check the number of processing units available. In my case, it was 4 cores.
Ideally, you shouldn’t need sudo privileges, but, I was running into problems when I didn’t run it with sudo privileges.
Final steps
Once the kernel and its modules are compiled and installed, we want to be using the new kernel the next time we boot up.
For this to happen, we need to use the following command:
Then, use the following command, which automatically looks for the kernels present in the /boot folder and adds them to the grub’s config file.
Now, restart the system and you should see that the new kernel is added to the boot loader entries.
On following the instructions, assuming there’s enough space available on disk and the current kernel configuration works fine, you shouldn’t encounter any problems. Note that you could always use the old kernel version in case of any problem and try the whole thing again!
The command uname -r should now show you the current kernel version being used.
An important note
The above steps are needed to build the kernel from source, for the first time. Once, this is done at least once and a new kernel image is ready, making changes and writing our own modules is simple. You will only be using the steps listed under Configuring and Compiling each time something new is to be implemented or configured differently.
Meaning, just remember the following:
cp /boot/config-$(uname -r) .configsudo make -j 4 && sudo make modules_install -j 4 && sudo make install -j 4I must give credit to the following worthwhile resources — they were hugely helpful with this task: Ramkitech.com, askubuntu.com, kernel.org and cyberciti.biz