Конфигурирование и компиляция ядра Linux
Пересборка ядра Linux дело очень интересное и почему-то часто отпугивает новичков. Но ничего сложного в этом нет, и скомпилировать ядро Linux бывает не сложнее, чем собрать (скомпилировать) любую другую программу из исходников. Пересборка ядра может понадобиться, когда вам требуются какие-нибудь функции, не включенные в текущее ядро, или же, наоборот, вы хотите что-то отключить. Все дальнейшие действия мы будем выполнять в Ubuntu Linux.
Установка утилит
Для настройки и сборки ядра Linux вам потребуется установить несколько пакетов, которые понадобятся для сборки и настройки ядра: kernel-package , build-essential , libncurses-dev . Сделать это можно командой:
sudo apt-get install build-essential kernel-package libncurses-devСкачиваем исходный код ядра
Теперь нужно скачать исходный код ядра. Мы будем скачивать ядро для Ubuntu. Вы можете скачать определенную версию ядра, например, ту, которую вы в данный момент используете или же скачать самую последнюю версию. Для того, чтобы определить версию ядра Linux, которую вы используете, выполните команду uname с параметром -r :
Вывод команды будет примерно следующим:
Имя пакета, содержащего исходные коды ядра обычно имеет следующий вид: linux-source-Версия. Например, для ядра версии 2.6.24: linux-source-2.6.24. Самая последняя версия ядра в репозиториях Ubuntu называется просто linux-source, без указания версии на конце. Для установки исходных кодов последней версии ядра Ubuntu Linux, выполните команду:
sudo apt-get install linux-sourceЭта команда скачивает исходники ядра и размещает их в директории /usr/src . На момент написания заметки последняя версия ядра, которая была скачана — 2.6.27, ее мы и будем использовать. Если мы теперь перейдем в директорию /usr/src и выполним команду ls , то увидим, что среди файлов присутствует файл linux-source-2.6.27.tar.bz2. Это и есть исходные коды ядра Linux (ядра Ubuntu).
Распаковываем исходный код ядра
Перейдем в директорию /usr/src и разархивируем ядро. Для этого выполните следующие команды:
cd /usr/src sudo tar xjf linux-source-2.6.27.tar.bz2 sudo ln -s linux-source-2.6.27 linuxДля удобства мы создали символьную ссылку с именем linux , которая указывает на директорию с исходниками.
Конфигурация ядра
Теперь перейдем к конфигурированию ядра. Чтобы не создавать конфигурацию с нуля, возьмем за основу конфигурацию ядра, которая в данный момент используется. Получить текущую конфигурацию можно выполнив команду make oldconfig . Выполните в терминале:
cd /usr/src/linux sudo make oldconfigВ результате выполнения команды make oldconfig создастся файл .config , содержащий параметры конфигурации ядра.
Получить справку по всем параметрам make для ядра Linux вы можете, выполнив команду make help .
Для изменения конфигурации ядра мы воспользуемся консольной утилитой menuconfig . Для ее запуска выполните:
Перед вами появится интерфейс, в котором вы можете включать или отключать определенные опции ядра:
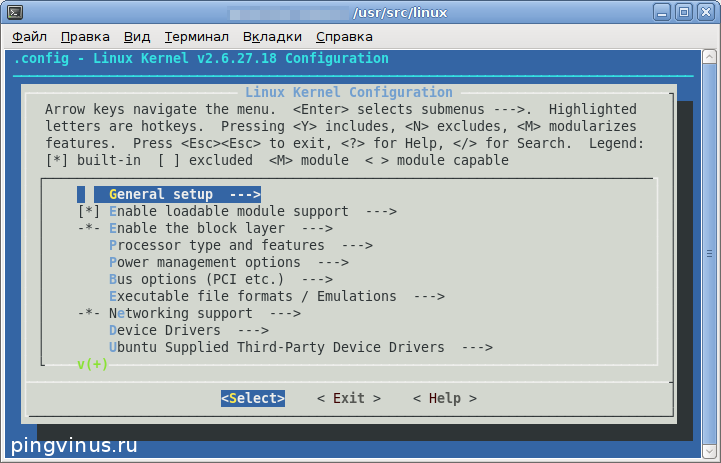
Для примера я включу опцию «NTFS write support». Для этого, нажимая кнопку Вниз , найдите пункт «File systems» и нажмите Enter .
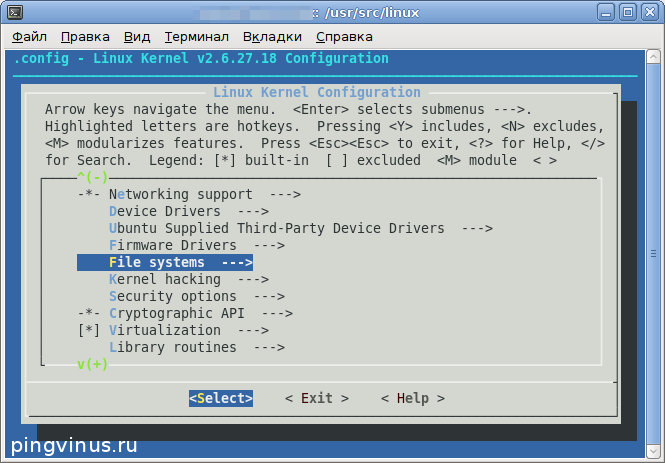
Вы окажетесь в меню настройки файловых систем. Найдите в этом списке пункт «DOS/FAT/NT Filesystems» и нажмите Enter .
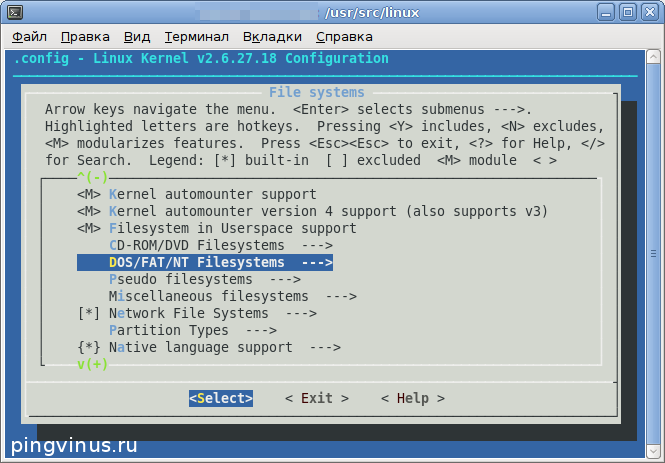
Перейдите к пункту «NTFS write support» и нажмите Пробел , рядом с пунктом появится звездочка, означающая, что данная опция будет включена в ядро.
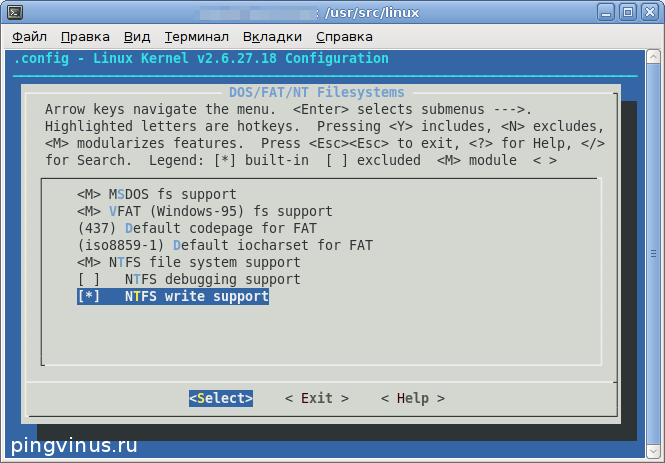
Теперь выберите «Exit» (нажав кнопку Вправо и затем Enter ) и выйдите из утилиты. Перед выходом из утилиты выскочит сообщение с вопросом — сохранить проделанные изменения, выберите Yes.
Компиляция ядра
Пришло время скомпилировать ядро с теми изменениями, которые мы внесли на предыдущем шаге. Для начала выполним команду, которая удалит файлы (если они имеются), оставшиеся от предыдущей компиляции:
Наконец, чтобы запустить компиляцию ядра, выполним команду:
sudo make-kpkg --initrd --append-to-version=-mykernel kernel_image kernel_headersКлюч -append-to-version используется, чтобы добавить к имени файла образа ядра, который мы получим после компиляции, строку -mykernel , чтобы было проще идентифицировать свое ядро. Вместо -mykernel вы можете использовать любой префикс.
Компиляция ядра занимает довольно много времени и может длиться от нескольких десятков минут до нескольких часов, в зависимости от мощности вашего компьютера.
Установка (инсталляция) ядра
После компиляции ядра вы получили на выходе два файла: linux-image-2.6.27.18-mykernel_2.6.27.18-mykernel-10.00.Custom_i386.deb, linux-headers-2.6.27.18-mykernel_2.6.27.18-mykernel-10.00.Custom_i386.deb. Мы воспользуемся командной dpkg -i , которая автоматически установит ядро и пропишет его в ваш загрузчик GRUB (в файл /boot/grub/menu.lst ). Отмечу, что ядро будет установлено, как ядро по умолчанию, поэтому если оно у вас не загрузится вам нужно будет загрузиться, используя ваше предыдущее ядро (оно должно быть в списке меню GRUB при загрузке компьютера) и вручную изменять файл menu.lst . Итак, для установки ядра выполните команды:
dpkg -i linux-image-2.6.27.18-mykernel_2.6.27.18-mykernel-10.00.Custom_i386.deb dpkg -i linux-headers-2.6.27.18-mykernel_2.6.27.18-mykernel-10.00.Custom_i386.debЗапуск системы с новым ядром
Проверим работоспособность системы с новым ядром. Перезагрузите компьютер. В меню загрузчика GRUB вы должны будете увидеть новый пункт, соответствующей вашему новому ядру, которое должно загрузиться по умолчанию. Если все пройдет успешно, то система запустится с новым ядром.
Rand/eng works
Although relatively straightforward, compiling and selecting the Linux headers is too manual and is only partially explained at several different documents in the codebase. This entry provides some guidelines and also scripts to automate a bit the process. Find the complete script at the bottom.
Building
First of all, move to the list of kernel sources. Browse through it to find the desired version of the headers. You may download the sources and uncompress them into the disk. In this sample script the kernel 4.14.151 is used.
1 2 3 4 5 6 7 8 9 10 11 12 13header_version=4.14.151 header_dir=linux-$header_version> mkdir -p ~/linux-headers cd ~/linux-headers current=$PWD # Download sources if [[ ! -d $header_dir ]]; then wget https://cdn.kernel.org/pub/linux/kernel/v4.x/$header_dir.tar.gz tar xvzf $header_dir.tar.gz cd ~/linux-headers/$header_dir fiHave a look at the Documentation/process/changes.rst file to understand the expected versions of the third-party libraries required for the compilation. Follow the process manually, then head to Documentation/admin-guide/README.rst .
First, the configuration must be defined. In this example we don’t tailor anything, so it will take a considerable amount of space (not being accurate, you should probably make sure you have 10GB+ of available disk).
# Note: before continue, perform all checks on the versions for the packages cd ~/linux-headers/$header_dir # Create configuration file (here, a sample one; not tailored) ## Note: the kernel will be larger when using a sample configuration ## For instance, you may consider saving 10-15 GB for this cp /boot/config-$(uname -r) .configIt is now time to compile the headers and the kernel modules. The first command will prompt a lot of questions. After that, both commands will take a good amount of time to finish. In the example we are dedicating the full computing power (all the CPUs) to speed up the building process.
# Compile headers make -j$cores> # Compile kernel modules ## Note: "make -j$ would compile using all CPUs" sudo make -j$cores> modules_installInstalling
After the compilation it is now time to install the headers in the system and make them available for use. You may find issues with configurations such as the locales. Just fix it and retry as needed.
# Install headers ## Note: be sure to properly setup the locales to correct values ## (e.g., everything to "en_US.UTF-8" did work) sudo make -j$cores> install ## Note: after this, the kernel will be available under /lib/modulesEnabling
After the installation, the system must know that this kernel is available for booting.
# Enable it for booting sudo update-initramfs -c -k $header_version> sudo update-grubIf you would wish to select this version of the kernel for the next boot, you can either:
- Enable the GRUB menu and select it manually
- Modify manually the configuration flags under etc/default/grub , then set the flags as desired. For instance, set something like GRUB_DEFAULT=”Advanced options for Ubuntu>Ubuntu, with Linux 4.14.151”
- Use some tool like grub-customizer. This one is handy when your VM is not able to show the GRUB menu. When running it, move to the “General settings” tab, then choose “default entry > predefined” and pick the specific version from the list
The latter option can be installed and run as follows:
# Install grub-customizer sudo add-apt-repository ppa:danielrichter2007/grub-customizer apt-get update sudo apt-get install grub-customizer ## Note: only needed for the usage of grub-customizer when connecting by xterm sudo apt install x11-xserver-utils -y # Run it (will require X11 previously installed in the system) sudo grub-customizer
Altogether
All the script put together, for convenience. Note that this works for building kernel 4.14.151 on an Ubuntu 16.04.4 LTS.
1 2 3 4 5 6 7 8 9 10 11 12 13 14 15 16 17 18 19 20 21 22 23 24 25 26 27 28 29 30 31 32 33 34 35 36 37 38 39 40 41 42 43 44 45 46 47 48 49 50 51 52 53 54 55 56 57 58 59 60 61 62 63 64 65 66 67 68 69 70 71 72 73 74 75 76 77 78 79 80 81 82 83 84 85 86 87 88 89 90 91 92 93 94 95 96 97 98 99 100 101 102 103#!/bin/bash header_version=4.14.151 header_dir=linux-$header_version> cores=$(nproc --all) mkdir -p ~/linux-headers cd ~/linux-headers current=$PWD # Download sources if [[ ! -d $header_dir ]]; then wget https://cdn.kernel.org/pub/linux/kernel/v4.x/$header_dir.tar.gz tar xvzf $header_dir.tar.gz cd ~/linux-headers/$header_dir fi # Install make sudo apt install -y build-essential cd ~ # Install third-party requirements if [[ ! -d ~/mcelog ]]; then git clone git://git.kernel.org/pub/scm/utils/cpu/mce/mcelog.git cd mcelog make sudo make install fi cd $PWD # Install third-party requirements sudo apt install -y jfsutils reiserfsprogs xfsprogs btrfs-progs pcmciautils quota ppp nfs-common procps oprofile udev grub iptables openssl bc sudo apt install -y libelf-dev libssl-dev # Check versions to fit those in Documentation/process/changes.rst gcc --version make --version ld -v fdformat --version depmod -V e2fsck -V fsck.jfs -V fsck.jfs -V reiserfsck -V xfs_db -V mksquashfs -version dpkg -l | grep btrfsck pccardctl -V dpkg -l | grep quota pppd --version showmount --version ps --version dpkg -l | grep oprofile dpkg -l | grep udev grub --version || grub-install --version dpkg -l | grep mcelog iptables -V openssl version bc --version perl --version perldoc -l Getopt::Long perl -MGetopt::Long -le 'print $INC' perl -MGetopt::Std -le 'print $INC' perl -MFile::Basename -le 'print $INC' perl -MFile::Find -le 'print $INC' # Create configuration file (here, a sample one; not tailored) ## Note: the kernel will be larger when using a sample configuration ## For instance, you may consider saving 10-15 GB for this cd ~/linux-headers/$header_dir cp /boot/config-$(uname -r) .config df -h # Compile headers make -j$cores> # Compile kernel modules ## Note: "make -j$ would compile using all CPUs" sudo make -j$cores> modules_install # Install headers ## Note: be sure to properly setup the locales to correct values ## (e.g., everything to "en_US.UTF-8" did work) sudo make -j$cores> install ## Note: after this, the kernel will be available under /lib/modules df -h # Enable it for booting sudo update-initramfs -c -k $header_version> sudo update-grub # Install grub-customizer sudo add-apt-repository ppa:danielrichter2007/grub-customizer apt-get update sudo apt-get install grub-customizer ## Note: only needed for the usage of grub-customizer when connecting by xterm sudo apt install x11-xserver-utils -y # Run it (will require X11 previously installed in the system) sudo grub-customizer df -h