- How to Compile and Install the Linux Kernel on Ubuntu
- The setup I tested this on
- Installing dependencies, downloading the kernel source
- Configuring the kernel
- Compiling
- Installation
- Checking if kernel was installed sucessfully
- Bonus: Modifying the kernel source
- And that’s it
- Building Linux Kernel
- Step 1: Download the Source Code
- Step 2: Extract the Source Code
- Step 3: Install Required Packages
- Step 4: Configure Kernel
- Step 5: Build the Kernel
- Step 6: Update the Bootloader (Optional)
- Step 7: Reboot and Verify Kernel Version
How to Compile and Install the Linux Kernel on Ubuntu
In this post I will show you how to compile and install the Linux kernel from source on Ubuntu.
I know that there are tons of tutorials on compiling the Linux kernel. However, while I tried many of them, none of them worked for me. I always either got error messages during compilation or the compilation terminated without error messages but failed at installation. Therefore, I decided to write down how I did it.
The setup I tested this on
I used a freshly installed VirtualBox with Ubuntu Server 22.04. I did not do any modifications to the machine and didn’t install any packages on it beforehand. Additionally, I also tested the steps presented in this post on a real computer with an AMD Ryzen 7 2700X CPU.
Installing dependencies, downloading the kernel source
First we need to install a few packages that are required for the compilation:
$ sudo apt install build-essential libncurses-dev bison flex libssl-dev libelf-dev fakeroot Additionally we also need to install the dwarves package. When I tried it without the package, the compilation failed with an error message.
Next we need to need to download the kernel source from the offical kernel.org website.
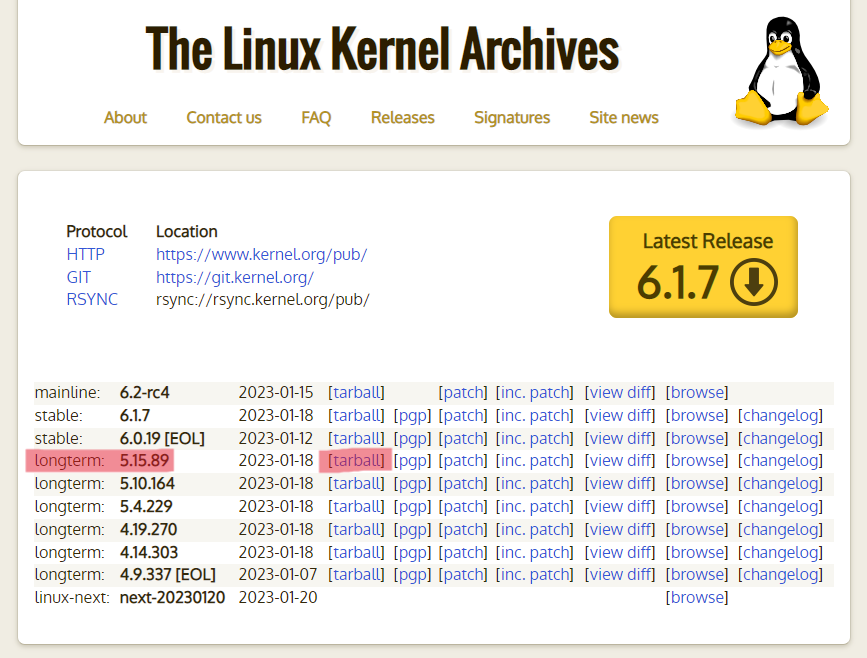
Choose the latest longterm release and copy the link of the tarball hyperlink. Then use this link to download and unpack the kernel source to your Ubuntu machine:
$ wget https://cdn.kernel.org/pub/linux/kernel/v5.x/linux-5.15.89.tar.xz $ tar -xf linux-5.15.89.tar.gz Configuring the kernel
Now enter the directory of the Linux source:
The configuration of the Linux kernel can be specified in a .config file. A good starting point is to copy the config file of your currently installed Linux:
$ cp -v /boot/config-$(uname -r) .config However, this config file includes tons of unnecessary drivers and kernel modules which dramatically increases the build time. To mitigate this, we can use the localmodconfig command. This command looks at the loaded kernel modules of your system and modifies the .config file such that only these modules are included in the build. This should work perfectly fine as long as you don’t plan to use the generated build on another machine than the one you compile the source on.
If, while running the above command, any requests are promted to you, just hit enter each time (without typing an answer).
Next, you need to make four modifications to the configuration. Otherwise the build will fail. To do this, you can either directly modify the .config file or simply run the following commands:
$ scripts/config --disable SYSTEM_TRUSTED_KEYS $ scripts/config --disable SYSTEM_REVOCATION_KEYS $ scripts/config --set-str CONFIG_SYSTEM_TRUSTED_KEYS "" $ scripts/config --set-str CONFIG_SYSTEM_REVOCATION_KEYS "" Compiling
Now it’s time to compile the kernel. For this just run the command
Note that it is very important to run the command with the fakeroot prefix. This was something I had to figure out myself because none of the other tutorials I read mention it. When you don’t run fakeroot make but only make the build process will terminate without any error messages which seems good but isn’t. In reality, the build fails with error code 2 (can be checked by running echo $? afterwards) after some time.
You can also speed up the build by using multiple CPU cores of your machine. For instance,
will use eight cores of your machine.
The build time heavily depends on your machine and is especially slow on virtual machines. On my VirtualBox with only one CPU core it took around 3 hours. On a physical computer with an AMD Ryzen 7 2700X with 8 cores it took only 6 minutes.
After the build finishes, you can check whether it is successful by running
This outputs the return code of the previous command. If it returns 0 , the build was sucessful. For any other value than 0 the build was not sucessful.
Installation
The installation is split into two parts: Installing the kernel modules and installing the kernel itself.
First install the kernel modules by running
$ sudo make modules_install Then install the kernel itself:
After that, reboot your machine:
Checking if kernel was installed sucessfully
You can check the version of the installed kernel by running
This outputs something like

You know that the installation was sucessfull if the displayed Linux version matches the one of the kernel source you downloaded.
Bonus: Modifying the kernel source
Of course you can also modify the Kernel source before installation to make your own custom version Linux. As a very simple example for such a modification I’ll modify the name of the operating system. Any other modification of the source code works the same.
The default name is of course “Linux”. It is stored in the include/linux/uts.h header file, which looks like this:
// include/linux/uts.h /* SPDX-License-Identifier: GPL-2.0 */ #ifndef _LINUX_UTS_H #define _LINUX_UTS_H /* * Defines for what uname() should return */ #ifndef UTS_SYSNAME #define UTS_SYSNAME "Linux" #endif #ifndef UTS_NODENAME #define UTS_NODENAME CONFIG_DEFAULT_HOSTNAME /* set by sethostname() */ #endif #ifndef UTS_DOMAINNAME #define UTS_DOMAINNAME "(none)" /* set by setdomainname() */ #endif #endif We can now change the operating system name by changing the UTS_SYSNAME field. In my case I’ll change it to DavidOS :
// include/linux/uts.h /* SPDX-License-Identifier: GPL-2.0 */ #ifndef _LINUX_UTS_H #define _LINUX_UTS_H /* * Defines for what uname() should return */ #ifndef UTS_SYSNAME #define UTS_SYSNAME "DavidOS" // #ifndef UTS_NODENAME #define UTS_NODENAME CONFIG_DEFAULT_HOSTNAME /* set by sethostname() */ #endif #ifndef UTS_DOMAINNAME #define UTS_DOMAINNAME "(none)" /* set by setdomainname() */ #endif #endif After you modified the file, you can simple re-compile the kernel and then install it:
$ fakeroot make $ sudo make modules_install $ sudo make install $ sudo reboot The compile time should now be significantly shorter than the first time. The reason is that make re-uses some results from the first compilation run.
When you now run uname -rs you get the following:
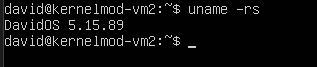
As you can see, it now displays DavidOS instead of Linux .
And that’s it
Now you know how to compile the Linux kernel yourself. You can use this knowledge to upgrade to the latest kernel version long before your Linux distribution does. Besides this you can also customize the kernel to adapt it to your needs.
How to Build Linux Kernel From Scratch
The Linux Kernel is the foundation of all the Linux distributions. The kernel is responsible for communication between hardware and software and the allocation of available resources.
All Linux distributions are based on a predefined kernel. But, if you want to disable certain options and drivers or try experimental patches, you need to compile your own Linux kernel.
In this step-by-step guide, you will learn how to build and compile a Linux kernel from scratch.

- A system running Linux
- Access to the terminal/command line
- A user account with sudo/root privileges
- 12GB of available space on the hard drive
Building Linux Kernel
The process of building a Linux kernel can be performed in seven easy steps. However, the procedure may require a significant amount of time to complete, depending on the system speed.
Follow the steps below to build the latest Linux kernel.
Note: If the latest kernel version on the official website does not match the one mentioned in the steps below, replace the version number in the commands with the current latest version.
Step 1: Download the Source Code
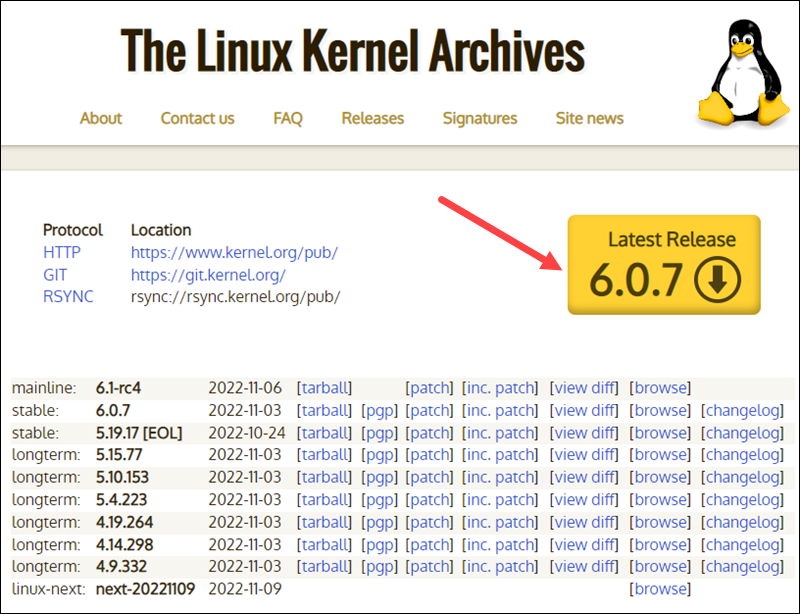
1. Visit the official kernel website and download the latest kernel version. The downloaded file contains a compressed source code.
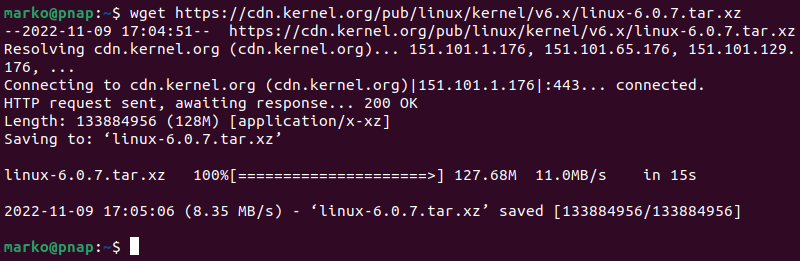
2. Open the terminal and use the wget command to download the Linux kernel source code:
wget https://cdn.kernel.org/pub/linux/kernel/v6.x/linux-6.0.7.tar.xzThe output shows the “saved” message when the download completes.
Note: Learn what to do when you get wget: command not found error.
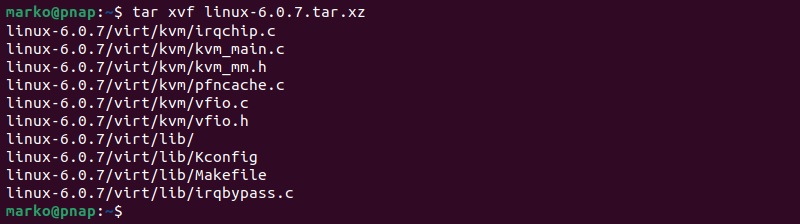
Step 2: Extract the Source Code
When the file is ready, run the tar command to extract the source code:
The output displays the extracted kernel source code:
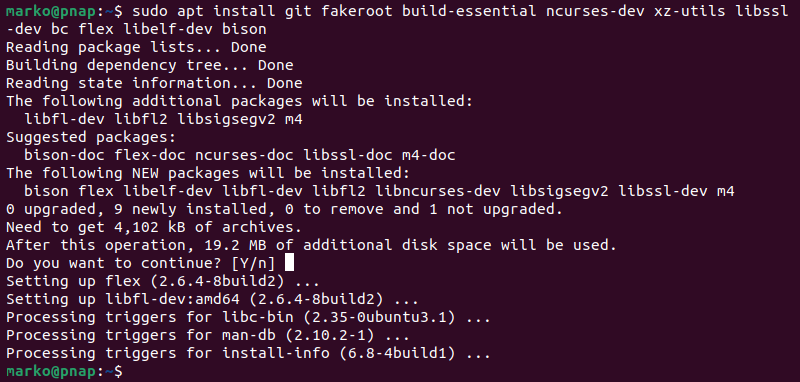
Step 3: Install Required Packages
Install additional packages before building a kernel. To do so, run this command:
sudo apt-get install git fakeroot build-essential ncurses-dev xz-utils libssl-dev bc flex libelf-dev bisonThe command we used above installs the following packages:
| Package | Package description |
| git | Tracks and makes a record of all changes during development in the source code. It also allows reverting the changes. |
| fakeroot | Creates the fake root environment. |
| build-essential | Installs development tools such as C, C++, gcc, and g++. |
| ncurses-dev | Provides API for the text-based terminals. |
| xz-utils | Provides fast file compression and decompression. |
| libssl-dev | Supports SSL and TSL that encrypt data and make the internet connection secure. |
| bc (Basic Calculator) | Supports the interactive execution of statements. |
| flex (Fast Lexical Analyzer Generator) | Generates lexical analyzers that convert characters into tokens. |
| libelf-dev | Issues a shared library for managing ELF files (executable files, core dumps and object code) |
| bison | Converts grammar description to a C program. |
Step 4: Configure Kernel
The Linux kernel source code comes with the default configuration. However, you can adjust it to your needs. To do so, follow the steps below:
1. Navigate to the linux-6.0.7 directory using the cd command:
2. Copy the existing configuration file using the cp command:
cp -v /boot/config-$(uname -r) .config
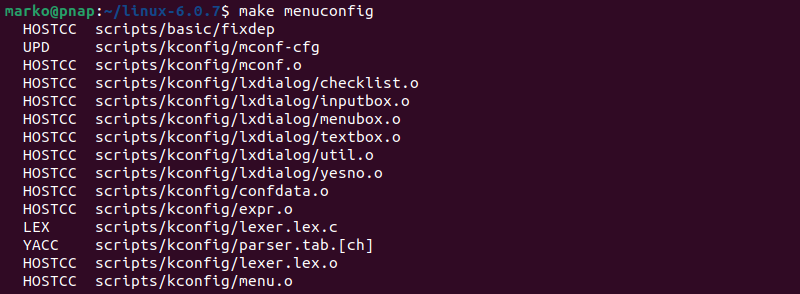
3. To make changes to the configuration file, run the make command:
The command launches several scripts that open the configuration menu:
4. The configuration menu includes options such as firmware, file system, network, and memory settings. Use the arrows to make a selection or choose Help to learn more about the options. When you finish making the changes, select Save, and then exit the menu.
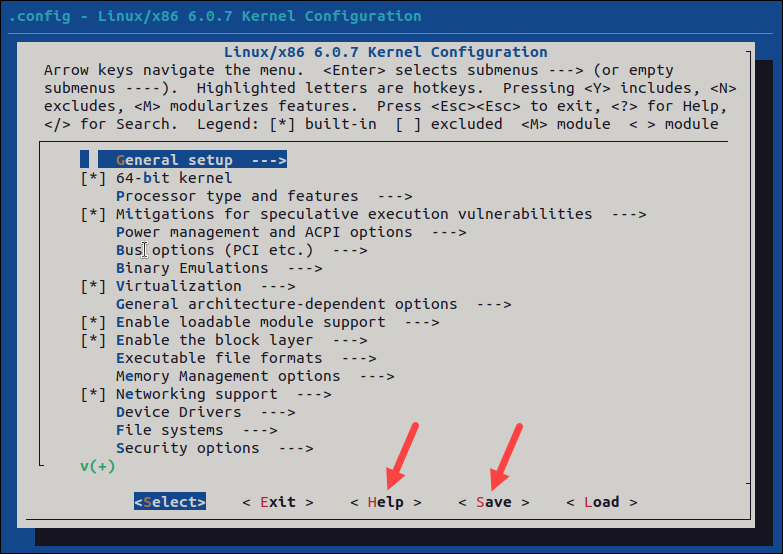
Note: Changing settings for some options can lead to a non-functional kernel. If you are unsure what to change, leave the default settings.
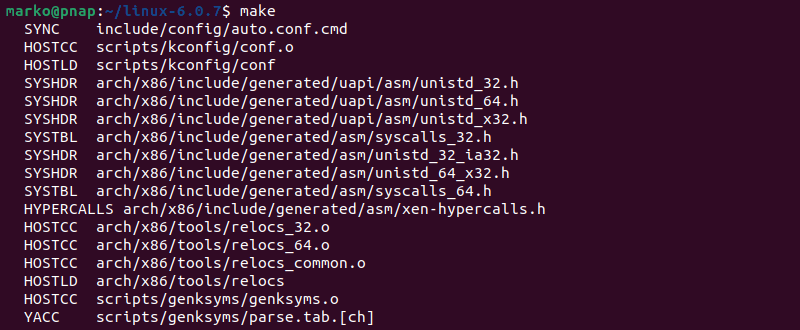
Step 5: Build the Kernel
1. Start building the kernel by running the following command:
The process of building and compiling the Linux kernel takes some time to complete.
The terminal lists all Linux kernel components: memory management, hardware device drivers, filesystem drivers, network drivers, and process management.
If you are compiling the kernel on Ubuntu, you may receive the following error that interrupts the building process:
No rule to make target 'debian/canonical-certs.pemDisable the conflicting security certificates by executing the two commands below:
scripts/config --disable SYSTEM_TRUSTED_KEYSscripts/config --disable SYSTEM_REVOCATION_KEYSThe commands return no output. Start the building process again with make , and press Enter repeatedly to confirm the default options for the generation of new certificates.
2. Install the required modules with this command:
sudo make modules_install
3. Finally, install the kernel by typing:
The output shows done when finished:
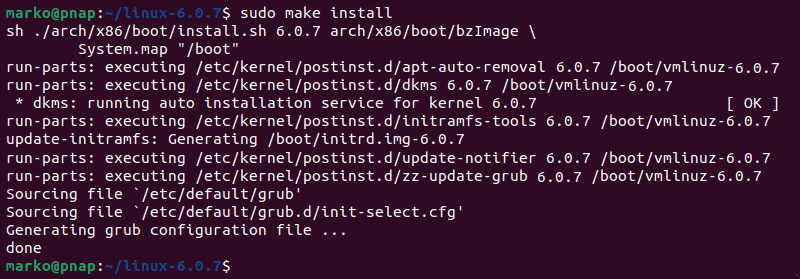
Step 6: Update the Bootloader (Optional)
The GRUB bootloader is the first program that runs when the system powers on.
The make install command performs this process automatically, but you can also do it manually.
1. Update the initramfs to the installed kernel version:
sudo update-initramfs -c -k 6.0.72. Update the GRUB bootloader with this command:
The terminal prints out the process and confirmation message:

Step 7: Reboot and Verify Kernel Version
When you complete the steps above, reboot the machine.
When the system boots up, verify the kernel version using the uname command:
The terminal prints out the current Linux kernel version.

In this step-by-step guide, you learned how to build a Linux kernel from scratch and install the required packages.
If you follow the instructions carefully, the process will complete successfully on your Linux machine.
The Linux kernel has a modular design. Functionality is extendible with modules or drivers. Learn how to use the modprobe command to add or remove modules on Linux.
Goran combines his leadership skills and passion for research, writing, and technology as a Technical Writing Team Lead at phoenixNAP. Working with multiple departments and on various projects, he has developed an extraordinary understanding of cloud and virtualization technology trends and best practices.
There are several methods to remove old or unused kernels. It’s also considered good system hygiene practice.
The Linux kernel is the underlying software architecture of each Linux distribution. It provides and defines.