- CdDvd / Burning
- Graphical User Interface(GUI)
- Burning ISO images
- Burning Files to CD or DVD
- Copying Discs and Other Advanced Operations
- Blu-Ray Burning
- Command Line (Terminal)
- Burning a CD or DVD using Command Line tools
- Creating an ISO image
- Checking CD Images Before Burning
- Burning a CD on the Command Line with wodim
- Blanking a CD/RW
- Using wodim on «unsupported» drives
- Burning a DVD or Blu-Ray Disc
- Blanking DVD+RW discs
- Downloading an Ubuntu ISO
- Verifying the ISO integrity
- Burning the ISO on to a DVD
- Burning from Windows
- Windows 7/8/8.1
- Windows 2000 or newer: Infra Recorder
- Windows XP or newer: ISO Recorder
- Burning from Mac OS X
- Burning from Ubuntu
- Burning from Kubuntu
- If the burning fails
- Checking the integrity of the finished DVD
- Burn iso from linux
CdDvd / Burning
Writing data to write-able and re-write-able CDs and DVDs and Blu-Ray media is commonly referred to as «burning». This tutorial covers the default burning software provided with Ubuntu as well as command line burning. There are also alternative burning programs to consider such as xcdroast or k3b.
For better results try the slowest burn speed reasonably possible. Most Gui tools have a «Properties» button to select speed but with Brasero those sorts of options appear after pressing the 1st «burn» button. Slower speeds ensure greater accuracy.
Graphical User Interface(GUI)
This section covers using a GUI for burning.
Burning ISO images
For burning ISO images like the Ubuntu LiveCD using a GUI, please refer to the BurningIsoHowto page.
Burning Files to CD or DVD
- Insert a blank CD or DVD into your drive
- Wait for the pop-up and choose Data or Music CD (older versions may offer a Photo CD option, and is identical to the Data CD option)
- To burn a Music CD, see AudioCDCreation
- To burn a Data CD, drag the data over to the window and click Burn
Copying Discs and Other Advanced Operations
- Click Applications ->Sound and Video ->Brasero
- Create a new project when prompted.
- Click Help ->Contents if further help is needed.
Blu-Ray Burning
Brasero and K3B can’t burn Blu-ray out of the box. In order to do so you have to install the cdrecord package from this PPA https://launchpad.net/~brandonsnider/+archive/cdrtools and in doing so you will be uninstalling wodim which is used by default and does not support BD-R media. See how to add a PPA.
Once you added the PPA, simply install cdrecord package as any other package.
Then you have to install K3b if you did not have it already installed and enable «Show advanced GUI elements» in the advanced settings.

Make sure in the «Programs» setting that cdrecord is being used. Use the «search» button to make K3b find cdrecord is necessary.

Once Show advanced GUI elements is enabled, the burn dialog will let you select cdrecord as the «Writting app» and in the «Misc» tab you have to select «No multisession».


Command Line (Terminal)
Burning a CD or DVD using Command Line tools
This section details the use of the command line(terminal) to burn either a CD or DVD disk.
Creating an ISO image
genisoimage -r -J -o cd_image.iso /directory
The -r and -J ensures long file names work for Unix (using Rock Ridge) and Windows (using Joliet extensions) respectively.
Checking CD Images Before Burning
- If you have sudo access, you can also mount the image, and explore its contents
sudo modprobe loop sudo mount -t iso9660 -o ro,loop=/dev/loop0 cd_image.iso /media/cdrom
Burning a CD on the Command Line with wodim
cdrecord can burn an ISO(.iso) disk image or other data onto a CD. To burn a data CD (using image prepared earlier):
$ wodim --devices wodim: Overview of accessible drives (1 found) : ------------------------------------------------------------------------- 0 dev='/dev/scd0' rwrw-- : 'LITE-ON' 'DVDRW SOHW-1633S' -------------------------------------------------------------------------
After finding the info. from device scanning, take the appropriate target. This is important if there are more than one device on the system.
$ ls -l /dev/cdrw lrwxrwxrwx 1 root root 4 2009-01-26 21:56 /dev/cdrw -> scd0
$ ls -l /dev/dvdrw lrwxrwxrwx 1 root root 4 2009-01-26 21:56 /dev/dvdrw -> scd0
wodim dev=/dev/cdrw -v -data cd_image.iso
wodim dev=/dev/cdrw -v -audio [wav files. ]
Blanking a CD/RW
wodim -vv dev=/dev/cdrw blank=all
As stated before, replace /dev/cdrw as needed if this is not your CD-Writer when it applies.
Using wodim on «unsupported» drives
Sometimes Ubuntu fails to detect and configure your Burner. This results in «no media found» if you use ‘wodim dev=/dev/cdrw’. Even ‘wodim -scanbus’ does not work — so you just don’t know, how to address the drive. You can work around this by looking into the boot messages with dmesg, to identify the devicepath to your burner.
$ dmesg hda: PIONEER DVD RW DVR-108, ATAPI CD/DVD-ROM drive hdb: IDE DVD-ROM 16X, ATAPI CD/DVD-ROM drive [. ] hda: ATAPI 40X DVD-ROM DVD-R CD-R/RW drive, 2000kB Cache
- Now you can burn on this drive using:
wodim dev=ATAPI:/dev/hda -data -v -eject your_data.iso
Burning a DVD or Blu-Ray Disc
- Install the dvd+rw-tools package. See [InstallingSoftware].
- Use the packages growisofs application to burn a DVD or Blu-Ray disc.
growisofs -Z /dev/dvdrw -R -J /some/files
growisofs -speed=2 -dvd-compat -Z /dev/dvdrw=dvd_image.iso
Note that -dvd-compat closes the disk in write-once context (DVD+R or DVD-R).
growisofs -M /dev/dvdwriter additionaldata
Blanking DVD+RW discs
dvd+rw-format -blank /dev/cdrw
CdDvd/Burning (последним исправлял пользователь tecnologia 2014-04-30 18:22:54)
The material on this wiki is available under a free license, see Copyright / License for details
You can contribute to this wiki, see Wiki Guide for details
Downloading an Ubuntu ISO
Ubuntu is distributed over the Internet as DVD image (.iso) files. The GettingUbuntu page has links to the ISO image files, as well as other methods of getting Ubuntu.
Verifying the ISO integrity
Before burning a DVD, it is highly recommended that you verify the md5 sum or sha256 sum (hash) of the .iso file. For instructions, please see HowToMD5SUM and HowToSHA256SUM. For the current list of Official Ubuntu SHA256 hashes, see the SHA256SUMS file for the release you’re using under http://releases.ubuntu.com (and optionally the PGP signatures in the SHA256SUMS.gpg file); hashes for the older MD5 algorithm are in the same directory. UbuntuHashes currently has only md5sums. Checking the hash ensures that the file was not damaged during the download process and is 100% intact.
Burning the ISO on to a DVD
Unlike a regular data file, the ISO file cannot be simply dragged and dropped or copied directly onto a disc. It needs to be burned in a specific way that expands/extracts the image so you have usable files on your disc.
- A working DVD burner (i.e. R/W drive)
- A blank DVD. (recent Ubuntu versions do not fit on to CD any more)
Inexpensive «write once» DVD-Rs are a good choice for burning ISO images.
Burning from Windows
Windows 7/8/8.1
- Right-click on an ISO image and choose “Burn disc image”.
- Select a disk burner (drive) and press «Burn».


Windows 2000 or newer: Infra Recorder
- Download and install Infra Recorder, a free and open source image burning program.
- Insert a blank CD in the drive and select Do nothing or Cancel if an autorun dialog pops up.
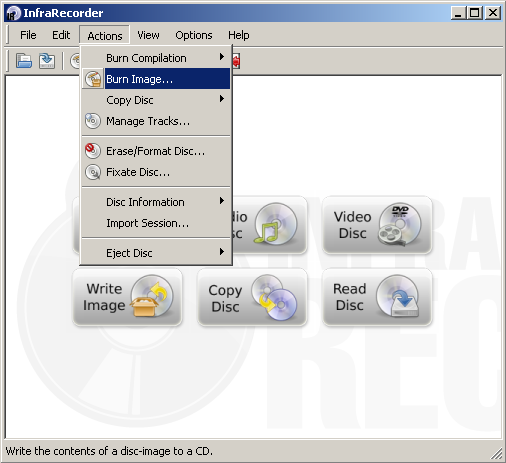
- Open Infra Recorder and click the ‘Write Image’ button in the main screen.
- Alternatively you can select the ‘Actions’ menu, then ‘Burn image’.
- Alternatively you can select the ‘Actions’ menu, then ‘Burn image’.
- Select the Ubuntu CD image file you want to use, then click ‘Open’.
- In the dialog, click ‘OK’.
Windows XP or newer: ISO Recorder
- Download and install the appropriate version of ISO Recorder.
- Insert an unformatted CD into your burner. (Note: one can burn DVDs with this tool only from Vista.)
- Open Windows Explorer, browse to your ISO file, right-click and choose «Next».
Burning from Mac OS X
Note: To burn most ISOs, you can use Apple’s Disk Utility (Disk Copy in older versions).
- Launch Disk Utility (Applications → Utilities → Disk Utility).
- Insert your blank CD/DVD.
- Drag and drop your .iso file to the left pane in Disk Utility. Now both the blank disc and the .iso should be listed.
- Select the .iso file, and click on the Burn button in the toolbar.
- Ensure that the «Verify burned data» checkbox is ticked (you may need to click on the disclosure triangle to see the checkbox).
- Click on Burn. The data will be burned and verified.


Burning from Ubuntu
- Insert a blank CD into your burner. A «CD/DVD Creator» or «Choose Disc Type» window might pop up. Close this, as we will not be using it.
- Browse to the downloaded ISO image in the file browser.
- Right click on the ISO image file and choose «Write to Disc».
- Where it says «Select a disc to write to», select the blank CD.
- If you want, click «Properties» and select the burning speed. Lower speeds offer greater reliability, but will take longer to write.
- Start the burning process.
- The program should automatically check whether the image has been burned correctly.
- If the standard CD burning application does not work, install K3B and follow the instructions for Kubuntu below.


Burning from Kubuntu

- Insert a blank CD into your burner. Open K3B from the KDE menu
- On the near bottom of the application where it says «Welcome to K3b — The CD and DVD Kreator» click «more actions. » and then pick «Burn Image».
- You may want to enable the disk verification option to make sure the image is burned correctly, and lower the burning speed to have more reliability.
- Start the burning process.
- You can use the default settings.
If the burning fails
If the CD writing fails, try writing at a slower speed. For better results, try the slowest burn speed reasonably possible. Most GUI tools have a «Properties» button to select speed but with Brasero those sorts of options appear after pressing the «burn» button first. This is the single most likely cause of problems but is much more widely known than MD5sum/SHA error-checking. Slower speeds ensure greater accuracy.
Checking the integrity of the finished DVD
The CDIntegrityCheck page describes how to verify the integrity of the finished disk. Please try your DVD as a LiveDVD. If your finished disk fails to boot when you restart your computer, please refer to the BootFromCD page.
Burn iso from linux
PowerISO for Linux can burn iso file and other image files from command line or a batch file. You can specify lots of burning options through the command line parameters, such as burning speed, verifying written data, ejecting disc after burning, and etc. PowerISO can detect image file formats automatically before burning. There is no need to convert the image file to iso format before burning. The disc will always be finalized after burning.
Usage: poweriso burn-image [-switches]
-eject: Eject disc after burning.
-verify: Verify written data after burning.
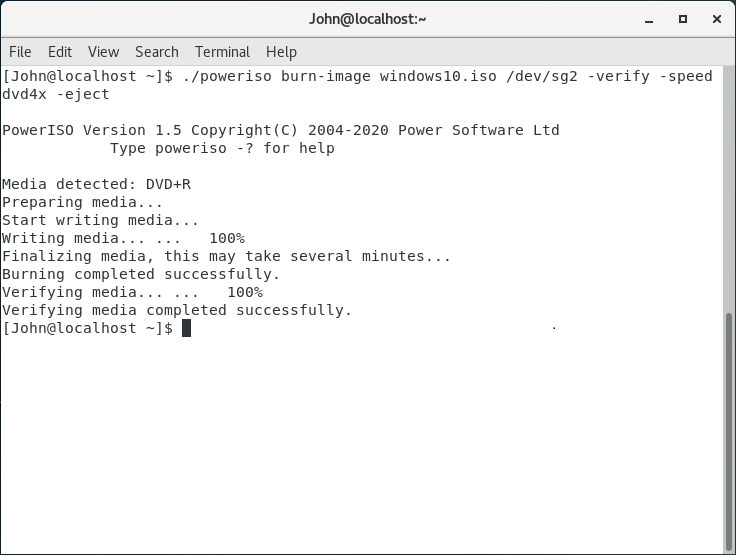
Example1: Burn iso file from Linux command line and verify written data, using dvd 4x burning speed. The recorder path is /dev/sg2. The disc will be ejected after burning.
Command: poweriso burn-image windows10.iso /dev/sg2 -verify -speed dvd4x -eject
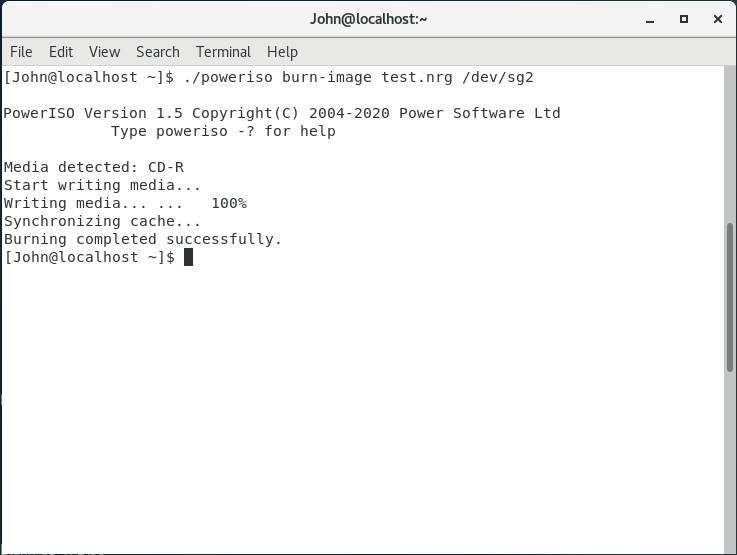
Example2: Burn nrg file from Linux command line. The recorder path is /dev/sg2.
Command: poweriso burn-image test.nrg /dev/sg2
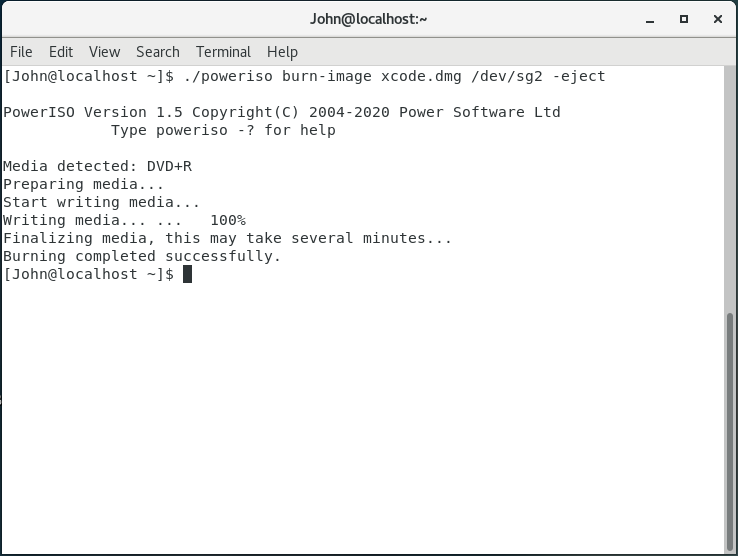
Example3: Burn dmg file from Linux command line. The recorder path is /dev/sg2. The disc will be ejected after burning. Dmg file is the most widely used disc image file format in Mac OSX computers. PowerISO can burn the dmg file to CD DVD disc directly from Linux command line.
Command: poweriso burn-image xcode.dmg /dev/sg2 -eject
Example4: Burn daa file from Linux command line. The recorder path is /dev/sg1. The data written to the disc will be verify after burning. PowerISO for Linux can burn the daa file directly without converting it to ISO format before burning.
Command: poweriso burn-image test.daa /dev/sg1 -verify