- Saved searches
- Use saved searches to filter your results more quickly
- License
- arch-linux-calamares-installer/alci-iso
- Name already in use
- Sign In Required
- Launching GitHub Desktop
- Launching GitHub Desktop
- Launching Xcode
- Launching Visual Studio Code
- Latest commit
- Git stats
- Files
- README.md
- Как быстрее установить Arch Linux с помощью Calam Arch
- Скачивание Calam Arch ISO
- Создание установщика Calam Arch USB
- Установка Arch Linux с Calam Arch
- Arch Linux easy installation with calamares installer
- Characteristics
Saved searches
Use saved searches to filter your results more quickly
You signed in with another tab or window. Reload to refresh your session. You signed out in another tab or window. Reload to refresh your session. You switched accounts on another tab or window. Reload to refresh your session.
Arch Linux Calamares Installer
License
arch-linux-calamares-installer/alci-iso
This commit does not belong to any branch on this repository, and may belong to a fork outside of the repository.
Name already in use
A tag already exists with the provided branch name. Many Git commands accept both tag and branch names, so creating this branch may cause unexpected behavior. Are you sure you want to create this branch?
Sign In Required
Please sign in to use Codespaces.
Launching GitHub Desktop
If nothing happens, download GitHub Desktop and try again.
Launching GitHub Desktop
If nothing happens, download GitHub Desktop and try again.
Launching Xcode
If nothing happens, download Xcode and try again.
Launching Visual Studio Code
Your codespace will open once ready.
There was a problem preparing your codespace, please try again.
Latest commit
Git stats
Files
Failed to load latest commit information.
README.md
Arch Linux Calamares Installer or ALCI
Use the correct version of Archiso to build the iso.
Read the archiso.md.
Download the content of the github with (use the terminal)
git clone https://github.com/arch-linux-calamares-installer/alci-iso
Pacman.conf in archiso folder
Only the archiso/pacman.conf will be used to download your packages.
You can activate more sources besides Arch Linux repos
arcolinux chaotic your own local repo Pacman.conf in archiso/airootfs/etc/
This will be your future system. Include the repositories you want. It will not be used to build the iso.
ArcoLinux keys and mirror
Add the ArcoLinux keys and Arcolinux mirrors to the packages.x86_64. The pacman-init service at etc/systemd/system/pacman-init.service will add any keys present.
Add the Chaotic keys and Chaotic mirrors to the packages.x86_64. The pacman-init service at etc/systemd/system/pacman-init.service will add any keys present.
Only the archiso/packages.x86-64 files will be used.
Add more packages at the bottom of the file
If you plan to use ArcoLinux packages
If you plan to use Chaotic packages
You can even add packages from your own personal local repo.
If you know you are going to need drivers for graphical cards or NICs put them on the iso. I am thinking about xf86-video-intel, nvidia or other drivers.
Install these two packages on your system if you want to include Chaotic packages on the iso
sudo pacman -S chaotic-mirrorlist chaotic-keyring
If not on ArcoLinux you can install them from AUR.
Install these two packages on your system if you want to include ArcoLinux packages on the iso
sudo pacman -S arcolinux-mirrorlist-git arcolinux-keyring
If not on ArcoLinux you can download the package from the alci_repo with sudo pacman -U.
After editing the necessary files (pacman.conf and packages.x86_64) you can start building.
Use the scripts from this folder:
Use script 30 and it will clean your pacman cache and redownload every package it needs.
Use script 40 to use your current pacman cache — it will only download what is needed.
You will find the iso in this folder:
Burn it with etcher or other tools and use it.
Still not sure what to do.
Check out the playlist on Youtube
We have added a script to activate your display manager by default. If you reboot you will boot into a graphical environment.
If you did not install a desktop environment on the iso you can still do so by going to TTY and installing one. SDDM stays after installation.
If you install more than one display manager they will overrule each other. SDDM will always lose to gdm, lightdm or lxdm.
If you are still in the terminal then activate the display manager of your choice manually.
sudo systemctl enable gdm
sudo systemctl enable lightdm
sudo systemctl enable sddm
sudo systemctl enable lxdm
Get the pacman databases in
Sometimes a «proc» folder stays mounted.
sudo umount /home//. use the TAB
We have added a /etc/pacman-more.conf file to your future system. That way we have the ArcoLinux repos and Chaotic repos if we do decide to install it after all. Remember to install the mirror and keys.
Run into issues — remove all packages manually with
and ensure they are all gone.
When testing out the ALCI in virtualbox, you can use the alias evb to enable and start virtualbox. As a result you can use your full resolution.
When using gdm as display manager remember to delete the file /archiso/airootfs/etc/motd from your system. That files comes originally from Arch Linux. To avoid waiting for every login and this nice look. https://imgur.com/a/EvCN4pm
Internet is NOT required for ALCI. Calamares is only using the internet to check where you live to put the red dot correctly on the world map (geoip). Calamares will not download anything.
The list you created in the packages.x86_64 file will be installed on the iso and on your future system.
On demand of our users we have added 3 links to the archiso folder so that in the live environment they will have network manager.
/archiso/airootfs/etc/systemd/system/multi-user.target.wants/NetworkManager.service /archiso/airootfs/etc/systemd/system/network-online.target.wants/NetworkManager-wait-online.service /archiso/airootfs/etc/systemd/system/dbus-org.freedesktop.nm-dispatcher.service
If you do not use Networkmanager, you can delete them. You can also keep them as they are pointing to services you have not installed. The links will have no effect at all.
Remember there is still nmtui if the gui Networkmanager fails you in some way.
If you did NOT install it on the iso. These are the steps you can still do.
setxkbmap be — I will set my keyboard to azerty
sudo pacman -Sy — get the pacman databases in
sudo pacman -S networkmanager — installing the software
sudo systemctl enable NetworkManager — mind the capital letters
sudo systemctl start NetworkManager
Then we restart Calamares.
Как быстрее установить Arch Linux с помощью Calam Arch

Если вам нравится Arch Linux и вы хотите его использовать, но у вас нет времени настраивать все вручную, вы можете попробовать установщик Calam Arch. Это отличный инструмент, с помощью которого можно с легкостью установить ванильный Arch Linux, а не через командную строку. Вот как им пользоваться.
Примечание. Для ISO-образа установщика Calam Arch Linux требуется не менее 1 ГБ места. Для достижения наилучших результатов используйте USB-накопитель объемом 1 ГБ или больше. В качестве альтернативы также можно записать файл ISO на DVD, хотя инструкции для DVD не рассматриваются в этом руководстве.
Скачивание Calam Arch ISO
Установщик Calam Arch ISO доступен для загрузки на странице проекта SourceForge. Чтобы загрузить последнюю версию установщика ISO на свой компьютер, сделайте следующее.
Сначала отправляйтесь в Страница Calam Arch SourceForge. Оказавшись на странице, найдите зеленую кнопку «Загрузить». Когда вы нажмете эту кнопку, начнется загрузка ISO-файла Calam Arch.
В качестве альтернативы, если вам нужна более старая версия установщика Calam Arch, найдите вкладку «Файлы» и выберите ее. Затем щелкните папку «Файлы», чтобы просмотреть более старые версии установщика.
Создание установщика Calam Arch USB
ISO-файл установщика Calam Arch необходимо записать на USB-накопитель. Есть много способов создать USB-накопитель с файлом ISO. В этом руководстве мы сосредоточимся на приложении Etcher.
Почему Etcher? Это кроссплатформенный. Итак, независимо от того, в какой операционной системе вы прошиваете ISO-файл Calam Arch, инструкции остаются одинаковыми. Чтобы получить доступ к приложению Etcher, перейдите на официальный сайт. Скачайте Etcher и установите его на свой компьютер.
После установки приложения Etcher на свой компьютер откройте его и следуйте пошаговым инструкциям ниже, чтобы создать установщик Calam Arch USB.
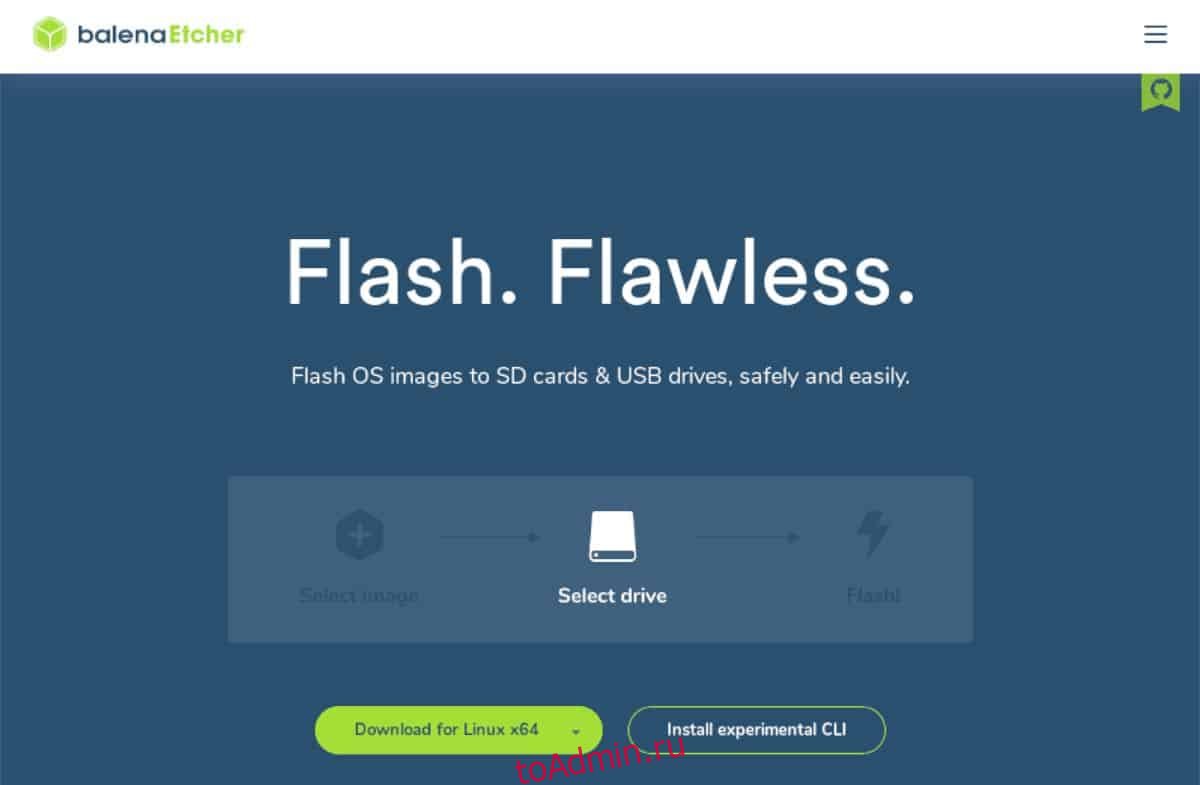
Шаг 1: Выберите мышью кнопку «Flash из файла». При нажатии на эту кнопку на экране появляется всплывающее меню. Используя меню, найдите файл ISO Calam Arch на вашем компьютере и выберите его.
Шаг 2: Найдите с помощью мыши кнопку «Выбрать цель». Затем выберите USB-накопитель, на который вы хотите установить ISO-файл Calam Arch.
Шаг 3. Нажмите «Вспышка!» в приложении Etcher, чтобы начать процесс перепрошивки. Этот процесс займет довольно много времени, так что наберитесь терпения. Когда он будет завершен, закройте Etcher.
После закрытия приложения Etcher перезагрузите компьютер, на котором вы планируете установить Arch Linux. Затем загрузитесь в BIOS и настройте его для загрузки с USB-накопителя.
Установка Arch Linux с Calam Arch
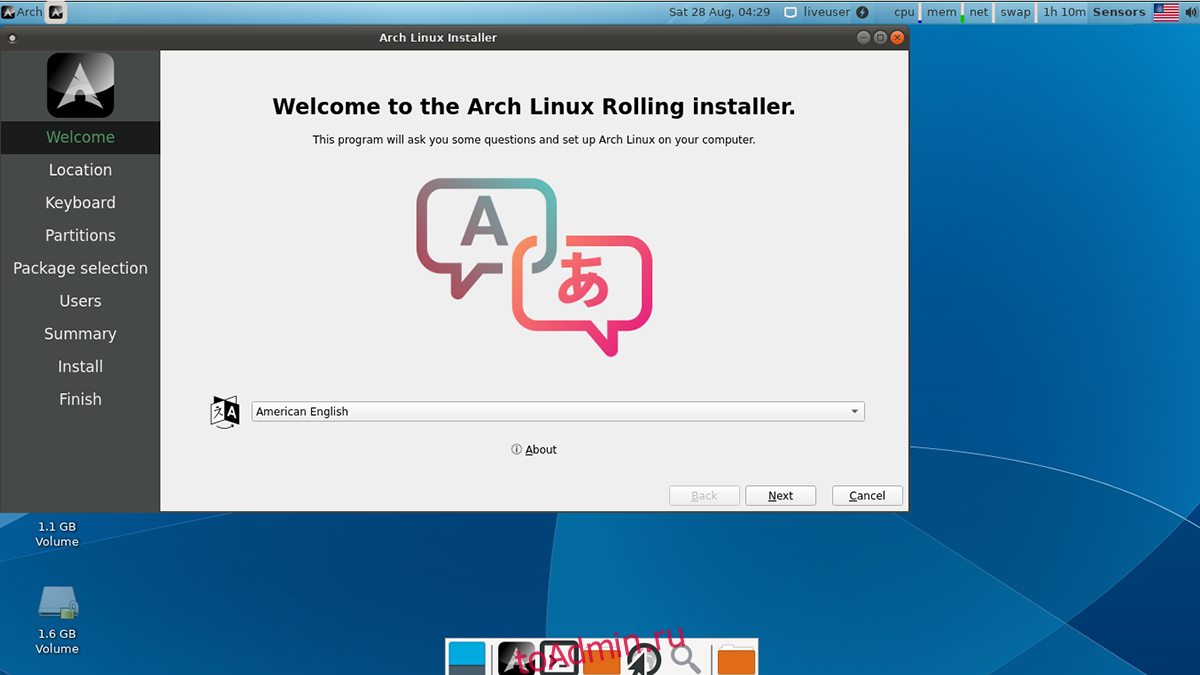
Чтобы установить Arch Linux с Calam Arch, начните с нажатия черного логотипа Arch Linux на рабочем столе. Затем следуйте пошаговым инструкциям ниже.
Шаг 1. Разрешите установщику Calam запуститься на рабочем столе. Затем на странице приветствия установщика найдите нужный язык. Затем нажмите кнопку «Далее», чтобы перейти на следующую страницу установщика.
Шаг 2. После выбора языка вам необходимо указать часовой пояс. Используя экранную карту, выберите желаемый часовой пояс. Или используйте раскрывающиеся меню, чтобы выбрать часовой пояс.
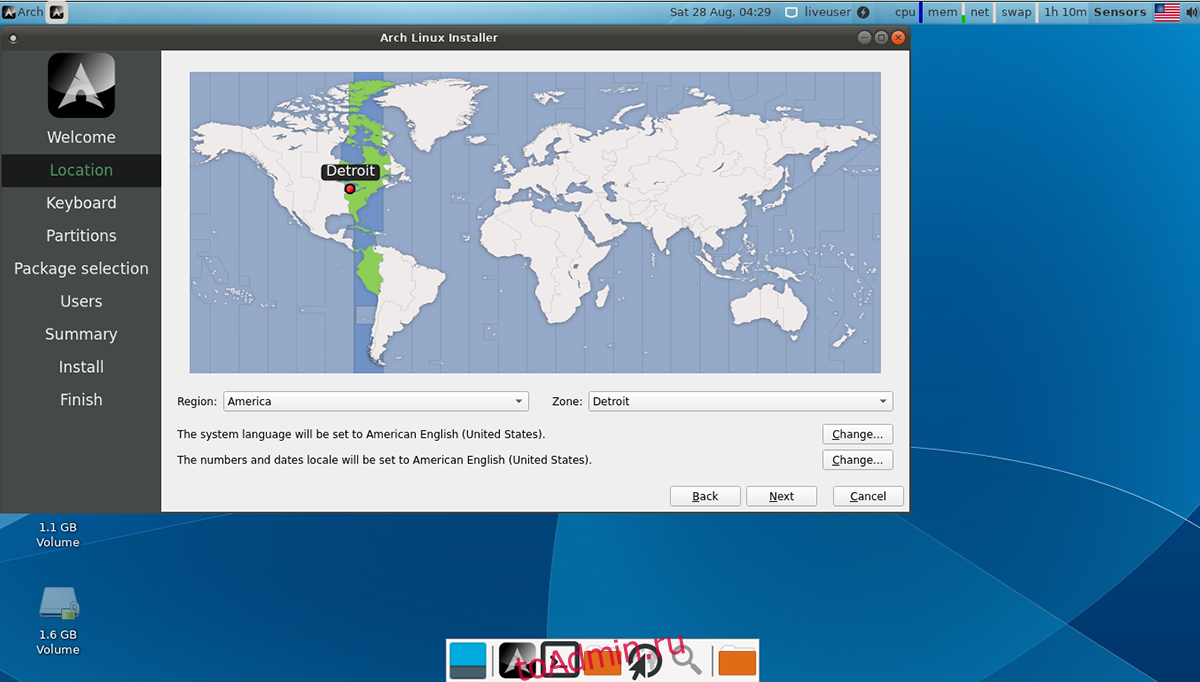
Нажмите «Далее», чтобы перейти к следующей странице.
Шаг 3: Теперь вам нужно выбрать раскладку клавиатуры. Используя экранное меню, найдите нужную раскладку клавиатуры. Или оставьте это значение по умолчанию, так как установщик Calam Arch должен автоматически обнаружить это.
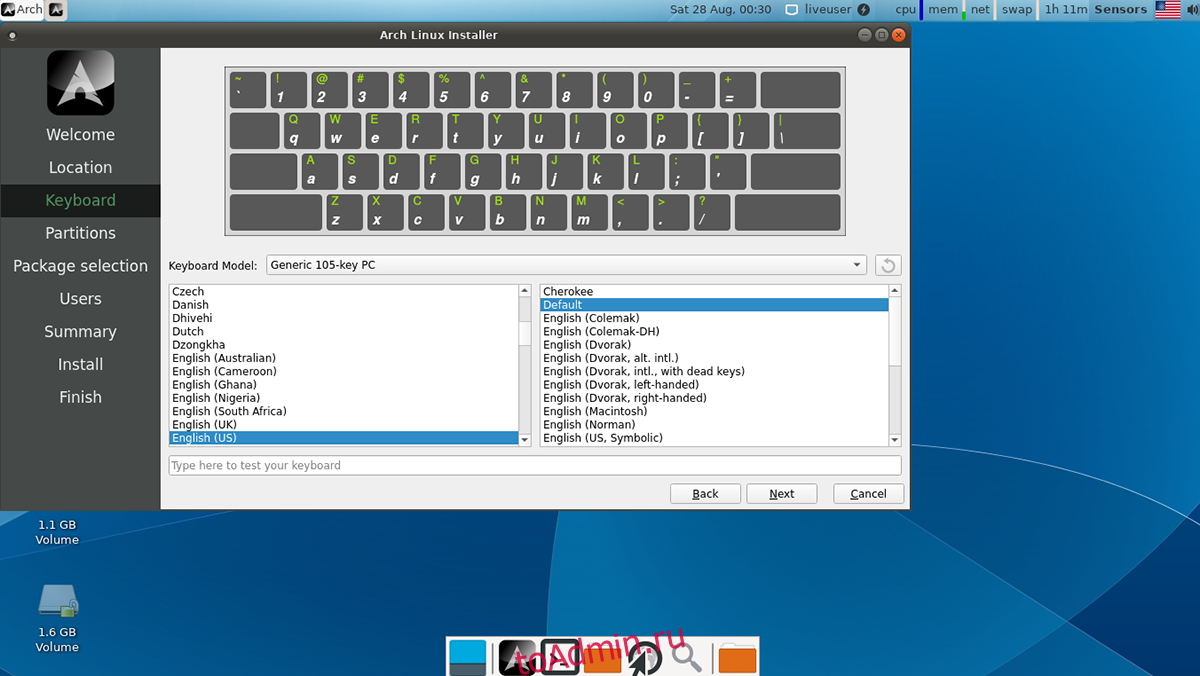
Нажмите кнопку «Далее», чтобы перейти на следующую страницу.
Шаг 4: После того, как клавиатура настроена, пора выбрать метод разбиения на разделы. Выберите «Установить вместе», если вы предпочитаете двойную загрузку с Windows. Или, если вы хотите стереть данные с жесткого диска, выберите опцию «Стереть диск».
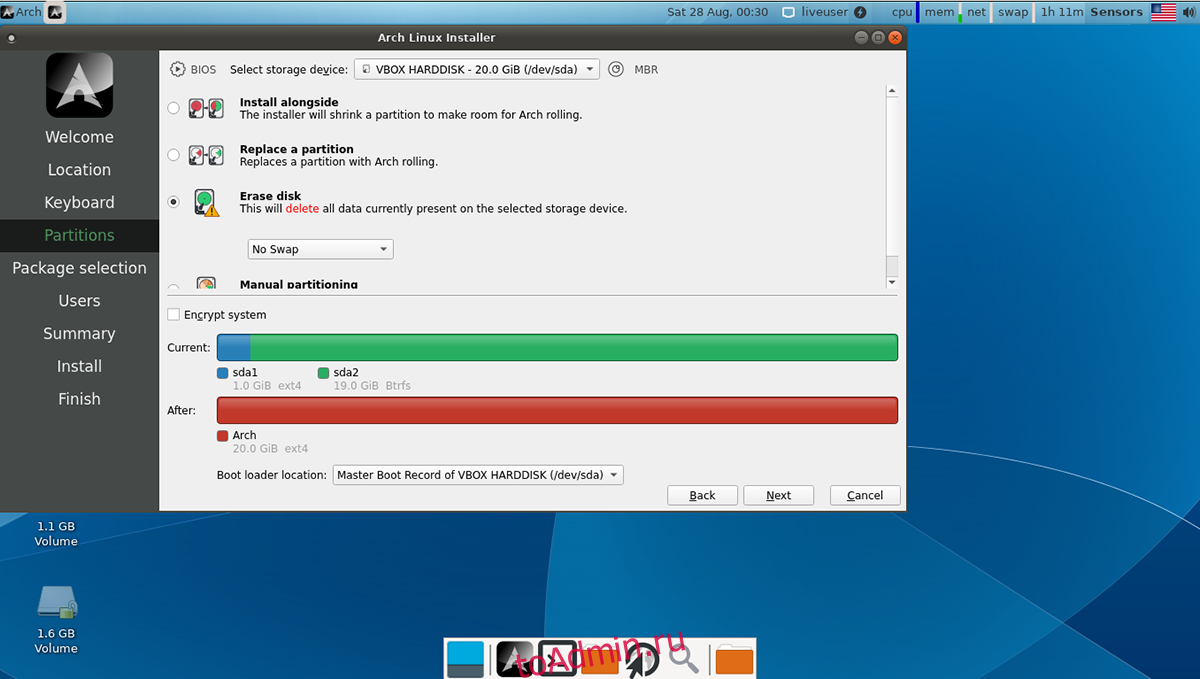
Когда закончите, нажмите кнопку «Далее».
Шаг 5: После настройки раздела вам нужно будет выбрать пакеты, которые вы хотите установить с новой установкой Arch Linux. Просмотрите список, выберите предпочтительную среду рабочего стола, настройки графического драйвера, поддержку принтера (при необходимости) и другие вещи.
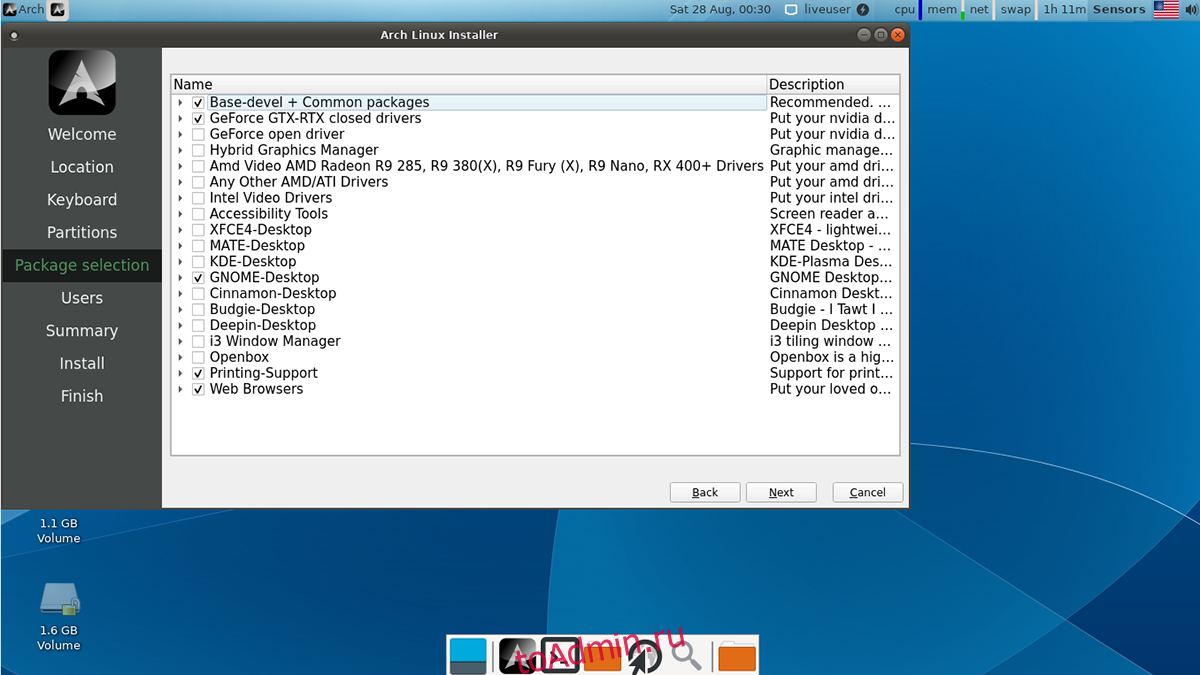
Когда все пакеты выбраны, нажмите кнопку «Далее», чтобы подтвердить свой выбор.
Шаг 6: После настройки пакетов для установщика Calam Arch Linux вам необходимо настроить свою учетную запись. Сначала напишите свое имя в поле «Как вас зовут». Затем настройте свое имя пользователя и имя вашего компьютера.
После настройки вашего имени, имени пользователя и имени компьютера введите свой пароль. Обязательно введите надежный и легко запоминающийся пароль. Нажмите кнопку «Далее», чтобы перейти к следующему шагу установщика.
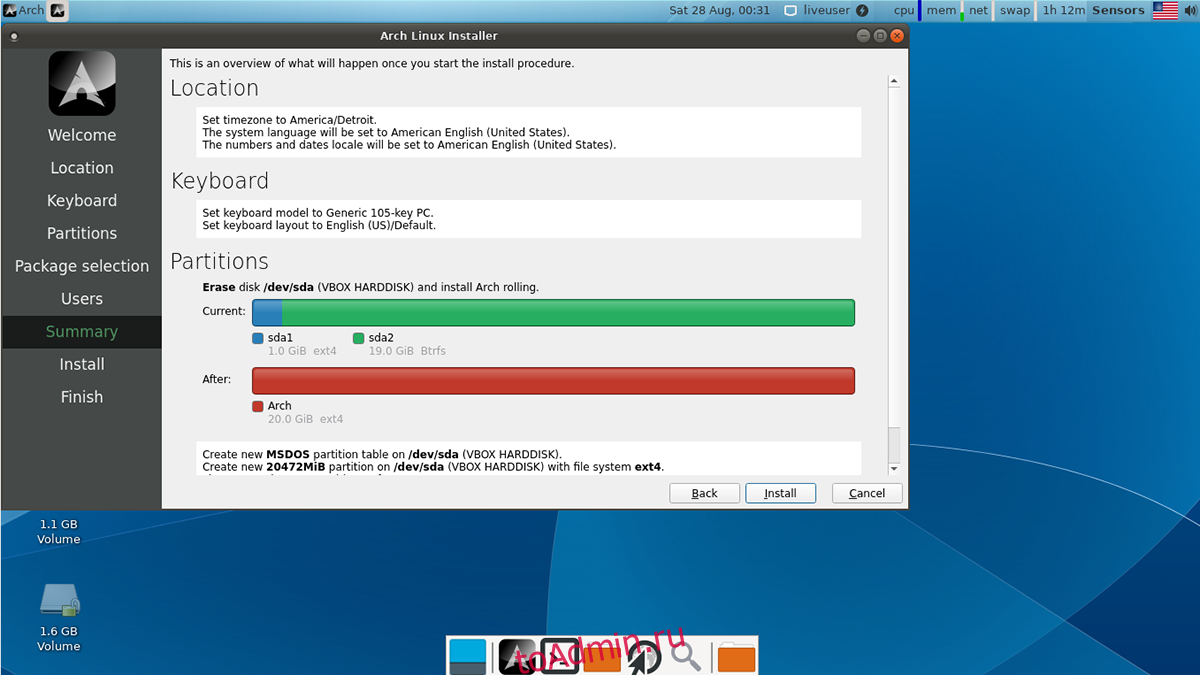
Шаг 7: После настройки вашего имени пользователя установщик Calam Arch покажет сводку вашей установки. Посмотрите его и убедитесь, что все в порядке. Когда закончите, нажмите кнопку «Установить» внизу страницы, чтобы установить операционную систему на ваш компьютер.
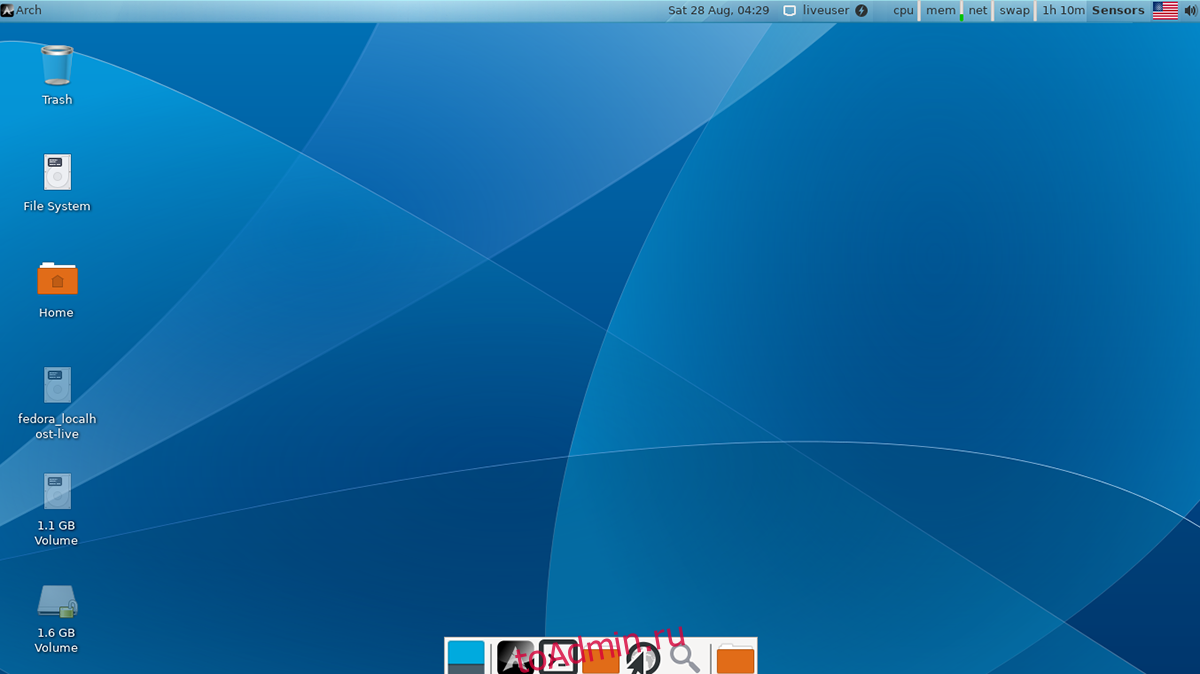
Когда установка будет завершена, отключите USB-накопитель и перезагрузитесь. После перезагрузки Arch Linux будет готов к работе. Наслаждаться!
Arch Linux easy installation with calamares installer
A Sourceforge account probably owned by a Greek developer (Current Release: Calam-Arch-Installer-2021-08 Kernel: 5.13.6, Brought to you by: kyknos123), offers a modified ISO of the distribution Arch Linux which allows you to install it with the calamares installer.

For those who are not familiar with Arch Linux, this is a rolling distribution, ie it is constantly updated without having to install it from the beginning. It offers the latest version of each package, usually including the kernel.
I have been using the distribution for many years and I can assure you that it is very stable. But it is not for beginners.
The project page states:
You can now easily install a clean arch linux from Arch Live Linux with Calam-Arch-Installer via video tutorials by following the steps.
Install it on Legacy-Bios or UEFI,
You can choose from 9 graphical installation environments, Xfce, Gnome, Plasma, Cinnamon, Budgie, Openbox, I3, Mate, and Deepin
Characteristics
- Install Legacy-UEFI
- Choices Install Desktop, Gnome-Xfce-Plasma-Cinnamon-Budgie-Mate-Deepin-I3-Openbox
- Enabled multilib + pamac
- Support Luks Yes
- Rolling
- Updated
Watch the video with the beginning of the installation
