- How to List Users in Linux
- Listing Users in Linux
- List Users with cat Command
- List Users with Terminal Pagers less and more
- List Users with awk Command
- List Users with getent Command
- Listing Normal and System users in Linux
- 3 способа узнать список пользователей в Linux
- Список всех пользователей в Linux
- 1. Показать пользователей в Linux, используя cat /etc/passwd
- Почему так много пользователей? Какие из них «настоящие»?
- 2. Просмотр пользователей с помощью getent passwd
- 3. Список пользователей Linux с compgen
- Несколько советов о перечислении пользователей в Linux
- Список только имена пользователей
- Проверьте, существует ли имя пользователя в системе
- Список всех подключенных пользователей
- Итог
- Свежие записи
- Записи Архивов по месяцам
- Рубрики
How to List Users in Linux
User management is a critical Linux system administration task. In large organizations, having insight into who has access to the system is crucial to correctly add users, remove users, and assign new user privileges.
This tutorial will show you how to list users on a Linux-based system. The guide provides four listing methods and explains essential concepts related to user administration.

Listing Users in Linux
Linux stores information about local users in the /etc/passwd file. Each line in the file contains information about a single user, including their username, user ID number (UID), home directory, and the login shell.
The following sections present multiple ways to access the data in /etc/passwd and list users on Linux distributions.
The commands used in the tutorial are:
Note: To display a list of the logged-on users and the information such as boot time, processes, hostnames, and more, use the who command.
List Users with cat Command
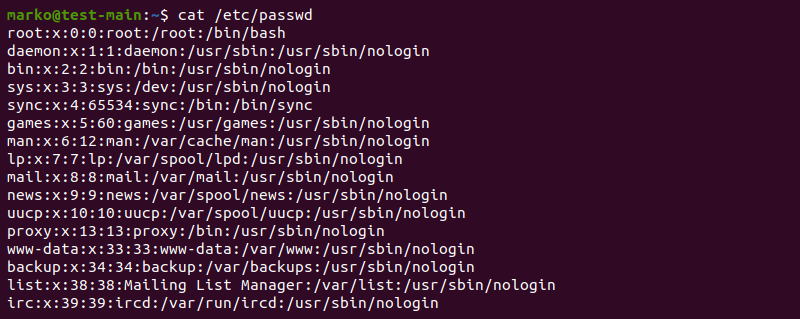
The cat command provides a straightforward way to list the contents of the /etc/passwd file.
The system outputs the entire file with all the users on the system.
To view the number of users only, pipe the output of the previous command to the wc command and make it count the number of lines:
The number of lines in /etc/passwd corresponds to the total number of users.

List Users with Terminal Pagers less and more
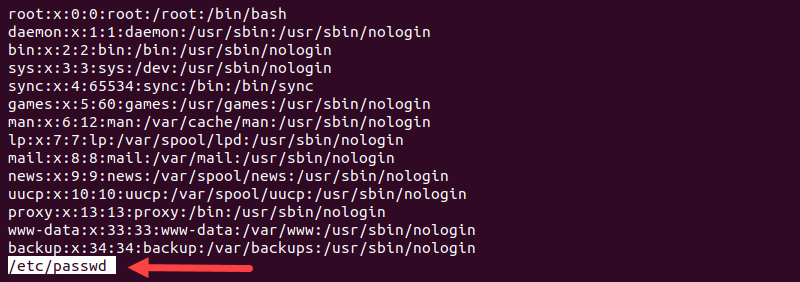
On systems with many users, it is useful to limit the /etc/passwd file output displayed at once. Use a terminal pager command, such as less or more , to browse through the file content line by line or page by page.
To open /etc/passwd using less , enter:
The first page of the file appears in the output. The list stops when it reaches the end of the terminal screen. Use the keyboard to navigate through the file.
Use more to get a similar result. This command is older and has a more limited set of functionalities:

List Users with awk Command
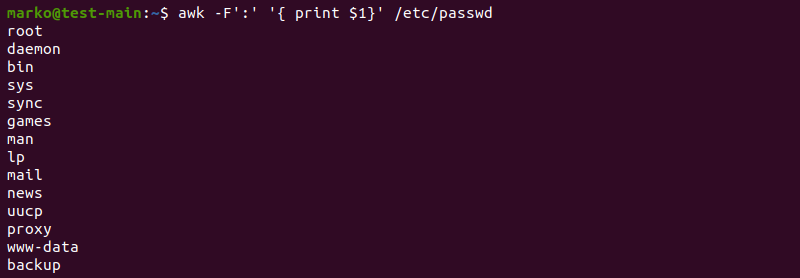
Use the awk command to list the usernames only, without additional information about each user. Since the data fields in /etc/passwd are separated by a colon symbol, the following syntax tells awk to output only the first field in each line:
Combine awk and less for a page-by-page view of the results.
List Users with getent Command
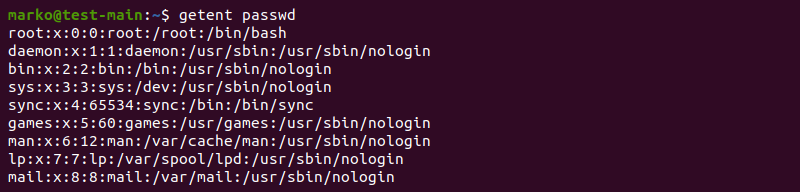
The getent command searches and displays system database entries. The searchable databases are listed in the /etc/nsswitch.conf file. By default, the file includes the passwd database.
List the entire contents of the passwd database by typing:
The output is the same as the output of the cat command.
However, you can use getent to look up specific users. To do so, use the following syntax:
If the user exists on the system, the command shows the related passwd entry line.

Listing Normal and System users in Linux
Linux-based systems have two types of users — system and normal users.
- System users are entities created by the system to run non-interactive processes, i.e., the processes that run in the background and do not require human interaction. The most important system user is root, which possesses administrative privileges.
- Normal users are human users created by root or another user with root privileges. Each normal user has a login shell and a home directory to store their files.
Both system and normal users in Linux have a unique user ID (UID) to identify them. System users have UIDs in the range from 0 (root user) to 999. Normal users typically receive UIDs from 1000 onwards, with each newly created user receiving the next smallest unused UID.
To check the UID range for normal users, use the grep command to search for the information stored in /etc/login.defs :
grep -E '^UID_MIN|^UID_MAX' /etc/login.defsThe output in this example shows that the smallest UID a normal user can receive is 1000, and the largest is 60000.

Use getent to search the passwd database by UID:
The output shows the user entry related to the UID.

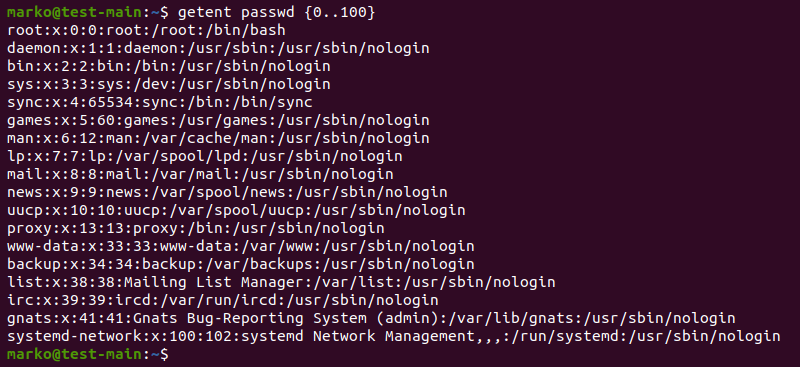
Use UIDs in combination with getent to search for users in a range:
The command now lists all the users within the specified UID range.
This guide showed you how to list all Linux users, search for users, and find the number of Linux users in any Linux distribution.
3 способа узнать список пользователей в Linux

Сегодня разные операционные системы имеют возможность использовать несколько пользователей, каждый со своими настройками и пользовательскими конфигурациями, чтобы облегчить совместную работу администраторов и операторов в одной системе.
Linux,очень силен в этом вопросе, поскольку позволяет нескольким пользователям одновременно работать в системе независимо. Он может даже позволить одному пользователю открывать несколько сеансов даже из разных мест для работы в системе.
Вот некоторые советы и рекомендации для как узнать всех пользователей Linux.
Список всех пользователей в Linux
Допустим, вы хотите создать пользователя sudo в Linux. Наверное, самое первое, что нужно знать, это как узнать, какие пользователи уже есть в моей системе. Есть несколько способов получить список пользователей в Linux.
1. Показать пользователей в Linux, используя cat /etc/passwd
Эта команда позволяет сисопам перечислять пользователей, которые локально хранятся в системе. Это даст список в структурированном виде, как:
root:x:0:0:root:/root:/bin/bash daemon:x:1:1:daemon:/usr/sbin:/usr/sbin/nologin bin:x:2:2:bin:/bin:/usr/sbin/nologin sys:x:3:3:sys:/dev:/usr/sbin/nologin sync:x:4:65534:sync:/bin:/bin/sync games:x:5:60:games:/usr/games:/usr/sbin/nologin man:x:6:12:man:/var/cache/man:/usr/sbin/nologin lp:x:7:7:lp:/var/spool/lpd:/usr/sbin/nologin mail:x:8:8:mail:/var/mail:/usr/sbin/nologin news:x:9:9:news:/var/spool/news:/usr/sbin/nologin johndoe:x:1000:1000:John Doe. /home/helder:/bin/bash davmail:x:127:65534::/var/lib/davmail:/usr/sbin/nologin statd:x:128:65534::/var/lib/nfs:/usr/sbin/nologin /etc/passwd (END)Структура в приведенном выше выводе выглядит так:
- Имя пользователя
- Зашифрованный пароль ( x означает, что пароль хранится)
- Идентификационный номер пользователя (UID)
- Идентификационный номер группы пользователя (GID)
- ФИО
- Домашний каталог пользователя
- Оболочка входа пользователя (по умолчанию — оболочка bash)
Почему так много пользователей? Какие из них «настоящие»?
Список показывает намного больше пользователей, чем вы ожидали, потому что в нем также перечислены все пользователи системы.
Теперь, если вы хотите отличить обычных пользователей от системных пользователей, вы можете обратиться к номеру идентификатора пользователя (UID).
Обычно обычный пользователь имеет UID, больший или равный 1000. Это дает вам подсказку, что пользователь с UID> = 1000 является обычным пользователем, а пользователи с UID
Вы также заметите, что у некоторых пользователей есть «nologin» в конце их строки. Это означает, что эти пользователи не могут войти в систему. Эти пользователи также называются псевдопользователями.
2. Просмотр пользователей с помощью getent passwd
Эта команда выдаст вам вывод, аналогичный «less /etc/passwd», однако на самом деле он запрашивает файл конфигурации функциональных возможностей переключателя службы имен GNU (находится в /etc/nsswitch.conf).
Это conf включает passwd, поэтому он будет отображаться очень похоже, но если вы используете LDAP для аутентификации, он также будет включать это.
3. Список пользователей Linux с compgen
Если вы просто хотите , чтобы перечислить все имена пользователей без какой — либо дополнительной информации, вы можете использовать CompGen команду с -u опцией.
Вывод будет выглядеть так:
compgen -u root daemon bin sys sync games man lp mail news uucp proxy www-data backup list irc gnats nobody systemd-network systemd-resolve syslog messagebus _apt uuidd avahi-autoipd usbmux dnsmasq rtkit cups-pk-helper speech-dispatcher whoopsie kernoops saned pulse avahi colord hplip geoclue gnome-initial-setup gdm abhishek Несколько советов о перечислении пользователей в Linux
Вы только что увидели три способа просмотра пользователей в Linux. Вот несколько советов, которые помогут вам при работе с списком пользователей.
Список только имена пользователей
У вас уже есть команда compgen для этого, но вам не нужно постоянно ее помнить.
Если мы хотим получить только список имен пользователей в системе, вы можете использовать команду awk или команду cut для фильтрации вывода двух других команд, которые мы видели ранее.
Любой из них даст нам отфильтрованный список пользователей, показывая только самый первый столбец с именем пользователя:
root daemon bin sys sync games man lp mail news johndoe davmail statdПроверьте, существует ли имя пользователя в системе
Это может быть полезно, если вы хотите знать, существует ли конкретное имя пользователя в системе:
getent passwd | grep johndoejohndoe:x:1000:1000:John Doe. /home/johndoe:/bin/bashСписок всех подключенных пользователей
Если вы хотите знать какие пользователи в настоящее время вошли в вашу систему Linux, вам нужно использовать простую команду who и это немедленно выведет список текущих имен пользователей с активным сеансом в вашей системе.
user@system:~$ who johndoe :0 2019-01-28 21:35 (:0) harrysmith pts/0 2019-02-01 09:51 (192.168.1.1) stevejones pts/1 2019-02-02 09:51 (192.168.1.173)В этом случае в списке появится не только список подключенных имен пользователей, но и то, как они подключены, с момента, когда они подключены и откуда они подключены.
В самом первом столбце будет указано, какое это имя пользователя.
Во втором столбце будет указано, к какому типу соединения это относится: если оно обозначено знаком «: X», где X — число, это означает, что используется графический интерфейс пользователя (GUI) или сеанс рабочего стола, например Gnome, XDE и т. д. ; если терминал отображает «pts/X», где X — число, это означает, что это соединение, установленное по протоколу SSH (командная строка).
В третьем столбце будет указано, с каких пор этот сеанс был подключен к серверу (дата и время). В четвертом и последнем столбце будет указано место, откуда он подключен. Если удаленно, будет отображаться IP-адрес, с которого установлено соединение, если локально (например, GUI), будет отображаться «(: X)», где X — это число сеанс в этом случае и будет соответствовать число во втором столбце для этой строки.
Итог
Как видите, перечисление пользователей в Linux совсем не сложно. Он состоит из простых команд, которые выводят всю информацию для вас, что бы вы ни хотели сделать или получить эту информацию, это то, что вам нужно отфильтровать в зависимости от того, что вы хотите проверить в системе.
Свежие записи
Записи Архивов по месяцам
Рубрики
- Active Directory (1)
- Airflow (2)
- Ansible (1)
- Apache NiFi (3)
- Apache Tomcat (1)
- Apache Zeppelin (3)
- Artifactory (1)
- Astra Linux (4)
- cadvisor (1)
- CentOS8 (33)
- CI/CD (8)
- CMS (3)
- Confluence (1)
- Debian (6)
- DNF (1)
- DNS (1)
- Docker (4)
- ETL (2)
- Fedora (1)
- ftp (5)
- GitHub (4)
- GitLab (1)
- Grafana (8)
- InfluxDB (2)
- InfluxDB 2.0 (1)
- Linux (163)
- liquibase (1)
- MySql (7)
- NextCloud (4)
- Nginx (5)
- Oracle Database (1)
- OwnCloud (3)
- Postgresql (7)
- Prometheus (3)
- Proxy (1)
- RedHat (39)
- SQLite (1)
- SSH (4)
- SVN (1)
- Tor (1)
- Ubuntu (24)
- Ubuntu Studio (1)
- VPN (2)
- Web Panel (2)
- Web Сервер (13)
- Windows (24)
- Zabbix (16)
- Автоматизация обмена данными (3)
- Анализ и Визуализация Данных (3)
- Анализ Кода (1)
- Анонимные ОС (4)
- Антивирусы (1)
- Без рубрики (4)
- Виртуальные Машины (8)
- Клиенты Удаленного Подключения (1)
- Команды (7)
- Менеджер Пакетов (2)
- Облако (6)
- Окружение рабочего стола (1)
- Операционные Системы (184)
- Почтовые Клиенты (4)
- Программное Обеспечение (94)
- Сетевое Хранилище (21)
- Система Wiki (1)
- Система управления версиями (9)
- Системы Автоматизации Развертывания (7)
- Системы Мониторинга (27)
- Системы Управления Базами Данных (22)
- Системы управления проектами (6)
- Системы Управления Проектом (9)
- Служба каталогов (2)
- Средства Разработки (3)
- Удаленное Подключение (11)