- The “chage” Command in Linux [7 Practical Examples]
- A. Description
- B. Syntax
- C. Options
- Practical Examples of the “chage” Command in Linux
- Example 1: Display Account Aging Information Using the “chage” Command in Linux
- Example 2: Change Last Password Change Date to the Specified Date
- Example 3: Specify the Account Expire Date Using “chage” Command in Linux
- Example 4: Specify the Minimum Number of Days Between Password Change
- Example 5: Specify the Maximum Number of Days Between Password Change
- Example 6: Specify the Number of Days of Warning Using “chage” Command in Linux
- Example 7: Change the Account Aging Information For the User Using “chage” Command in Linux
- Conclusion
- How to Force User to Change Password at Next Login in Linux
- Using passwd Command
- Using chage Command
The “chage” Command in Linux [7 Practical Examples]
The chage command has one of the most important uses in Linux. It is a very easy-to-use command that is used to change the user account’s password expiry information. In this article, you will get to know the syntax, options, and practical applications of the chage command in Linux.
A. Description
The chage command in Linux displays the user account’s aging information, changes the last password change date, and specifies the account expiration date, and minimum & maximum number of days between password change. It is also used to change the user account’s aging information.
B. Syntax
The chage command in Linux has a simple syntax. In the syntax, you need to mention the user whose accounts’s aging information you want to view or modify. And the syntax is as follows:
Note: In the syntax above, OPTION is enclosed by a square bracket denoting one option that can be used at the same time
C. Options
A large number of options are available for the chage command in Linux. You can see the most useful options of the command are listed here. However, you can look for the chage command on the man page to know more about its options.
- -l, Displays account aging information
- -d, Changes last password change date
- -E, Specifies the account expiration date
- -I, Specifies the number of days of the account inactivity
- -m, Specifies the minimum number of days between password change
- -M, Specifies the maximum number of days between password change
- -W, Specifies the number of days of warning
Note: The options in Linux CLI (Command Line Interface) are case-sensitive, so be cautious when you use them.
Practical Examples of the “chage” Command in Linux
The chage command in Linux is used to view & modify the user account’s aging information. You will learn some useful practical examples of the chage command in Linux here.
Example 1: Display Account Aging Information Using the “chage” Command in Linux
To display the aging information of the account I am using chage command in Linux along with option -l. I am also using the sudo command as I want to view the information of the root. To do the same you can follow the procedure below:
Steps to Follow:
➊ At first open the Ubuntu Terminal.
➋ To display the account aging information, type the following command in the command prompt:
➌ Now, press the ENTER button.
❹ As it will ask for the password, type the password of the account in the command prompt.
➎ Finally, press the ENTER button.
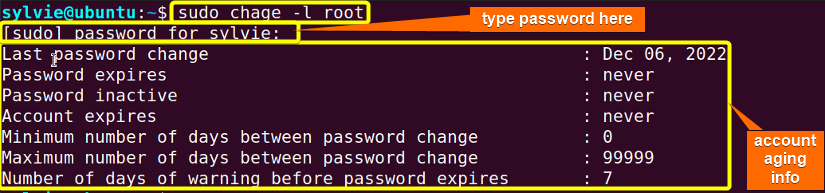
In the image below, the output shows the aging information of the account.
Similar Readings
- The “time” Command in Linux [4 Practical Examples]
- The “tty” Command in Linux [4 Practical Examples]
- The “uptime” Command in Linux [5 Practical Examples]
- The “vmstat” Command in Linux [6 Practical Examples]
- The “uname” Command in Linux [11 Practical Examples]
- The “apt-get” Command in Linux [10 Practical Examples]
Example 2: Change Last Password Change Date to the Specified Date
To change the last password change date of the account you can use chage command in Linux along with option -d. You have to use the sudo command to have access in the root.
Steps to Follow:
➊ At first open the Ubuntu Terminal.
➋ To change the last password change date, type the following command in the command prompt:
sudo chage -d 2022-12-01 root➌ Now, press the ENTER button.
❹ As it will ask for the password, type the password of the account in the command prompt.
➎ Then, press the ENTER button.
❻ To check the last password change date, type the following command in the command prompt:
❼ Finally, press the ENTER button.
In the following images, you can see the last password change date of the account is changed.
Before changing the last password change date 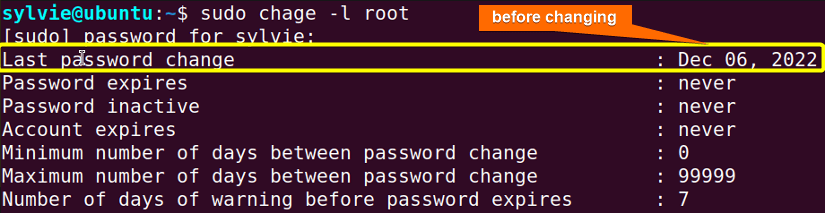 After changing the last password change date
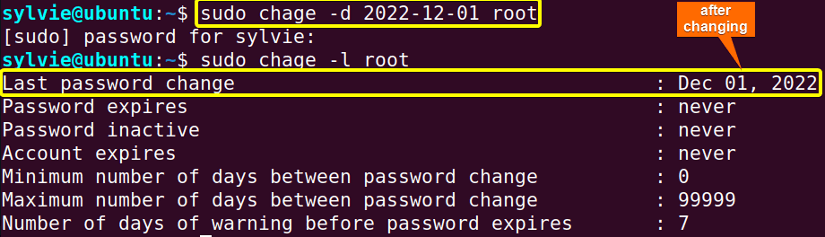
Example 3: Specify the Account Expire Date Using “chage” Command in Linux
To specify the account expiration date you can use chage command in Linux along with option -E. You have to use the sudo command to have access in the root.
Steps to Follow:
➊ At first open the Ubuntu Terminal.
➋ To specify the account expiration date, type the following command in the command prompt:
sudo chage -E 2080-10-05 root➌ Now, press the ENTER button.
❹ As it will ask for the password, type the password of the account in the command prompt.
➎ Then, press the ENTER button.
❻ To check the account expiration date, type the following command in the command prompt:
❼ Finally, press the ENTER button.
In the following images, you can see the account expiration date of the account is changed.
Before specifying the account expiration date 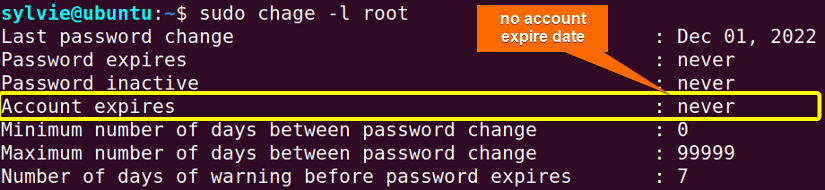 After specifying the account expiration date
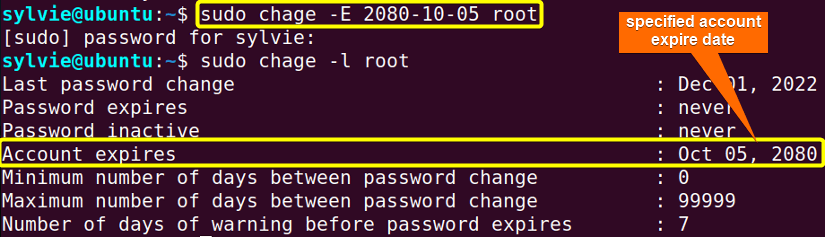
Similar Readings
- The “free” Command in Linux [8 Practical Examples]
- The “getent” Command in Linux [11 Practical Examples]
- The “groupadd” Command in Linux [7 Practical Examples]
- The “addgroup” Command in Linux [7 Practical Examples]
- The “groups” Command in Linux [6 Practical Examples]
- The “firewall-cmd” Command in Linux [7 Practical Examples]
Example 4: Specify the Minimum Number of Days Between Password Change
To specify the minimum number of days between password change of the account I am using chage command in Linux with option -m. I also have to use the sudo command to have access in the root. To do the same you can follow the procedure below:
Steps to Follow:
➊ At first open the Ubuntu Terminal.
➋ To specify the minimum number of days to expire the password of the account, type the following command in the command prompt:
➌ Now, press the ENTER button.
❹ As it will ask for the password, type the password of the account in the command prompt.
➎ Then, press the ENTER button.
❻ To check the account expiration date, type the following command in the command prompt:
❼ Finally, press the ENTER button.
In the images below, you can see the minimum number of days between the password change of the account is changed.
Before specifying the minimum number of days between password change  After specifying the minimum number of days between password change
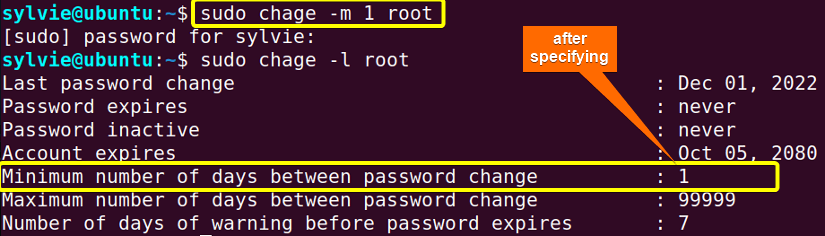
Example 5: Specify the Maximum Number of Days Between Password Change
To specify the maximum number of days between password change of the account I am using chage command in Linux with option -m. I am also using the sudo command to have access in the root. To do the same you can follow the procedure below:
Steps to Follow:
➊ At first open the Ubuntu Terminal.
➋ To specify the maximum number of days to expire the password of the account, type the following command in the command prompt:
➌ Now, press the ENTER button.
❹ As it will ask for the password, type the password of the account in the command prompt.
➎ Then, press the ENTER button.
❻ To check the account expiration date, type the following command in the command prompt:
❼ Finally, press the ENTER button.
In the following images, you can see the maximum number of days between the password change of the account is changed.
Before specifying the maximum number of days between password change 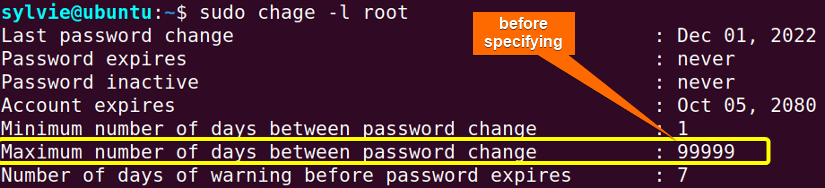 After specifying the maximum number of days between password change
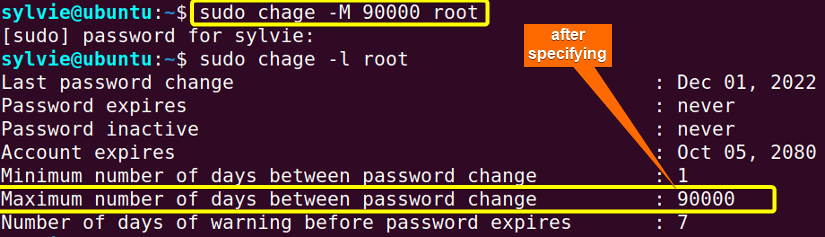
Similar Readings
- The “groupmod” Command in Linux [5+ Practical Examples]
- The “id” Command in Linux [7+ Practical Examples]
- The “service” Command in Linux [6 Practical Examples]
- The “sestatus” Command in Linux [4 Practical Examples]
- The “shutdown” Command in Linux [7 Practical Examples]
- The “finger” Command in Linux [6 Practical Examples]
Example 6: Specify the Number of Days of Warning Using “chage” Command in Linux
To specify the number of days of warning before password change of the account I am using chage command in Linux along with option -W. I am also using the sudo command to have access in the root. To do the same you can follow the procedure below:
Steps to Follow:
➊ At first open the Ubuntu Terminal.
➋ To specify the number of days of warning before password change of the account, type the following command in the command prompt:
➌ Now, press the ENTER button.
❹ As it will ask for the password, type the password of the account in the command prompt.
➎ Then, press the ENTER button.
❻ To check the account expiration date, type the following command in the command prompt:
❼ Finally, press the ENTER button.
In the images below, you can see the number of days of warning before the password expiration of the account is changed.
Before specifying the number of days before password expiration 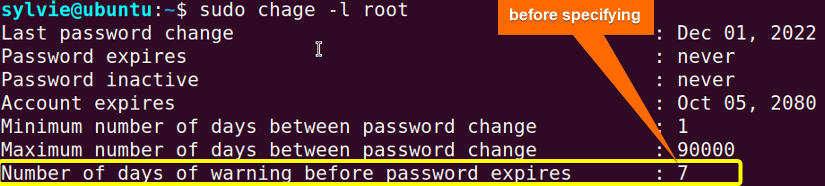 After specifying the number of days before password expiration
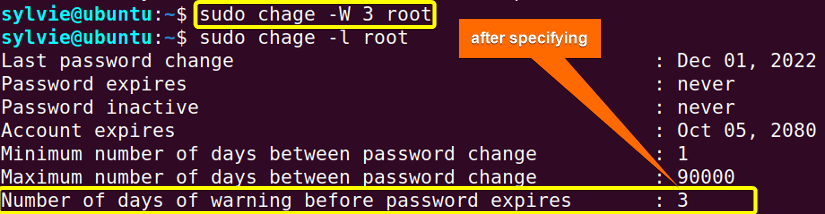
Similar Readings
- The “dmesg” Command in Linux [7+ Practical Examples]
- The “install” Command in Linux [6+ Practical Examples]
- The “reboot” Command in Linux [3 Practical Examples]
- The “sync” Command in Linux [8 Practical Examples]
- The “passwd” Command in Linux [7 Practical Examples]
- The “env ” Command in Linux [9 Practical Examples]
Example 7: Change the Account Aging Information For the User Using “chage” Command in Linux
To change the account aging information for the user you can use chage command in Linux. You have to use the sudo command to have access in the root.
Steps to Follow:
➊ At first open the Ubuntu Terminal.
➋ To specify the account aging information for the user, type the following command in the command prompt:
➌ Now, press the ENTER button.
❹ Type the new value in the command prompt.
➎ Then, press the ENTER button after typing each value.
❻ To check the changed information, type the following command in the command prompt:
❼ Finally, press the ENTER button.
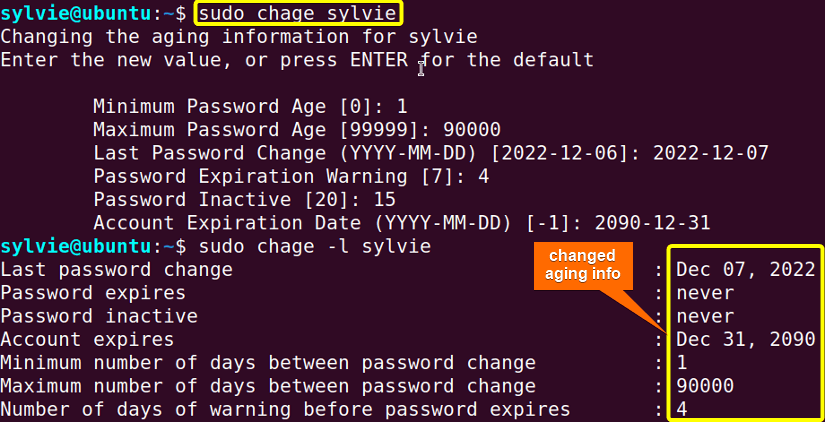
As you can see, All the account aging information are changed.
Conclusion
As you have seen in this article, the chage command has so many uses in user account in Linux. You’ve also learned the syntax, some functional options, and the practical application of this command. To become a master in Linux, try practical applications of this command by yourself.
Similar Readings
- The “sudo” Command in Linux [8 Practical Examples]
- The “df” Command in Linux [11 Practical Examples]
- The “apt” Command in Linux [13+ Practical Examples]
- The “top” Command in Linux [8 Practical Examples]
- The “htop” Command in Linux [7 Practical Examples]
- The “enable” Command in Linux [6 Practical Examples]
How to Force User to Change Password at Next Login in Linux
In our last article, we’ve explained you how to change user password expiry information in Linux, where we looked at different examples of the chage command. In this article, we will elaborate on how to forcefully make a user to change his/her password at the next login in Linux.
Note that if you have just created a user account with a default password, you can also use this trick to force that user to change their password upon the first login.
There are two possible ways to achieve this, as described in detail, below.
Using passwd Command
To force a user to change his/her password, first of all the password must have expired and to cause a user’s password to expire, you can use the passwd command, which is used to change a user’s password by specifying the -e or —expire switch along with username as shown.
Next verify the user ravi’s password expiration and aging information with the chage command as shown.
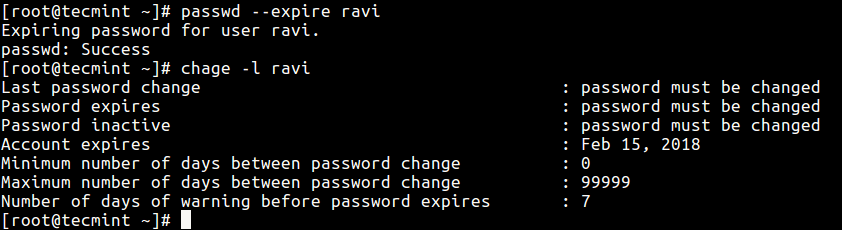
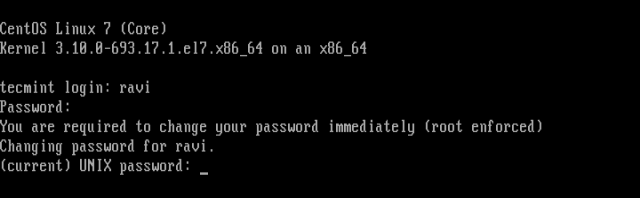
After running the passwd command above, you can see from the output of the chage command that the user’s password must be changed. Once the user ravi tries to login next time, he will be prompted to change his password before he can access a shell as shown in the following screen shot.
Using chage Command
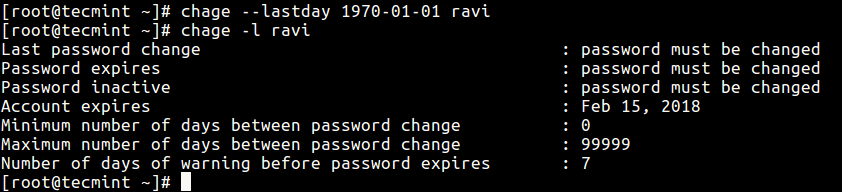
Alternatively, you can use the chage command, with the -d or —lastday option which sets the number of days since January 1st, 1970 when the password was last changed.
Now to set the password expiry of user, run the following command by specifying the day to zero (0), means that the password has not been changed since the above date (i.e. January 1st, 1970), so the password has literally expired and needs to be changed immediately before the user can access the system again.
# chage --lastday 0 ravi OR # chage --lastday 1970-01-01 ravi
Next check the user ravi’s password expiration and aging information with the chage command using -l option as shown.
Here are some additional user management guides for you.
Conclusion
It is always recommended to remind users to change their account passwords regularly for security reasons. In this article, we have explained two ways to force users to change their password in the next login. You can ask any questions via the comment form below.