- Как перейти с DHCP на статический IP-адрес в Ubuntu 22.04
- Как перейти с DHCP на статический IP-адрес в Ubuntu 22.04
- Как перейти с DHCP на статический IP-адрес в Ubuntu 22.04 с помощью терминала
- Как перейти с DHCP на статический IP-адрес в Ubuntu 22.04 с помощью графического интерфейса
- Вывод
- How to change from DHCP to Static IP Address in Ubuntu 20.04?
- How do I change DHCP to static IP in Ubuntu?
- How do I change DHCP to static IP in Linux?
- How do I change DHCP to static IP in Ubuntu 18.04 server?
- How do I set a static IP in Ubuntu terminal?
- How do I change my static IP address?
- How do I get rid of static IP?
- How do I change DHCP to static?
- How do I change DHCP query?
- How do I set a static IP in Linux?
- How do I setup a static IP address?
- What is a static IP address?
- How do you add an IP address?
- How to change from DHCP to Static IP address in Ubuntu 22.04
- How to change from DHCP to static IP address in Ubuntu 22.04
- How to change from DHCP to static IP address on Ubuntu 22.04 using terminal
- How to change from DHCP to static IP address on Ubuntu 22.04 using GUI
- Conclusion
Как перейти с DHCP на статический IP-адрес в Ubuntu 22.04
DHCP (протокол динамической конфигурации хоста) — это сетевое явление, с помощью которого устройства настраиваются в сети. DHCP назначает динамические IP-адреса устройствам по сети.
Сетевые администраторы склонны присваивать веб-серверам или FTP-серверам статические IP-адреса. Статические IP-адреса подходят для бизнеса, так как клиенты могут легко отслеживать веб-сайт по статическому IP-адресу.
В этом руководстве мы продемонстрировали возможные способы перехода с DHCP на статический IP-адрес в Ubuntu 22.04.
Как перейти с DHCP на статический IP-адрес в Ubuntu 22.04
Статический IP-адрес можно назначить с помощью терминала или поддержки графического интерфейса Ubuntu 22.04. Мы предоставили шаги для обоих методов, и вы можете следовать методу, который вам больше подходит.
Как перейти с DHCP на статический IP-адрес в Ubuntu 22.04 с помощью терминала
Терминал является наиболее часто используемым и мощным инструментом для пользователя Linux. Здесь вы научитесь переходить на статический IP-адрес в Ubuntu 22.04, используя его терминал.
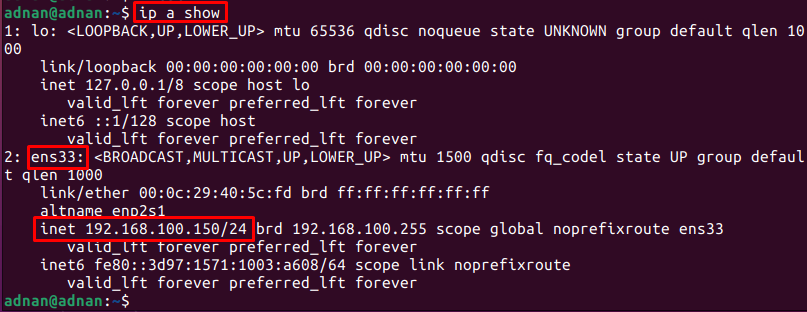
Шаг 1: Запустите терминал (CTRL+ALT+Т) и выполните следующую команду, чтобы получить текущий IP-адрес, DNS, шлюз ваших сетевых интерфейсов:

Текущий IPv4-адрес нашего сетевого интерфейса: 192.168.214.138.
Шаг 2: NMTUI — это инструмент командной строки для настройки вашего IP-адреса в Ubuntu 22.04. Выполните следующую команду, чтобы запустить его:
Выбирать «Изменить подключение” вариант продолжения:
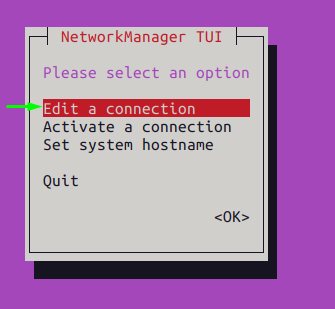
Примечание: Для навигации в nmtui вы должны использовать «вкладка» и «войти» ключ.
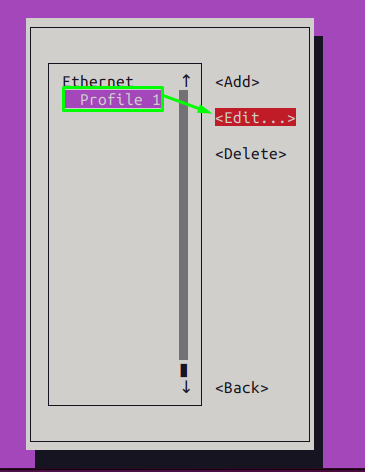
Выберите профиль сети и перейдите к «Редактировать», как показано ниже:
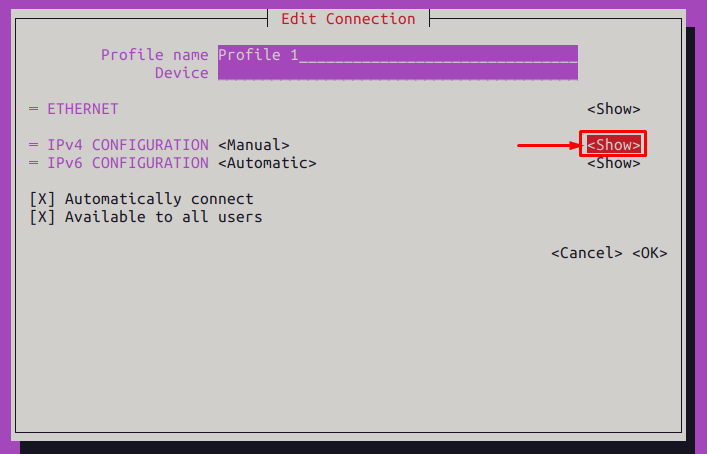
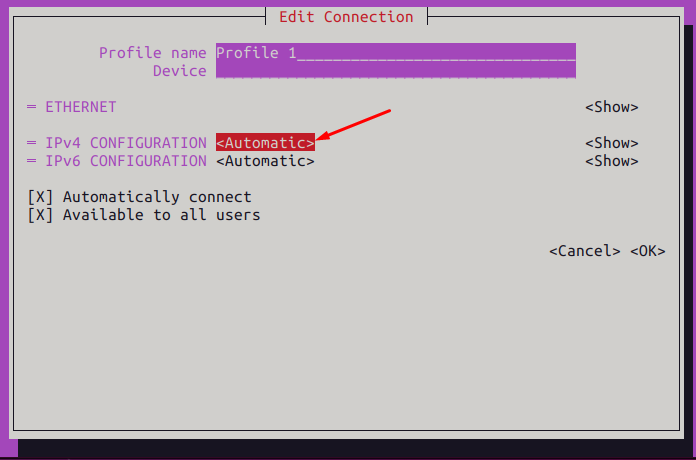
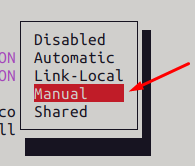
Изменить «КОНФИГУРАЦИЯ IPv4” вариант из “автоматический» к «Руководство по эксплуатации”


После этого нажмите клавишу табуляции, чтобы перейти к «Шоу» и нажмите Enter.
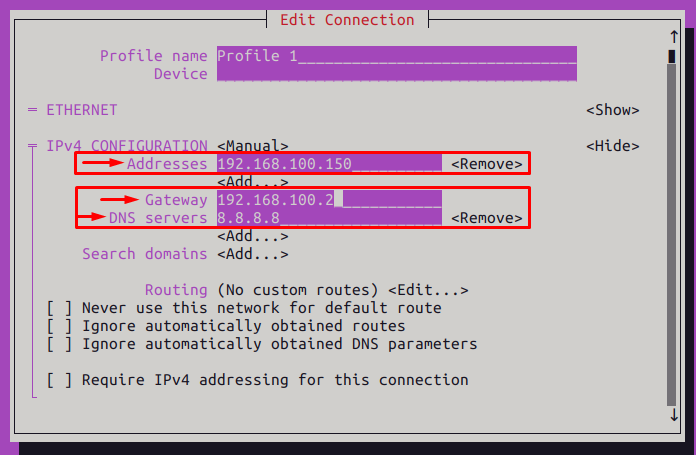
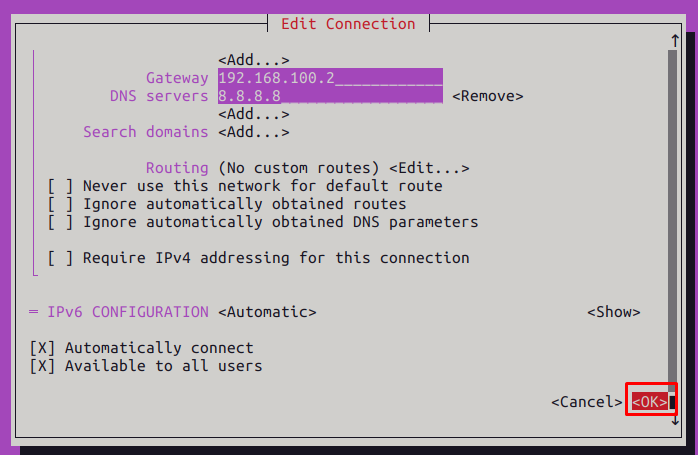
Вы найдете параметры конфигурации IPv4, где вы можете установить IP-адрес, шлюз и DNS, как мы сделали здесь.
Мы установили следующие значения:
После этого используйте клавишу табуляции для прокрутки вниз и нажмите Enter на «ХОРОШО“.

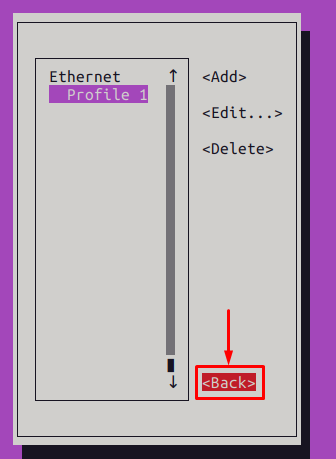
Шаг 3: Теперь выберите «Назад», чтобы перейти к основному интерфейсу инструмента nmtui.
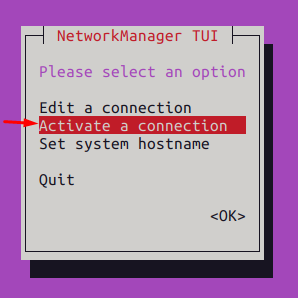
Выберите Активировать соединение:
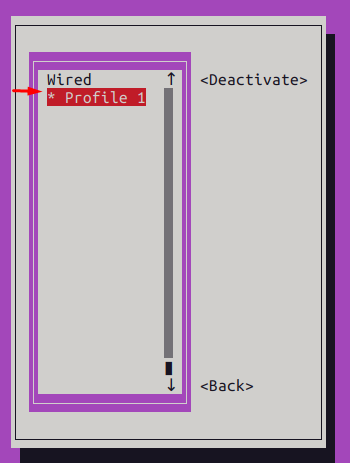
Выберите профиль, в котором вы внесли изменения, и перейдите к «Деактивировать» вариант:
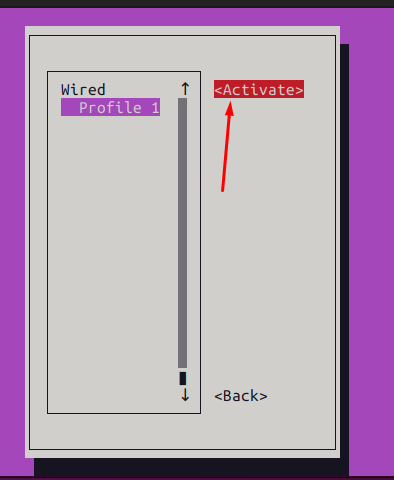
Активируйте профиль подключения, чтобы адаптироваться к изменениям:
Шаг 4: После того, как все сделано, вы можете проверить недавно измененный IP-адрес с терминала с помощью следующей команды:
Вывод показывает IPv4-адрес «ens33» был изменен.
Как перейти с DHCP на статический IP-адрес в Ubuntu 22.04 с помощью графического интерфейса
Мы выполнили различные шаги, используя графический интерфейс Ubuntu 22.04, чтобы переключиться на статический IP-адрес.
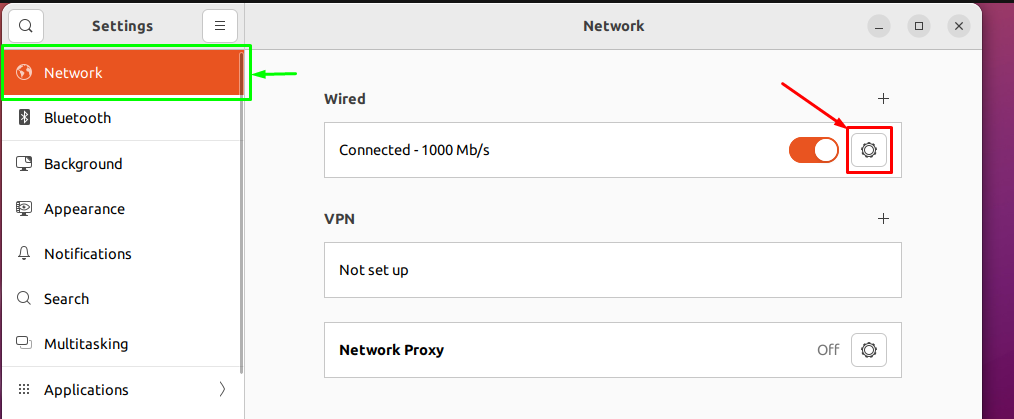
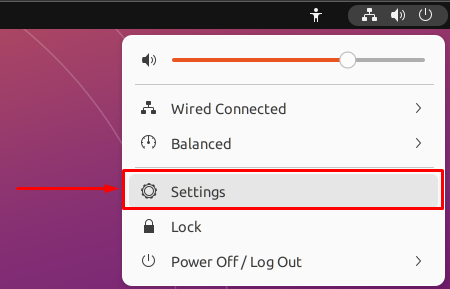
Шаг 1: Откройте систему Настройки:

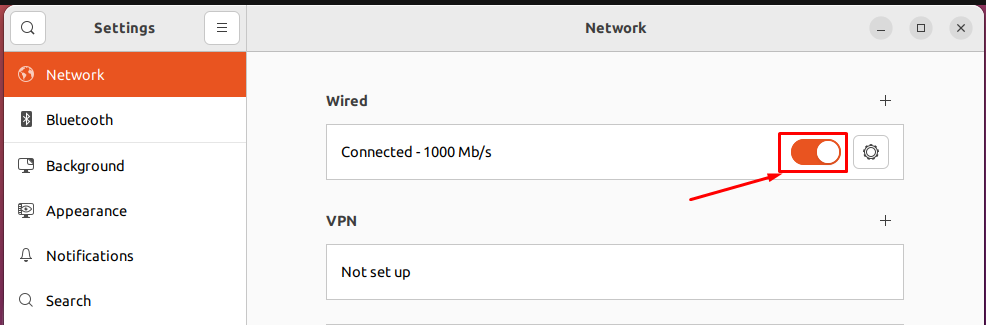
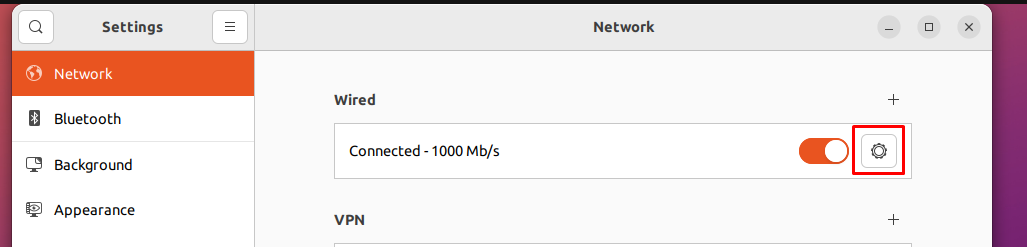
в Сеть нажмите на значок настроек, как показано ниже:
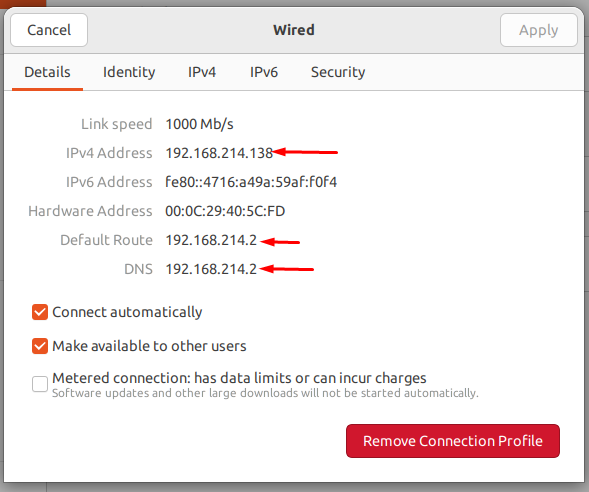
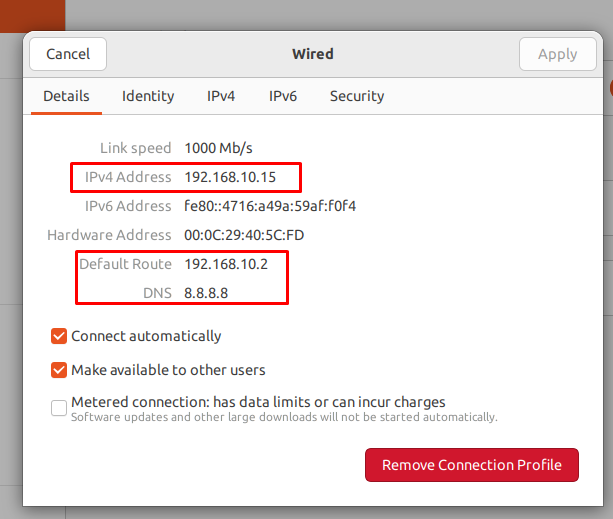
Вы получите подробную информацию о соединении (IP-адреса, DNS, маршрут по умолчанию, скорость соединения), как показано на следующем изображении:
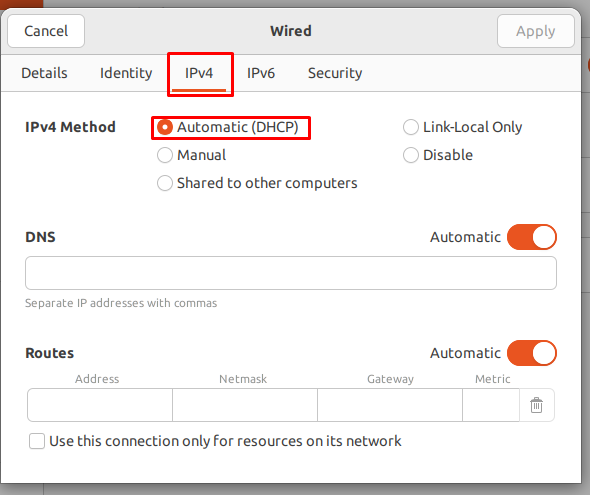
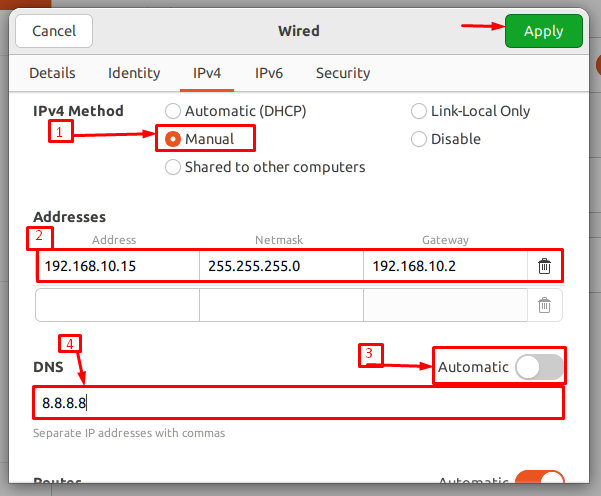
Шаг 2: Теперь перейдите к IPv4 вкладку для настройки статического IP-адреса. В настоящее время IP-адреса назначаются автоматически:
Измените переключатель на Руководство по эксплуатации и установите значение для Адрес, Сетевая маска, Шлюз, и DNS как мы сделали здесь. Кроме того, вам нужно отключить кнопку-переключатель перед DNS, чтобы установить его ручное значение.
После внесения всех изменений нажмите кнопку Применять кнопка:

После изменения настроек соединения выключите/включите переключатель, чтобы перезапустить это соединение:
После перезагрузки снова нажмите на шестеренку настроек, чтобы проверить, изменился ли IP-адрес или нет?

Если вы заметили вкладку сведений, IPv4 адрес, г. Шлюз (маршрут по умолчанию) и DNS изменяются в соответствии с назначенными нами значениями.

Вывод
DHCP (протокол динамической конфигурации хоста) назначает IP-адреса сетевым устройствам. Однако, если ваше устройство является веб-сервером или FTP-сервером, то рекомендуется назначить вашему устройству статический IP-адрес. В этом посте мы продемонстрировали различные методы перехода с DHCP на статический IP-адрес в Ubuntu 22.04 с использованием графического интерфейса и терминала.
How to change from DHCP to Static IP Address in Ubuntu 20.04?
Assign Static IP Address on Ubuntu 20.04 LTS Desktop Login to your desktop environment and click on network icon and then choose wired settings. In the next window, Choose IPV4 Tab and then select Manual and specify the IP details like IP address, netmask, gateway and DNS Server IP.
- How do I change DHCP to static IP in Ubuntu?
- How do I change DHCP to static IP in Linux?
- How do I change DHCP to static IP in Ubuntu 18.04 server?
- How do I set a static IP in Ubuntu terminal?
- How do I change my static IP address?
- How do I get rid of static IP?
- How do I change DHCP to static?
- How do I change DHCP query?
- How do I set a static IP in Linux?
- How do I setup a static IP address?
- What is a static IP address?
- How do you add an IP address?
How do I change DHCP to static IP in Ubuntu?
Configuring Static IP address on Ubuntu Desktop
Depending on the interface you want to modify, click either on the Network or Wi-Fi tab. To open the interface settings, click on the cog icon next to the interface name. In “IPV4” Method» tab, select “Manual” and enter your static IP address, Netmask and Gateway.
How do I change DHCP to static IP in Linux?
In the “/etc/sysconfig/network-scripts”, identify the network interface to be modified and start editing it. In order to set an IP to be static on CentOS or RHEL, you want to modify the “BOOTPROTO” parameter from “dhcp” to “static” and add your network information such as the netmask or the default gateway.
How do I change DHCP to static IP in Ubuntu 18.04 server?
- Set DHCP to dhcp4: no .
- Specify the static IP address 192.168. 121.199/24 . .
- Specify the gateway gateway4: 192.168. 121.1.
- Under nameservers , set the IP addresses of the nameservers addresses: [8.8. 8.8, 1.1.
How do I set a static IP in Ubuntu terminal?
- Step 1: Get the name of network interface and the default gateway. .
- Step 2: Locate Netplan configuration. .
- Step 3: Edit Netplan configuration for assigning static IP.
How do I change my static IP address?
Right-click on the network adapter you want to assign an IP address and click Properties. Highlight Internet Protocol Version 4 (TCP/IPv4) then click the Properties button. Now change the IP, Subnet mask, Default Gateway, and DNS Server Addresses. When you’re finished click OK.
How do I get rid of static IP?
Select Advanced Settings and then Continue to Advanced Settings. From the Menu, select Static IP. Set the Static IP address: option to ‘Off’ and press Apply to save the setting.
How do I change DHCP to static?
- Go to Settings, click on Network & Internet then WiFi.
- Tap on the network you are currently connected to to open the settings menu.
- Tap on the pencil icon in the top right to access the network settings.
- Tap Advanced Options.
- Under IP Settings, change it from DHCP to Static.
How do I change DHCP query?
- Go to WAN >Internet Connection and find DHCP query frequency.
- Select Continuous mode and hit apply to save.
How do I set a static IP in Linux?
- Set Your IP Address. ifconfig eth0 192.168.1.5 netmask 255.255.255.0 up. Related. Masscan Examples: From Installation to Everyday Use.
- Set Your Default Gateway. route add default gw 192.168.1.1.
- Set Your DNS Server. Yes, 1.1. 1.1 is a real DNS resolver by CloudFlare. echo «nameserver 1.1.1.1» > /etc/resolv.conf.
How do I setup a static IP address?
- Connect to your network.
- Open your network preferences panel by typing your router’s IP. Find yours here — same link as the above.
- Look for an option with keywords like «Assign» «IP» & «DHCP»
- Write an IP of your choice and Airtame’s MAC address you found earlier.
- Save all settings.
What is a static IP address?
An Internet Protocol (IP) address is a unique number assigned to each computer on a network. . A computer on the Internet can have a static IP address, which means it stays the same over time, or a dynamic IP address, which means the address can change over time.
How do you add an IP address?
Open Network (and Dial-up) Connections.
Click Properties. Click Internet Protocol (TCP/IP) then click Properties. Click Advanced. Type in the new IP address then click Add.

Redis
Installing Redis on Debian 9Step 1: Install Redis from APT Repo. Redis package is included in the default Debian 9 repositories, therefore, issue the .

Shutdown
Press Ctrl+Alt+Del and you will see the Power Off dialog box. Click on the Power Off button to power off your system. In case, you want to cancel the .

Address
Right-click or long tap on the adapter for the network card that you want to change. Choose Properties from the menu that opens up. In the Properties .
Latest news, practical advice, detailed reviews and guides. We have everything about the Linux operating system
How to change from DHCP to Static IP address in Ubuntu 22.04
![]()
DHCP (Dynamic Host Configuration Protocol) is the networking phenomenon through which the devices are configured on networks. The DHCP assigns dynamic IP addresses to the devices over the network.
The network administrators tend to assign static IP addresses to the web servers or the FTP-servers. The static IP addresses are suitable for the businesses as the customers can easily track the website via static IP address.
In this guide, we have demonstrated possible methods to change from DHCP to static IP address on Ubuntu 22.04.
How to change from DHCP to static IP address in Ubuntu 22.04
The static IP address can be assigned using the terminal or the graphical interface support of Ubuntu 22.04. We have provided the steps for both methods and you can follow the method which better suits you.
How to change from DHCP to static IP address on Ubuntu 22.04 using terminal
The terminal is the most used and powerful tool for a Linux user. Here, you will learn to change to a static IP address on Ubuntu 22.04 using its terminal.
Step 1: Fire up the terminal (CTRL+ALT+T) and execute the following command to get the current IP address, DNS, Gateway of your network interfaces:
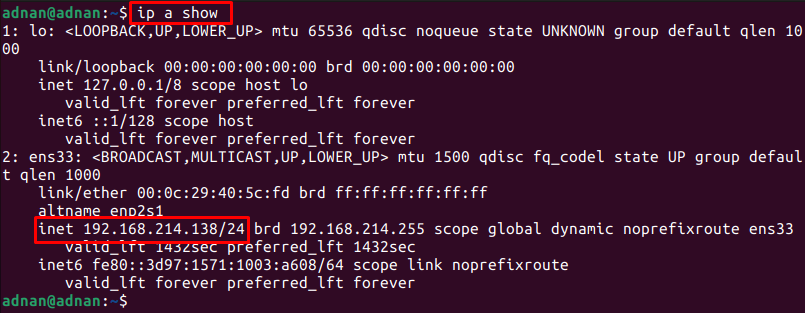
The current IPv4 address of our network interface is 192.168.214.138.
Step 2: NMTUI is a command line tool to configure your IP on Ubuntu 22.04. Execute the following command to launch it:
Choose “Edit a connection” option to continue:

Note: To navigate in a nmtui, you have to use the “tab” and “enter” key.
Choose the network profile and navigate to “Edit” option as shown below:

Change the “IPv4 CONFIGURATION” option from “Automatic” to “Manual”
After that, press the tab key to navigate to “Show” and hit enter.

You will find the options for IPv4 configuration where you can set the IP-address, Gateway, and the DNS as we did here.
We have set the following values:

After that, use the tab key to scroll down and hit enter on “OK“.
Step 3: Now, choose the “Back” option to go to the main interface of nmtui tool.

Choose Activate connection:

Choose the profile where you have performed the changes and navigate to the “Deactivate” option:

Activate the connection profile to adapt to the changes:

Step 4: Once all done, you can check the newly changed IP address from the terminal via the following command:

The output shows the IPv4 address of the “ens33” has been changed.
How to change from DHCP to static IP address on Ubuntu 22.04 using GUI
We have performed various steps using the GUI of Ubuntu 22.04 to switch to the static IP address.
Step 1: Open the system Settings:
In the Network tab, click on the settings icon as shown below:

You will get the details of the connection(IP addresses, DNS, default route, Link speed) as shown in the following image:

Step 2: Now, navigate to the IPv4 tab to configure the static IP address. Currently, the IP addresses are being assigned automatically:

Change the radio-button to Manual and set the value for Address, Netmask, Gateway, and DNS as we did here. Moreover, you need to turn off the toggle button in-front of DNS to set its manual value.
After doing all the changes, click on the Apply button:
After changing the connection’s settings, turn off/on the toggle button to restart this connection:

After restarting, click on the settings gear again to check if the IP address has changed or not?
If you notice the details tab, the IPv4 address, the Gateway (default route), and DNS are changed as per the values we assigned.
Conclusion
The DHCP (Dynamic Host Configuration Protocol) assigns the IP addresses to the network devices. However, if your device is a web server or FTP-server, then it is recommended to assign a static IP address to your device. In this post, we have demonstrated various methods to change from DHCP to static IP on Ubuntu 22.04 using the GUI and terminal.