- How do I configure my DNS settings in Ubuntu server?
- How to set DNS Nameserver on Ubuntu 22.04 LTS Jammy
- Steps to change the DNS Nameserver on Ubuntu 22.04 LTS Linux
- 1. Open Ubuntu Settings
- 2. Go to Network Settings
- 3. Set DNS Server on Ubuntu 22.04
- 4. Open Command terminal
- 5. Edit Netplan Confgiuration file
- Change DNS Server in Ubuntu
- Step 1: Check your current DNS Server
- Step 2: Temporarily change DNS (to test it out)
- Available DNS Providers
- Step 3: Permanently change DNS
- Method 1: The easy way 🙂
- Method 2: The not-so-easy way
How do I configure my DNS settings in Ubuntu server?
According to this page it appears to be simple. However, /etc/bind does not exist on the default installation of Ubuntu 12.04.3 LTS server. So, without installing any further software, how can configure DNS and remove dnsmasq on ubuntu server? I am quite familiar with sudo & nano .
Also take a look at help.ubuntu.com/community/Dnsmasq. bind IS a nameserver. If you need nameserver functionality on your server, you must install a nameserver. It would help if you could describe what it is you are trying to achieve.
You were reading a manual to configure a DNS Server, not how to configure the DNS entries in the server. The manual you should have read are this
I don’t have the rep to post a comment on another answer, but in reply to Nullet’s answer on September 17th 2013, this worked for me. I was thinking that there was a problem with my router (a cheap, ISP provided one). I also think it worth mentioning that on the dns-nameservers line, you should use the IP of the public DNS. Don’t use the local address of the DNS, which is most likely on your router. I was connecting to the DNS on my router, which for some unknown reason wasn’t working with my server. Instead, I found out where the DNS on my router was getting its information from, and set dn
I think there is a better answer here unix.stackexchange.com/a/154538/82018 — basically you can override your dhcp settings to «prepend» a server in front of the ones you currently use. This is nice as you don’t have to rely solely on the new server, you just give it precedence for lookups.
How to set DNS Nameserver on Ubuntu 22.04 LTS Jammy
Well, whenever we visit some website such as how2shout.com in a browser, to find the website the browser needs the Ip-address of it. Here, the DNS comes into the picture. The Domain Name System, or DNS for short, is a system that converts Internet addresses or computer names into IP addresses and vice versa.
A browser request for the IP address will be sent to the DNS server. For private individuals, this is usually the case with the associated Internet provider. The DNS server then returns the IP address.
There are numerous DNS servers connected and always inform each other about changes. If a DNS server does not find a name or an IP address, it asks the other DNS server.
The DNS is therefore responsible and necessary for us to be able to access websites via Internet addresses or IP addresses.
Steps to change the DNS Nameserver on Ubuntu 22.04 LTS Linux
Although the DNS server address supplied by your internet service provider automatically gets configured, however, if you want to change it manually then follow this guide.
#1st Method Using GUI
1. Open Ubuntu Settings
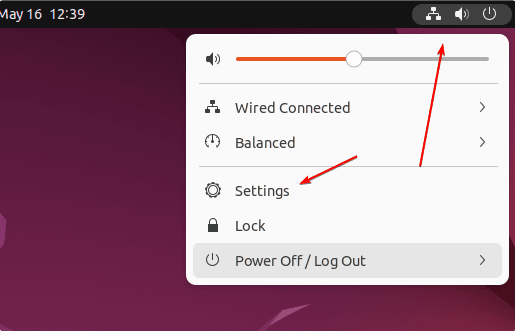
On your Ubuntu 22.04, click on the Power icon given on the right top side of the Taskbar. A pop-up will appear there select the “Settings” option to open it.
2. Go to Network Settings
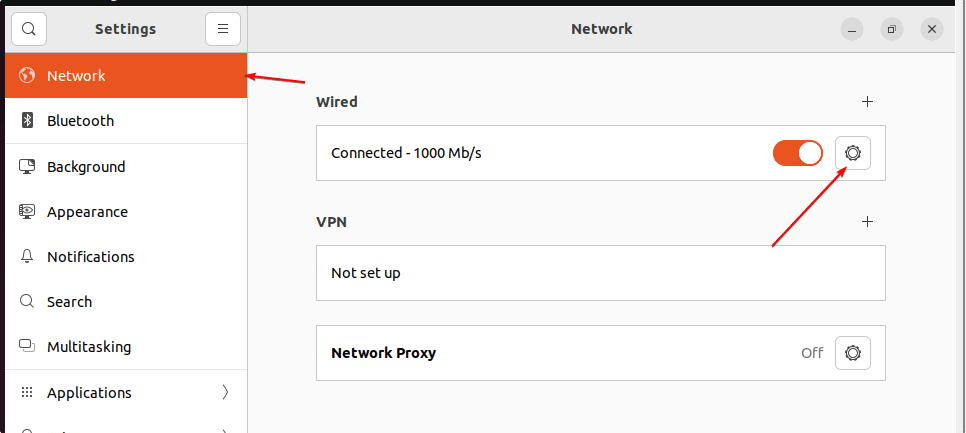
Once you are on the Settings page, go to the Network menu given on the left sidebar and then click on the Gear icon given for Wired or Wireless connection.
3. Set DNS Server on Ubuntu 22.04
Now, you will have a window to configure IP addresses and other settings related to the network. However, to configure DNS Server Ip-address, select IPV4 Tab and then click on the Toggle button given in front of DNS. This will disable the automatic fetching of DNS Server addresses from your Internet provider. After that enter the IP address of the DNS server you want to set on your Ubuntu 22.04. Here we are using the address of the Google DNS server to perform this tutorial, you can set whatever you want to. After that click on the “Apply” button to save the configuration.

From now onwards to resolve some domain names, the system will check it with the Google DNS server or the one you have set.
Note: Don’t forget to Turn the Network Off and On to get the immediate effect or else the same will reflect on your next system boot-up.
#2nd method using CLI
4. Open Command terminal
Those who are not using the GUI Desktop of Ubuntu 22.04 or prefer to use the command line, can go for the Netplan configuration file. First, open the command terminal, those who are on the server version already have terminal access, whereas the Desktop user can use the keyboard shortcut – Ctrl+Alt+T.
5. Edit Netplan Confgiuration file
Ubuntu has a command-line Netplan tool that uses a YAML configuration file; we can use it to set our network configuration.
Switch to Netplan directory:
List the available file:
Before editing the file, find out your ethernet adapter name and also the IP address of the PC in your network range. To find it, you can use the command ip a
sudo nano 01-network-manager.yaml
Add the following lines, however, make sure the space should be as given in the block of code because YAML is an indent-sensitive language. And don’t forget to replace ens160 with your adapter and Ip-address + Gateway as well. After that move to the nameservers section and set whatever DNS server address you want on your system to use for resolving domain names.
network: version: 2 renderer: NetworkManager ethernets: ens160: dhcp4: no addresses: - 192.168.17.100/24 gateway4: 192.168.17.2 nameservers: addresses: [1.1.1.1, 8.8.8.8, 4.4.4.4]
Save the file by pressing Ctlr+O, hitting the Enter key, and then exiting using Ctrl+X.
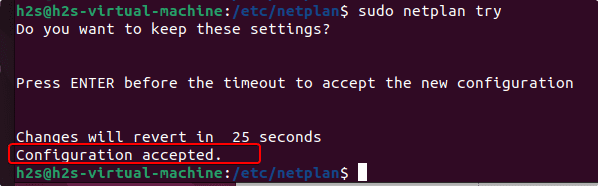
Before applying your Netplan configuration file, let’s test it by issuing the following command:
Hit the Enter key, if the Configuration you have done in the Netplan file is valid, you will have an output saying- Configuration accepted.
Now, Apply the configuration:
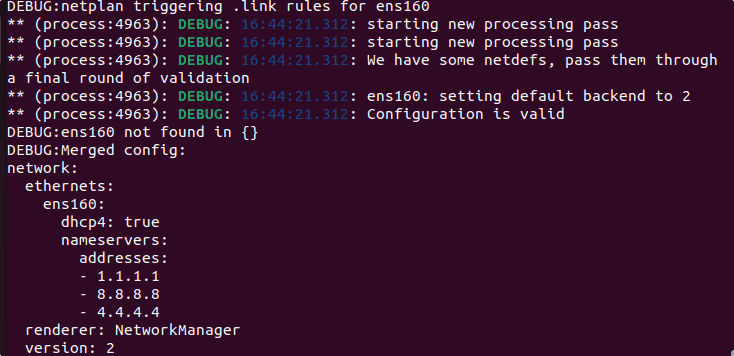
If you want also want to see what is happening while applying the new Netplan configuration, use:
With the help of the Domain Name System, the assignments between IP addresses and domain names can be resolved in the outward and backward directions. Since DNS is very important for the functioning of an IP network, there are numerous security extensions such as DNSSEC, DNS over TLS, or DNS over HTTPS.
Other Articles:
Change DNS Server in Ubuntu

Changing the DNS server on Ubuntu is an easy task, but needs to be done carefully.
This article shows you how to do it easily.
Step 1: Check your current DNS Server
The first step is to always check, and note down the currently used DNS Servers – in case the change in DNS Server does not result in intended changes.
To show the current DNS servers that are being used per interface, use the ‘resolvectl’ command:
For systems running Ubuntu 20.04 or newer, please use the following command:
Running either of these commands will show you the DNS server(s) being used by each network interface.
Let us see the output of the ‘resolvectl’ command on my computer:
$ resolvectl status Global Protocols: -LLMNR -mDNS -DNSOverTLS DNSSEC=no/unsupported resolv.conf mode: stub Link 2 (enp1s0) Current Scopes: DNS Protocols: +DefaultRoute +LLMNR -mDNS -DNSOverTLS DNSSEC=no/unsupported Current DNS Server: 8.8.8.8 DNS Servers: 8.8.8.8 8.4.4.8As evident from the output, my current DNS provider is Google.
I’d like to change that to something else, maybe Cloudflare.
Step 2: Temporarily change DNS (to test it out)
Before you change the DNS settings permanently, it is best to change it temporarily and see the results.
If there is regression, no need to revert as this is only a temporary change. If the results are as expected, we will make it permanent.
To temporarily change the DNS server, edit the /etc/resolv.conf file.
In /etc/resolv.conf , the line which starts with the keyword nameserver deals with DNS Servers.
NEVER remove the line that says nameserver 127.0.0.53 . Comment it out by putting a pound/hash symbol at the beginning of that line.
Add one or two lines that begin with nameserver and specify the IP address next to it. Below is what it should look like (if I want Cloudflare as my DNS provider):
nameserver 1.1.1.2 nameserver 1.0.0.2The first line is your primary DNS server and second line is the fall-back DNS server. The fall-back DNS server is used when [for some reason] the primary DNS server is unavailable.
Once these two lines are added to your /etc/resolv.conf file, you should immediately see the results.
You can verify if the DNS server changed with the help of dig command.
$ dig google.com | grep SERVER ;; SERVER: 1.1.1.2#53(1.1.1.2) (UDP)Grep-ing the output, we see that Cloudflare’s DNS servers are being used. That confirms that the temporary change in DNS server was in effect immediately.
After temporarily switching DNS, if you do not like the change, remove the lines that you had added and uncomment the nameserver 127.0.0.53 line.
Available DNS Providers
In case you are not aware of IP addresses for DNS servers, below is the table of a few popular DNS providers, and their primary and fall-back addresses:
| Provider | Primary IP Address | Fall-back IP Address |
|---|---|---|
| Cloudflare | 1.1.1.1 | 1.0.0.1 |
| Cloudflare (malware blocking) | 1.1.1.2 | 1.0.0.2 |
| 8.8.8.8 | 8.4.4.8 | |
| Quad9 | 9.9.9.9 | 149.112.112.112 |
| OpenDNS | 208.67.222.222 | 208.67.220.220 |
To use Cloudflare (with malware blocking) as my DNS provider, I will use the 1.1.1.2 and 1.0.0.2 IP addresses.
Step 3: Permanently change DNS
After temporarily changing your DNS provider, if you are satisfied with the results, it is time to make this change permanent.
Method 1: The easy way 🙂
To permanently change your DNS server, install the resolvconf package using the following command:
sudo apt-get install resolvconfOnce that is installed, edit the /etc/resolvconf/resolv.conf.d/head file and add the same nameserver lines to it like so (assuming Cloudflare as DNS provider):
nameserver 1.1.1.2 nameserver 1.0.0.2Once that is done, start the resolvconf.service with the following command:
sudo systemctl enable --now resolvconf.serviceMethod 2: The not-so-easy way
One way to permanently change your DNS server is to edit the YAML file that resides in the /etc/netplan/ directory.
Before that, note down the name of your network interface beforehand. You can do so using the ip command:
That will list various network interfaces. Locate the interface and note it down.
Usually, there is only one file in /etc/netplan/ directory, but the name is mostly different. If there are multiple files, grep all files for your interface name. That should narrow down the candidate file to one.
Once you know the filename, open it for editing. You should see something similar to my output:
network: ethernets: enp1s0: dhcp4: true version: 2My network interface is called ‘enp1s0’, yours might be different.
Under my interface, I will add the nameservers field (below, not under dhcp ), and another filed called addresses under it as well. I will specify the address in a bracket, separated by commas, like so:
network: ethernets: enp1s0: dhcp4: true nameservers: addresses: [1.1.1.2, 1.0.0.2] version: 2Once that is done, save changes and exit.
Then, run the following command to make changes effective:
Done! You have now permanently changed your DNS server 🙂