- Команда chgrp в Linux
- Команда chgrp Linux
- Синтаксис и опции chgrp
- Использование команды chgrp
- Выводы
- How to Change File/Group Owner with chown Command in Linux
- How to view file permissions
- How to change file owner with chown command
- How to change the group owner with chown command
- How to change both file owner and group owner of a file
- How to recursively change file ownership
- How to change ownership using a reference file
Команда chgrp в Linux
При домашнем использовании операционной системы Linux мы редко задумываемся о том, кто является владельцем файла. Если же говорить о запуске сервера, то расклад меняетя. Для того, чтобы повысить безопасность, сервер получает собственного пользователя и группу. Нередко серверы используют одну и ту же группу, вроде www-data.
Мы изучим то, как работает команда chgrp с файлами и каталогами. Особое внимание уделим символическим ссылкам, так как они могут создать проблемы при использовании небезопасных параметров.
Команда chgrp Linux
Стандарт прав файлов пришёл в Linux из Unix. У каждого файла есть владелец (user) и группа (group), помимо этого описываются права остальных пользователей (other). Права состоят из трёх пунктов: чтение (read), запись (write), выполнение (execute). Для изменения прав используется команда umask, но для изменения непосредственно владельца и группы используются команды chown и chgrp. Для просмотра текущих прав можно использовать команду ls.
Синтаксис и опции chgrp
$ chgrp [параметры] новая_группа имя_файла
Список распространённых параметров команды chgrp:
- -h – работать непосредственно с самими символьными ссылками, а не с файлами, на которые они ссылаются;
- —dereference – работать с файлами, а не самими символьными ссылками. Используется по умолчанию;
- -R – рекурсивная обработка каталога со всем его содержимым;
- -H – перейти по символической ссылке и изменить атрибуты файла/каталога. Сама ссылка остаётся без изменений. Используется вместе с параметром -R;
- -L — перейти по символической ссылке и продолжить рекурсивную обработку. Сама ссылка остаётся без изменений. Используется вместе с параметром -R;
- -P – при встрече с символьной ссылкой обрабатывать только её. Используется вместе с параметром -R, является значением по умолчанию;
- —reference=имя_образца – использовать группу образца. Используется вместо новая_группа;
- -c – при обработке выводить только изменения;
- -v – выводить информацию о каждом обработанном файле.
Использование команды chgrp
Рассмотрим сразу несколько случаев использования, с реальным файлом и каталогом, а затем с символическими ссылками на них. Простейший пример использования команды chgrp без параметров. Следующая команда меняет группу на www-data для файла file в текущей папке:
sudo chgrp www-data file.txt
А эта меняет группу на www-data для папки folder:
sudo chgrp www-data folder
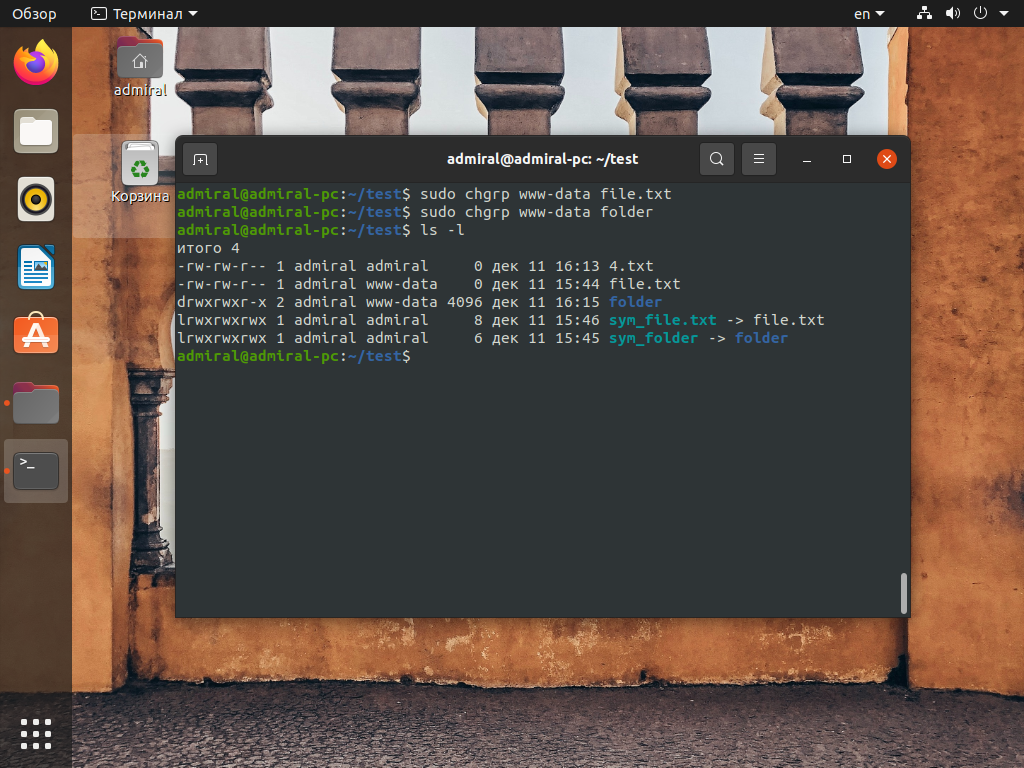
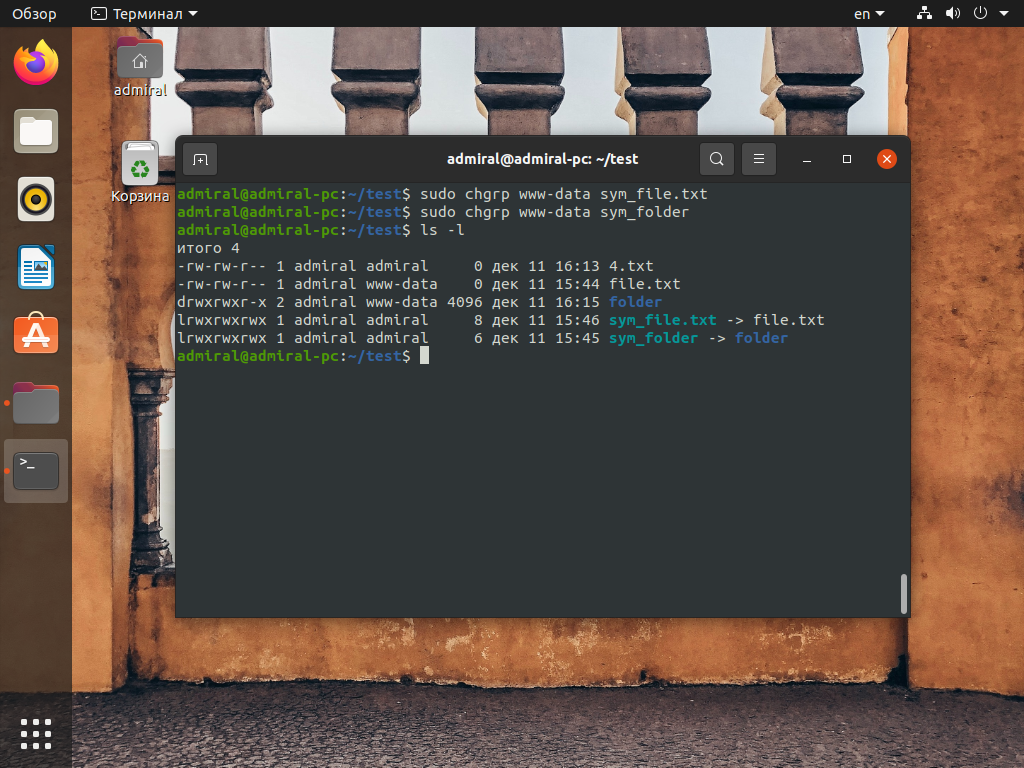
С реальными файлами и каталогами команда работает весьма предсказуемо, меняя их группу. Файлы в папке остаются неизменными. Если же обрабатывать символические ссылки, то их атрибуты останутся неизменными, а файлы получат новую группу. Такое поведение аналогично работе с параметром —dereference. Например, эти команды, применённые к символическим ссылкам, отработают как показано на снимке:
sudo chgrp www-data sym_file.txt
sudo chgrp www-data sym_folder
Теперь посмотрим на то, как будет работать параметр -h, меняющий атрибуты символической ссылки:
sudo chgrp -h www-data sym_file
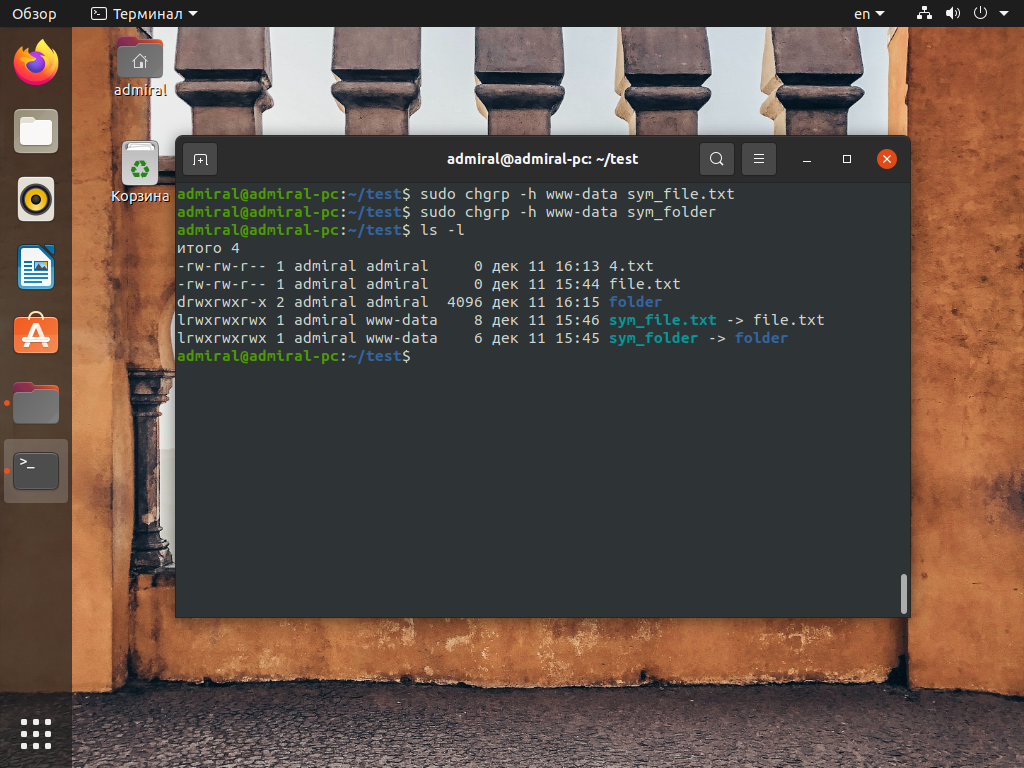
С параметром -h изменились только атрибуты ссылок, а не сами файлы. Теперь рассмотрим работу c параметром -R, предназначенным для рекурсивной обработки каталогов:
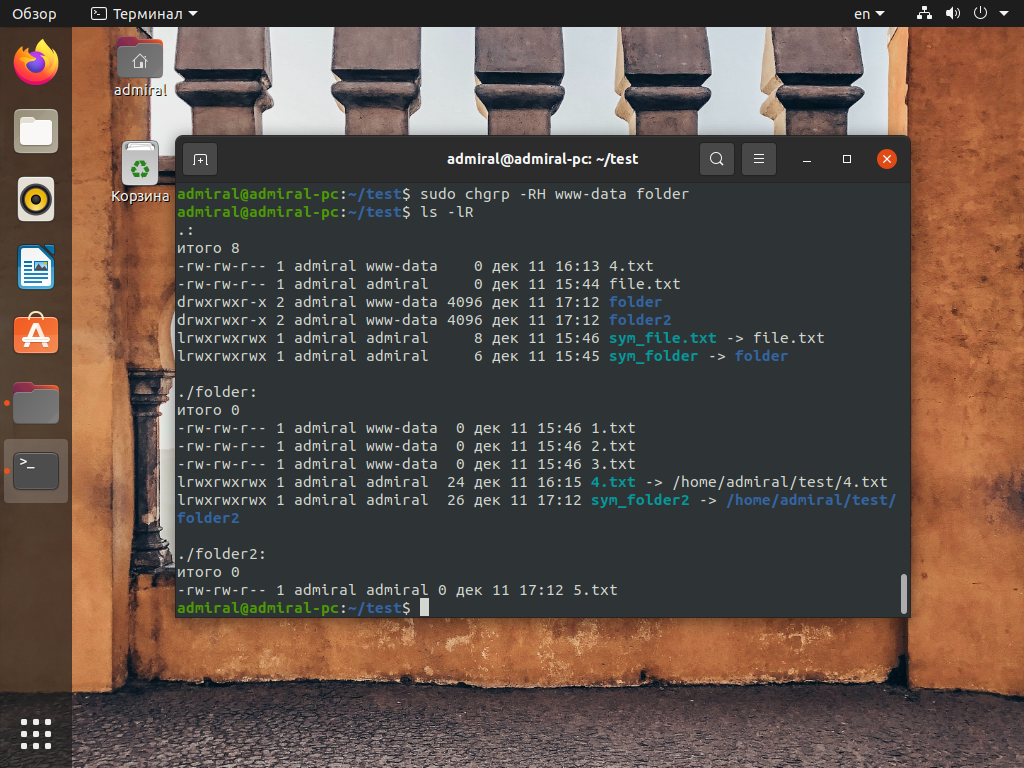
sudo chgrp -R www-data folder

Новая группа была задана не только каталогу, но и всем файлам внутри. Обратите внимание на то, что поведение изменилось, теперь при обработке символической ссылки атрибуты выставляются для самой ссылки, а не файла.
Чтобы увидеть разницу между параметрами -H и -L, рассмотрим ещё пару примеров. Напомним, что их надо использовать совместно с параметром -R:
sudo chgrp -RH www-data folder
С использованием параметра -H поведение при обработке символических ссылок изменилось, теперь они обрабатываются так, как будто команды выполняются по отдельности. Атрибуты ссылок не меняются, меняются атрибуты самих файлов, при переходе на каталог рекурсивная обработка прекращается.
sudo chgrp -RL www-data folder

С использованием параметра -L при переходе к папке по символической ссылке рекурсивная обработка не прекращается. Обращаем ваше внимание на то, что параметры -H и -L использовать небезопасно, они могут дойти до системных файлов.
Выводы
Команда chgrp Linux выполняет одну функцию – меняет группу у файлов и каталогов. При обработке символических ссылок надо быть предельно осторожным, чтобы не навредить системе, поэтому параметр -R не рекомендуется дополнять другими. Также вы можете менять пользователя и группу одновременно с помощью команды chown.
Как вы могли заметить, программа chgrp задаёт только одну группу, на деле же списки управления доступом (ACL) позволяют назначать несколько групп. Для работы с ними можно использовать утилиты setfacl и getfacl, также имеется утилита с графическим интерфейсом eiciel (в репозиториях Debian 10 и Ubuntu 20.04 лежит устаревшая версия, последняя (0.9.13) умеет задавать права рекурсивно).
Обнаружили ошибку в тексте? Сообщите мне об этом. Выделите текст с ошибкой и нажмите Ctrl+Enter.
How to Change File/Group Owner with chown Command in Linux
Short for change ownership, Chown command is a command-line utility that is used to change the user or group ownership of a file or directory and even links. The Linux philosophy is such that every file or directory is owned by a specific user or group with certain access rights.
Using different examples, we will try and see the various use cases of the chown command . Chown command employs quite a simple and straight forward syntax.
$ chown OPTIONS USER: GROUP file(s)
Let’s briefly flesh out the parameters:
The attribute USER refers to the username of the user that will own the file. You can specify either the username or the UID ( User ID). Meanwhile, the GROUP option indicates the name of the new group that the file will acquire after running the command. The file option represents a regular file or a directory or even a symbolic link. These are the three entities whose permissions can be altered.
A few points to note:
1) When the USER option is specified alone, ownership of the file/directory changes to that of the specified user while the group ownership remains unchanged. Here’s an example:
In the above command, user ownership of the file file1.txt changes from the current user to the user john.
2) If the USER option is proceeded by a full colon i.e. USER: and the group name is not provided, then the user takes ownership of the file but the file’s group ownership switches to the user’s login group. For example:
In this example, the user john takes ownership of the file file1.txt, but the group ownership of the file changes to john’s login group.
3) When both the user and group options are specified separated by a colon i.e USER:GROUP – without any spaces therein – the file takes ownership of the new user and the group as specified
In the above example, the file takes the user and group ownership of user john.
4) When the USER option is left out and instead the group option is preceded by the full colon :GROUP then, only the group ownership of the file changes.
How to view file permissions
To view file permissions, simply use the ls -l command followed by the file name

From the output, we can see that the file is owned by user linuxtechi which and belongs to the group linuxtechi in the 3rd and 4th columns respectively.
How to change file owner with chown command
Before changing permissions, always invoke sudo if you are not working as the root user. This gives you elevated privileges to change user and group ownership of a file.
To change file ownership, use the syntax:
$ sudo chown james file1.txt
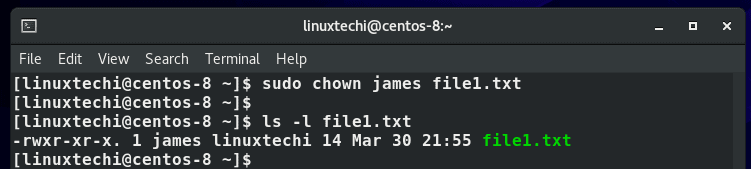
From the output, you can clearly see that the ownership of the file has changed from linuxtechi to user james .
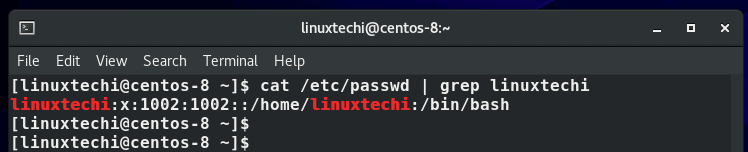
Alternatively, instead of using the username, you can pass the UID of the user instead. To get the UID, view the /etc/passwd file.
$ cat /etc/passwd | grep username
From the example below, we can see that the UID of user linuxtechi is 1002
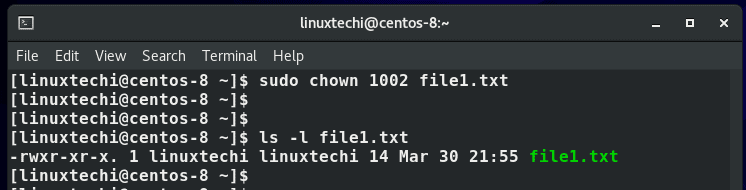
To change the file ownership back to linuxtechi user, we shall execute the command:
How to change the group owner with chown command
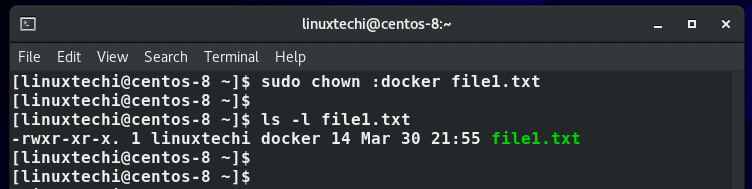
As earlier discussed, to change the group owner of a file, omit the user and simply prefix the group name with a full colon.
For example, to change the group owner of file1.txt from linuxtechi to docker , we executed the command:
$ sudo chown :docker file1.txt
How to change both file owner and group owner of a file
If you want to change both the owner and group that a file belongs to, specify both the user and group options separated by a full colon as shown in the syntax below. Be sure that there are no spaces between the options and the colon.
$ sudo chown user:group filename
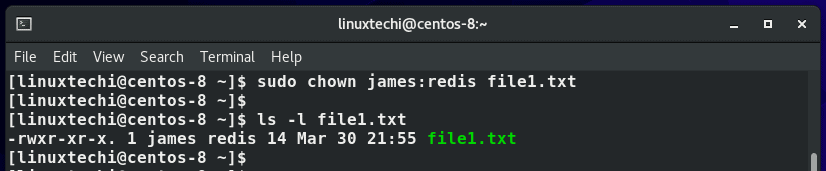
For example, the following command changes the ownership of the file file1.txt to user james and group redis as verified using the ls command.
$ sudo chown james:redis file1.txt
How to recursively change file ownership
When applying permissions to directories, you might want to apply changes recursively i.e make the ownership changes to descend and apply to files and sub-directories. To achieve this, user the recursive option -R or –recursive directive.
$ sudo chown -R user:group directory
For example, the command below assigns all files and folders in the /var/www directory ownership to the www-data group.
$ sudo chown -R :www-data /var/www
The example below assigns ownership of the directory reports alongside all the files and folders in the directory to the user linuxtechi.
$ sudo chown -R linuxtechi reports
How to change ownership using a reference file
Lastly, there’s a nifty way that you can use to change ownership of a file, and that is by using a reference file. Using the chown command, you can change the user and group ownership of a file using another file as the point of reference.
The syntax is shown below:
$ chown –reference=ref_file file
Suppose you want to assign user and group ownership of file1.txt to another file file2.txt. How would you go about it? This is illustrated in the command below.
$ chown --reference=file1.txt file2.txt
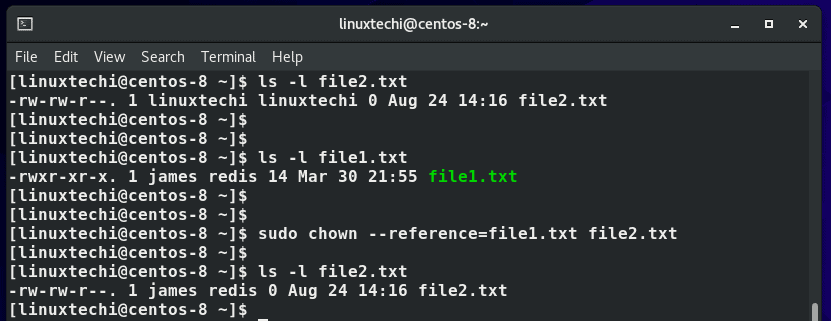
The output above confirms that file2.txt inherits the user and group ownership of file1.txt .In the command, file1.txt is the reference file.
Chown command is a powerful tool that is used for managing file and directory ownership. For additional information, check out the chown man pages.