- Terminal Basics #1: Changing Directories in Linux Terminal
- Understanding paths in Linux
- Changing directory with cd command
- Troubleshooting
- No such file or directory
- Not a directory
- Too many arguments
- Special directory notations
- Test your knowledge
- Changing Linux System Language (Locales) From Command Line on Ubuntu and Debian Based Distros
- Changing Linux system language from the terminal
- Change Linux Command Line Parameter from U-boot
- Runtime Kernel command line creation [ edit | edit source ]
Terminal Basics #1: Changing Directories in Linux Terminal
Learn how to change directories in the Linux command line using absolute and relative paths in this part of the Terminal Basics series.
The cd command in Linux allows you to change directories (folders). You just have to give the path to the directory.
And here comes the first challenge if you are new to Linux. You are probably not sure about the path. Let’s tackle that first.
Understanding paths in Linux
The path traces the location in the Linux directory structure. Everything starts at the root and then goes from there. You can check your current location with the following:

It should show an output like /home/username. Of course, it will be your username. As you can see, paths are composed of / and directory names. Path /home/abhishek/scripts means the folder scripts is inside the folder abhishek , which is inside the folder home . The first / is for root (from where the filesystem starts), the trailing / are separators for the directories.
Type ls / in the terminal and press enter. It will show you the content of the root directory. Try it.
- . (single dot) denotes the current directory.
- .. (two dots) denote the parent directory taking you one directory above the current one.
Here’s a pictorial representation.
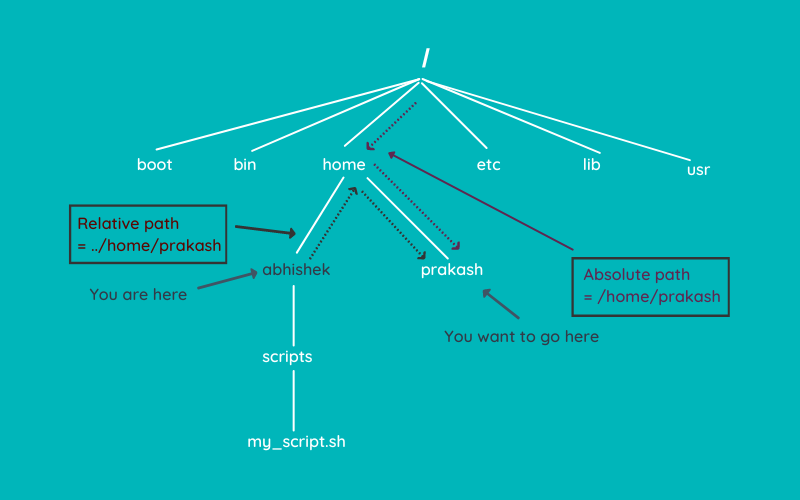
Want more on paths in Linux? This article will help you.
Changing directory with cd command
Now that you are familiar with the concept of path, let’s see how you can change the directory.
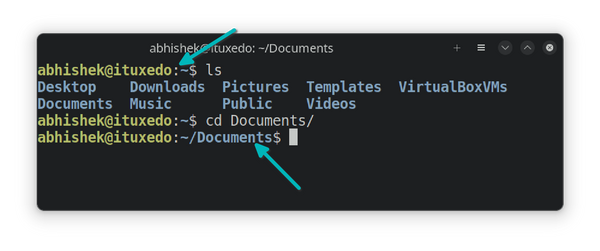
If you just type cd and press enter, it will take you to your home directory from any location. Go on, try it.
Enter the following command to see the directories inside your home directories:
This is what it shows to me:
[email protected]:~$ ls Desktop Downloads Pictures Templates VirtualBoxVMs Documents Music Public Videos Yours may be similar but not exactly the same.
Let’s say you want to go to the Documents directory. Since it is available under the current directory, it will be easier to use the relative path here:
The default terminal emulators of most Linux distributions show you the current location in the prompt itself. You don’t have to use pwd all the time just to know where you are.
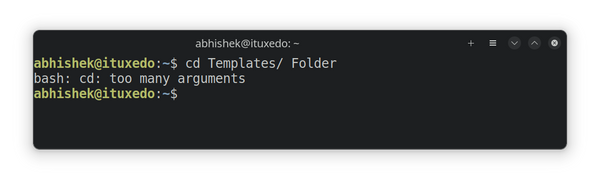
Now, let’s say you want to switch to the Templates directory that was located in your home directory.
You can use the relative path ../Templates (.. takes you to the one directory above Documents to /home/username and from there you go to Templates).
But let’s go for the absolute path instead. Please change ‘abhishek’ with your username.
Now you are in the Templates directory. How about going to the Downloads directory? Use the relative path this time:
Here’s a replay of all the above directory change examples you just read.
Utilize the tab completion in the terminal. Start typing a few letters of the command and directory and hit the tab key. It will try to autocomplete or show you the possible options.
Troubleshooting
You may encounter a few common errors while changing the directories in Linux terminal.
No such file or directory
If you see an error like this while changing the directories:
Then you made mistake with the path or name of the directories. Here are a few things to note.
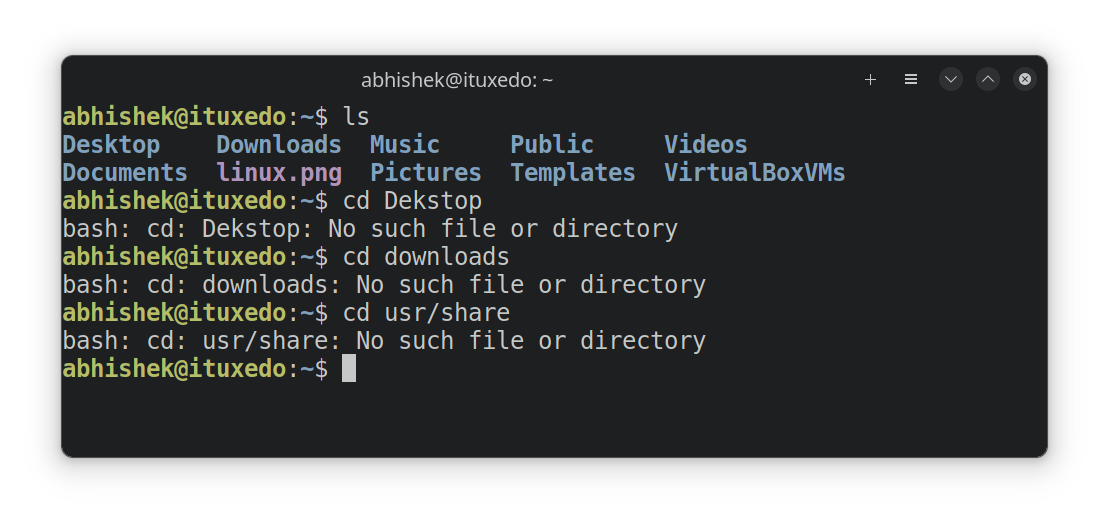
- Make sure there is no typo in the directory name.
- Linux is case sensitive. Downloads and downloads are not the same.
- You are not specifying the correct path. Perhaps you are in some other location? Or did you miss the first / in the absolute path?
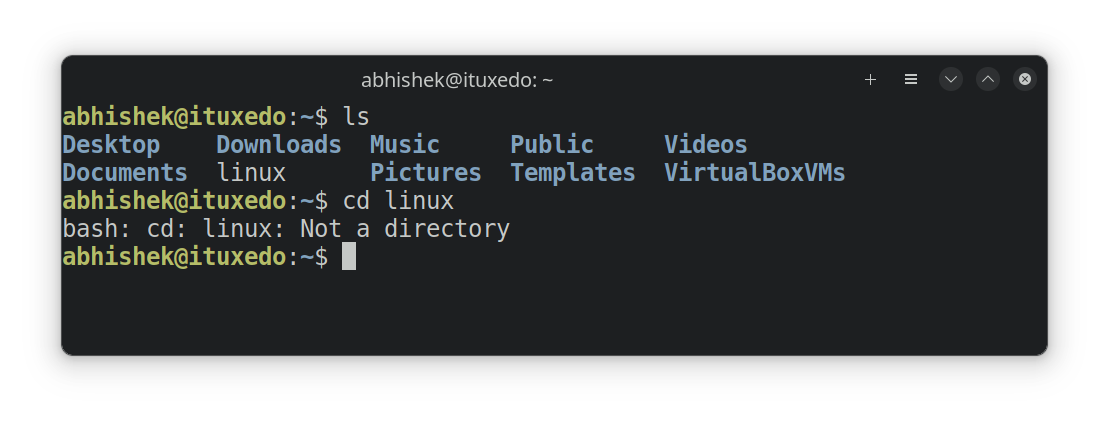
Not a directory
If you see an error like this:
It means that you are trying to use the cd command with a file, not a directory (folder). Clearly, you cannot enter a file the same way you enter a folder and hence this error.
Too many arguments
Another common rookie Linux mistake:
The cd commands take only one argument. That means that you can only specify one directory to the command.
If you specify more than one or mistyped a path by adding a space to the path, you’ll see this error.
If you press cd — , it will take you to your previous directory. It’s quite handy when you are switching between two distant locations. You don’t have to type the long paths again.
Special directory notations
Before ending this tutorial, let me quickly tell you about the special notation ~ . In Linux, ~ is a shortcut for the user’s home directory.
If user abhi is running it, ~ would mean /home/abhi and if user prakash was running it, it would mean /home/prakash .
To summarize all the special directory notations you learned in this chapter of the terminal basics series:
| Notation | Description |
|---|---|
| . | Current directory |
| .. | Parent directory |
| ~ | Home directory |
| — | Previous directory |
Test your knowledge
Here are a few simple exercises to test your newly learned knowledge of the path and the cd command.
Move to your home directory and create a nested directory structure with this command:
mkdir -p sample/dir1/dir2/dir3- Go to the dir3 using either absolute or relative path
- Move to dir1 using relative path
- Now go to dir2 using the shortest path you can imagine
- Change to the sample directory using absolute path
- Go back to your home directory
Want to know if you got all of them right or not? Feel free to share your answers in the It’s FOSS Community.
Now that you know how to change directories, how about you learn about creating them?
I highly recommend reading this article to learn small but useful things about the terminals and the commands.
Stay tuned for more chapters in the Linux Terminal Basics series if you want to learn the essentials of the Linux command line.
And, of course, your feedback on this new series is welcome. What can I do to improve it?
Changing Linux System Language (Locales) From Command Line on Ubuntu and Debian Based Distros
It’s been some time since I wrote something on It’s FOSS. The truth is that I’ve been writing for a Spanish version of It’s FOSS. If you’ve not visited it and/or you’re a Spanish speaker, please visit It’s FOSS en Español and check all the Linux content in Spanish.
You may be wondering why I’m sharing this fact with you. It’s because this post includes this new page as an example.
At the time of doing a clean installation of your favorite Linux distro, the system asks you to choose a main language. Even though it’s not frequent, some people consider changing that language to a new one later on, like me for example.
See, I have to take screenshots in both Spanish (for It’s FOSS en Español) and in English (for It’s FOSS). This becomes a problem, because I have only one computer, and changing the user is not a fast solution for me.
That’s why I’d like to share with you this quick tip, where I’ll show you how to change your main system language with two simple lines in the terminal.
Changing Linux system language from the terminal
Let’s suppose you want to change your main language from English to Spanish.
Verify which language you have set as default (main language). For this, let’s use the locale command.
You should see something like this.
[email protected]:~$ locale LANG=en_US.UTF-8 LANGUAGE= LC_CTYPE="en_US.UTF-8" LC_NUMERIC="en_US.UTF-8" LC_TIME="en_US.UTF-8" LC_COLLATE="en_US.UTF-8" LC_MONETARY="en_US.UTF-8" LC_MESSAGES="en_US.UTF-8" LC_PAPER="en_US.UTF-8" LC_NAME="en_US.UTF-8" LC_ADDRESS="en_US.UTF-8" LC_TELEPHONE="en_US.UTF-8" LC_MEASUREMENT="en_US.UTF-8" LC_IDENTIFICATION="en_US.UTF-8" LC_ALL=Here you can see that the main language is English. Now to change it, use the dpkg command in this fashion:
sudo dpkg-reconfigure localesOnce you run the command before, you should see the next screen in your terminal.
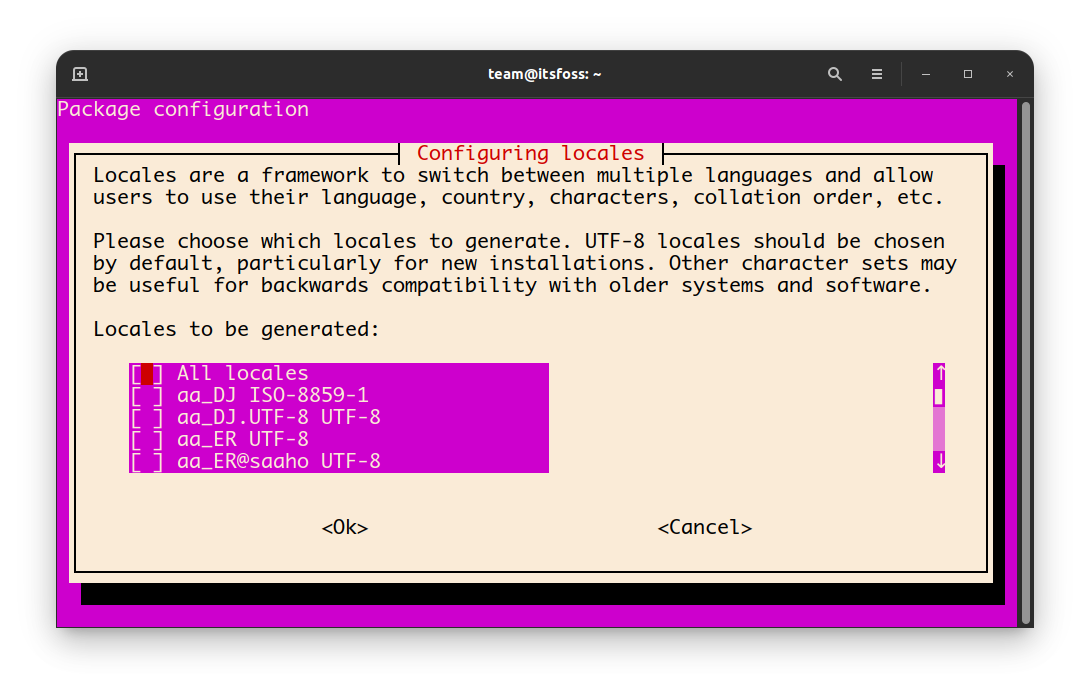
Here, you should move using the up and down arrow until you reach the desired language. In my case, I desire Spanish, and more specific, Mexican Spanish because I’m Mexican.
Not all languages may have the options, but if yours have, opt for UTF-8.
Once your language has been found, press the SPACE KEY to mark it and then ENTER.

Finally, select this new language as your default by moving to it using the arrow key and pushing the ENTER KEY, in the last windows.
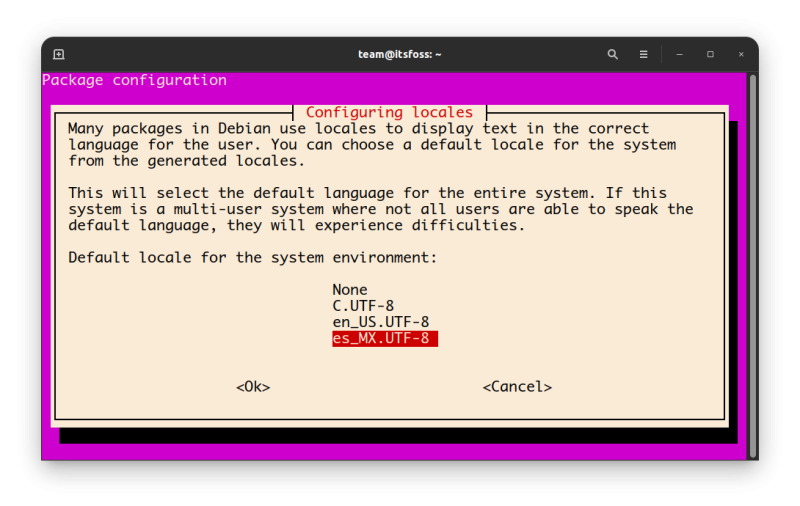
Once done, you should see a message like this in your terminal:
Generating locales (this might take a while). en_US.UTF-8. done es_MX.UTF-8. done Generation complete.And that’s all! Now you’re able to change your default language as many times you want directly from the terminal.
Please let us know if you have any doubt about this topic in the comments section. Good look!
Change Linux Command Line Parameter from U-boot
When booting a Linux kernel, U-Boot, among the other things, take care of passing a string called command line as kernel parameter. U-Boot uses its bootargs environment variable as parameter. This variable can be defined statically in U-Boot environment as follow:
NAON#setenv bootargs 'root=/dev/mmcblk0p1 rw console=ttyO0,115200n8 earlyprintk mem=176M vram=46M notifyk.vpssm3_sva=0xBF900000' NAON#saveenv Saving Environment to SPI Flash. Erasing SPI flash. Writing to SPI flash. done NAON#
But a most commonly used approach is to use different environment variables that append a dedicated section of command line. This is more flexible and allow the user to change only a single part of the command line without take care of the whole string.
Runtime Kernel command line creation [ edit | edit source ]
As noted above, commonly the command line is created by U-Boot environment variable substitution and string concatenation.
As an example we’ll show how to change Naon the frame buffer size by using the default environment variables setup.
Here is a dump of the interesting sections of the environment:
NAON#printenv net_nfs nfsargs addip addcons addmem mem vram net_nfs=run loadk nfsargs addip addcons addmem; bootm $ nfsargs=setenv bootargs root=/dev/nfs rw nfsroot=$:$ panic=5 addip=setenv bootargs $ ip=$:$:$:$:$:$ addcons=setenv bootargs $ console=$,115200n8 earlyprintk addmem=setenv bootargs $ mem=$ vram=$ notifyk.vpssm3_sva=$ mem=176M vram=46M
When using net_nfs configuration, which loads the kernel binary image from TFTP and uses NFS as root file system, U-Boot:
- initializes bootargs when running nfsargs macro
- appends network configuration when running addip macro (see [1] for a more detailed explanation of all this parameters)
- appends console configuration with addcons macro
- appends memory parameters with addmem macro
- please note that this macro uses mem, vram and notify_mem variable substitution to setup its parameter
NAON#setenv vram 36M NAON#saveenv Saving Environment to SPI Flash. Erasing SPI flash. Writing to SPI flash. done
Will reduce framebuffer memory allocation from 46MiB to 36MiB.
Here is the new boot output:
NAON#run net_nfs TFTP from server 192.168.0.250; our IP address is 192.168.0.78 [snip] Bytes transferred = 2688084 (290454 hex) ## Booting kernel from Legacy Image at 81000000 . Image Name: Linux-2.6.37-naon-0.2.0 Image Type: ARM Linux Kernel Image (uncompressed) Data Size: 2688020 Bytes = 2.6 MiB Load Address: 80008000 Entry Point: 80008000 Verifying Checksum . OK Loading Kernel Image . OK OK Starting kernel . Uncompressing Linux. done, booting the kernel. [ 0.000000] Linux version 2.6.37-naon-0.2.0 (ezsdk@ezsdk) (gcc version 4.3.3 (Sourcery G++ Lite 2009q1-203) ) #2 Mon May 7 18:21:09 CEST 2012 [ 0.000000] CPU: ARMv7 Processor [413fc082] revision 2 (ARMv7), cr=10c53c7f [ 0.000000] CPU: VIPT nonaliasing data cache, VIPT aliasing instruction cache [ 0.000000] Machine: naon [ 0.000000] bootconsole [earlycon0] enabled [ 0.000000] vram size = 37748736 at 0x0 [ 0.000000] reserved size = 37748736 at 0x0 [ 0.000000] FB: Reserving 37748736 bytes SDRAM for VRAM [ 0.000000] Memory policy: ECC disabled, Data cache writeback [ 0.000000] OMAP chip is TI8148 2.0 [ 0.000000] SRAM: Mapped pa 0x40300000 to va 0xfe400000 size: 0x20000 [ 0.000000] Built 1 zonelists in Zone order, mobility grouping on. Total pages: 35488 [ 0.000000] Kernel command line: root=/dev/nfs rw nfsroot=192.168.0.250:/home/shared/devel/dave/naon-DAA/sw/linux/sdk/rfs/nelk-min panic=5 ip=192.168.0.78:192.168.0.250:192.168.0.254:255.255.255.0:naon:eth0 console=ttyO0,115200n8 earlyprintk mem=176M vram=36M notifyk.vpssm3_sva=0xBF900000 [ 0.000000] PID hash table entries: 1024 (order: 0, 4096 bytes) [snip]