- How can I make chown work recursively?
- 7 Answers 7
- How to Change Ownership of Files and Folders Recursively
- chown recursively
- Change both owner and group recursively
- Conclusion
- Chown Command in Linux (File Ownership)
- How to Use chown #
- How to Change the Owner of a File #
- How to Change the Owner and Group of a File #
- How to Change the Group of a File #
- How to Change Symbolic Links Ownership #
- How to Recursively Change the File Ownership #
- Using a Reference File #
- Conclusion #
How can I make chown work recursively?
I’ve got a directory called pdfs that contains a bunch of sub- and sub-sub-directories. I want to change ownership on all PDF files in all of the subfolders. I just tried this:
chown -R someuser:somegroup *.pdf . but it didn’t change ownership of the PDFs in subdirectories. The user and group do exist. According to the man page for chown , the -R should mean recursive:
-R, --recursive operate on files and directories recursively 7 Answers 7
Recursive mode only works on directories, not files. By using the glob ‘*.pdf’ the shell is passing the file list to chown, which sees these are files, and changes the permissions on the files it sees, and that’s it.
Remember, in shells, the glob is evaluated by the shell, not the command. If the glob matches files, they are passed to the command and the command never knows a glob existed. (This is different than how Windows Command prompt used to do things). If you have a dir, with the contents something like:
machine:$ ls -F file1.pdf file2.pdf other.txt subdir/ chown -R someuser:somegroup *.pdf The shell would first make the list: file1.pdf file2.pdf
and then run your command:
chown -R someuser:somegroup file1.pdf file2.pdf See, there’s no directory for -R to act on. It does what you asked it — change ownership on the two files on the command line, ignoring that quirky -R flag.
To do what you want, to use the ‘*.pdf’ as a pattern for this directory and subdirectories, you can use find , which can find files that match a filename pattern (or many other criterea) and pass to a subcommand
find . -type f -name '*.pdf' | xargs chown someuser:somegroup This starts in current dir ‘.’ to look for files (filetype f) of name pattern ‘*.pdf’ then passes to xargs, which constructs a command line to chmod. Notice the quotes around the pattern ‘*.pdf’ , remember that the shell will create a glob if it can, but you want the pattern passed to find , so you need to quote it.
Because filenames may have spaces in them, you want to use a trick to make it filename-with-spaces safe:
find . -type f -name '*.pdf' -print0 | xargs -0 chown someuser:somegroup In bash 3 and lower, this is the way you need to do it. More powerful globbing is available in bash 4 (with shopt -s globstar )and other shells. The same in zsh, using a recursive glob ** :
chown -R someuser:somegroup ./**/*.pdf How to Change Ownership of Files and Folders Recursively
Learn how to use the chown command to recursively change the user and group ownership of files and directories in Linux command line.
chown owner_name file_or_folderThe problem arrives when you change the ownership of a directory, its content remains unchanged. The solution is not too complicated as well.
To change the ownership of all the contents of a directory, you can use the recursive option -R with chown command:
chown -R owner_name folder_nameIf you want to change both owner and group recursively, you can use it in the following manner:
chown -R owner_name:group_name folder_nameLet’s see it in detail and also see how you can change user and group recursively. Things are a lot easier to understand if you are familiar with the concept of file ownership and permission.
chown recursively
To recursively change the ownership of a directory, use it like this:
chown -R new_owner_name directory_nameIf you have to change the ownership of multiple directories with their contents, you can do it in the same line:
chown -R new_owner_name directory1 directory2 directory3Let me show that with a sample example. I have a directory named new_dir with some content in it. This directory and its content are owned by the root user.
[email protected]:~# ls -l /home/abhi/ total 4 drwxr-xr-x 3 root root 4096 May 30 07:30 new_dir [email protected]:~# ls -l /home/abhi/new_dir/ total 20 -rw-r--r-- 1 root root 12813 May 30 07:30 new.txt drwxr-xr-x 2 root root 4096 May 30 07:30 one_more_dirWhen I change the ownership of the new_dir, its ownership is changed:
[email protected]:~# chown abhi /home/abhi/new_dir [email protected]:~# ls -l /home/abhi/ total 4 drwxr-xr-x 3 abhi root 4096 May 30 07:30 new_dir But the files and folders inside it are still owned by root.
[email protected]:~# ls -l /home/abhi/new_dir/ total 20 -rw-r--r-- 1 root root 12813 May 30 07:30 new.txt drwxr-xr-x 2 root root 4096 May 30 07:30 one_more_dir Now, if I use the recursive option -R with chown command, it changes the ownership for everything inside the specified directory, not just the directory.
[email protected]:~# chown -R abhi /home/abhi/new_dir [email protected]:~# ls -l /home/abhi/new_dir/ total 20 -rw-r--r-- 1 abhi root 12813 May 30 07:30 new.txt drwxr-xr-x 2 abhi root 4096 May 30 07:30 one_more_dir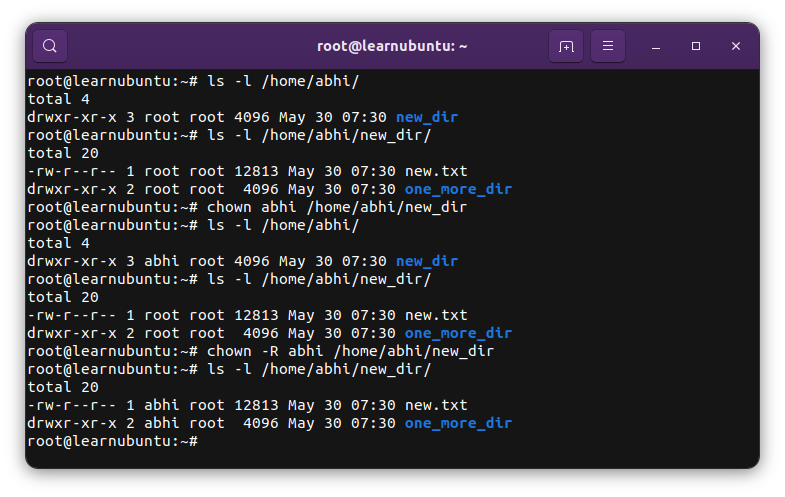
Change both owner and group recursively
The chown command allows you to change the owner as well as the group of files.
To recursively change the owner and group of a directory and all its content, use the chown command like this:
chown -R user_name:group_name directory_nameYou can use the same for changing the ownership of multiple folders:
chown -R user_name:group_name dir1 dir2Conclusion
Recently, I moved a self-hosted Ghost instance to a new server launched with DigitalOcean’s 1-click deployment. I had to upload the entire images folder from the backup (downloaded on the local system) to the new server. The system required changing the ownership of this image folder from root to ghost.
This method saved me the trouble. I hope this quick little tutorial helps you as well.
I highly recommend brushing up the basics of file permissions and ownership.
It’s one of the essential Linux concepts you must know.
Chown Command in Linux (File Ownership)
The chown command allows you to change the user and/or group ownership of a given file, directory, or symbolic link.
In Linux, all files are associated with an owner and a group and assigned with permission access rights for the file owner, the group members, and others.
In this tutorial, we will show you how to use the chown command through practical examples.
How to Use chown #
Before going into how to use the chown command, let’s start by reviewing the basic syntax.
The chown command expressions takes the following form:
chown [OPTIONS] USER[:GROUP] FILE(s) USER is the user name or the user ID (UID) of the new owner. GROUP is the name of the new group or the group ID (GID). FILE(s) is the name of one or more files, directories or links. Numeric IDs should be prefixed with the + symbol.
- USER — If only the user is specified, the specified user will become the owner of the given files, the group ownership is not changed.
- USER: — When the username is followed by a colon : , and the group name is not given, the user will become the owner of the files, and the files group ownership is changed to user’s login group.
- USER:GROUP — If both the user and the group are specified (with no space betwen them), the user ownership of the files is changed to the given user and the group ownership is changed to the given group.
- :GROUP — If the User is omitted and the group is prefixed with a colon : , only the group ownership of the files is changed to the given group.
- : If only a colon : is given, without specifying the user and the group, no change is made.
By default, on success, chown doesn’t produce any output and returns zero.
Use the ls -l command to find out who owns a file or what group the file belongs to:
-rw-r--r-- 12 linuxize users 12.0K Apr 8 20:51 filename.txt |[-][-][-]- [------] [---] | | | +-----------> Group +-------------------> Owner Normal users can change the group of the file only if they own the file and only to a group of which they are a member. Administrative users can change the group ownership of all files.
How to Change the Owner of a File #
To change the owner of a file use the chown command followed by the user name of the new owner and the target file as an argument:
For example, the following command will change the ownership of a file named file1 to a new owner named linuxize :
To change the ownership of multiple files or directories, specify them as a space-separated list. The command below changes the ownership of a file named file1 and directory dir1 to a new owner named linuxize :
chown linuxize file1 dir1The numeric user ID (UID) can be used instead of the username. The following example will change the ownership of a file named file2 to a new owner with UID of 1000 :
If a numeric owner exists as a user name, then the ownership will be transferred to the user name. To avoid this prefix the ID with + :
How to Change the Owner and Group of a File #
To change both the owner and the group of a file use the chown command followed by the new owner and group separated by a colon ( : ) with no intervening spaces and the target file.
The following command will change the ownership of a file named file1 to a new owner named linuxize and group users :
chown linuxize:users file1If you omit the group name after the colon ( : ) the group of the file is changed to the specified user’s login group:
How to Change the Group of a File #
To change only the group of a file use the chown command followed by a colon ( : ) and the new group name (with no space between them) and the target file as an argument:
The following command will change the owning group of a file named file1 to www-data :
Another command that you can use to change the group ownership of files is chgrp .
How to Change Symbolic Links Ownership #
When the recursive option is not used, chown command changes the group ownership of the files to which the symlinks points, not the symbolic links themselves.
For example, if you try to change the owner and the group of the symbolic link symlink1 that points to /var/www/file1 , chown will change the ownership of the file or directory the symlink points to:
Chances are that instead of changing the target ownership, you will get a “cannot dereference ‘symlink1’: Permission denied” error.
The error occurs because by default on most Linux distributions symlinks are protected, and you cannot operate on target files. This option is specified in /proc/sys/fs/protected_symlinks . 1 means enabled and 0 disabled. We recommend not to disable the symlink protection.
To change the group ownership of the symlink itself, use the -h option:
How to Recursively Change the File Ownership #
To recursively operate on all files and directories under the given directory, use the -R ( —recursive ) option:
chown -R USER:GROUP DIRECTORY The following example will change the ownership of all files and subdirectories under the /var/www directory to a new owner and group named www-data :
If the directory contains symbolic links pass the -h option:
Other options that can be used when recursively changing the directory ownership are -H and -L .
If the argument passed to chown command is a symbolic link that points to a directory, the -H option will cause the command to traverse it. -L tells chown to traverse each symbolic link to a directory that is encountered. Usually, you should not use these options because you might mess up your system or create a security risk.
Using a Reference File #
The —reference=ref_file option allows you to change the user and group ownership of given files to be same as those of the specified reference file ( ref_file ). If the reference file is a symbolic link chown will use the user and group of the target file.
chown --reference=REF_FILE FILE For example, the following command will assign the user and group ownership of the file1 to file2
chown --reference=file1 file2Conclusion #
chown is a Linux/UNIX command-line utility for changing the file’s user and/or group ownership.
To learn more about the chown command visit the chown man page or type man chown in your terminal.
If you have any questions or feedback, feel free to leave a comment.