- How to Use Chown Command to Change File Ownership [11 Examples]
- chown Command Syntax
- 1. How to Find the Ownership of the File
- 2. How to Change Ownership of File
- 3. How to Change Group Ownership of File
- 4. How to Change Ownership and Group of File
- 5. How to Change Ownership of the Symbolic Link
- 6. How to Transfer File Ownership to the User
- 7. How to Copy Ownership From Another File
- 8. How to Change Ownership of the Directory Recursively
- 9. How to Print Chown Command Process Details
- 10. How to Suppress Chown Command Errors
- 11. How to Change File User and Group ID
- How do I change the owner of a directory in Linux?
- chown command syntax
- Changing the owner of a directory
- Changing the ownership of all sub-directories
- Changing the owner of a file
- Changing the owners of multiple files
- Changing the owner of directory and file at once
- Changing the owner using wildcards
- Conclusion
- About the author
- Talha Saif Malik
How to Use Chown Command to Change File Ownership [11 Examples]
In Linux, everything is a file, which means, all input/output resources, such as files, directories, disk drives, printers, etc are exposed as files through the file system namespace. In addition to this, there is ownership associated with each and every file in Linux.
The ownership is represented by two entities – user and group. The combination of access permissions and ownership allows Linux to implement an access control mechanism in an effective way.
In this guide, we will learn about the chown command. As the name suggests, the chown command is used to change the ownership of the files. After following this guide, beginners will be able to use the chown command effectively while working with Linux systems.
chown Command Syntax
The syntax of the chown command is as follows:
$ chown [OPTION]. [OWNER][:[GROUP]] [FILE-1] [FILE-2]. [FILE-N]
Now let’s understand the usage of the chown command with some practical examples in Linux.
1. How to Find the Ownership of the File
The easiest way to find the owner of the file is using the ls command, which will list the user and group of the file.
$ touch file-1.txt $ ls -l file-1.txt

In the above output, we can see that the file is owned by the tecmint user and group. This information is represented by the third and fourth columns respectively.
2. How to Change Ownership of File
The chown command allows us to change the ownership of the file. Let’s see its usage by setting user narendra as the owner of the file:
$ sudo chown narendra file-1.txt
Now, let’s verify that ownership of the file has been changed:

3. How to Change Group Ownership of File
Similar to the user, we can also change the group ownership of the file using the chown command. So, let’s set group ownership of the file to the group – narendra:
$ sudo chown :narendra file-1.txt
It is important to note that, we have to use a colon (:) with the group name while changing the group ownership.
Now, let’s verify the group ownership of the file:

4. How to Change Ownership and Group of File
In the previous examples, we used the chown command twice. First, to change the user ownership and then to change the group ownership. However, we can change both user and group using a single command.
Let’s reset the file ownership to the user and group tecmint, using the following command:
$ sudo chown tecmint:tecmint file-1.txt
In this example, we have used the colon (:) character to separate the user and group. The value before the colon represents the user whereas the value after the colon represents the group.
Now, let’s check the updated file ownership:

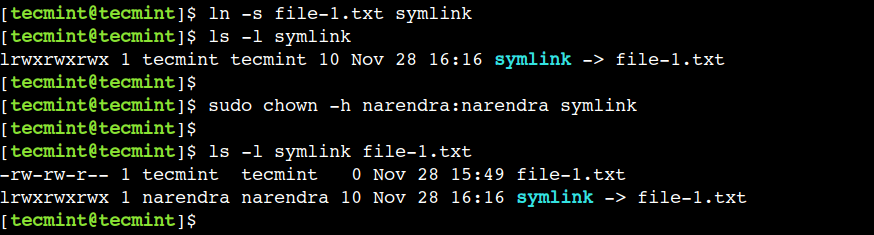
5. How to Change Ownership of the Symbolic Link
By default, the chown command dereferences the symbolic link, which means, if the input file is a symbolic link then it changes the ownership of the reference file instead of the symbolic link itself.
However, we can override the default behavior using the -h option as shown in the following example.
First, create a symbolic link and verify that it’s pointing to the correct reference file:
$ ln -s file-1.txt symlink $ ls -l symlink
Next, change the ownership of the symbolic link using the -h option:
$ sudo chown -h narendra:narendra symlink
Finally, verify the ownership of the symbolic link and its reference file:
6. How to Transfer File Ownership to the User
Sometimes, we need to update the ownership of the file only after validating its current ownership. In such cases, we can use the —from option of the chown command as shown.
$ sudo chown -h --from narendra:narendra tecmint:tecmint symlink
In this example, the —from option represents the current owner of the file whereas the next argument represents the new ownership. So the above command updates the ownership of the file – symlink, only if the file is owned by the user and group – narendra.
Now, let’s check the updated ownership of the file:

In this example, we have specified both user and group using the colon (:) character. However, we can specify either of them as discussed in the previous examples.
7. How to Copy Ownership From Another File
Sometimes, it’s convenient to copy the ownership from the existing file instead of providing the same from the command line. In such scenarios, we can use the —reference option with the chown command, which represents the file from which ownership is to be copied.
First, create a new file and change its ownership:
$ touch file-2.txt $ sudo chown narendra:narendra file-2.txt
Now, let’s check the current ownership of both files:
Next, set the ownership of the file-2.txt file the same as the file-1.txt using the following command:
$ sudo chown --reference=file-1.txt file-2.txt
Finally, verify that the ownership has been updated successfully:
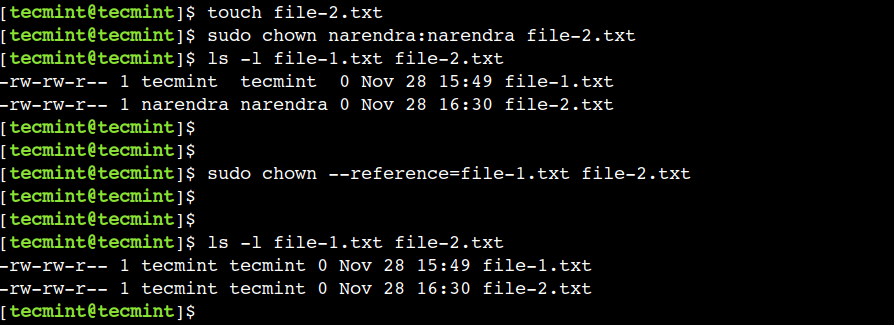
In the above output, we can see that now both files have the same ownership.
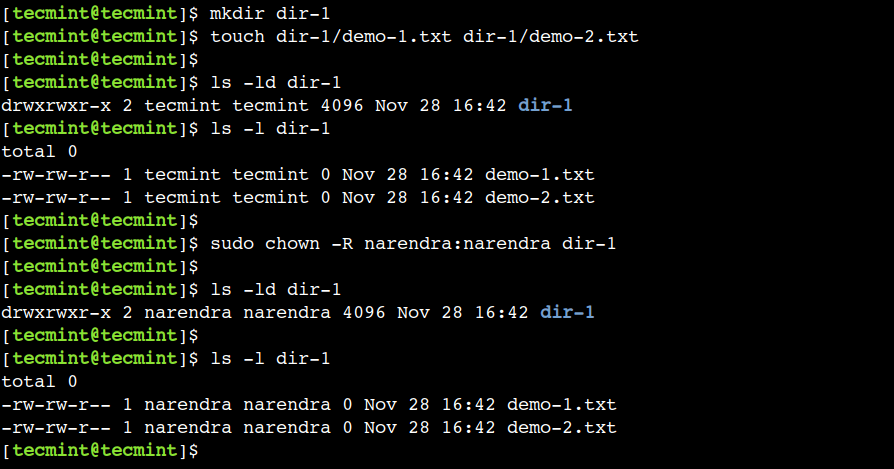
8. How to Change Ownership of the Directory Recursively
We can use the chown command to change the ownership of the directory as well. However, the default behavior of the command is non-recursive.
It means that the chown command will change the ownership of the input directory only. However, we can override this default behavior using the -R option as shown in the following example.
First, create a directory and two files into it:
$ mkdir dir-1 $ touch dir-1/demo-1.txt dir-1/demo-2.txt
Next, check the ownership of the directory and its files:
Then, change the ownership of the directory and its files in a recursive way:
$ sudo chown -R narendra:narendra dir-1
Finally, verify the ownership of the directory and its files:
9. How to Print Chown Command Process Details
By default, the chown command doesn’t print anything on the terminal after changing the ownership. Hence, so far we have been using the -l option of the ls command to verify the updated ownership.
To overcome this limitation, we can enable the verbose mode of the command that prints the diagnostics for each processed file. This option gives meaningful information when we use it with the -R option:
So, let’s use the -v option of the command to enable the verbose mode:
$ sudo chown -Rv tecmint:tecmint dir-1
Now, let’s check the output of the command:

10. How to Suppress Chown Command Errors
Like other Linux commands, chown also provides meaningful information in case of error scenarios. The error can happen due to various reasons, such as non-existing files, groups, or users, insufficient permission to perform certain operations, and so on.
However, sometimes we don’t want to show these error messages. In such cases, we can use the -f option of the command to suppress the error messages.
To understand this in a better way, let’s try to change the ownership of the non-existing file:
$ sudo chown -f narendra:narendra non-existing-file.txt $ echo $? 1
Now, let’s see the output of the command:

As we can see, the above command doesn’t show any error. However, the command reports failure using the non-zero return value.
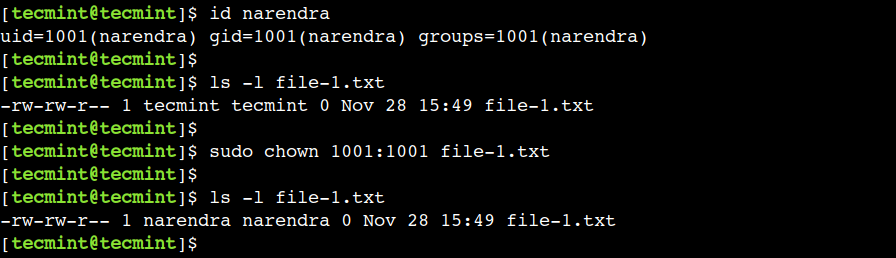
11. How to Change File User and Group ID
So far, we used the user and group names to change the ownership of the file. However, we can also use the user and group IDs to achieve the same result.
First, use the id command to find the user and group ID of the user – narendra:
Now, let’s use the user and group ID 1001 with the chown command:
$ ls -l file-1.txt $ sudo chown 1001:1001 file-1.txt
Finally, verify that the ownership has been updated successfully:
In this article, we discussed some practical examples of the chown command. One can use these examples in day-to-day life to boost productivity while working with Linux systems.
Do you know of any other best example of the chown command in Linux? Let us know your views in the comments below.
How do I change the owner of a directory in Linux?
![]()
All files and directories that exist on your Linux system have an owner, a group, and permission access rights that are granted to the file owners, its group members, or others. The chown command permits a Linux user to change any directory or file’s ownership. In this post, we will demonstrate the usage of the chown command for changing ownership through practical examples. But firstly, you should understand why you would want to change the ownership of any directory or file?
Here is the list of few scenarios in which you want to do this:
- For example, you want an already created directory or file to be accessible to a particular user.
- When a user leaves an organization, all of his data comes under the responsibility of another employee. Therefore, you want to change the ownership of the new team member.
- Changing directory or file ownership is also necessary when you are writing a script that has to be used by only a specific person.
- Transferring files between different Linux systems also requires changes in files and directories ownership.
Now let’s check out the syntax of the chown command.
chown command syntax
Utilize the “User” for the username or replace it using the user ID, also known as UID. Add the group name in the “Group” part of the GID (group ID). At the end of the chown command, add files or directories for which you want to change the ownership.
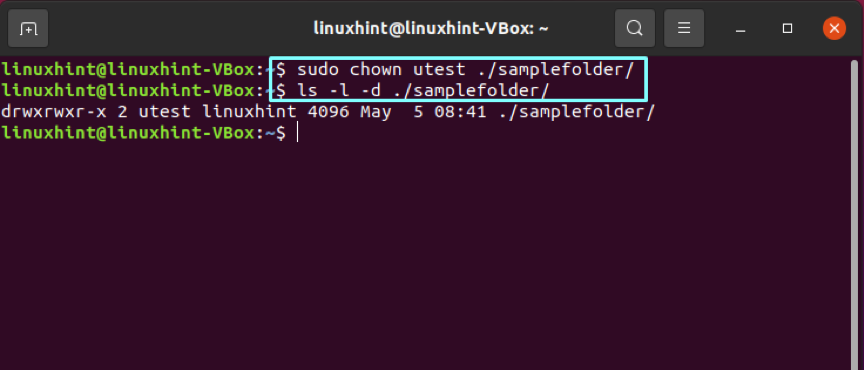
Changing the owner of a directory
We have created a separate user named “utest” and a group “ugroup” for demonstrating the examples. To change the ownership of any directory, utilize the chown command with the username and path of the directory.
Now, write out the “ls” command and check if your directory ownership is updated or not.
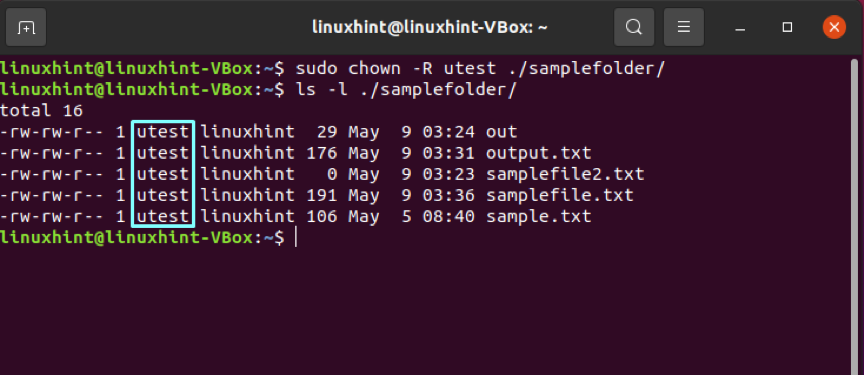
Changing the ownership of all sub-directories
Utilize the “-R” option of the chown command for changing the owners of all the files or folders present in a directory.
List out the directory content to view the results.
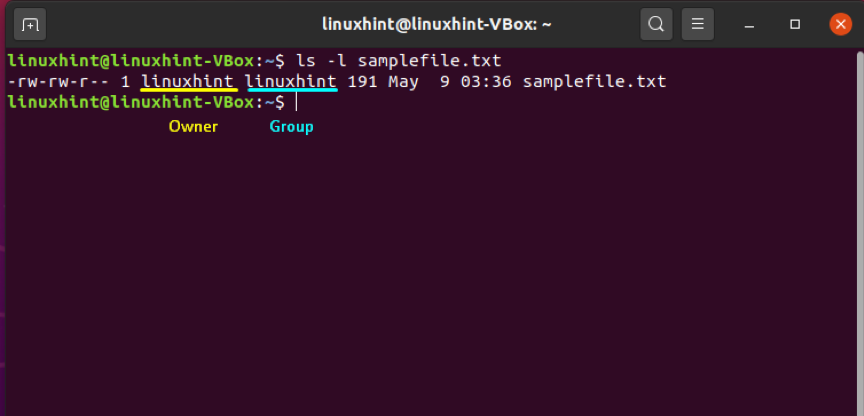
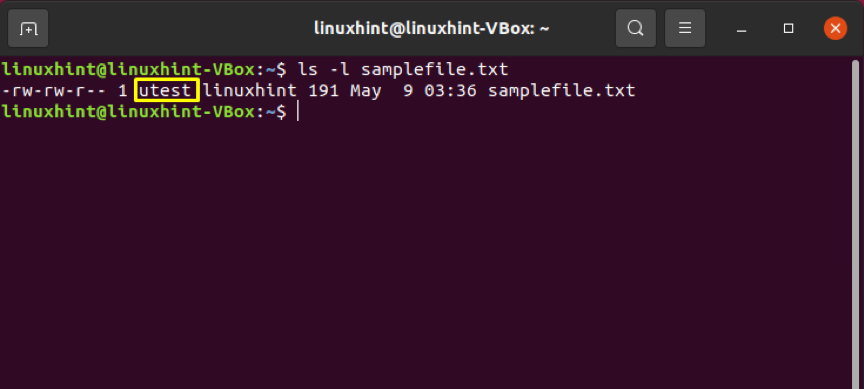
Changing the owner of a file
First of all, list out the file content to know about its ownership.
After that, specify the name of the user who you want to be the new owner of this file. In our case, we have chosen “utest” to avail the ownership of “samplefile.txt.”
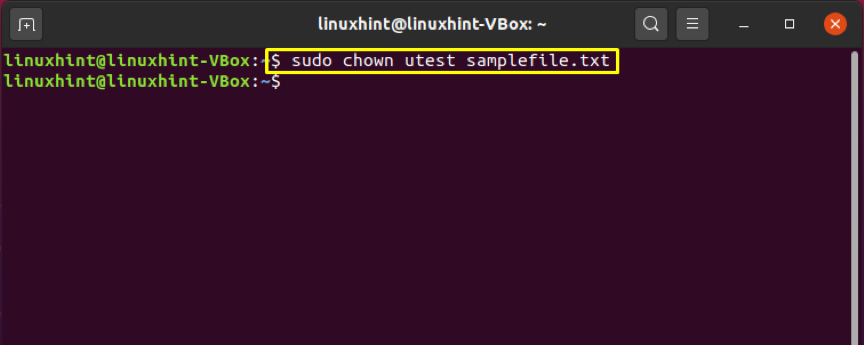
Again, verify the updated ownership changes.
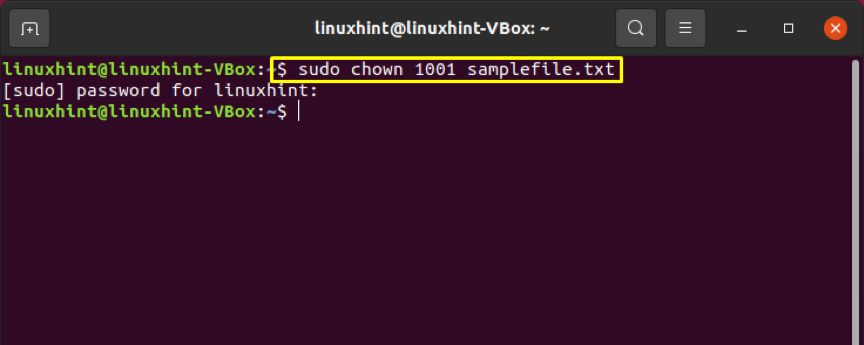
You can also use the “User ID” or “UID” of any user for this purpose. For that, retrieve the user ID of the new user by utilizing the “id” command with the “-u” option.
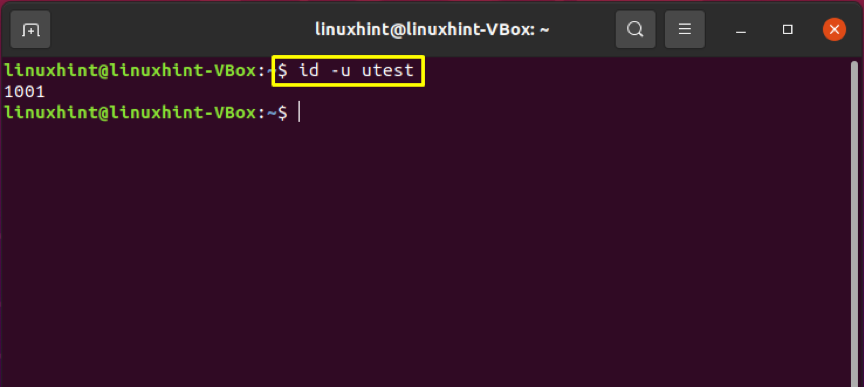
Add the User ID instead of the username to make the ownership changes.
Changing the owners of multiple files
Specify the file names at the end of the chown command to change the ownership of multiple files at once.
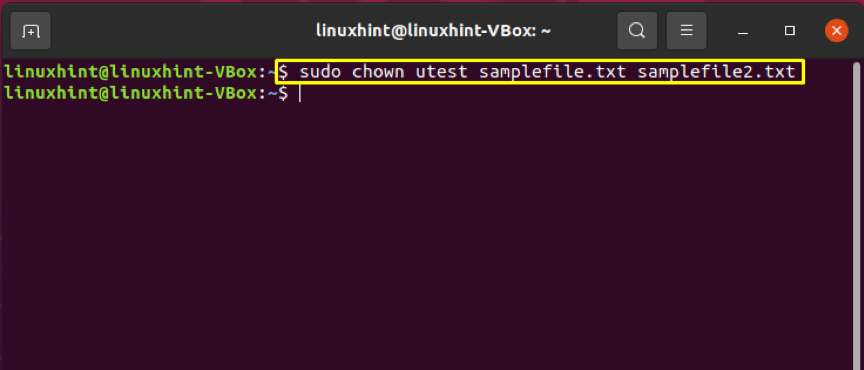
Write out the below-given command to confirm the changes.

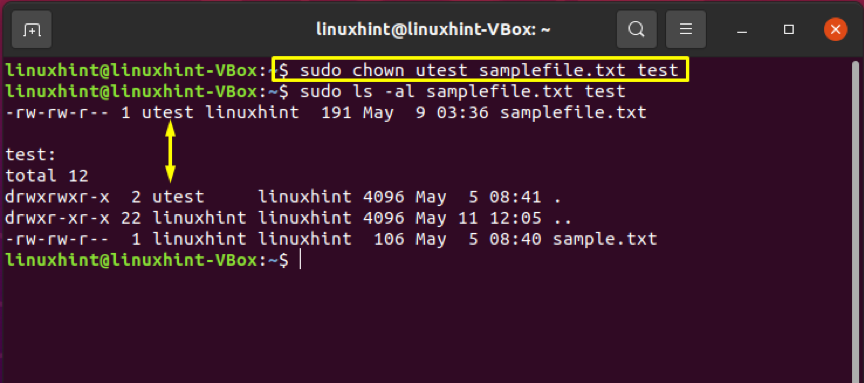
Changing the owner of directory and file at once
Follow the below-given method for changing the owners of the file and directory instantly.
This command will make “utest” the new owner of the “test directory” and the “samplefile.txt.”
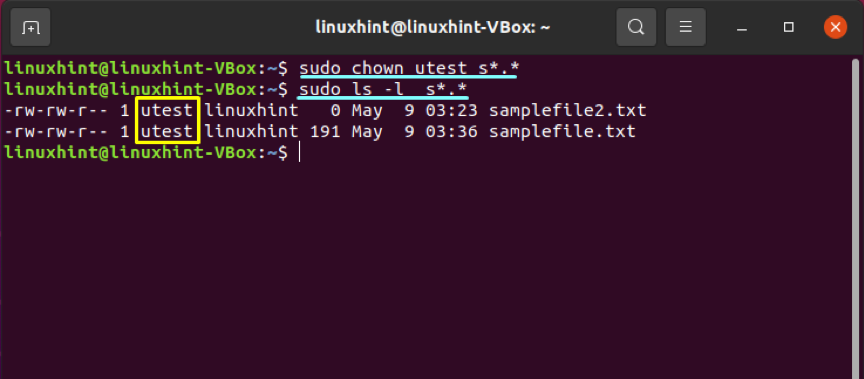
Changing the owner using wildcards
Wildcards are used to select a specific file group according to the given pattern. The chown command will then change the owner of the files after retrieving them from the wildcard execution.
Conclusion
For data security concerns, you may want to specify the ownership of files and directories. In Linux, we use the chown command-line utility for changing the ownership of directories or files. You can also utilize this command for changing directories and multiple file ownership at once. In this post, all of these statements are justified by providing practical examples.
About the author
Talha Saif Malik
Talha is a contributor at Linux Hint with a vision to bring value and do useful things for the world. He loves to read, write and speak about Linux, Data, Computers and Technology.