- How to Change System Proxy Settings from the Command Line on Ubuntu Desktop?
- Change Ubuntu Desktop Proxy Settings from the Command Line
- For “HTTP” Proxy
- For “HTTPS” Proxy
- For “FTP” Proxy
- For “Socks” Proxy
- How to Change System Wide Proxy Settings?
- How to Switch the Proxy Mode?
- 1: “Auto” mode
- 2: “Manual” mode
- 3: None
- Conclusion
- About the author
- Zahra Zamir
- Configure Proxy On Ubuntu – Settings & Options!
- Setting Up Proxy with Ubuntu Desktop GUI
- Setting Up Proxy with Ubuntu Desktop Terminal
- Setting Up Permanent Proxy for Single User
- Setting Up Permanent Proxy for All User
- Conclusion
- Recent Posts
- How to Configure Proxy Settings on Ubuntu 20.04
- Setting Up Proxy with Ubuntu Desktop GUI
- Setting up Proxy With Ubuntu Desktop Terminal
- Setting Up Temporary Proxy for a Single User
- Setting Up Permanent Proxy for a Single User
- Setting Up Permanent Proxy for All Users
- Setting Up Proxy for APT
How to Change System Proxy Settings from the Command Line on Ubuntu Desktop?
![]()
Changing the proxy on the Ubuntu server is useful since it helps you improve the network performance of the system. Further, it helps you control internet usage, prevent server crashes, and provide better security and faster page loading time. Although it is very easy to change the proxy settings for Ubuntu desktop using the GUI method while using the terminal if a user wants to change the proxy settings it might become an uncomfortable situation to close the terminal and switch to GUI just to change the proxy.
This article will present you with the command line method to change proxy settings on the Ubuntu desktop.
Change Ubuntu Desktop Proxy Settings from the Command Line
To change the system proxy setting in Ubuntu by using the command line, we will use the gsettings. The gsettings is a command line tool which is used in Ubuntu to modify the database settings. gsettings in Ubuntu enable users to monitor or set keys for changes; It is used to manage applications’ settings
To change the proxy settings on the Ubuntu system, use the below-mentioned command to run the gsettings tool:
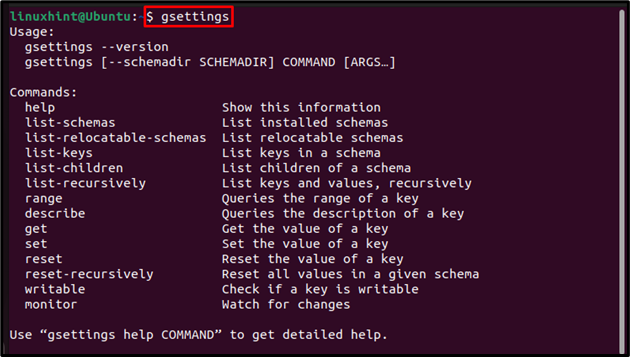
Once the gsetting tool is started, you can easily change the proxy settings by following the syntax of the below-mentioned commands:
Now I will use the above commands to change the proxy settings for each; HTTP, HTTPS, FTP and Socks.
For “HTTP” Proxy
HTTP proxy is used to identify suspicious web content that is coming from a non-trusted source. It is required in Ubuntu to protect the HTTP server from miscellaneous attacks. To set up the HTTP proxy settings, run the below-mentioned commands to determine the host (server name or IP) and port for HTTP:
Note: Here, I have used the IP address as host but that is just an example IP.

The below-mentioned command determines the port for http proxy:

To verify that the http proxy is changed/updated successfully;

For “HTTPS” Proxy
Hypertext Transfer Protocol over Secure Socket (HTTPS) is basically a request protocol between server and clients to provide a secure transaction and communication for users. To determine the host for https proxy, run the below-mentioned command:

After that determine the port for HTTPS by using the below-mentioned command:

Then verify by using the below-mentioned command:

For “FTP” Proxy
FTP proxy acts as a bridge/relay to transfer files between source and destination. Its performance is better for larger files than HTTP. To change the FTP proxy, run the below-mentioned commands to determine both the host and port on the Ubuntu system:


Then verify, by using the below-mentioned echo command

For “Socks” Proxy
SOCKS proxy facilitates communication between servers by using a firewall, it supports routing any type of traffic generated by any program or protocol. Similar to all of the above, the socks proxy can also be changed with the gsetting tool and for that, use the below-mentioned commands:


How to Change System Wide Proxy Settings?
All the above-mentioned commands will change the proxy setting for the current user, but if you want to imply same proxy changes system-wide then run all the commands with sudo to have administrative permission to change the system proxy:
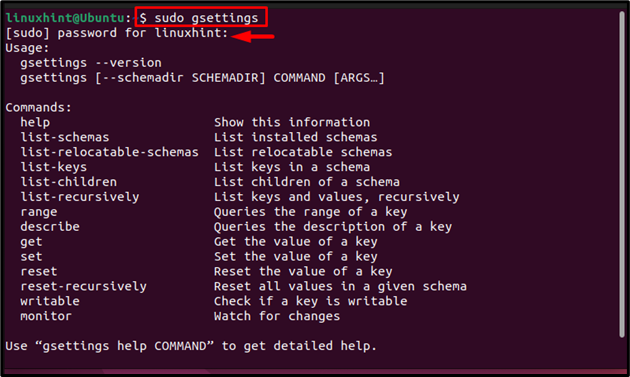
Just to quote the example; here I have only changed the “http” proxy setting for the whole system. You can change your desired proxy settings for the complete system by following the same commands mentioned in the previous section just remember to use “sudo” with them:


How to Switch the Proxy Mode?
There are three proxy setting modes in the Ubuntu system and those are:
1: “Auto” mode
Run the below-mentioned commands to switch the proxy mode to “auto mode”, this is useful if you are using PAC (Proxy Auto-Config) in Ubuntu.

Switch to auto mode through the following command:

2: “Manual” mode
The manual mode is used if you want to manually change each proxy settings as we did in the first two sections of this article.

3: None
If you do not want any proxy changes being applied to your system then you can clear all proxy settings by using the below-mentioned command:

Conclusion
To change the system proxy setting in Ubuntu through the command line, the gsetting tool is used. All the proxy settings can be modified/changed with the gsetting tool. The command and syntaxes for each proxy setting are discussed in the above-mentioned guidelines. The proxy modes “auto”, “manual” and “none” are also discussed above along with commands for each mode.
About the author
Zahra Zamir
An Electronics graduate who loves to learn and share the knowledge, my passion for my field has helped me grasp complex electronics concepts and now I am here to share them with others.
Configure Proxy On Ubuntu – Settings & Options!
Generally Proxies are used in business networks to prevent attacks and unexpected access and intrusions into the internal networks.
A proxy server can act as an intermediary between the client computer and the internet, and allows you to implement Internet access controls like authentication for Internet connection, sharing Internet connections, bandwidth control and content filtering and blocking.
If your home or office network is behind a proxy server, then you will need to setup proxy in order to browse the Internet.
In this tutorial, we will show you several ways to configure proxy settings in Ubuntu desktop.
Setting Up Proxy with Ubuntu Desktop GUI
You can setup the proxy in Ubuntu Desktop by following the below steps:
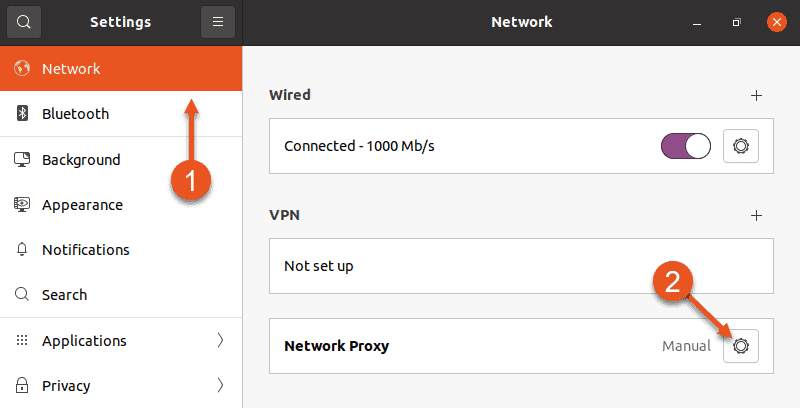
1. Open System Settings in Ubuntu as shown below:

2. Click on the Network => Network Proxy as shown below:

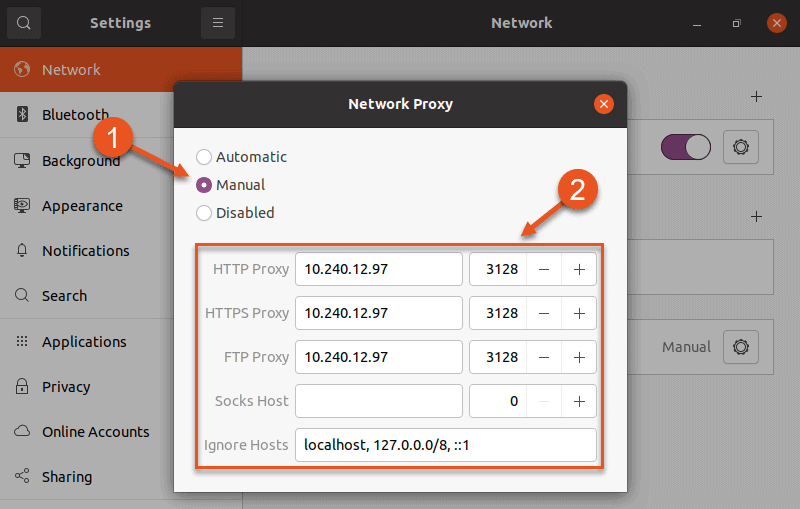
3. In the Method drop down list, choose Manual, provide proxy server’s hostname or IP address and port number.
4. Click on Apply system wide to apply the changes.
Setting Up Proxy with Ubuntu Desktop Terminal
You can also set proxy settings using environment variables. There are several environment variables available in Linux to setup a proxy for HTTP, HTTPS and FTP.
You can setup proxy for temporary usage and permanent for single and all users.
The basic syntax of setting up proxy as shown below:
Setting Up Permanent Proxy for Single User
You can setup a permanent proxy for a single user by editing the ~/.bashrc file:
First, login to your Ubuntu system with a user that you want to set proxy for.
Next open the terminal interface and edit the ~/.bashrc file as shown below:
Add the following lines at the end of the file that matches with your proxy server:
export http_proxy=username:password@proxy-server-ip:8080
export https_proxy=username:password@proxy-server-ip:8082
export ftp_proxy=username:password@proxy-server-ip:8080
exprot no_proxy=localhost, 127.0.0.1
Save and close the file when you are finished.
Then to activate your new proxy settings for the current session, use the following command:
Setting Up Permanent Proxy for All User
You can also setup Permanent proxy for all users by setting up global variables in /etc/environment file.
To do so, login with root or administrative user and edit the /etc/environment file:
Add the following lines at the end of the file that matches with your proxy server:
http_proxy=»http://username:password@proxy-server-ip:8080/»
https_proxy=»http://username:password@proxy-server-ip:8082/»
ftp_proxy=»http://username:password@proxy-server-ip:8083/»
no_proxy http://username:password@proxy-server-ip:8080/»;
Acquire::https::Proxy «https://username:password@proxy-server-ip:8081/»;
Save and close the file when you are finished. Now, you can install any package in your system.
You can also install the package by specifying your proxy settings with your command as shown below:
‘http://username:password@proxy-server-ip:8080’ apt-get install package-name
Conclusion
In the above guide, we learned how to setup proxy in Ubuntu using several methods. I hope you have now enough knowledge to setup proxy on Ubuntu system.
Recent Posts
- Forcepoint Next-Gen Firewall Review & Alternatives
- 7 Best JMX Monitoring Tools
- Best PostgreSQL Backup Tools
- Best CSPM Tools
- Best Cloud Workload Security Platforms
- Best Automated Browser Testing Tools
- Event Log Forwarding Guide
- Best LogMeIn Alternatives
- Citrix ShareFile Alternatives
- SQL Server Security Basics
- Cloud Security Posture Management Guide
- Cloud Workload Security Guide
- The Best JBoss Monitoring Tools
- ITL Guide And Tools
- 10 Best Enterprise Password Management Solutions
How to Configure Proxy Settings on Ubuntu 20.04
Using a proxy server as an internet access intermediary is a common business scenario. However, personal users can also benefit from increased network security, privacy, and speed provided by proxies.
In this tutorial, you will learn how to set up your Ubuntu 20.04 system to work with a proxy server.
- Ubuntu 18.04 or later
- Access to terminal with sudo privileges
- Proxy info (web or IP address, username, and password)
Note: If you wish to set up one of your machines to act as a proxy, refer to How to Set Up & Install Squid Proxy Server on Ubuntu.
Setting Up Proxy with Ubuntu Desktop GUI
1. To access proxy settings using the Ubuntu GUI, open Ubuntu’s main Settings.
2. Select the Network setting in the menu on the left side of the window.
3. Then, click the cog in the Network Proxy section.
4. A Network Proxy dialogue appears. Choose Manual and enter your proxy info into the fields below.
5. Exit the dialogue and Ubuntu will automatically apply the proxy settings.
Setting up Proxy With Ubuntu Desktop Terminal
Use the command line interface for more granular control of proxy settings. This allows you to:
- Make temporary or permanent changes to the configuration.
- Set up proxy for a single user or for all users.
Setting Up Temporary Proxy for a Single User
A temporary proxy connection resets after a system reboot. To establish such a connection for the current user, use the export command.
The syntax for establishing a temporary proxy connection is:
export HTTP_PROXY=[username]:[password]@[proxy-web-or-IP-address]:[port-number] export HTTPS_PROXY=[username]:[password]@[proxy-web-or-IP-address]:[port-number] export FTP_PROXY=[username]:[password]@ [proxy-web-or-IP-address]:[port-number] . export NO_PROXY=localhost,127.0.0.1. 1Provide the proxy address (web or IP), followed by the port number. If the proxy server requires authentication, add your proxy username and password as the initial values.
This is what the set of commands should look like in terminal:

The purpose of the NO_PROXY line is to tell the system that local traffic should ignore the proxy.
Setting Up Permanent Proxy for a Single User
As stated above, proxy settings configured through a terminal window reset after you reboot your system. To make permanent changes for a single user, edit the .bashrc file.
1. Open the file with a text editor of your choice:
2. Now add the following lines at the bottom of the .bashrc file:
export HTTP_PROXY="[username]:[password]@[proxy-web-or-IP-address]:[port-number]" export HTTPS_PROXY="[username]:[password]@[proxy-web-or-IP-address]:[port-number]" export FTP_PROXY="[username]:[password]@ [proxy-web-or-IP-address]:[port-number]" . export NO_PROXY="localhost,127.0.0.1. 1"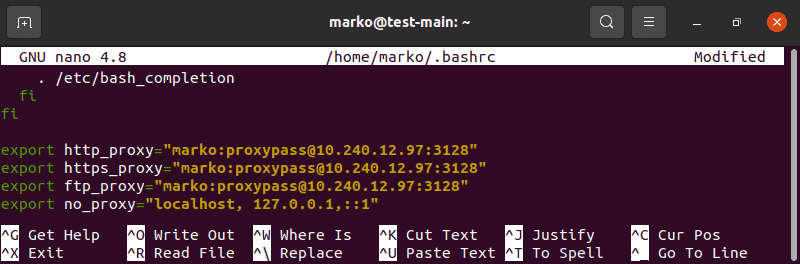
4. Then, run the following command in to apply the new settings to the current session:
Setting Up Permanent Proxy for All Users
To permanently set up proxy access for all users, you have to edit the /etc/environment file.
1. First, open the file in a text editor:
2. Next, update the file with the same information you added to the .bashrc file in the previous scenario:
export HTTP_PROXY="[username]:[password]@[proxy-web-or-IP-address]:[port-number]" export HTTPS_PROXY="[username]:[password]@[proxy-web-or-IP-address]:[port-number]" export FTP_PROXY="[username]:[password]@ [proxy-web-or-IP-address]:[port-number]" . export NO_PROXY="localhost,127.0.0.1. 1"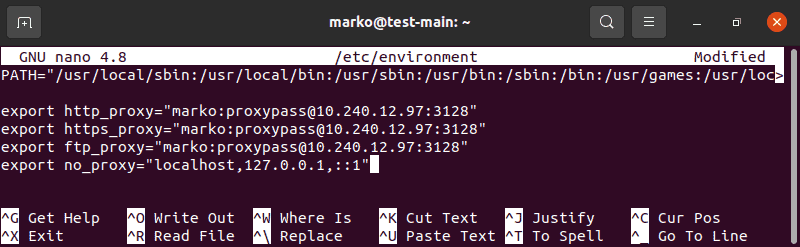
3. Save the file and exit. The changes will be applied the next time you log in.
Setting Up Proxy for APT
On some systems, the apt command-line utility needs a separate proxy configuration, because it does not use system environment variables.
1. To define proxy settings for apt, create or edit (if it already exists) a file named apt.conf in /etc/apt directory:
2. Add the following lines to the file:
Acquire::http::Proxy "http://[username]:[password]@ [proxy-web-or-IP-address]:[port-number]"; Acquire::https::Proxy "http://[username]:[password]@ [proxy-web-or-IP-address]:[port-number]";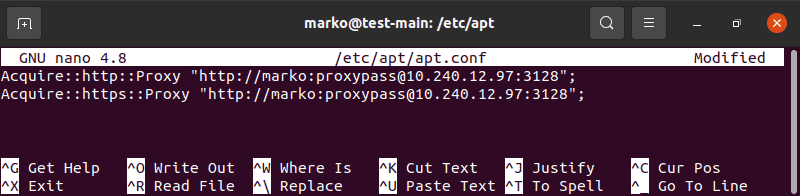
3. Save the file and exit. The configuration will be applied after a reboot.
This tutorial provided instructions on how to set up proxy settings on Ubuntu 20.04. You should now know how to make temporary and permanent changes to your system’s proxy configuration, for a single user or for the entire system.