- How to Change root Password on Linux
- Method 1: Change root Password on Most Linux Distributions
- Method 2: Change root Password on Ubuntu Linux
- Method 3: Change Linux Password Data as root
- How to Reset or Change the Root Password in Linux
- Changing Your Root Password in Ubuntu
- Step 1: Open a Terminal Window
- Step 2: Change Your Root Password
- Resetting a Root Password in Ubuntu
- Step 1: Boot to Recovery Mode
- Step 2: Drop Out to Root Shell
- Step 3: Remount the File System with Write-Permissions
- Step 4: Change the Password
- Changing the Root Password in CentOS
- Step 1: Access the Command Line (Terminal)
- Step 2: Change the Password
- Reset Root Password in CentOS
- Step 1: Access Boot Menu
- Step 2: Edit Boot Options
- Step 3: Remount the Drive
- Step 4: Changing the Password
- Step 5: Restart
How to Change root Password on Linux
The root account has the ability to control anything on a Unix system, and Linux is no different. One has to use the passwd command to change Linux password data, and the same goes for root. Due to the special nature of this command, some precautions do apply. Notably, it’s not possible to change Linux password data for the root user readily on an Ubuntu or Ubuntu spin system without first making some changes.
A majority of users who want to change Linux password data will need to open a graphical terminal. You can hold down Ctrl, Alt and T to do so or perhaps click on the Applications menu, head to system tools and select terminal. CentOS users who don’t have a graphical interface installed will want to log into their virtual terminal with a user account, assuming they have the sudo packages updated.
Method 1: Change root Password on Most Linux Distributions
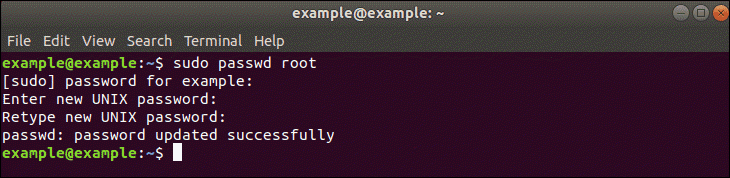
Assuming your distribution has the sudo package installed, you can change the root passwd with the sudo passwd root command. You’ll be asked for your sudo password first, and then you’ll have to enter a new UNIX password twice. Your password will be tested for complexity, so you’ll want to make sure that it’s good. Once you’ve entered the password in twice, your root account should be changed. Hold down Ctrl and Alt then push F1-F6 to get to an empty virtual terminal. Type root and then the new password to make sure it works. Considering the hazards related to working as root, make sure to type exit to get out of this console. Hold down Ctrl, Alt and F7 to get back to your graphical environment if you’re not working from a server. This method should work on Debian and many other distributions. It should also work with Arch if you have the all the prerequisite packages installed.
Method 2: Change root Password on Ubuntu Linux
Ubuntu and its various derivatives hash out the root account, which functionally disables it. You won’t be able to readily change out the password of the root user because it doesn’t really exist. This is true for Xubuntu, Kubuntu, Lubuntu and potentially most installations of Linux Mint and Trisquel. While it’s possible to activate the account, it’s not at all recommended. Keep in mind that your first user on these systems is an administrator and can access a root account by typing sudo -i at the prompt and entering your password. This works the same as any other root login, and it’s a good bit safer. If you’re absolutely certain that you want to activate the root account and understand the risks involved, then type sudo passwd root and push enter. Enter a new UNIX password and make sure you don’t forget it. You’ll then need to run sudo passwd -u root to unlock your account. You’ll get a message that reads something like “password expiry information changed,” which means you’ve opened the account. The root user will work like normal, but please keep in mind just how dangerous this actually is. When you want to disable the root account, you can type sudo passwd -dl root to lock it up again.
Method 3: Change Linux Password Data as root
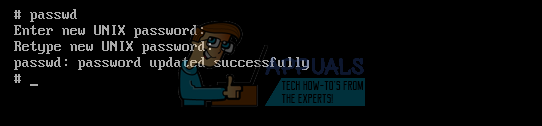
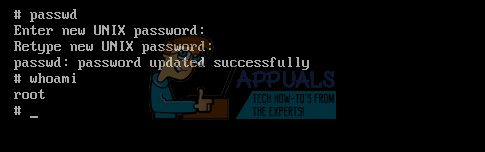
If you’re logged in as root say on a CentOS, Fedora or Red Hat Enterprise Linux server’s virtual terminal, then you can change the password simply by typing passwd and then pushing enter. You’ll receive a prompt that reads “Enter new UNIX password:” and then you’ll be asked to type it a second time. Keep in mind that you should have actually logged into root in order to do this, or perhaps used sudo su to access a root prompt. This won’t work on an unaltered Ubuntu or Linux Mint system, but it’s good for those running server systems or using ssh to log into ones remotely. Make sure before you try this that you have # as the symbol in your prompt. Depending on the default login shell set for root, the prompt may have other bits of information in it.
Remember that regardless of what method or which distribution you’re working on, you can also type whoami and push enter to find out who you’re logged in as.
How to Reset or Change the Root Password in Linux
In Linux, root privileges (or root access) refers to a user account that has full access to all files, applications, and system functions.
Most basic Linux user accounts run with limited privileges. This keeps users from making mistakes or accidentally exposing the system to vulnerabilities.
To use protected operating system features, a Linux user has to temporarily elevate their privileges using a command like sudo . The sudo command tells the system to run a command as a superuser, or root user. When you run a function using sudo , you’ll usually have to enter your password.
Some versions of Linux will elevate your user privileges for a set amount of time around (15 minutes) before reverting. Other versions only perform a single task with elevated privileges.
It’s a good idea to change your passwords regularly and consider using enterprise password management software.
This guide will help you change your Linux root password in Ubuntu or CentOS, or reset the password.
Changing Your Root Password in Ubuntu
Step 1: Open a Terminal Window
Right-click the desktop, then left-click Open in terminal.
Alternately, you can click Menu > Applications > Accessories > Terminal.
Step 2: Change Your Root Password
In the terminal window, type the following:
The system will prompt you to enter your password – this is the same password you use to log in to the system.
Next, the system will prompt you to enter a new password. Do so, and then re-enter it exactly the same when the system prompts you to retype the password. This double-entry confirms that you have typed the password correctly.
Resetting a Root Password in Ubuntu
In some situations, you may need to access an account for which you’ve lost or forgotten a password.
Step 1: Boot to Recovery Mode
Restart your system. Once you see the splash screen for the computer manufacturer, hold down the shift key. The system should come up with a black and white GRUB, or boot menu, with different Linux kernel versions displayed.
Select the second one from the top – the highest revision, followed by (recovery mode). Press Enter.
Step 2: Drop Out to Root Shell
The system should display a menu with different boot options. Use the arrow keys to navigate to the option labeled root and press Enter.
The system should respond by giving you a command-line interface with a prompt.
Step 3: Remount the File System with Write-Permissions
Right now, your system only has read-only access to your system. That means it can look at the data, but cannot make any changes. But we need write-access to change the password, so we’ll need to remount the drive with the appropriate permissions.
Press Enter. This should allow you to make changes to the data on the hard drive.
Step 4: Change the Password
Substitute the name of the user for username, then press Enter. The system asks you to type a new UNIX password and then to retype it.
Once you’ve entered and confirmed the new password, reboot the system by entering the following:
Hit Enter, and your system should restart. Don’t press any keys, let the system come up to the login screen, and test to make sure the new password works.
Note: Learn how to use the chpasswd command. Chpasswd is helpful for managing multiple passwords and making multiple changes.
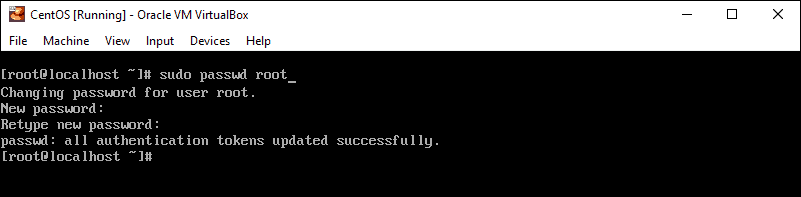
Changing the Root Password in CentOS
Changing a password in CentOS is almost identical to changing it in Ubuntu.
Step 1: Access the Command Line (Terminal)
Right-click the desktop, then left-click Open in Terminal. Or, click Menu > Applications > Utilities > Terminal.
Step 2: Change the Password
At the prompt, type the following, then press Enter:
The system should prompt you to enter your existing password. Do so, then follow the prompts to enter and confirm a new root password.
Reset Root Password in CentOS
This is a similar process as in Ubuntu, with a couple of variations.
Step 1: Access Boot Menu
Restart the system, then tap the Esc key about once per second to launch the GRUB menu.
Step 2: Edit Boot Options
Use the arrows to highlight the version of Linux you boot into, then press e.
Use the arrows to highlight the line that starts with kernel or Linux.
At the end of the line, add a space then type single. Press Enter, then boot into single-user mode by pressing Ctrl-X or B. (The system will display the command to use.)
Step 3: Remount the Drive
You should have a command line, and you’ll have root privileges. To enable read/write access on your hard drive, type the following:
Step 4: Changing the Password
Press Enter, and the system should prompt you to enter and confirm a new password.
Step 5: Restart
Type the following, pressing enter after each line:
Your system should restart. Confirm that your new password works by logging in.
Note: If you ever come across a Linux boot failure, be sure to save our guide on using GRUB rescue to troubleshoot it.
If you already have access to your user account, resetting or changing your password in Linux is simple.
It can be more challenging if you’ve lost or forgotten a password, but with a little creative restarting and editing, you shouldn’t find it too hard.
Sofija Simic is an experienced Technical Writer. Alongside her educational background in teaching and writing, she has had a lifelong passion for information technology. She is committed to unscrambling confusing IT concepts and streamlining intricate software installations.
In Linux, special tools were developed for managing applications. Application software for Linux typically.
The find command is a useful command-line tool in Linux. It allows you to use the terminal to search for a .
There’s a reason that tech support asks you if you’ve rebooted your Linux server. It’s cliched but true.
This guide is for users who have already configured a CentOS server and installed the Apache HTTP services.