- I need to change the WiFi credentials (SSID and key / password) on my devices. How should I do that?
- Option 1: use the in-app “change WiFi credentials” feature for devices that supports it
- Option 2: reuse your old router
- Option 2a: routers without special settings to use it as an accesspoint
- Option 3: change router / accesspoint settings of the new router
- Option 4: re-pair the devices without deletion in the eWeLink app
- Share this:
- How to access and change WiFi Router Settings
- How do you access your router settings?
- How do I improve my wireless router settings?
- How to modify or change your WiFi Router settings?
- 1] Change Router’s IP address
- 2] Change Routing mode
- 3] Change Default Firewall Policy
- 4] Content Filtering
- 5] Enable or disable VPN passthrough
- 6] Configure DoS/DDoS Preventions
I need to change the WiFi credentials (SSID and key / password) on my devices. How should I do that?
There are 4 ways to do this which depend a litte bit on your exact situation.
Since eWeLink 4.6.0 you can change the WiFi credentials for power measurement devices (like the Sonoff POW and several brands SA-001) with firmware 3.5.0 or higher from within the app. Since eWeLink 4.11.0 Sonoff TH10/16’s and RF bridge with firmware 3.5.0 do support this feature too. You need to have a working WiFi connection between your mobile and eWeLink supported device. If you don’t have a working WiFi connection then you can proceed with option 2, 3 or 4.
When the involved device is not a power measurement device and you bought a new router / accesspoint you can use option 2 or 3. When the involved device is not a power measurement device and you had security issues with the old credentials you can use option 4.
Option 1: use the in-app “change WiFi credentials” feature for devices that supports it
In eWeLink 4.6.0 this option works only works with power measurement devices like the Sonoff POW, Sonoff S31, several brands SA-001, etc. with firmware 3.5 or higher. Sonoff TH10/16 and RF Bridge with firmware 3.5.0 do support this too with firmware 3.5.0 and eWeLink 4.11.0. Other devices will follow in the future.
- Connect your mobile phone to the WiFi network where you want your eWeLink supported device to connect to.
- Open the settings of the device in the eWeLink app.
- Scroll down the page and tap on WiFi settings .
- Tap the networkname the device is currently connected to (only option shown).
- Check whether the network displayed is the one you are connected to with your mobile.
- Edit the WiFi password if needed.
- Tap Save in the upper right corner.
- Wait a little while untill the network indicator stopped blinking.
- Your eWeLink supported device is now connected to the new network.
Option 2: reuse your old router
Most routers can be reused as an accesspoint. Modern routers even have features to configure them as accesspoint without a lot off hassle. How you exactly need to connect and configure your old router varies. But below we give some general points of attention. If you want to know some specific information for your router Google the brand and model number of your router for a manual or community information.
More information about the definition of an accesspoint can be found at this Wikipedia page: https://en.wikipedia.org/wiki/Wireless_access_point
Option 2a: routers without special settings to use it as an accesspoint
This solution is also explained in a Youtube video below (not ours, just a random one). In that video the old router gets connected to the new one before configuring the settings on the old router. The risk of doing that is that you get the wrong IP address send by the new router and that you can’t access the old router in that way. That’s why you are going to disable the DHCP server and why we recommend to first configure the old router and then connect the old router to the new router.
- Connect your PC or laptop with a LAN cable to one of the LAN ports (mostly numbered 1 to 4) of the old router.
- On a Windows PC hold the Windows key , press R and release the keys. As analternative you can press the Windows key + S or click the magnifying icon on the taskbar.
- Type CMD and press the Enter key.
- Type ipconfig and press Enter.
- Search for an active Ethernet LAN controller and look which IP-address and gateway IP address it has. Write down the gateway IP address.
- Open a webbrowser, enter the gateway IP address on the address bar and press enter.
- Login to your router with the last login credentials set. If you don’t know often a default admin works both username and password. Or admin as username and a empty password. Elsewise: Google is your friend to find the default login credentials. Otherwise: contact the seller/provider/manufacturer of the router.
- Find and disable the DHCP settings of the router and disable the DHCP server. If possible do not restart the router.
- Set an unique IP address for the router it self so that you can change other settings when needed in the future.
- Save the settings.
- Restart the router if required by the router’s confirmation of saving the settings.
- Connect the LAN cable on your new router to one of the LAN ports (mostly numbered 1 to 4). Connect the other side of the cable to one of the LAN ports on the old router.
- If needed login again at the router’s webpage to change WiFi credentials to the same as before.
Option 3: change router / accesspoint settings of the new router
In your router / accesspoint settings you can change the WiFi SSID (network name) and key (password) to be exactly the same as it was on the old router / accesspoint. Mostly all devices will connect again to the new router / accesspoint. In the case some of them won’t: remove them from the power and after a few seconds power them again. And if that doesn’t help too: follow option 2 below.
Option 4: re-pair the devices without deletion in the eWeLink app
Leave the devices in your current account ( so don’t delete them! ). Pair the devices in the way you normally would do. All settings will remain in tact. Since eWeLink 4.4.0 it is possible to pair more than 1 device at once with the Add multiple devices options during the pairing process in the app. This help speeding up the process a bit.
This article describes more about what settings are being saved where and what the (dis)advantages are: Where do eWeLink supported devices save what data and what are (dis)advantages of that?
Share this:
- Click to share on Twitter (Opens in new window)
- Click to share on Facebook (Opens in new window)
- Click to share on Telegram (Opens in new window)
- Click to share on LinkedIn (Opens in new window)
- Click to share on WhatsApp (Opens in new window)
- Click to share on Skype (Opens in new window)
- Click to share on Reddit (Opens in new window)
- Click to share on Tumblr (Opens in new window)
- Click to share on Pinterest (Opens in new window)
- Click to print (Opens in new window)
- Click to email this to a friend (Opens in new window)
How to access and change WiFi Router Settings
Almost all modern Wi-Fi routers are equipped with a configuration interface that you can access through a web browser and use it to set your preferences. So, if you’ve never paid much attention to your router, it’s time you learn how to access and change WiFi Router Settings. We have used screenshots for JIO – and so the actual settings may vary in your case – but the procedure remains more or less the same.
How do you access your router settings?
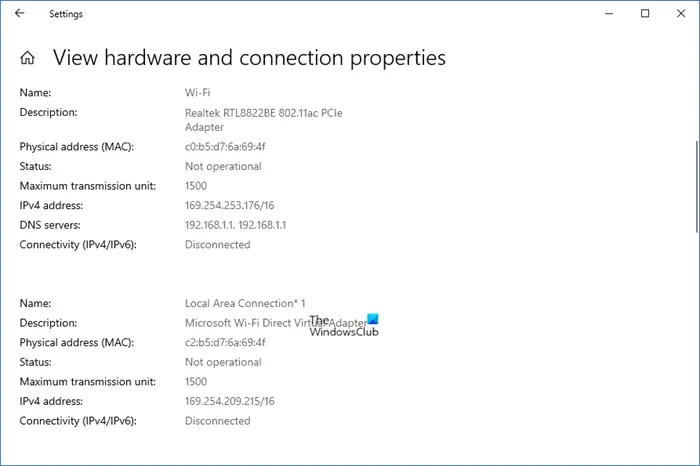
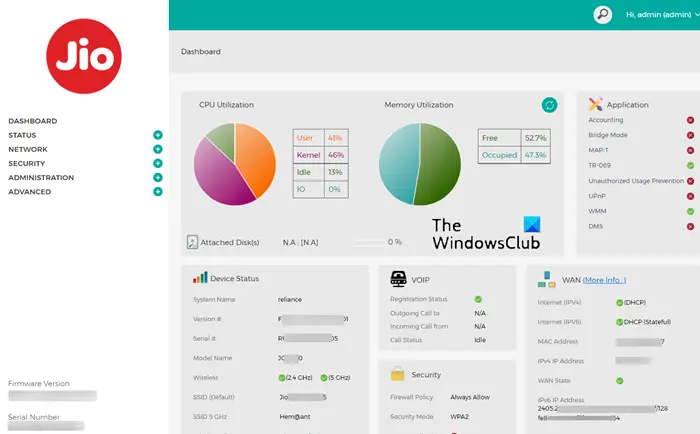
Fire up your browser and type in the IP address of the router. You will get the default gateway IP via Network Settings > View hardware and connection properties in Windows. Next, enter the username (normally it is admin by default) and password (normally it is blank by default), and then click OK or Log In. Once in you will see your Dashboard.
How do I improve my wireless router settings?
- Change Router’s IP address
- Change Routing mode
- Change Default Firewall Policy
- Allow or Disallow Content Filtering
- Enable or disable VPN passthrough
- Configure DoS/DDoS Preventions
Before you start, make sure the router is powered on and the computer is connected to the network.
How to modify or change your WiFi Router settings?
1] Change Router’s IP address
To find your default gateway, first, click the Windows button and choose Settings.
Next, select the Network and Internet Settings tile and click View hardware and connection properties.
Scroll down to Default gateway entry and copy-paste the address (192.16X.XX.X) in a new tab address bar.
Enter the Username and Password to get access to the Router settings.
Switch to the Network tab.
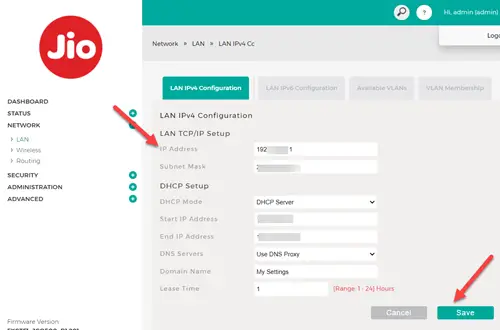
Under LAN configuration, change the IP address. Then, enter a valid Domain name and hit the Save button to save the changes.
2] Change Routing mode
Routing mode enables private IP networks that use unregistered IP addresses to connect to the Internet. Also, as it performs dual functions of security and address conservation, it is typically implemented in remote-access environments. You can change it to Classic Routing but doing so will revert all port firewall settings to defaults.
Go to Network tab and choose the Routing menu.
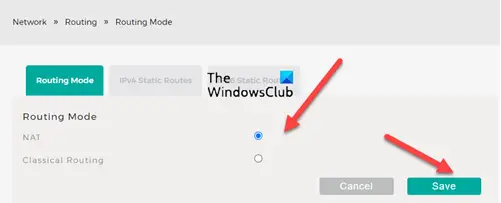
On the right choose the desired routing mode. By default, it’s set to NAT. This mode is designed for IP address conservation.
3] Change Default Firewall Policy
Firewall is a mechanism that manage the flow of network traffic between networks or hosts that employ differing security postures. To provide an additional layer of security Network designers often include firewall functionality at places other than the network perimeter. You can switch between Allow Always and Block Always. Enabling Firewall Always ensures protection from unwanted threats.
4] Content Filtering
Most routers support a built-in website filtering to block or allow a few specific sites. This helps in creating a safer browsing environment for guests by blocking access to inappropriate content. As such, you can enable Content Filtering to block certain keywords from appearing in your results.
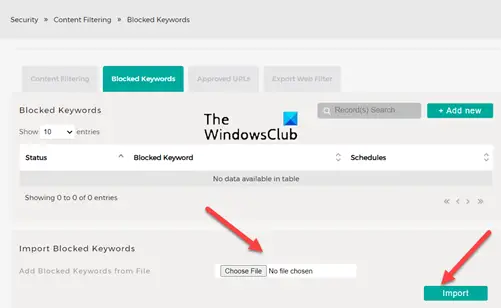
Simply hit the Choose File to browse to the location of the file to which you have added the list of keywords you would like to block and hit the Import button.
Similarly, you can only approve certain URLs, you consider as safe for browsing
5] Enable or disable VPN passthrough
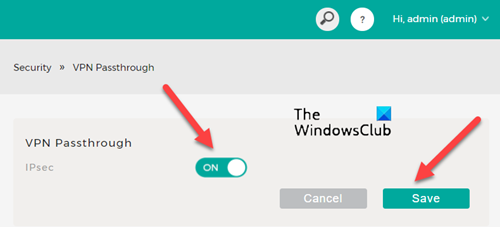
VPN Passthrough is a capability that enables any device connected to a router to establish outbound VPN connections. For example, if you would like to connect to your VPN server from your PC or Desktop, you can turn on the VPN Passthrough feature on your router to pass data packets that come from a VPN client to reach the VPN server through the router.
6] Configure DoS/DDoS Preventions
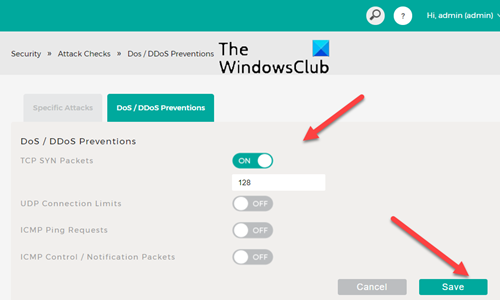
Customers demand robust protection against DDoS attacks and other security threats for their network assets. The nature of DDoS varies widely and can range from small and sophisticated to large and bandwidth-busting. It is for this reason, many Internet Service Providers offer fully managed DDoS protection through their router’s settings.
We hope you find the post useful.
See this post if you are unable to access the Router configuration page using login URL or IP address.