- How to Change Users in Linux Command Line
- Various user types in Linux
- 1. System Users
- 2. Regular Users
- 3. Super Users
- Switch users in the command line
- Switch to root user
- How to Make a User an Administrator in Ubuntu
- Make a User an Administrator in Ubuntu Through the GUI
- Make a User an Administrator in Ubuntu Through the Command Line
- Method 1: The usermod command
- Method 2: The gpasswd command
- Search
- About This Site
- Latest Tutorials
- How to Switch Users in Ubuntu and Other Linux Distributions [Quick Beginner Tip]
- Change user in Linux command line
- Change users in Linux graphically (for desktop Linux)
How to Change Users in Linux Command Line
Linux systems have different users and different types of users. Learn how to switch the users in Linux command line or how to change to the root user in Linux.
Linux systems have different types of users with different types or permissions as well.
Not all users can execute all commands and not all users are allowed to switch to other users neither. This all might sound confusing but, I will try to explain these so it can be easy to understand.
For the moment, here’s a quick summary of how to switch users in Linux command line.
To switch users, you need to know the password of that user. You can switch the users with this command:
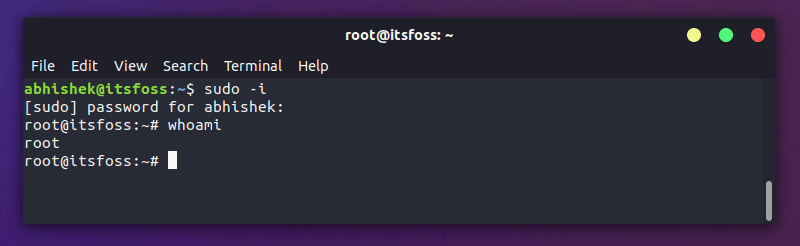
To switch to root user in Ubuntu, you can use this command:
Various user types in Linux
If you list all users in Linux, you’ll see a lot of users that you didn’t know about. Who are these users? Where did they come from? I could write an entire article in regards of how users work in Linux, however, this is not the idea for this one.
Basically, there are 3 types of users in Linux:
1. System Users
These are the users that are automatically created in Linux systems to be able to run services or applications and are not intended to log in to the system (in fact you can’t log in as any of these users).
2. Regular Users
These are the (human) users who can log in to a system. Each of these users might have or not different permissions or levels in the system which is given by the groups they belong to.
3. Super Users
These are system administrators or users who can perform high-level tasks that can be considered critical or system dangerous.
Switch users in the command line
When using a Linux system you can log in with a user and then simply “switch” to another user through the same command line session. In order to do this, there is a command “su -“, which allows you to switch to become another user:
[email protected]:~$ su - janedoe Password: [email protected]:~$ In the above example, you need to know the password of janedoe in order to switch to that user. Which makes sense because if you are going to switch to a user, you need to know the password of that user else it will be a security risk.
Switch to root user
For security reasons, some systems have ‘root’ account blocked for direct login, either locally or remotely, so this means it will not accept someone who tries to log in using ‘root’ even with the correct password.
So, how do you perform actions as the ‘root’ user? That’s what the ‘sudo’ command allows you to.
The sudo command will basically execute anything you want in the system as if the ‘root’ was doing it. You don’t need to know the ‘root’ user’s password, in fact, probably nobody knows it or there is no password assigned to ‘root’. You only need to know your own user’s password and that user must be in the ‘sudoers’ group, which is basically the group of users which can use ‘sudo’ in the system.
Normally, it is a good practice to run the commands with sudo that needs to run with root permission like this:
But if you want to change to root user so that all the subsequent commands will be run as root, you can use:
You’ll use your own password here, not the root account’s password.
As a sudo user yourself, you can create sudo user by adding the user to sudo group.
Linux systems allow you to easily switch users or execute high-level commands with the usage of ‘su‘ and ‘sudo’ commands. And remember: with great sudo power comes great responsibility!
How to Make a User an Administrator in Ubuntu

If you have more than one user on your Linux system, you may not want all of them to perform administrative tasks or mess up private system settings. In this case, you can avoid giving these users administrative rights in Ubuntu. Unauthorized users won’t be able to install or uninstall software on your system, and they won’t be able to change important system settings and configurations. Even if you are not at your computer, unauthorized users cannot perform these tasks because they all need sudo privileges and must know the password for sudo.
However, if you want to grant administrative privileges to a user, this article is for you.
In this article, I describe how to make a user an administrator through the graphical user interface and explain what commands you need to use on the command line to add a user to the sudo (authorized) user group.
We have run the commands and procedures mentioned in this article on an Ubuntu 20.04 and Ubuntu 22.04 system.
Make a User an Administrator in Ubuntu Through the GUI
In order to change user settings through the UI, you need to open the Users tab in the System Settings utility. You can access it through the following two ways:
Enter the ‘users’ keyword in the system Dash and click on the “Users” search result.

Click on the downward arrow located in the top-right corner of your Ubuntu desktop, click on your username in the following view and then click Account Settings from the drop-down.

The Settings utility will open, displaying the Users tab. Please note that only an authorized user can change user settings in Ubuntu. First, you need to unlock the tab in order to make changes as an administrator by clicking the Unlock button located in the top-right corner of the Users view:

This will open the following Authentication dialog where you can provide the password for the authorized user:

Enter the password and then click the Authenticate button. Now you can make changes to any user’s settings. Click on the username of the user you want to make an Administrator.

In the Account Type of the user you will see two buttons; the Standard button and the Administrator button. Click on the Administrator button to make this user an Administrator. As soon as you do this, the user will be given administrative privileges and can now perform all operations that need root rights.
Make a User an Administrator in Ubuntu Through the Command Line
We will describe two ways to make a standard Ubuntu user an Administrator through the command line:
We will use the Ubuntu command line application, the Terminal, to perform this operation. You can open the Terminal either through the system Dash or the Ctrl+Alt+T shortcut.
Method 1: The usermod command
Open the Terminal and enter the following command as sudo as only an authorized user can edit user settings in Ubuntu:
$ sudo usermod -aG sudo “username”
In this example we will use the following command to make a user with the username “sampleuser” an administrator:
$ sudo usermod -aG sudo sampleuser

Enter the password for sudo and the user will be added to the “sudo” group which means that he/she can perform all administrative tasks on Ubuntu.
You can verify that the user is now in the “sudo” group by checking the groups a user belongs to, through the following command:
The following output of the ‘groups’ command for our “sampleuser” indicates that he/she is now part of the sudo group.
![]()
Method 2: The gpasswd command
Open the Terminal and enter the following gpasswd command as sudo as only an authorized user can edit user settings in Ubuntu:
$ sudo gpasswd -a “username” sudo
In this example, we are adding the “sampleuser” to the sudo group through the following command:
$ sudo gpasswd -a sampleuser sudo
![]()
You can also remove a user from the sudo group through the -r switch in the same gpasswd command:
$ sudo gpasswd -d “username” sudo
In this example, we are removing the “sampleuser” from the sudo group through the following command:
$ sudo gpasswd -a sampleuser sudo
![]()
Through the methods described in this article, you can make an ordinary Ubuntu user an Administrator so that they can perform all tasks that require root privileges on the system.
Search
About This Site
Vitux.com aims to become a Linux compendium with lots of unique and up to date tutorials.
Latest Tutorials
How to Switch Users in Ubuntu and Other Linux Distributions [Quick Beginner Tip]
It is really simple to switch users in Ubuntu or any other Linux distribution using the terminal.
All you need to do is to know the unsername and its account password and you can switch users with su command:
You’ll be asked to enter the password of the user you want to switch to.
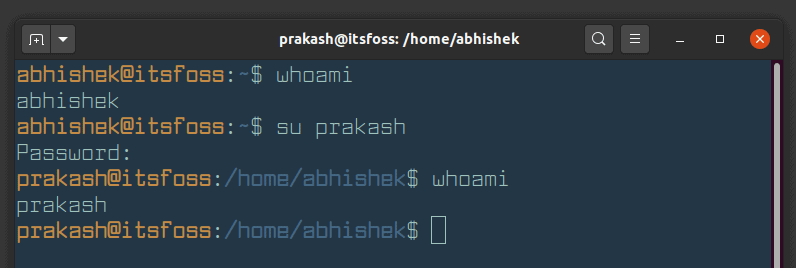
As you can see in the screenshot above, I changed to user prakash from user abhishek in the terminal.
There are some minor details with this method that I’ll share with you in a moment. I’ll also share the graphical way of switching users in Linux if you are using desktop Linux.
If you want to switch to the root user in Ubuntu, you can use the following command:
sudo su
You’ll have to enter your own user password here.
Change user in Linux command line

Let’s see things a bit in detail. To switch users, you need to first know the exact username because tab competition doesn’t work here. You can list all the users in Linux command line by viewing the content of the /etc/passwd file.
You’ll also need to know the password of the user account you want to switch to. This is for security reason, of course.
If you are the admin user or have sudo access, you can change account password with passwd command.
You’ll notice that some people use a — between su and the username. There is a specific reason for that.
When you use -, -l or –login option, you start the shell as a login shell. This means that it will initialize the environment variables like PATH and changes to the home directory of the changed user. It will be as if you logged into the terminal as the second user.
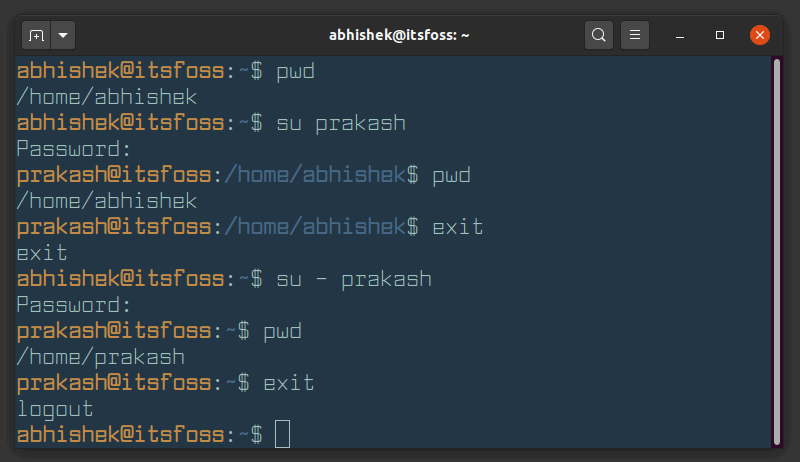
Note: though — is more popular, it is advised to use –login option.
Change users in Linux graphically (for desktop Linux)
If you are using desktop Linux, the above method may not be sufficient for you. Why? Because you switch the user in the terminal only. It is confined to the terminal. Nothing is changed outside the terminal.
If you want to switch users so that you can log in as another user and use all the system (browser, applications etc) graphically, you’ll have to log out and then log back in.
Now the screenshots may look different but the steps remain the same. Here’s how to switch users in Ubuntu Linux.
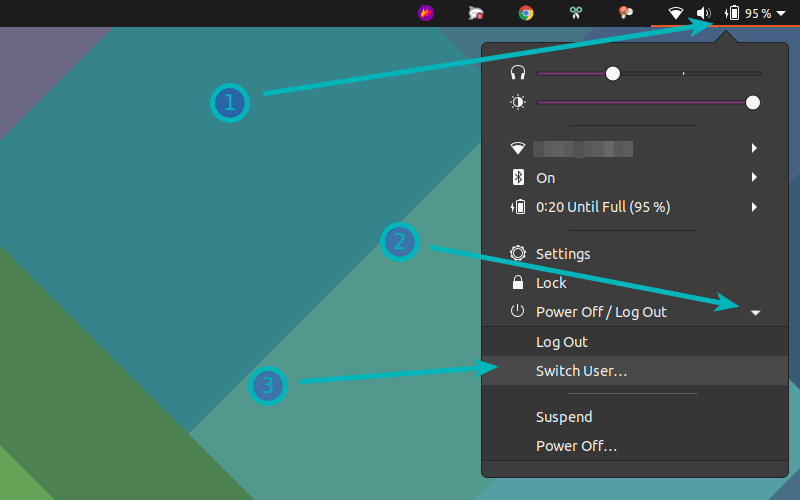
Go to the top right corner and click the Power Off/Log out option to open the dropdown and you can choose either of Switch User or Log Out.
- Switch User: You get to keep your session active (applications keep on running) for current user. Good for temporarily switching users as you won’t lose your work.
- Log out: Current session ends (all applications are closed). Good when you want to switch to the other user for a long time.
You can choose whichever option is more suited for your need.
Now, you’ll be at the login screen with all the available users for your system. Choose the user account of your choice.
Clearly, you need to know the password of the user account you want to use.
That’s it. I hope you find this quick beginner tip helpful in changing users in Ubuntu and other Linux distributions. Questions and suggestions are always welcome.