- Change folder permissions and ownership
- 9 Answers 9
- Команда chown Linux
- Команда chown Linux
- 1. Синтаксис и опции
- 2. Использование chown
- Выводы
- How to Use chown Command to Change Ownership in Linux
- Examples of chown command in Linux
- 1. Change or set the user ownership of a file
- 2. Change the user and group ownership
- 3. Change the group to default group of a user
- 4. Change the group only
- 5. Change user and group ownership of a directory recursively
- 6. Set the same user and group ownership as a reference file
Change folder permissions and ownership
I would like the user to have full rights on this folder (as well as all sub-directories and files in it):
currently owned by root. I have found numerous posts (in this forum and elsewhere) on how to do this for files but I can’t find a way to do it for whole folders.
9 Answers 9
Use chown to change ownership and chmod to change rights.
As Paweł Karpiński said, use the -R option to apply the rights for all files inside of a directory too.
Note that both these commands just work for directories too. The -R option makes them also change the permissions for all files and directories inside of the directory.
sudo chown -R username:group directory will change ownership (both user and group) of all files and directories inside of directory and directory itself.
sudo chown username:group directory will only change the permission of the folder directory but will leave the files and folders inside the directory alone.
As enzotib mentioned, you need to use sudo to change the ownership from root to yourself.
Note that if you use chown : (Note the left-out group), it will use the default group for that user.
If you want to change only the group, you can use:
BEWARE of recursively taking ownership of ANY directory. Think before you leap. Don’t be chown copypastin’ from the internet, kids. Just because you want to install a node package and it won’t let you, don’t sudo chown -R just because the fist hit from googling the error message says to. Reckless sudo chown -R -ing can kill your OS.
It needs to be said that using the -R option only applies to files and folders that exist in the directory already. It does NOT apply to future creations. For example, if you create another folder or file as root within the folder you’ve already changed permissions on, you will have the same experiences you’re having now until you chmod\chown them again.
Make the current user own everything inside the folder (and the folder itself):
very helpful for newbies (like me) when don’t know what to type in ‘usergroup’ for sudo chown
If you prefer, this can be done with a GUI as well. You will need to open Nautilus as root to do so. Press Alt + F2 to access the «Run Applications» dialog and enter gksu nautilus
Next, browse to and right click on the folder you would like to modify. Then, select «Properties» from the context menu. You can now select the user or group that you would like to be the «Owner» of the folder as well as the permissions you would like to grant them. Finally, press «Apply Permissions to Enclosed Files» to apply the changes recursively.
Though it seems this does not always work for some operations in a deep folder tree. If it does not work use the appropriate terminal command.
Команда chown Linux
Основа философии Linux — все объекты операционной системы — это файлы, для предоставления доступа к тем или иным возможностям системы мы просто даем доступ пользователю к нужным файлам или убираем. Я более подробно рассказывал обо всех правах в статье права доступа к файлам в Linux, здесь же скажу только что у каждого файла есть три группы прав: для владельца, группы и всех остальных.
При создании файла ему тот пользователь, от имени которого он был создан становится его владельцем, а группой устанавливается основная группа владельца. Но владельца файла и группу можно менять, для этого используются команды chown и chgrp. В этой статье будет рассмотрена команда chown linux, а также основные примеры её использования.
Команда chown Linux
1. Синтаксис и опции
Синтаксис chown, как и других подобных команд linux очень прост:
$ chown пользователь опции /путь/к/файлу
В поле пользователь надо указать пользователя, которому мы хотим передать файл. Также можно указать через двоеточие группу, например, пользователь:группа. Тогда изменится не только пользователь, но и группа. Вот основные опции, которые могут вам понадобиться:
- -c, —changes — подробный вывод всех выполняемых изменений;
- -f, —silent, —quiet — минимум информации, скрыть сообщения об ошибках;
- —dereference — изменять права для файла к которому ведет символическая ссылка вместо самой ссылки (поведение по умолчанию);
- -h, —no-dereference — изменять права символических ссылок и не трогать файлы, к которым они ведут;
- —from — изменять пользователя только для тех файлов, владельцем которых является указанный пользователь и группа;
- -R, —recursive — рекурсивная обработка всех подкаталогов;
- -H — если передана символическая ссылка на директорию — перейти по ней;
- -L — переходить по всем символическим ссылкам на директории;
- -P — не переходить по символическим ссылкам на директории (по умолчанию).
Утилита имеет ещё несколько опций, но это самые основные и то большинство из них вам не понадобится. А теперь давайте посмотрим как пользоваться chown.
2. Использование chown
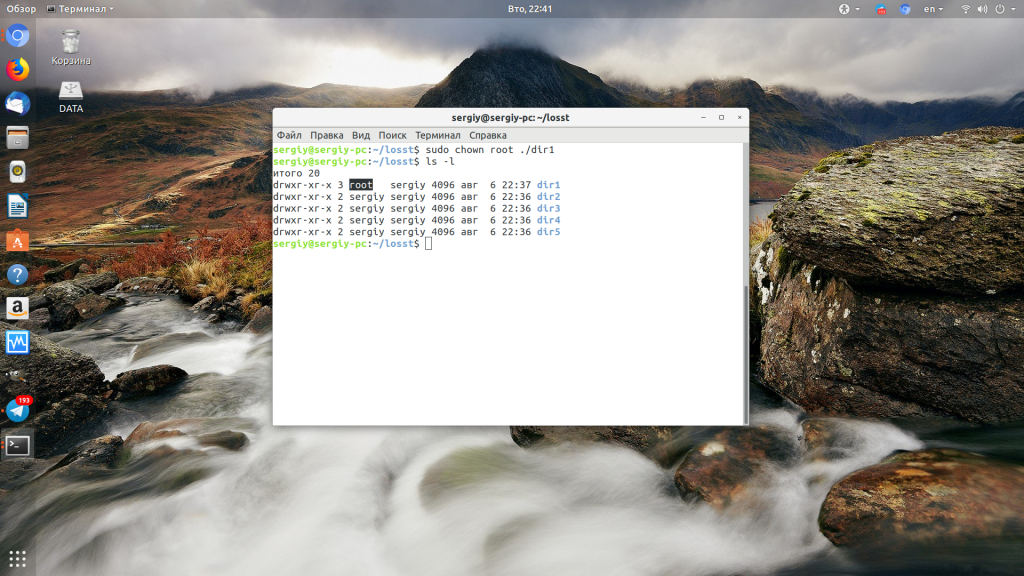
Например, у нас есть несколько папок dir и их владелец пользователь sergiy:

Давайте изменим владельца папки dir1 на root:
Если вы хотите поменять сразу владельца и группу каталога или файла запишите их через двоеточие, например, изменим пользователя и группу для каталога dir2 на root:

Если вы хотите чтобы изменения применялись не только к этому каталогу, но и ко всем его подкаталогам, добавьте опцию -R:
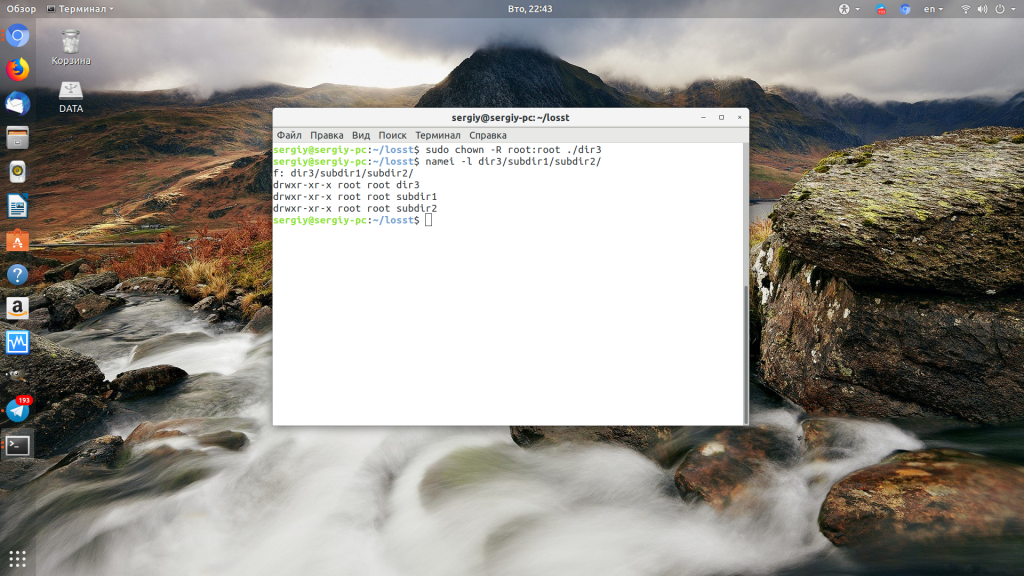
Дальше давайте изменим группу и владельца на www-data только для тех каталогов и файлов, у которых владелец и группа root в каталоге /dir3:
chown —from=root:root www-data:www-data -cR ./
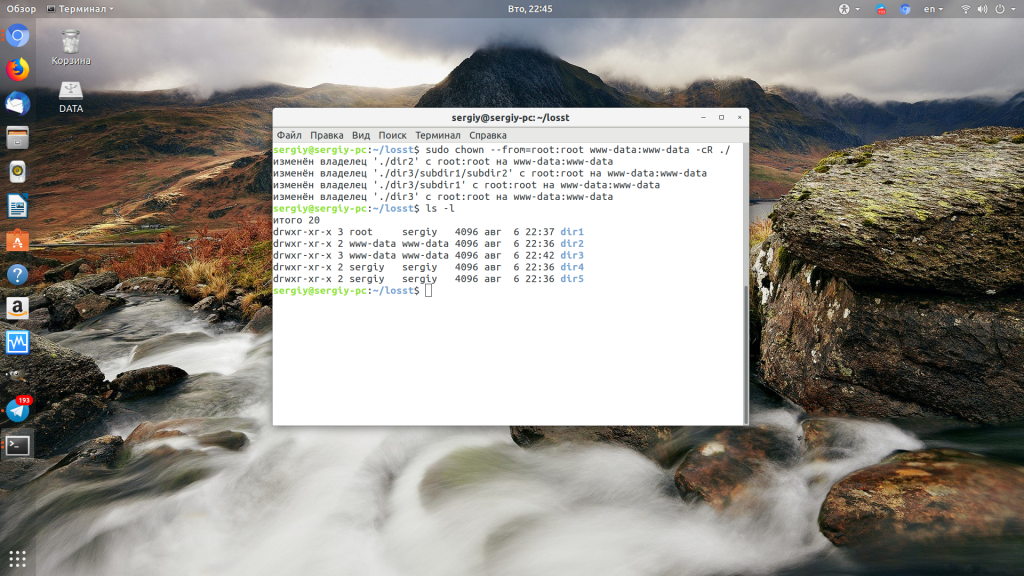
Для обращения к текущему каталогу используйте путь ./. Мы его использовали и выше. Далее указываем нужную группу с помощью опции —from и просим утилиту выводить изменения, которые она делает в файловой системе с помощью опции -c.
Выводы
Команда chown очень простая и позволяет только менять владельца и группу. Если вы хотите более подробно настроить права для владельца, группы и всех остальных, вам понадобится команда chmod. Права — довольно частая проблема при настройке работы различных программ, знание двух этих команд плюс ls и namei может помочь исправить много ошибок.
Обнаружили ошибку в тексте? Сообщите мне об этом. Выделите текст с ошибкой и нажмите Ctrl+Enter.
How to Use chown Command to Change Ownership in Linux
The chown command in Linux enables you to change the user and group ownership of a file or directory. Learn to use chown with some practical examples.
The chown command in Linux allows you to change the ownership of files and directories. You can rightly guess that ‘chown’ is short for ‘change owner’.
If you are not aware of these terms, I highly recommend reading my explainer article about file permissions and ownership in Linux.
Here’s a picture to quickly recall it:
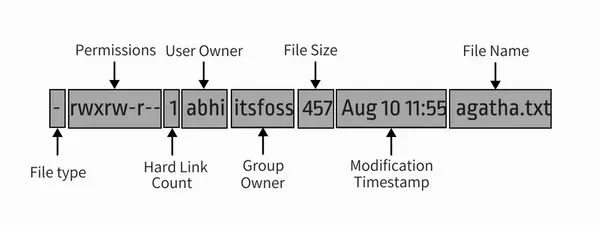
With the chown command, you can change both user and group ownership of a file or a directory.
Examples of chown command in Linux
Here’s what the syntax for chown command looks like:
chown [options] user_spec filesDo keep in mind that chown is an administrative command and so you need to be root or have sudo rights in order to make changes with chown command. I hope you know how to add sudo user.
Otherwise, you’ll see an error like this:
chown: changing ownership of 'agatha.txt': Operation not permittedNow let’s see how to use the chown command with examples.
Here’s the example set I am going to use:
-rw-r--r-- 1 abhishek abhishek 456 Jan 24 09:30 agatha.txt drwxr-xr-x 2 abhishek abhishek 4096 Jan 24 09:31 mydir drwxr-xr-x 3 abhishek abhishek 4096 Jan 24 09:30 new -rw-r--r-- 1 abhishek abhishek 356 Jan 24 09:30 sherlock.txt1. Change or set the user ownership of a file
To change the ownership of a file, use the command in this fashion:
sudo chown user_name file_nameYou may also use UID (user ID) instead of the user name. Here’s an example of the changes it makes:
[email protected]:~/tutorial$ sudo chown prakash agatha.txt [email protected]:~/tutorial$ ls -l agatha.txt -rw-r--r-- 1 prakash abhishek 456 Jan 24 09:30 agatha.txtAs you can see the owner of the file has changed to ‘prakash’ from ‘abhishek’ but the group remains ‘abhishek’. Let me show you how to change both user ownership and group ownership.
2. Change the user and group ownership
To change the user and group ownership of a file, you can specify the group with the user name separated by a column like this:
sudo chown user_name:group_name file_nameOf course, you can use UID and GID instead of user name and group name respectively.
[email protected]:~/tutorial$ sudo chown prakash:adm sherlock.txt [email protected]:~/tutorial$ ls -l sherlock.txt -rw-r--r-- 1 prakash adm 356 Jan 24 09:30 sherlock.txtAs you can see in the example above, I changed the user of the file sherlock.txt to ‘prakash’ and the group to ‘adm’.
3. Change the group to default group of a user
Every user has a default or primary group. If the user creates a new file or directory, this primary group automatically becomes the group owner of the file. You can list the default group of a user with the id command.
Now if you want to change the group ownership of a file to the default group of a user, you should just leave the group name after colon.
sudo chown user_name: file_nameAs you can see in the example below, sherlock.text file user owner ‘prakash‘ and group owner ‘adm‘. I changed the owner to ‘abhishek’ but didn’t provide the group name. And yet it changed the group from ‘adm’ to default ‘abhishek’ group.
[email protected]:~/tutorial$ ls -l sherlock.txt -rw-r--r-- 1 prakash adm 356 Jan 24 09:30 sherlock.txt [email protected]:~/tutorial$ sudo chown abhishek: sherlock.txt [email protected]:~/tutorial$ id abhishek uid=1000(abhishek) gid=1000(abhishek) groups=1000(abhishek),4(adm),24(cdrom),27(sudo),30(dip),46(plugdev),116(lpadmin),126(sambashare),999(docker) [email protected]:~/tutorial$ ls -l sherlock.txt -rw-r--r-- 1 abhishek abhishek 356 Jan 24 09:30 sherlock.txt4. Change the group only
If you just want to change the group without being bothered by the user owner, you can use the chown command like this:
sudo chown :group_name file_nameIn the example below, I set the group ownership to sudo without touching the user ownership:
[email protected]:~/tutorial$ ls -l agatha.txt -rw-r--r-- 1 prakash abhishek 456 Jan 24 09:30 agatha.txt [email protected]:~/tutorial$ sudo chown :sudo agatha.txt [email protected]:~/tutorial$ ls -l agatha.txt -rw-r--r-- 1 prakash sudo 456 Jan 24 09:30 agatha.txt5. Change user and group ownership of a directory recursively
In all the above commands, you can replace file with directory and it will work the same for changing ownership of the directory.
The one problem here is that by default the ownership of the content inside the directory is not changed.
sudo chown -R user_name:group_name directory_name6. Set the same user and group ownership as a reference file
You can use a file as reference and change the user and group ownership of a file based on the reference file in this manner:
sudo chown --reference=file1.txt file2.txtIn the example below, file agatha.txt has been used as a reference. And as you can see, the ownership of sherlock.txt has been changed on the basis of agatha.txt.
[email protected]:~/tutorial$ ls -l agatha.txt sherlock.txt -rw-r--r-- 1 prakash sudo 456 Jan 24 09:30 agatha.txt -rw-r--r-- 1 abhishek abhishek 356 Jan 24 09:30 sherlock.txt [email protected]:~/tutorial$ sudo chown --reference=agatha.txt sherlock.txt [email protected]:~/tutorial$ ls -l agatha.txt sherlock.txt -rw-r--r-- 1 prakash sudo 456 Jan 24 09:30 agatha.txt -rw-r--r-- 1 prakash sudo 356 Jan 24 09:30 sherlock.txtI think you have enough examples of the chown command to understand it. You can always refer to chown man page for more details.
If you have questions or suggestions, do let me know.