- Как изменить имя компьютера Ubuntu
- Требования к имени компьютера
- Как изменить имя компьютера
- Не меняется имя компьютера
- Выводы
- Как изменить Hostname (имя компьютера)
- Просмотр текущего Hostname
- Как изменить Hostname
- Способ 1. Используем команду hostnamectl
- Способ 2. Редактируем файлы /etc/hostname и /etc/hosts
- Проверка результата
- Как временно изменить Hostname
- 7 ways to set your hostname in Fedora, CentOS, or Red Hat Enterprise Linux
- Change all three names with hostnamectl
- Change the static and pretty names in the GUI with GNOME Settings
- Change the static name with cockpit
- Change the static name in the hostname file
- Change the static name with nmcli
- Change the transient name with sysctl
- Change the transient name with hostname
- Be careful with /etc/hosts
- Follow the conformity convention
Как изменить имя компьютера Ubuntu
Имя компьютера или по-другому, имя хоста устанавливается во время установки системы. Оно используется для идентификации компьютера в локальной сети, например, передается службой NetBIOS как имя сервера Samba, а также вы будете постоянно видеть его в терминале перед приглашением ввода команды.
Если вы задали не такое имя как хотите во время установки, то изменить имя компьютера Ubuntu не так уж сложно, но графических инструментов для этого в системе придумано не было, поэтому придется делать все через терминал.
Требования к имени компьютера
Вы можете использовать практически любое имя компьютера, но для него есть некоторые ограничения. Не желательно использовать два одинаковых имени компьютера в одной локальной сети, иначе могут возникнуть проблемы с различными интернет-сервисами и самая очевидная — вы не сможете понять где какой компьютер.
Второе ограничение — имя компьютера может содержать только буквы английского алфавита от a до z, цифры от 0 до 9, а также символы дефиса и точки. Начинаться и заканчиваться имя должно только буквой или цифрой, а не символом подчеркивания. Имя хоста регистронезависимо, поэтому COMPUTER и computer будут означать одно и то же. По длине стоит ограничение от 2 до 69 символов, но этого вполне достаточно.
Как изменить имя компьютера
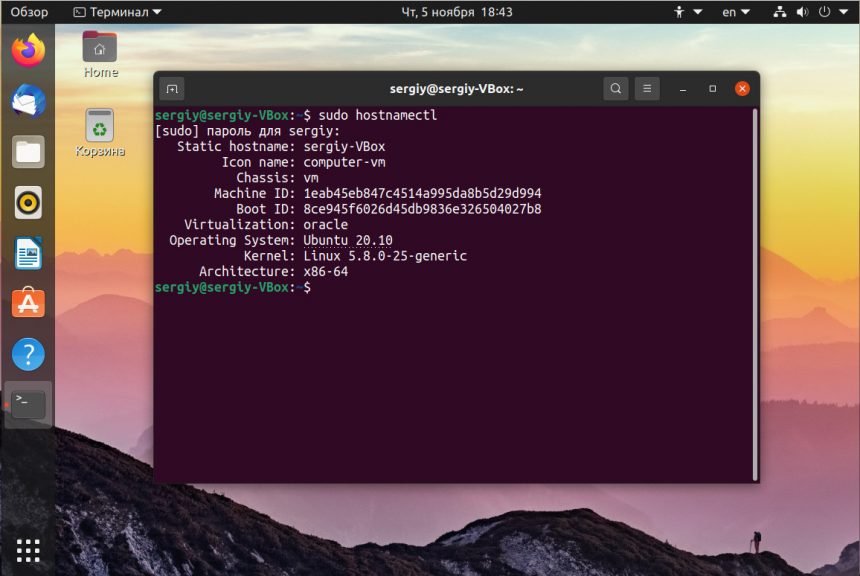
Посмотреть текущее имя компьютера можно выполнив команду hostnamectl без параметров:
Изменить имя хоста Ubuntu можно несколькими способами. Самый простой способ установить имя компьютера, которое сохранится только до перезагрузки можно использовать команду hostname, которой в параметре нужно передать новое имя. Например:
Но после перезагрузки все вернется как было раньше. Чтобы сделать изменения постоянными нужно изменить содержимое двух файлов. /etc/hostname и /etc/hosts:

Удалите старое имя из этого файла и пропишите новое. Затем сохраните изменения.
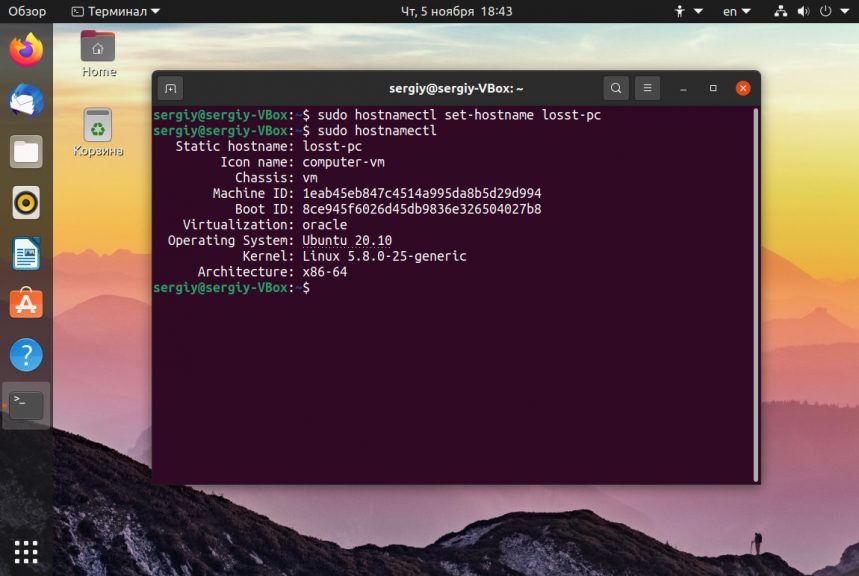
В современных версиях Ubuntu вы можете использовать команду hostnamectl, в отличие от первого варианта изменения сохранятся после перезагрузки:
sudo hostnamectl set-hostname новое_имя
Затем откройте второй файл:
Здесь немного сложнее, найдите строку:
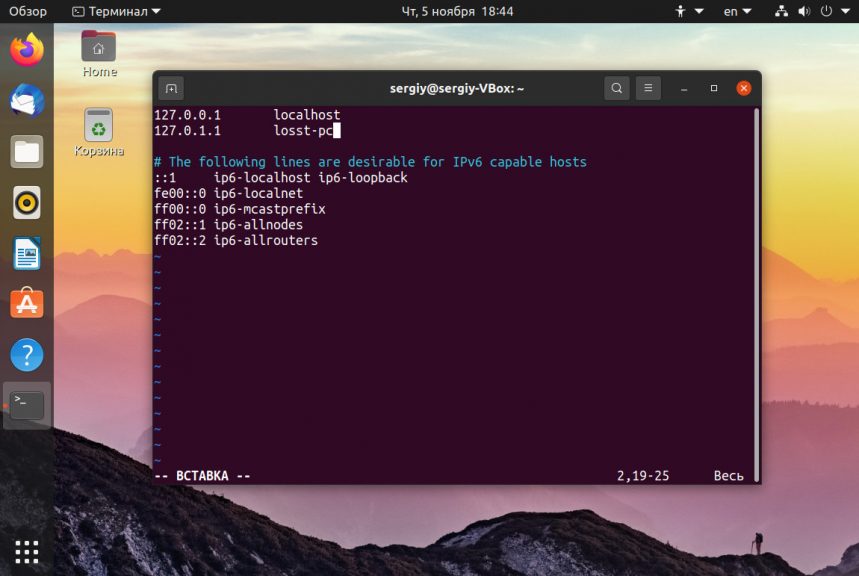
И замените старое имя на новое, после этого необходимо перезагрузить компьютер. Если вы не хотите перезагружать систему, то вы можете просто перезагрузить сервис управления входом пользователей:
systemctl restart systemd-logind.service
Теперь все должно работать правильно. Но это не единственный способ сменить имя хоста в Ubuntu.
Не меняется имя компьютера
Если вы поменяли имя компьютера, а после перезагрузки восстанавливается все как было, например, какое-то там dhcpcd0-pc, то, скорее всего, виноват NetworkManager. Здесь решение либо удалить эту программу, либо изменить имя хоста Ubuntu с помощью NetworkManager. Для этого выполните:
sudo vi /etc/NetworkManager/NetworkManager.conf
И добавьте в файл такие строки:

Теперь после перезагрузки NetworkManager поменяет имя хоста Ubuntu на правильное и больше проблем с этим не будет.
Выводы
Вот и все, теперь вы знаете как сменить имя компьютера Ubuntu. Для этого есть вполне достаточно способов, чтобы вы могли выбрать именно то, что нужно. Если у вас остались вопросы, спрашивайте в комментариях!
Обнаружили ошибку в тексте? Сообщите мне об этом. Выделите текст с ошибкой и нажмите Ctrl+Enter.
Как изменить Hostname (имя компьютера)

Hostname (имя компьютера, имя хоста) задается во время установки системы Linux. Hostname определяет название компьютера и используется преимущественно для идентификации компьютера в сети. Нельзя назначать два одинаковых Hostname для компьютеров в одной сети.
Просмотр текущего Hostname
Чтобы показать текущий Hostname можно использовать команду hostname без параметров:
Также Hostname можно отобразить командой hostnamectl :
Как изменить Hostname
Рассмотрим, как изменить Hostname двумя разными способами.
Способ 1. Используем команду hostnamectl
Во многих systemd-based дистрибутивах (например, в Ubuntu Linux) есть утилита hostnamectl .
Воспользуемся командой hostnamectl , чтобы установить новое значение Hostname равным pingvinus . Используется аргумент set-hostname:
sudo hostnamectl set-hostname pingvinusСпособ 2. Редактируем файлы /etc/hostname и /etc/hosts
Еще один способ изменения Hostname — это ручное редактирование файла /etc/hostname и файла /etc/hosts .
Сначала выполните команду (вместо pingvinus укажите свое значение):
Отредактируем файл /etc/hostname для редактирования в редакторе nano, выполняем команду:
Измените текущее значение в файле на новое. Сохраните изменения и закройте файл. Это можно сделать, нажав Ctrl+C , затем Y и Enter .
Hostname прописывается также в файле /etc/hosts , поэтому нужно изменить его значение в этом файле. Откроем файл:
Найдите строку вида « 127.0.0.1 ваш_hostname » и впишите новое имя хоста. Сохраните изменения и закройте файл.
Проверка результата
Чтобы проверить, изменилось ли значение Hostname, откройте новое окно терминала и введите команду:
Как временно изменить Hostname
Чтобы изменить Hostname в текущей работающей системе Linux, но до первой перезагрузки, можно использовать просто команду hostname , указав ей новое значение имени хоста:
7 ways to set your hostname in Fedora, CentOS, or Red Hat Enterprise Linux

A hostname is a human-readable string that helps people refer to a computer by a familiar name, rather than by a number or unwieldy descriptors like, «the third one from the bottom of the second-to-last rack.» Often, a hostname is set during the installation process, but there are times when it needs to be changed. On Linux, there are many ways to set a hostname, and this article aims to cover them all.
Before exploring the tools related to hostnames, though, you must understand the different contexts in which the term is used. There are potentially two designators of a system’s hostname: the computer’s administrator (a laptop’s owner, or a server’s root user) and the network (depending on protocols and settings). This factor can lead to confusion, because you might look at your computer’s hostname and see one value, only to find that the same computer is referred to as something different over the network.
There’s a historical reason for this situation. Long ago, before DNS, hosts on a network had to be defined locally in the file /etc/hosts . If there were 31 hosts on a network and a new one was added, then 32 hosts had to update their /etc/hosts file to reflect the correct IP address and corresponding hostname for each of their neighbors. This process didn’t scale well for bigger networked systems such as the World Wide Web (the Internet), and so DNS was invented, and the concept of hostnames largely was abstracted away from local computers to instead be managed by the network.
Today, the important hostname is the one the network uses. The hostname value in /etc/hosts is often set to localhost by default.
With this context in mind, here are all the different ways to manipulate a hostname on Linux.
Change all three names with hostnamectl
The hostnamectl command from systemd can manipulate three varieties of hostnames:
- Transient: Received from network configuration.
- Static: Provided by the kernel.
- Pretty: Provided by the user.
A transient hostname can change as needed to avoid name collisions. For instance, if you name your computer penguin but there’s already another host with that name on the network, your network hostname becomes penguin-1 .
Static and pretty hostnames are a little like local variables: They’re used for activities occurring on the local machine, mostly as a convenience for the user, along with applications that need to know whether they’re running locally or remotely (for example, over a forwarded X session).
When invoked without any arguments, hostnamectl returns the static and pretty names, plus some system information:
$ hostnamectl Static hostname: penguin Pretty hostname: Penguin VM Icon name: computer-vm Chassis: vm Machine ID: 418d9ce8ead44bbfb6970c0d356b89bf Boot ID: fb3a310237ef41f88b1c62c26f19065a Virtualization: kvm Operating System: Fedora 30 (Workstation Edition) CPE OS Name: cpe:/o:fedoraproject:fedora:30 Kernel: Linux 5.0.9-301.fc30.x86_64 Architecture: x86-64 $ sudo hostnamectl set-hostname --pretty "Web dev test environment" $ sudo hostnamectl set-hostname --static webdev-test-env $ hostnamectl Static hostname: webdev-test-env Pretty hostname: Web dev test environment [. ] Change the static and pretty names in the GUI with GNOME Settings
If you want to set the static and pretty names in a desktop application, use GNOME Settings. To launch GNOME Settings, go to the Activities menu in the upper left corner of your GNOME desktop. Type Settings into the search field, or click the Show Applications icon on the left dock and find Settings in the application icons as shown below:

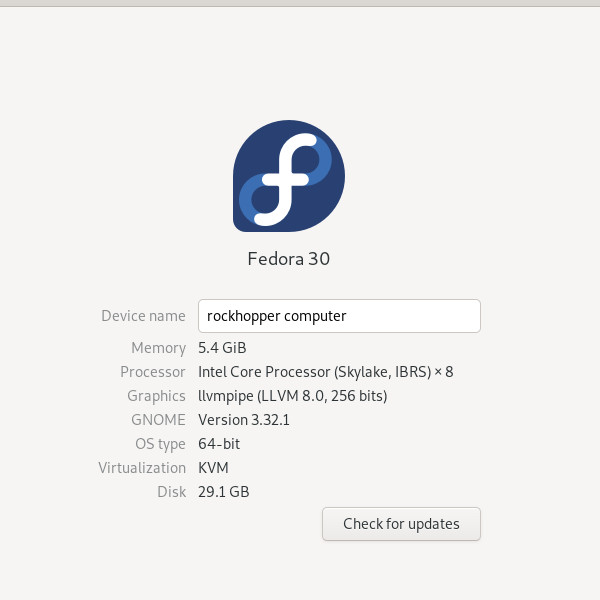
$ hostnamectl Static hostname: rockhopper-computer Pretty hostname: rockhopper computer [. ] Change the static name with cockpit
Fedora, CentOS, and RHEL systems feature a web console application called Cockpit for monitoring and configuring local and remote machines. Using Cockpit, you can change the static hostname for your own machine, or any machine you administer (as long as it has Cockpit enabled).
First, install and enable Cockpit:
$ sudo dnf install cockpit [. ] $ sudo systemctl enable --now cockpit 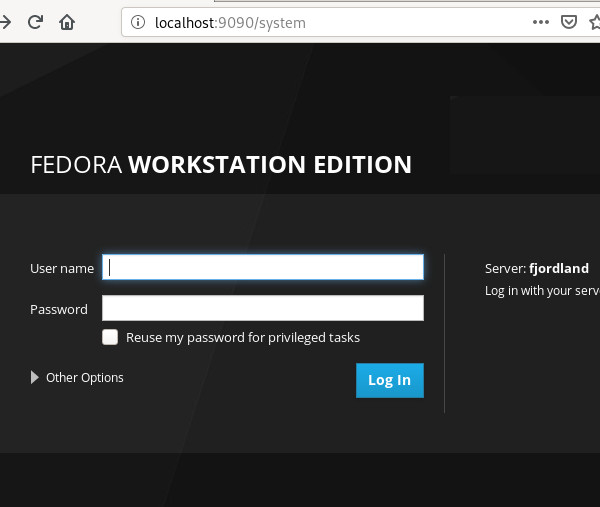
In the web console, click the System tab in the left column. Click the entry for Host name and edit the Pretty Host Name and (static) Real Host Name:
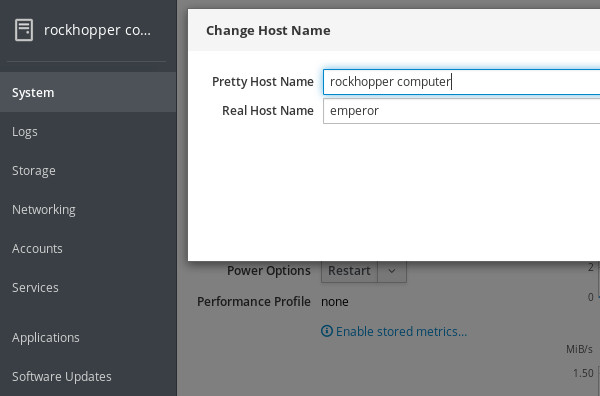
$ sudo echo "galapagos" > /etc/hostname $ hostnamectl Static hostname: snares Pretty hostname: rockhopper web console computer [. ] Change the static name in the hostname file
You can also set the static hostname manually by editing /etc/hostname . This file contains exactly one line by default. If you have not changed the hostname yet, then that line probably reads localhost.localdomain . If you have used hostnamectl to change the hostname already, then this file reflects that change.
Editing this file manually is not necessarily recommended, because it doesn’t update all the other hostname values the way hostnamectl does. For example:
$ sudo echo "galapagos" > /etc/hostname $ hostnamectl Static hostname: galapagos Pretty hostname: rockhopper computer Transient hostname: rockhopper-computer [. ] Change the static name with nmcli
Another way to change a static hostname is through the command line interface for Network Manager, nmcli :
$ sudo nmcli general hostname emperor $ hostnamectl Static hostname: emperor Pretty hostname: rockhopper computer Transient hostname: rockhopper-computer [. ] Change the transient name with sysctl
The sysctl command allows you to configure kernel parameters while Linux is running (that is, instead of at boot time). Your computer’s transient hostname is a kernel parameter, so you can modify it with this command:
$ sudo sysctl kernel.hostname=humboldt $ hostnamectl Static hostname: emperor Pretty hostname: rockhopper computer Transient hostname: humboldt [. ] Change the transient name with hostname
The hostname command from the util-linux package is a simple tool to query and set the transient hostname.
To query your current hostname:
$ sudo hostname fjordland $ hostnamectl Static hostname: emperor Pretty hostname: rockhopper computer Transient hostname: fjordland Be careful with /etc/hosts
The /etc/hosts file is mostly historic, although it is used by some applications and protocols, and can be a useful method for creating shortcuts to hosts you use often. You can use it to set a hostname, but usually, you’re just creating an alias to localhost at IP address 127.0.0.1 (your computer’s network loopback address).
For example, if you change /etc/hosts from the default entries like this:
$ cat /etc/hosts 127.0.0.1 magellanic magellanic.localdomain magellanic magellanic.localdomain4 ::1 magellanic magellanic.localdomain magellanic magellanic.localdomain6 $ ping -c 1 localhost PING localhost(magellanic (::1)) 56 data bytes 64 bytes from magellanic (::1): icmp_seq=1 ttl=64 time=0.182 ms [. ] $ ping -c 1 magellanic PING magellanic(magellanic (::1)) 56 data bytes 64 bytes from magellanic (::1): icmp_seq=1 ttl=64 time=0.181 ms [. ] $ hostnamectl Static hostname: emperor Pretty hostname: rockhopper computer Transient hostname: fjordland Follow the conformity convention
As you can tell from the iterations within this article, a computer’s hostname can get confusing should you use too many methods to set it, or if you change it frequently. While nothing enforces uniformity across hostname types, it’s a convention to keep everything the same on each computer.
Choose a memorable name and use it for your pretty name. Let the static and transient names be derived from that. Just as importantly, in a large network, choose meaningful names. For instance, all upper management computers may be named after a D&D monster, while all computers in the IT department may be named after a famous starship, and so on. Using a naming schema helps avoid name collisions and provides context to an otherwise dizzying list of network hosts.