- linux bond status
- How do I enable bonding in Linux?
- What is bond interface in Linux?
- How does bonding work Linux?
- How do I know if an interface is bonded?
- How do I verify a bond?
- How do I change bonding mode in Linux?
- What is the difference between bonding and teaming?
- How do I configure network bonding?
- What is the bond interface?
- What is Bond in Ifconfig?
- What is a bonded LAN connection?
- How to Configure Network Bonding or Teaming in Ubuntu
- How to Configure Network Bonding or Teaming in Ubuntu
- Related Posts
- 6 thoughts on “How to Configure Network Bonding or Teaming in Ubuntu”
linux bond status
Verify the bonding status by using the command cat /proc/net/bonding/bond0 . Check the LACP parameters from the actor (server self-configuration) device and confirm that they are correct as per the local configuration. Verify link failure counts and MII status and determine if any links are flapping.
How do I enable bonding in Linux?
- Step 1: Create a Bonding Channel Configuration File. Linux and other platforms stores network configuration by default in /etc/sysconfig/network-scripts/ directory. .
- Step 3: Load bond driver/module. Make sure bonding module is loaded when the channel-bonding interface (bond0) is brought up. .
- Step 4: Test configuration.
What is bond interface in Linux?
The Linux bonding driver provides a method for aggregating multiple network interfaces into a single logicalbonded interface. The behavior of the bonded interfaces depends upon the mode; generally speaking, modes provide either hot standby or load balancing services.
How does bonding work Linux?
Network bonding is a process of combing or joining two or more network interfaces together into a single interface. In Linux, a special kernel module named bonding is used to connect multiple network interfaces into a single interface. .
How do I know if an interface is bonded?
- Verify the bonding status by using the command cat /proc/net/bonding/bond0 .
- Check the LACP parameters from the actor (server self-configuration) device and confirm that they are correct as per the local configuration.
How do I verify a bond?
To verify the bond, you will need to contact the Surety and provide them with a scanned copy of the bond with your inquiry. If you do not have a copy, The Surety & Fidelity Association of America (SFAA) has provided a link to their “Bond Authenticity Inquiry Form” to supply the appropriate information.
How do I change bonding mode in Linux?
- Change the active slave to em1. ifenslave command can be used to attach or detach or change the currently active slave interface from the bonding. .
- Attach the new slave interface. .
- Detach the old slave interface. .
- Verify.
What is the difference between bonding and teaming?
NIC Teaming and NIC bonding are two different things. NIC Teaming uses one of two methods, failover, and load-balancing with fail over. With a team you do not get a single 2gb connection (with two 1 gb NICs). . True bonding would be taking two NICs and bonding them together to get a single fat pipe.
How do I configure network bonding?
- create a file ifcfg-bondX and add below lines. DEVICE=bond0. IPADDR=192.168.0.1. .
- After creating bonding interface, its time to configure slave interface.
- Edit interface files and add below lines. DEVICE=ethX. .
- Restart the network service to load the newly added configuration.
What is the bond interface?
A bond interface (also known as a bonding group or bond) is identified by its Bond ID (for example: bond1) and is assigned an IP address. The physical interfaces included in the bond are called slaves and do not have IP addresses.
What is Bond in Ifconfig?
Network Interface Bonding is a mechanism used in Linux servers which consists of binding more physical network interfaces in order to provide more bandwidth than a single interface can provide or provide link redundancy in case of a cable failure.
What is a bonded LAN connection?
Network bonding allows multiple network connections to act together with a single logical interface. You might do this because you want more bandwidth than a single connection can handle. Or maybe you want to switch back and forth between your wired and wireless networks without losing your network connection.

Install
How to Install KVM on Ubuntu 20.04Step 1: Check Virtualization Support in Ubuntu. Before installing KVM on Ubuntu, we are first going to verify if the.

Java
How to run a java programOpen a command prompt window and go to the directory where you saved the java program (MyFirstJavaProgram. java). . Type ‘j.

Step
How To Install Apache Maven on Ubuntu 18.04 and 16.04Step 1 – Prerequisites. First of all, you make sure that you installed appropriate Java on your s.
Latest news, practical advice, detailed reviews and guides. We have everything about the Linux operating system
How to Configure Network Bonding or Teaming in Ubuntu
Network Interface Bonding is a mechanism used in Linux servers which consists of binding more physical network interfaces in order to provide more bandwidth than a single interface can provide or provide link redundancy in case of a cable failure. This type of link redundancy has multiple names in Linux, such as Bonding, Teaming or Link Aggregation Groups (LAG).
To use network bonding mechanism in Ubuntu or Debian based Linux systems, first you need to install the bonding kernel module and test if the bonding driver is loaded via modprobe command.

Check Network Bonding in Ubuntu
On older releases of Debian or Ubuntu you should install ifenslave package by issuing the below command.
$ sudo apt-get install ifenslave
To create a bond interface composed of the first two physical NCs in your system, issue the below command. However this method of creating bond interface is ephemeral and does not survive system reboot.
$ sudo ip link add bond0 type bond mode 802.3ad $ sudo ip link set eth0 master bond0 $ sudo ip link set eth1 master bond0
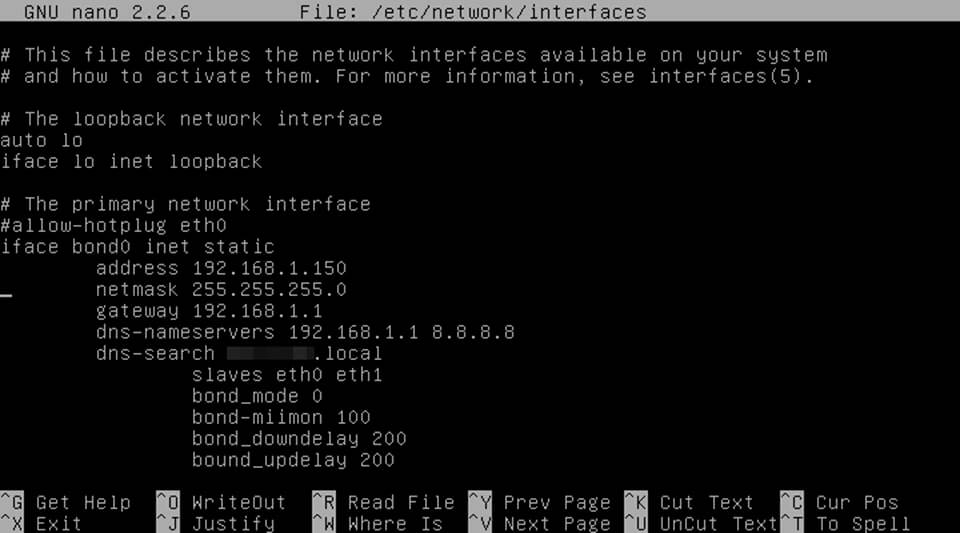
To create a permanent bond interface in mode 0 type, use the method to manually edit interfaces configuration file, as shown in the below excerpt.
$ sudo nano /etc/network/interfaces
# The primary network interface auto bond0 iface bond0 inet static address 192.168.1.150 netmask 255.255.255.0 gateway 192.168.1.1 dns-nameservers 192.168.1.1 8.8.8.8 dns-search domain.local slaves eth0 eth1 bond_mode 0 bond-miimon 100 bond_downdelay 200 bound_updelay 200
Configure Bonding in Ubuntu
In order to activate the bond interface, either restart network service, bring down the physical interface and rise the bond interface or reboot the machine in order for the kernel to pick-up the new bond interface.
$ sudo systemctl restart networking.service or $ sudo ifdown eth0 && ifdown eth1 && ifup bond0
The bond interface settings can be inspected by issuing the below commands.
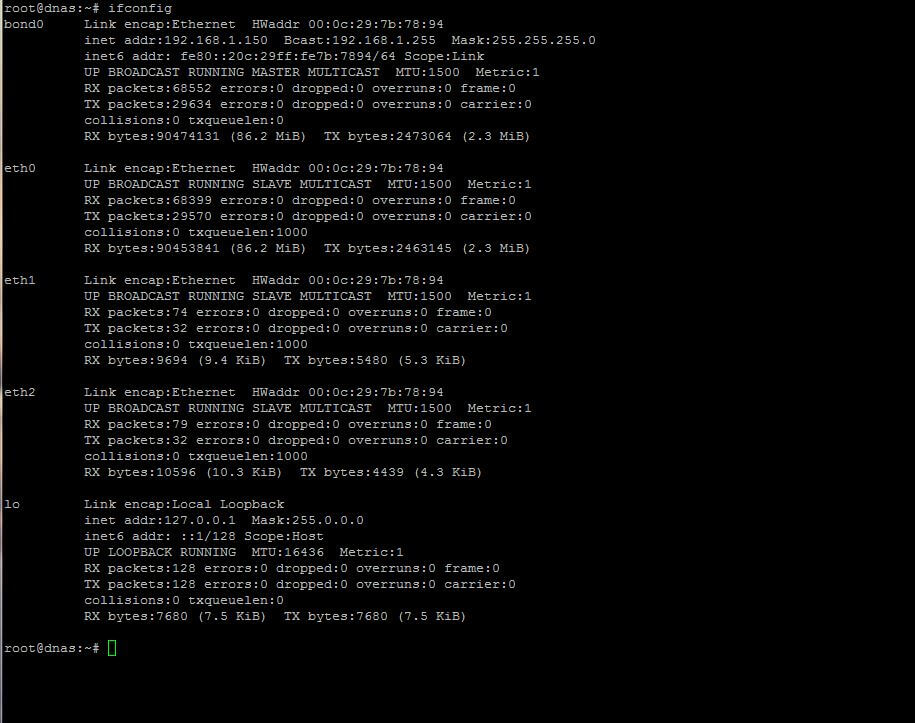
Verify Bond Interface in Ubuntu
Details about the bond interface can be obtained by displaying the content of the below kernel file using cat command as shown.
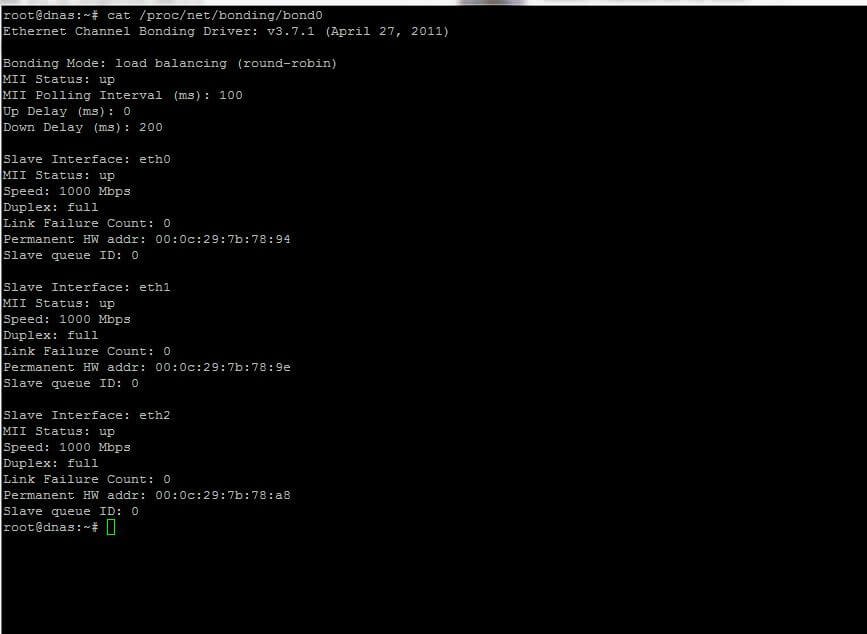
Check Bonding Information in Ubuntu
To investigate other bond interface messages or to debug the state of the bond physical NICS, issue the below commands.

Check Bond Interface Messages
Next use mii-tool tool to check Network Interface Controller (NIC) parameters as shown.

Check Bond Interface Link
The types of Network Bonding are listed below.
The full documentations regarding NIC bonding can be found at Linux kernel doc pages.
How to Configure Network Bonding or Teaming in Ubuntu
Network Interface Bonding is a mechanism used in Linux servers which consists of binding more physical network interfaces in order to provide more bandwidth than a single interface can provide or provide link redundancy in case of a cable failure. This type of link redundancy has multiple names in Linux, such as Bonding, Teaming or Link Aggregation Groups (LAG).
To use network bonding mechanism in Ubuntu or Debian based Linux systems, first you need to install the bonding kernel module and test if the bonding driver is loaded via modprobe command.
On older releases of Debian or Ubuntu you should install ifenslave package by issuing the below command.
$ sudo apt-get install ifenslave
To create a bond interface composed of the first two physical NCs in your system, issue the below command. However this method of creating bond interface is ephemeral and does not survive system reboot.
$ sudo ip link add bond0 type bond mode 802.3ad $ sudo ip link set eth0 master bond0 $ sudo ip link set eth1 master bond0
To create a permanent bond interface in mode 0 type, use the method to manually edit interfaces configuration file, as shown in the below excerpt.
$ sudo nano /etc/network/interfaces
# The primary network interface auto bond0 iface bond0 inet static address 192.168.1.150 netmask 255.255.255.0 gateway 192.168.1.1 dns-nameservers 192.168.1.1 8.8.8.8 dns-search domain.local slaves eth0 eth1 bond_mode 0 bond-miimon 100 bond_downdelay 200 bond_updelay 200
In order to activate the bond interface, either restart network service, bring down the physical interface and rise the bond interface or reboot the machine in order for the kernel to pick-up the new bond interface.
$ sudo systemctl restart networking.service or $ sudo ifdown eth0 && ifdown eth1 && ifup bond0
The bond interface settings can be inspected by issuing the below commands.
Details about the bond interface can be obtained by displaying the content of the below kernel file using cat command as shown.
To investigate other bond interface messages or to debug the state of the bond physical NICS, issue the below commands.
Next use mii-tool tool to check Network Interface Controller (NIC) parameters as shown.
The types of Network Bonding are listed below.
The full documentations regarding NIC bonding can be found at Linux kernel doc pages.
I’am a computer addicted guy, a fan of open source and linux based system software, have about 4 years experience with Linux distributions desktop, servers and bash scripting.
Each tutorial at TecMint is created by a team of experienced Linux system administrators so that it meets our high-quality standards.
Related Posts


6 thoughts on “How to Configure Network Bonding or Teaming in Ubuntu”
Thank you for your post! Where can I find information about adding network redundancy, not just link redundancy?. Specifically, connecting a single server with 2 NIC’s to 2 separate switches. I’m more worried about a switch failure in the network; it’s the weak link that would shut the whole system down completely. Ideally, I’d have a redundant network allowing (at bare minimum) out-of-band access to remote servers through Telnet, SSH, or web GUI’s. Link Aggregation also requires configuration on a switch… meaning a minimum of a QUAD port NIC. If I have only 2 ports, I’m splitting them between switches, not bonding them. So it seems that link aggregation (to me) is a conversation only after network redundancy/stability is achieved. Can you recommend any specific articles or resources? Reply
Now that Unbuntu in 20.04 is using Netplan what do I need to do to configure a real server (HPE dl60 H9) with two network interfaces at 192.168.3.24 and 192.168.3.25 as fixed IP with no DHCP and binded into a single interface? Can I still use these commands or do I have to figure out the arcane syntax of Netplan? Reply
I’m trying to bond enp3s0 and wlp4s0 interfaces connected to one wireless repeater. enp3s0 is connected to ap2, which is connected to ap1. wlp4s0 is directly connected to ap1. So they are getting IP from one source. As enp3s0 first gets ip it’s working fine, but wlp4s0 doesn’t get IP because of error: wlp4s0: IAID conflicts with one assigned to enp3s0 CTRL-EVENT-DISCONNECTED bssid=bc:ee:7b:90:74:c8 reason=4 locally_generated=1 wlp4s0: IAID 03:d7:8c:63
Jun 05 11:30:45 fallback-os dhcpcd[23163]: wlp4s0: IAID conflicts with one assigned to enp3s0
Jun 05 11:30:45 fallback-os dhcpcd[23163]: wlp4s0: adding address fe80::3e65:1ccc:341a:27c9
Jun 05 11:30:45 fallback-os dhcpcd[23163]: wlp4s0: soliciting a DHCP lease
Jun 05 11:30:46 fallback-os dhcpcd[23163]: wlp4s0: offered 192.168.1.178 from 192.168.1.254
Jun 05 11:30:46 fallback-os dhcpcd[23163]: wlp4s0: soliciting an IPv6 router
Jun 05 11:30:46 fallback-os dhcpcd[23163]: wlp4s0: probing address 192.168.1.178/24
Jun 05 11:30:46 fallback-os dhcpcd[23163]: wlp4s0: hardware address f8:1a:67:5c:7c:e2 claims 192.168.1.172 It would be great if someone could help to resolve this issue. Reply
I have eth0 from ISP0 and eth1 from ISP1 , both have different gateways and IP addresses. So based on what have you put those static values for bond0?
"address 192.168.1.150 netmask 255.255.255.0 gateway 192.168.1.1"