- Мой путь админа
- Комментарии
- Отправить комментарий
- Популярные сообщения из этого блога
- Элементарная Cisco
- Unbound — настройка кеширующего DNS-сервера
- Как отремонтировать диск LVM с помощью fsck
- 1. Проверка и исправление диска LVM без шифрования с помощью fdisk
- 2. Исправление LVM с шифрованием
- Связанные статьи:
- Рекомендуемые статьи:
- 1 Комментарий
- Best practice run a filesystem check on lvm volume?
- 2 Answers 2
- How to repair an LVM disk using fsck
- 1. Checking and repairing an unencrypted LVM disk using fdisk
- 2. Fix LVM with encryption
- Related articles:
Мой путь админа
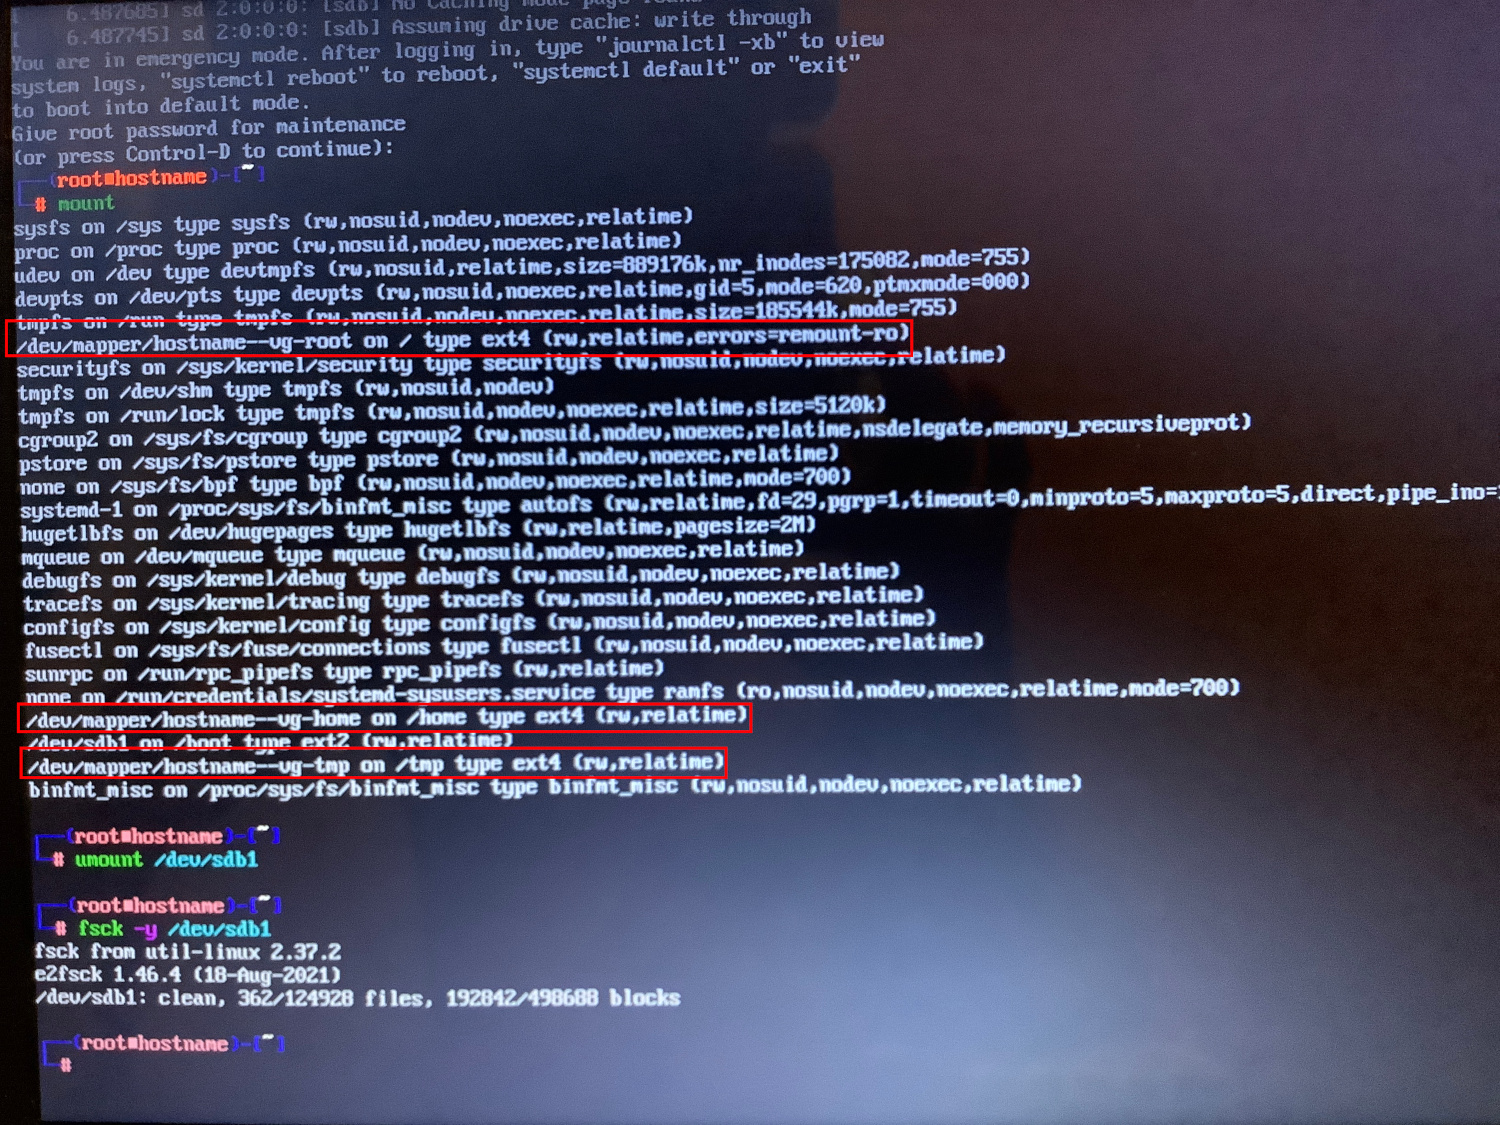
Часто бывает, что после аппаратного сбоя сервер не поднимается. Причиной зачастую является поломанная ФС, с обычными разделами все понятно, запускаем fsck -y /dev/sdX1, но что делать если у Вас раздел LVM?
В данной ситуации необходимо подключить сам LVM раздел, а потом уже начать его проверку. Если Вы точно знаете, что у Вас файловая система в ext4, то можно запускать fsck.ext4.
Скачиваем образ Ubuntu и грузимся с него в редиме восстановления (rescue):
- Получить ссылку
- Электронная почта
- Другие приложения
Комментарии
Отправить комментарий
Популярные сообщения из этого блога
Элементарная Cisco
Провайдер sh run sla monitor — состояние провайдера sh track sh run route IPSEC sh cry isakm sa — список сессий clear crypto isakm sa — почистить список сессии IPsec (сокращение от IP Security ) — набор протоколов для обеспечения защиты данных, передаваемых по межсетевому протоколу IP . Позволяет осуществлять подтверждение подлинности ( аутентификацию ), проверку целостности и/или шифрование IP-пакетов. Порты: Protocol: UDP, port 500 (for IKE, to manage encryption keys) Protocol: UDP, port 4500 (for IPSEC NAT-Traversal mode) Protocol: ESP, value 50 (for IPSEC) Protocol: AH, value 51 (for IPSEC)
Unbound — настройка кеширующего DNS-сервера
В релизе FreeBSD 10.0 DNS -сервер BIND заменен на связку из кеширующего DNS- сервера Unbound и библиотеки LDNS . Разбираясь с нововведениями, решил заодно ознакомиться и с настройкой Unbound .
Как отремонтировать диск LVM с помощью fsck
Если из-за ошибок на диске система не может загрузиться, то обычно в консоли аварийного режима нужно выполнить проверку разделов диска, примерно следующим образом (нужно указать своё имя диска и номер раздела):
umount /dev/sda2 fsck -y /dev/sda2
Но если речь идёт о LVM, либо о LVM с шифрованием, то ситуация усложняется.
Смотрите также:
Определить, что используется технология LVM или LVM с шифрованием можно по записям /dev/mapper/hostname—vg-root и /dev/mapper/hostname—vg-home, которые указываются вместо имён разделов в выводе команды

1. Проверка и исправление диска LVM без шифрования с помощью fdisk
Для проверки LVM используйте следующие шаги.
Для начала проверяем разметку дисков с lsblk:
NAME MAJ:MIN RM SIZE RO TYPE MOUNTPOINT sda 8:0 0 20G 0 disk └─sda1 8:1 0 20G 0 part └─xubuntu--vg-root 253:0 0 19G 0 lvm / sr0 11:0 1 1024M 0 rom
Как можно увидеть, LVM назван xubuntu—vg-root, но мы не можем запустить fsck на это имя, так как команда не найдёт его. Нам нужно получить полное имя, для этого нужно запустить команду lvm lvscan для получения LV имени с которым мы можем запустить fsck на LVM.
Следующая команда должна запускаться с повышенными правами (с sudo или как root):
inactive '/dev/xubuntu-vg/root' [Как можно увидеть, имя диска который нужно проврить на ошибки это /dev/xubuntu-vg/root, оно должно подойти для запуска fsck на этом имя.
Если /dev/xubuntu-vg/root не ACTIVE, нужно сделать его активным чтобы мы могли запустить его проверку.
lvchange -ay /dev/xubuntu-vg/rootТеперь это должно выглядеть примерно так:
sudo lvscan ACTIVE '/dev/xubuntu-vg/root' [Теперь можно запустить fsck для проверку тома LVM:
или запустить форсированную проверку с автоматическим исправлением ошибок:
2. Исправление LVM с шифрованием
Может так быть, что действия из предыдущего примера возможны только при нормальной загрузке системы, когда доступны все возможные утилиты. Соответственно, в Emergency mode указанные операции не удастся выполнить.
Поэтому рассмотрим пример восстановления системы с Live образа. Причина анализируемой проблемы в том, что apt autoremove удалила пакет cryptsetup и другие важные для расшифровки и нормальной работы раздела утилиты. Это привело к тому, что система перестала загружаться (из-за того, что корневой раздел не может быть смонтирован и расшифрован используя LVM).
Если вы не используете LVM и полнодисковое шифрование, то дальнейшее возможно вам не подходит.
В данном примере удалось исправить систему и переустановить cryptsetup и lvm2 в окружении chroot: для этого понадобилось загрузиться с флешки Live USB, запустить последующие команды в терминале и перезагрузиться
sudo cryptsetup open --type luks /dev/nvme0n1p3 nvme0n1p3_crypt
- замените /dev/nvme0n1p3 на ваш собственный диск
- замените "nvme0n1p3_crypt" на корректное имя раздела для вашей установки, вы можете его узнать запустив следующее в chroot:
cat /etc/crypttab | cut -f1 -d " "
Монтирование корневого раздела
sudo vgscan sudo vgchange -ay sudo mount /dev/mapper/xubuntu--vg-root /mnt
Подготовка окружения chroot:
sudo mount /dev/nvme0n1p2 /mnt/boot/ # замените nvme0n1p2 на ваш загрузочный раздел! sudo mount -o rbind /dev/ /mnt/dev/ sudo mount -t proc proc /mnt/proc/ sudo mount -t sysfs sys /mnt/sys/
Делаем так, чтобы в chroot работал DNS:
sudo cp /etc/resolv.conf /mnt/etc/resolv.conf
Переустанавливаем отсутствующие пакеты:
apt install cryptsetup lvm2
Заново генерируем (это может быть выполнено командой apt на предыдущем шаге — если это уже было сделано, то пропустите):
Размантируем файловые системы:
sudo umount /mnt/sys sudo umount /mnt/proc sudo umount /mnt/boot
Связанные статьи:
Рекомендуемые статьи:
1 Комментарий
…Попробовала решить свою проблему, озвученную ранее на форуме, при помощи данной статьи. lvscan показал, что все директории ACTIVE.
fsck from util-linux 2.37.2 e2fsck 1.46.4 (18-Aug-2021) /dev/mapper/hostname--vg-root is mounted. e2fsck: Cannot continue, aborting.
Best practice run a filesystem check on lvm volume?
Is there a way to use tune2fs for an ext filesystem on LVM? The most frequent way i have filesystem checks run is to have the OS do them automatically upon startup at regular intervals via tune2fs: tunefs -c 5 -i 7days /dev/sda1 but that does not work with lvm.
If fsck is the way, what switches does one pass to it? Without lvm, i fsck -c -c -D -C0 /dev/sda1 to get badblocks out of the picture and optimize folder structure. What lvm commands should be run before running the fsck?
Most of the documentation I have referenced in the past is not available.
2 Answers 2
How to run fsck against a LVM filesystem?
It's a good idea to make a snapshot or backup of the drive first.
1. and 2. depending which drive to fix.
Booting to emergency mode by adding systemd.unit=emergency.target to grub line is a good start. / is still mounted.
If fsck is the way, what switches does one pass to it?
You could check the root partition with a dry run ( fsck -N ) to see if errors are present. You'd need to boot from an external device to actually fix this one. ( fsck -y is useful if there is a lot to fix, skips the annoying "Fix (y)?" question on each error found.)
Is there something built in to lvm to automatically check the fs?
(What is the best practice set of commands to make certain that filesystems are checked when they reside on LVM?)
No. AFAIK /etc/fstab - 6th field is setting this. (see man fstab)
The sixth field, (fs_passno), is used by the fsck(8) program to determine the order in which filesystem checks are done at reboot time. The root filesystem should be specified with a fs_passno of 1, and other filesystems should have a fs_passno of 2. Filesystems within a drive will be checked sequentially, but filesystems on different drives will be checked at the same time to utilize parallelism available in the hardware. If the sixth field is not present or zero, a value of zero is returned and fsck will assume that the filesystem does not need to be checked.
If so, which logfile entry actually proves a check was done?
This is stored to the filesystem. For ext2/ext3/ext4 it could look like this (fsck in 13, mount count will be set to 0. tune2fs -C set mount count manually)
sudo tune2fs -l /dev/mapper/vg0-lv0 | grep -i "mount count" Mount count: 17 Maximum mount count: 30 (Other filesystems eg. XFS, btrfs work differently but you get the idea)
What lvm commands should be run before running the fsck?
How to repair an LVM disk using fsck

If, due to errors on the disk, the system cannot boot, then usually in the emergency mode console you need to check the disk partitions, approximately as follows (you need to specify your disk name and partition number):
umount /dev/sda2 fsck -y /dev/sda2
But if we are talking about LVM, or LVM with encryption, then the situation becomes more complicated.
You can determine that the LVM or LVM technology with encryption is used by the entries /dev/mapper/hostname--vg-root and /dev/mapper/hostname--vg-home, which are indicated instead of the partition names in the command output
1. Checking and repairing an unencrypted LVM disk using fdisk
Use the following steps to repair LVM.
First, we check the partitioning of disks with lsblk:
NAME MAJ:MIN RM SIZE RO TYPE MOUNTPOINT sda 8:0 0 20G 0 disk └─sda1 8:1 0 20G 0 part └─xubuntu--vg-root 253:0 0 19G 0 lvm / sr0 11:0 1 1024M 0 rom
As you can see, LVM is named xubuntu--vg-root, but we cannot run fsck on that name because the command will not find it. We need to get the full name, for this we need to run the lvm lvscan command to get the LV name with which we can run fsck on LVM.
The following command should be run with elevated privileges (with sudo or as root):
inactive '/dev/xubuntu-vg/root' [As you can see, the drive name to check for errors is /dev/xubuntu-vg/root, it should be good enough to run fsck on that name.
If /dev/xubuntu-vg/root root is not ACTIVE, we need to make it active so that we can start checking it.
lvchange -ay /dev/xubuntu-vg/rootIt should now look something like this:
sudo lvscan ACTIVE '/dev/xubuntu-vg/root' [Now we can run fsck to check the LVM volume:
or run a forced check with automatic error correction:
2. Fix LVM with encryption
It may be that the actions from the previous example are possible only during normal system boot, when all possible utilities are available. Accordingly, in Emergency mode, these operations will fail.
Therefore, let's consider an example of recovering a system from a Live image. The reason for the analyzed problem is that “apt autoremove” command removed the “cryptsetup” package and other utilities important for decryption and normal operation of the partition. This caused the system to stop booting (because the root partition could not be mounted and decrypted using LVM).
If you are not using LVM and full disk encryption, then the probably following is not for you.
In this example, it was possible to fix the system and reinstall cryptsetup and lvm2 in a chroot environment: for this you needed to boot from the Live USB stick, run the following commands in the terminal and reboot
Finding the root partition:
sudo cryptsetup open --type luks /dev/nvme0n1p3 nvme0n1p3_crypt
- replace /dev/nvme0n1p3 with your own drive
- replace “nvme0n1p3_crypt” with the correct partition name for your computer, you can find it by running the following in the chroot:
cat /etc/crypttab | cut -f1 -d " "
Mounting the root partition
sudo vgscan sudo vgchange -ay sudo mount /dev/mapper/xubuntu--vg-root /mnt
Preparing the chroot environment:
sudo mount /dev/nvme0n1p2 /mnt/boot/ # replace nvme0n1p2 with your boot partition! sudo mount -o rbind /dev/ /mnt/dev/ sudo mount -t proc proc /mnt/proc/ sudo mount -t sysfs sys /mnt/sys/
Make DNS service available in chroot:
sudo cp /etc/resolv.conf /mnt/etc/resolv.conf
We reinstall the missing packages:
apt install cryptsetup lvm2
Re-generate (this can be done with the “apt” command in the previous step – if it was already done, then skip):
Leaving the chroot environment:
Let’s write the buffer to disk:
sudo umount /mnt/sys sudo umount /mnt/proc sudo umount /mnt/boot