- Disk Speed Test (Read/Write): HDD, SSD Performance in Linux
- dd: TEST Disk WRITE Speed
- dd: TEST Disk READ Speed
- dd: TEST Read/Write Speed of an External Drive
- hdparm: Test HDD, SSD, USB Flash Drive’s Performance
- 18 Replies to “Disk Speed Test (Read/Write): HDD, SSD Performance in Linux”
- How to Check Disk Performance (IOPS and Latency) in Linux?
- Using FIO (Flexible I/O) Tool for Storage Benchmarking
- Fio Config File Examples
- Measuring Disk Latency Using Ioping
Disk Speed Test (Read/Write): HDD, SSD Performance in Linux
From this article you’ll learn how to measure an input/output performance of a file system on such devices as HDD, SSD, USB Flash Drive etc.
I’ll show how to test the read/write speed of a disk from the Linux command line using dd command.
I’ll also show how to install and use hdparm utility for measuring read speed of a disk on Linux Mint, Ubuntu, Debian, CentOS, RHEL.
To get the accurate read/write speed, you should repeat the below tests several times (usually 3-5) and take the average result.
Cool Tip: How to choose SSD with the best quality/price relation! Read more →
dd: TEST Disk WRITE Speed
Run the following command to test the WRITE speed of a disk:
$ sync; dd if=/dev/zero of=tempfile bs=1M count=1024; sync 1024+0 records in 1024+0 records out 1073741824 bytes (1.1 GB) copied, 3.28696 s, 327 MB/s
dd: TEST Disk READ Speed
The file tempfile , that has just been created by the previous command, was cached in a buffer and its read speed is much higher then the real read speed directly from the disk.
To get the real speed, we have to clear cache.
Run the following command to find out the READ speed from buffer:
$ dd if=tempfile of=/dev/null bs=1M count=1024 1024+0 records in 1024+0 records out 1073741824 bytes (1.1 GB) copied, 0.159273 s, 6.7 GB/s
Clear the cache and accurately measure the real READ speed directly from the disk:
$ sudo /sbin/sysctl -w vm.drop_caches=3 vm.drop_caches = 3 $ dd if=tempfile of=/dev/null bs=1M count=1024 1024+0 records in 1024+0 records out 1073741824 bytes (1.1 GB) copied, 2.27431 s, 472 MB/s
dd: TEST Read/Write Speed of an External Drive
Cool Tip: Have added a new drive to /etc/fstab ? No need to reboot! Mount it with one command! Read more →
To check the performance of some External HDD, SSD, USB Flash Drive or any other removable device or remote file-system, simply access the mount point and repeat the above commands.
Or you can replace tempfile with the path to your mount point e.g.:
$ sync; dd if=/dev/zero of=/media/user/MyUSB/tempfile bs=1M count=1024; sync
Reminder: All the above commands use the temporary file tempfile . Don’t forget to delete it when you complete the tests.
hdparm: Test HDD, SSD, USB Flash Drive’s Performance
hdparm is a Linux command line utility that allows to set and view hardware parameters of hard disk drives.
And it can also be used as a simple benchmarking tool that allows to quickly find out the READ speed of a disk.
hdparm is available from standard repositories on the most Linux distributions.
Install hdparm depending on your Linux distribution.
Cool Tip: Troubleshooting an issue with a hard drive performance? It will be a good idea also to test download/upload Internet speed. It can be easily done from the Linux command line! Read more →
On Linux Mint, Ubuntu, Debian:
$ sudo apt-get install hdparm
On CentOS, RHEL:
Run hdparm as follows, to measure the READ speed of a storage drive device /dev/sda :
$ sudo hdparm -Tt /dev/sda /dev/sda: Timing cached reads: 16924 MB in 2.00 seconds = 8469.95 MB/sec Timing buffered disk reads: 1386 MB in 3.00 seconds = 461.50 MB/sec
18 Replies to “Disk Speed Test (Read/Write): HDD, SSD Performance in Linux”
williamj@SilverK:~$ sync; dd if=/dev/zero of=tempfile bs=1M count=1024; sync 1024+0 records in 1024+0 records out 1073741824 bytes (1.1 GB, 1.0 GiB) copied, 0.313688 s, 3.4 GB/s williamj@SilverK:~$ dd if=tempfile of=/dev/null bs=1M count=1024 1024+0 records in 1024+0 records out 1073741824 bytes (1.1 GB, 1.0 GiB) copied, 0.093416 s, 11.5 GB/s williamj@SilverK:~$ sudo /sbin/sysctl -w vm.drop_caches=3 [sudo] password for williamj: vm.drop_caches = 3 williamj@SilverK:~$ dd if=tempfile of=/dev/null bs=1M count=1024 1024+0 records in 1024+0 records out 1073741824 bytes (1.1 GB, 1.0 GiB) copied, 0.7639 s, 1.4 GB/s
“Reminder: All the above commands use the temporary file tempfile. Don’t forget to delete it when you complete the tests.”
I can not find any place where you instruct as to how to delete the tempfile. How is this done safely?
go to directory where you executed the command, in terminal:
““rm tempfile““
or in a gui select the file and delete it.
I must have done something wrong. I tested first with bs=4k and count=256k.
It finished quickly.
Afterwards I decided myself to alter the parameters like so: bs=1M and count=256k
I didn’t know exactly what I was doing. I left it running not having slightest hunch if it’s wrong to interrupt it via Ctrl-C. It run approximately 1000 seconds having written almost 100GB of all 150GB free on the SSD. Only then I’ve read the man pages searching for clues but still didn’t found. So I have a couple of questions if kindly allowed. That ‘k’ at the end of count I am not sure of it’s meaning or even if it makes sense. I have to also ask what would have happened if the command filled the whole free space? Would it have stopped by itself with message/error? Was it dangereous for an ssd doing this. The fact I performed it from sysresccd on ssd with Windows installed has any effect on outcome?
I mean the if = is it from the RAM memory? I specified an of= on the ssd after mounting it like /mnt/windows/some.output.file. Is the way I did it significant for the results?
@JON > bs=4k and count=256k
k means what it always means: about 1,000, but in the case of computers (here), usually 1024. “bs” means block size, “count” means number of blocks. So this means write 4k x 256k bytes. 1k x 1k = 1 megabyte (about 1,000 x about 1,000 = about 1,000,000). How many megabytes? Since we already took care of the ‘k’s; 4x 256 = 1024 (aka about 1000, or 1k again.) What’s 1k x 1k x 1k? 1 gigabyte (about 1,000,000,000.) You wrote 1 gigabyte of zeros. Therefore, > bs=1M and count=256k 1M = (1k x 1k)
(1k x 1k) x 1k(the k from “count”) = 1 gigabyte
1 gigabyte x 256 = 256 gigabytes. You were writing 256 gigabytes of zeros. Your drive is only 150 gigabytes in size. It won’t hurt your drive, it will just delete everything on your drive. When it fills your drive, it will stop. The “if” is not from ram, it is a program (/dev/zero) in your system disguised as a file but whenever it is read is just endless zeros.
How to check sdb drive?
Should I use /dev/sdb instead of /dev/zero here:
sync; dd if=/dev/zero of=/media/user/MyUSB/tempfile bs=1M count=1024; sync
?
I think you missed the best software package for this kind of tests. It’s called fio:
https://github.com/axboe/fio/
It’s not accurate. The second sync does not influence the measurement (it’s being run after dd reports the results) and thus it’s influenced by caching. If you try the same test with 4096 or 8192 megs, you’ll have worse results (but closer to the reality). One way to correct for this is measuring the whole process with the time command and then doing the division manually. E.g.:
# time (sync; dd if=/dev/zero of=tempfile bs=1M count=8192; sync) You’ll see that dd will report a higher throughput, but you can then divide 8192 with whatever seconds time comes up with.
You need `conv=fdatasync` in your dd commands to include flush and sync time. Otherwise the results will be way too high, as others have mentioned.
/dev/sdb2:
Timing cached reads: 16830 MB in 1.99 seconds = 8454.99 MB/sec
Timing buffered disk reads: 434 MB in 3.01 seconds = 144.27 MB/sec
Hello, after doing some tests with different “GB” my storage on NVMe was filled with 7% (56GB), can I delete that storage or stay there permanently?
How to Check Disk Performance (IOPS and Latency) in Linux?
In this article we will discuss how to check the performance of a disk or storage array in Linux. IOPS (input/output operations per second) is the number of input-output operations a data storage system performs per second (it may be a single disk, a RAID array or a LUN in an external storage device). In general, IOPS refers to the number of blocks that can be read from or written to a media.
Most disk manufacturers specify nominal IOPS values, but in fact these are not guaranteed. To understand the performance of your storage subsystem prior to starting a project, it is worth getting the maximum IOPS values your storage can handle.
Using FIO (Flexible I/O) Tool for Storage Benchmarking
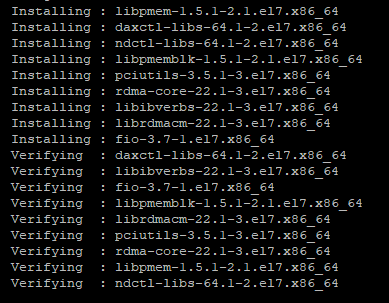
To measure disk IOPS performance in Linux, you can use the fio (the tool is available for CentOS/RHEL in EPEL repository). So, to install fio in RHEL or CentOS, use the yum (dnf) package manager:
# yum install epel-release -y
# yum install fio -y
Or apt-get in Debian or Ubuntu:
Then you to identify the disks to test. The test is done by performing read/write operations in the directory your disk or LUN is mounted to.
Let’s do several types of disk IOPS performance tests in various disk load scenarios (a test mode you select depending on a hosted app logic and general infrastructure of a project).
Random Read/Write Operation Test
When running the test, an 8 GB file will be created. Then fio will read/write a 4KB block (a standard block size) with the 75/25% by the number of reads and writes operations and measure the performance. The command is as follows:
# fio —randrepeat=1 —ioengine=libaio —direct=1 —gtod_reduce=1 —name=fiotest —filename=testfio —bs=4k —iodepth=64 —size=8G —readwrite=randrw —rwmixread=75
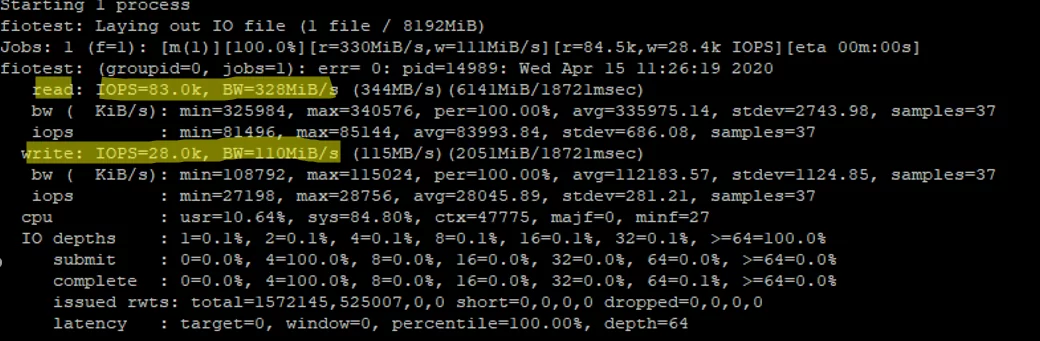
I ran my first test on an array that consisted of two SSDs and got good results:
- Read: 3280MiB/s, IOPS avg 83000
- Write: 110MiB/s, IOPS avg 28000
Since we have run a combined read/write test, the values for the separate tests will be higher.
In comparison, I measured the performance on a SATA drive:
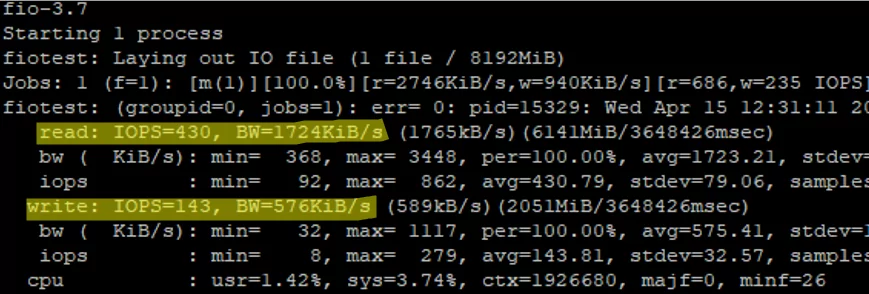
Of course, the HDD results are worse than those of the SSD.
Random Read Operation Test
To measure disk performance for random read operations only, run the following command:
# fio —randrepeat=1 —ioengine=libaio —direct=1 —gtod_reduce=1 —name=fiotest —filename=testfio —bs=4k —iodepth=64 —size=8G —readwrite=randread
The final part of the command was changed to —readwrite=randread .
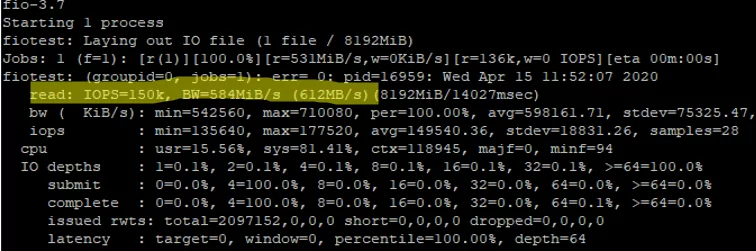
As I told earlier, the read/write performance will be higher if measured separately:
READ: IOPS=150k, BW=584MiB/s (612MB/s)
Random Write Operation Test
To measure disk performance for random write operations, run this command:
# fio —randrepeat=1 —ioengine=libaio —direct=1 —gtod_reduce=1 —name=fiotest —filename=fiotest —bs=4k —iodepth=64 —size=8G —readwrite=randwrite
WRITE: IOPS=84.7k, BW=331MiB/s (347MB/s)
Write operation performance on good SSDs is also very high. Like in read operation test, the difference as compared to a mixed test reaches 200-250 MiB/s and 50000 IOPS.
If you refer to the official manufacturer documentation (these are Intel SSDs), it is safe to say that the values are true.
Fio Config File Examples
Fio allows to check disk performance using interactive commands and with configuration files prepared in advance for testing. To use the this option, create a file:
And add the following contents into it:
[global] rw=randread size=8G filename=/tmp/testfio ioengine=libaio iodepth=4 invalidate=1 direct=1 [bgread] rw=randread iodepth=64
The test will measure the read performance of a disk. To test write performance, use the following config file:
[global] rw=randwrite size=8G filename=/tmp/testfio ioengine=libaio iodepth=4 invalidate=1 direct=1 [bgwrite] rw=randwrite iodepth=64
Measuring Disk Latency Using Ioping
Besides IOPS, there is another important parameter that characterizes the quality of your storage: it is latency. Latency is an input/output request delay that determines the time of access to a storage (measured in milliseconds). The higher the latency is, the more your app has to wait till it gets data from your disk. The latency values over 20 ms for typical data storage systems are considered poor.
To check disk latency in Linux, the ioping tool is used:
Run the latency test for your disk (20 requests are run):
The average value is 298.7 us (microseconds), so the average latency in our case is 0.3 ms, that is excellent.
The latency value can be specified in us (microseconds) or ms (milliseconds). To get a ms value from an us one, divide it by 1,000.
So you can perform a storage load test on your server prior to launching a project and check the highest performance values. However, the test doesn’t guarantee that your disk array or disk will show the same performance constantly, but it is worth to take the test on the initial stage of a project. Learn how to test IOPS in Windows in this article.