- How to Check Folder Permission Linux
- Prerequisites
- Users and User Groups
- Checking File and Folder Permissions
- Checking File Permission Using GUI
- Checking File Permission Using CLI
- Modifying File and Folder Permissions
- Changing File Ownership
- Final Thoughts
- About the author
- Sidratul Muntaha
- Linux File Permission Tutorial: How to Check and Change Permissions
- How to View Check Permissions in Linux
- Check Permissions using GUI
- Check Permissions in Command-Line with Ls Command
- Using Chmod Command to Change File Permissions
- Define File Permission with Symbolic Mode
- Define File Permission in Octal/Numeric Mode
- Changing User File and Group Ownership
How to Check Folder Permission Linux
![]()
Linux is a multi-user operating system. It can handle multiple users accessing the system at the same time. This is one of the key reasons why Linux is so popular in mainframes, servers, supercomputers, etc. Being a multi-user system, it’s paramount to have functional user permission management. It’s the fundamental that defines what user/group can access what part of the system.
For file access, this user permission is managed as the file permissions. In this guide, we’ll have a deep dive into the file and folder permissions in Linux.
Prerequisites
To understand the file and folder permissions, it’s important to understand several key concepts. In this section, we’ll describe each of them briefly.
Users and User Groups
Linux allows access to the systems to individual users. Any valid user can connect to the system locally or remotely and enjoy access to whatever resource is allocated.
If there are hundreds of users, then managing all their permissions individually is quite inefficient. To solve this, Linux introduces the concept of user groups. Each group may contain one or more users. Changing permissions for the user group will automatically be applied to every user within that group.
Checking File and Folder Permissions
Depending on the type of UI, there are two ways you can check the file permissions of a folder/directory.
Checking File Permission Using GUI
If your distro comes with a desktop environment, then it will also likely have a file manager installed. All the file managers can check and show the file permissions. For demonstration, let’s have a look at Nautilus, the default file manager in GNOME.
Right-click on any file/folder, and select “Properties”.
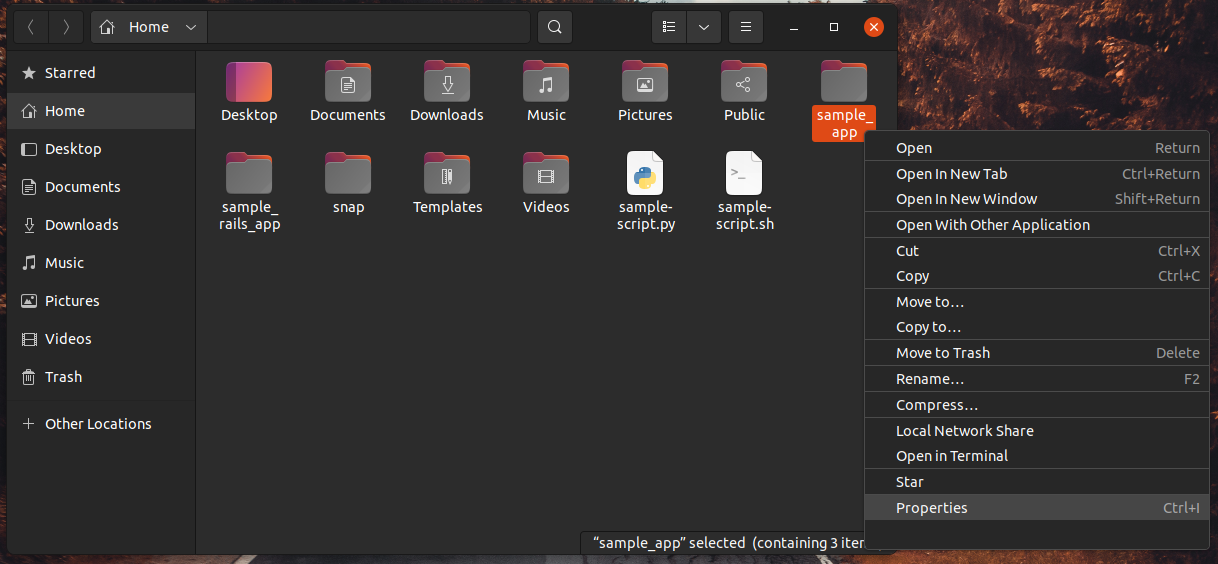
To check the permissions, head to the “Permission” tab.
Checking File Permission Using CLI
This is the more recommended (albeit slightly confusing) method of checking file permissions in Linux. We’ll be using the ls tool that comes preinstalled in all Linux distros.
To check the file permissions, run the following ls command. Check out this guide for an in-depth exploration of the ls command.

If no file location is specified, then ls will print info about all the files in the current directory. Note that ls may not print the file permissions and info if it’s a directory.
For example, when trying to check permissions for the directory “~/Desktop”, ls won’t print any info at all.

In such a situation, run ls on the parent directory of the target directory. In this case, it’s “~/”.
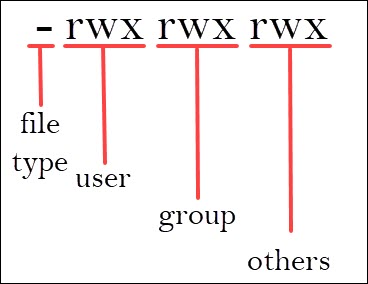
Explaining the file permissions
As we can see, the file permission is described as a string of some ASCII characters. This guide on Linux file permissions explains everything in more detail. Here, we’ll have a brief overview.
There are 3 permission types.
- read (r) – The user’s capability to read the file content.
- write (w) – The user’s capability to write or modify the file or contents of the directory.
- execute (x)- The user’s capability to execute the file or see the contents of the directory.
The permission string contains the following data.
- Character 1: Describes the file type(directory, symlink, setuid/setgid permissions, or sticky bit permissions).
- Character 2-4: Describes the file permission for the owner.
- Character 5-7: Describes the group permissions for the file.
- Character 8-10: Describes the file permission for everyone else in the system.
For the file type, there are a couple of different values.
- _ : No special permissions.
- d : Directory
- l: Symbolic link, also known as symlinks. Learn more about symlinks in Linux.
- s: setuid/setgid permissions.
- t: Sticky bit permissions.
Modifying File and Folder Permissions
The file permissions are important values. However, with the right authority, a user in the Linux system can change the file permission.
To change the permissions, Linux comes with a built-in tool called chmod. For example, to mark a script file as an executable, we’d run the following command.

If you wanted to remove the “executable” flag from the file, then the command would look like this.

For a beginner, it’s recommended to practice various chmod commands, for example, granting a user permission to a folder. The next guide goes deeper into chmod with explanations.
Changing File Ownership
The owner of a file also impacts the file permissions. Generally, it’s the user that originally created the file. However, different users can be assigned as the owner of the file or directory.
To change the ownership of a file, Linux comes with the tool chown.
Final Thoughts
File permission is an important concept in Linux. Checking file permission for a folder is an easy task. Linux comes with the necessary tools to manage them directly from the command line. This guide successfully demonstrates checking and modifying the file permission of files and folders.
About the author
Sidratul Muntaha
Student of CSE. I love Linux and playing with tech and gadgets. I use both Ubuntu and Linux Mint.
Linux File Permission Tutorial: How to Check and Change Permissions
Linux, like other Unix-like operating systems, allows multiple users to work on the same server simultaneously without disrupting each other.
Individuals sharing access to files pose a risk exposing classified information or even data loss if other users access their files or directories. To address this, Unix added the file permission feature to specify how much power each user has over a given file or directory.
In this tutorial, you will learn how to view and change file permissions in Linux.

How to View Check Permissions in Linux
To start with file permissions, you have to find the current Linux permission settings. There are two options to choose from, depending on your personal preference: checking through the graphical interface or using the command.
Check Permissions using GUI
Finding the file (directory) permission via the graphical user interface is simple.
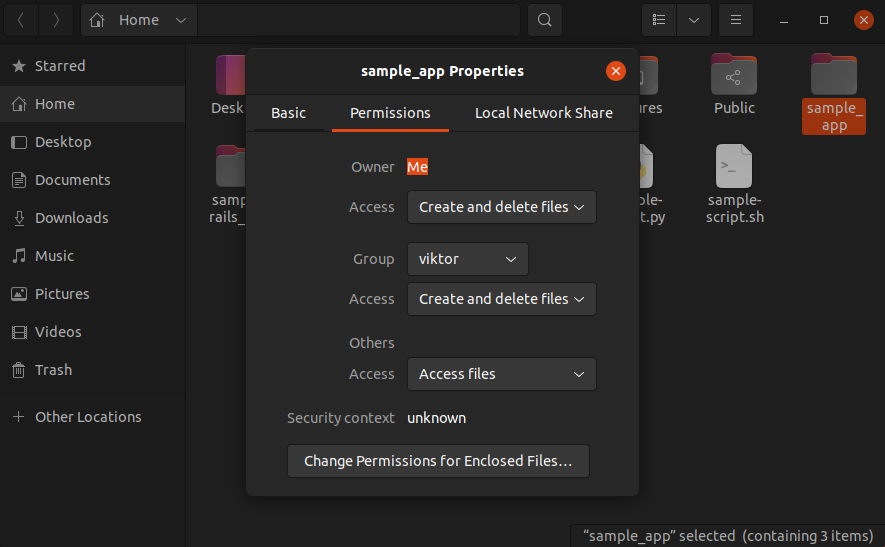
1. Locate the file you want to examine, right-click on the icon, and select Properties.
2. This opens a new window initially showing Basic information about the file.
Navigate to the second tab in the window, labeled Permissions.

3. There, you’ll see that the permission for each file differs according to three categories:
- Owner (the user who created the file/directory)
- Group (to which the owner belongs to)
- Others (all other users)
For each file, the owner can grant or restrict access to users according to the categories they fall in.
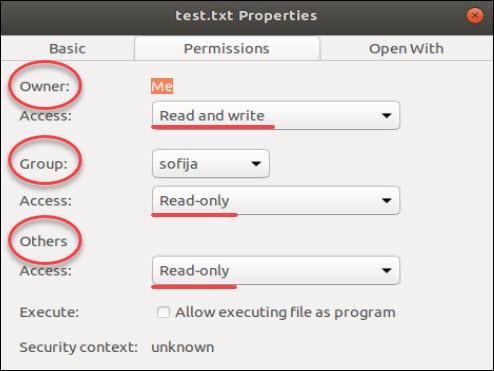
In our example, the owner of the file test.txt has access to “Read and write”, while other members of its group, as well as all other users, have “Read-only” access. Therefore, they can only open the file, but cannot make any modifications.
To alter the file configuration, the user can open the drop-down menu for each category and select the desired permission.
Additionally, you can make the file executable, allowing it to run as a program, by checking the Execute box.
Check Permissions in Command-Line with Ls Command
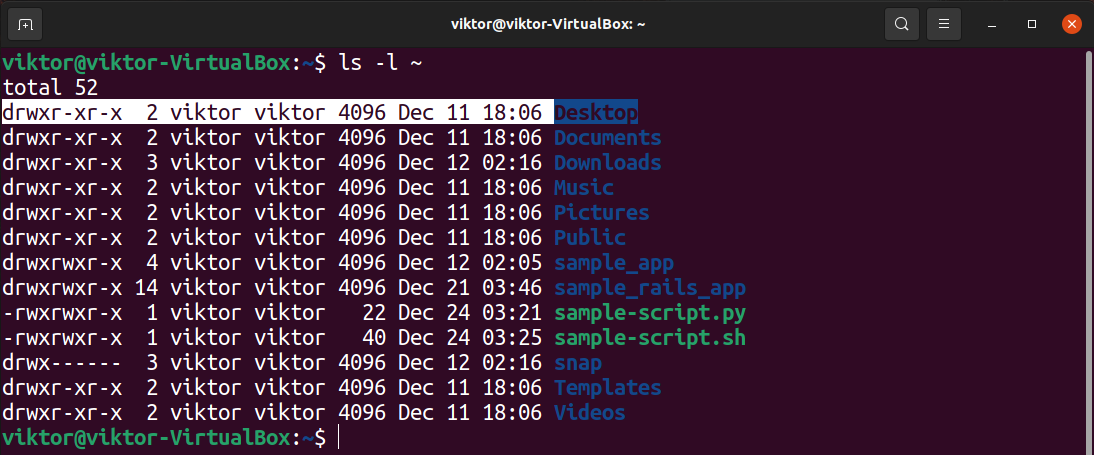
If you prefer using the command line, you can easily find a file’s permission settings with the ls command, used to list information about files/directories. You can also add the –l option to the command to see the information in the long list format.
To check the permission configuration of a file, use the command:
For instance, the command for the previously mentioned file would be:

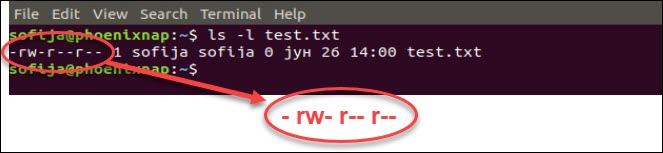
As seen in the image above, the output provides the following information:
- file permission
- the owner (creator) of the file
- the group to which that owner belongs to
- the date of creation.
It shows the permission settings, grouped in a string of characters (-, r, w, x) classified into four sections:
- File type. There are three possibilities for the type. It can either be a regular file (–), a directory (d) or a link (i).
- File permission of the user (owner)
- File permission of the owner’s group
- File permission of other users
The characters r, w, and x stand for read, write, and execute.
The categories can have all three privileges, just specific ones, or none at all (represented by –, for denied).
Users that have reading permission can see the content of a file (or files in a directory). However, they cannot modify it (nor add/remove files in a directory). On the other hand, those who have writing privileges can edit (add and remove) files. Finally, being able to execute means the user can run the file. This option is mainly used for running scripts.
In the previous example, the output showed that test.txt is a regular file with read and write permission assigned to the owner, but gives read-only access to the group and others.
Using Chmod Command to Change File Permissions
As all Linux users, you will at some point need to modify the permission settings of a file/directory. The command that executes such tasks is the chmod command.
chmod [permission] [file_name]There are two ways to define permission:
- using symbols (alphanumerical characters)
- using the octal notation method
Define File Permission with Symbolic Mode
To specify permission settings using alphanumerical characters, you’ll need to define accessibility for the user/owner (u), group (g), and others (o).
Type the initial letter for each class, followed by the equal sign (=) and the first letter of the read (r), write (w) and/or execute (x) privileges.
To set a file, so it is public for reading, writing, and executing, the command is:
chmod u=rwx,g=rwx,o=rwx [file_name]To set permission as in the previously mentioned test.txt to be:
• read and write for the user
• read for the members of the group
• read for other users
Use the following command:
Note: There is no space between the categories; we only use commas to separate them.
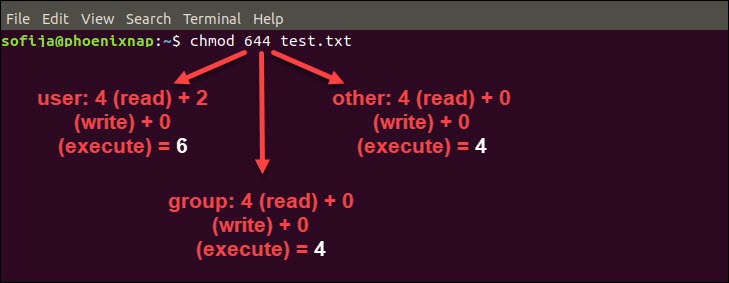
Another way to specify permission is by using the octal/numeric format. This option is faster, as it requires less typing, although it is not as straightforward as the previous method.
Instead of letters, the octal format represents privileges with numbers:
The privileges are summed up and depicted by one number. Therefore, the possibilities are:
- 7 – for read, write, and execute permission
- 6 – for read and write privileges
- 5 – for read and execute privileges
- 4 – for read privileges
As you have to define permission for each category (user, group, owner), the command will include three (3) numbers (each representing the summation of privileges).
For instance, let’s look at the test.txt file that we symbolically configured with the chmod u=rw,g=r,o=r test.txt command.
The same permission settings can be defined using the octal format with the command:
Define File Permission in Octal/Numeric Mode
Note: If you need a more in-depth guide on how to use Chmod In Linux to change file permissions recursively, read our Chmod Recursive guide.
Changing User File and Group Ownership
Aside from changing file permissions, you may come across a situation that requires changing the user file ownership or even group ownership.
Performing either of these tasks requires you first need to switch to superuser privileges. Use one of the options outlined in the previous passage.
To change the file ownership use the chown command:
chown [user_name] [file_name]Instead of [user_name] type in the name of the user who will be the new owner of the file.
To change the group ownership type in the following command:
chgrp [group_name] [file_name]Instead of [group_name] type in the name of the group that will be the new owner of the file.
Learning how to check and change permissions of Linux files and directories are basic commands all users should master. To change file’s group permissions, you might find helpful our article on how to use the chgrp command.
No matter whether you prefer using the GUI or command-line, this article should help you better understand how to use file permissions.