- 12 Linux Chown Command Examples to Change Owner and Group
- 1. Change the owner of a file
- 2. Change the group of a file
- 3. Change both owner and the group
- 4. Using chown command on symbolic link file
- 5. Using chown command to forcefully change the owner/group of symbolic file.
- 6. Change owner only if a file is owned by a particular user
- 7. Change group only if a file already belongs to a certain group
- 8. Copy the owner/group settings from one file to another
- 9. Change the owner/group of the files by traveling the directories recursively
- 10. Using chown command on a symbolic link directory
- 11. Using chown to forcefully change the owner/group of a symbolic link directory recursively
- 12. List all the changes made by the chown command
- Команда chown Linux
- Команда chown Linux
- 1. Синтаксис и опции
- 2. Использование chown
- Выводы
12 Linux Chown Command Examples to Change Owner and Group
The concept of owner and groups for files is fundamental to Linux. Every file is associated with an owner and a group. You can use chown and chgrp commands to change the owner or the group of a particular file or directory.
In this article, we will discuss the ‘chown’ command as it covers most part of the ‘chgrp’ command also. Even if you already know this command, probably one of the examples mentioned below might be new to you.
1. Change the owner of a file
# ls -lart tmpfile -rw-r--r-- 1 himanshu family 0 2012-05-22 20:03 tmpfile # chown root tmpfile # ls -l tmpfile -rw-r--r-- 1 root family 0 2012-05-22 20:03 tmpfile
2. Change the group of a file
# ls -l tmpfile -rw-r--r-- 1 himanshu family 0 2012-05-22 20:03 tmpfile # chown :friends tmpfile # ls -l tmpfile -rw-r--r-- 1 himanshu friends 0 2012-05-22 20:03 tmpfile
If you observe closely, the group of the file changed from ‘family’ to ‘friends’. So we see that by just adding a ‘:’ followed by the new group name, the group of the file can be changed.
3. Change both owner and the group
# ls -l tmpfile -rw-r--r-- 1 root family 0 2012-05-22 20:03 tmpfile # chown himanshu:friends tmpfile # ls -l tmpfile -rw-r--r-- 1 himanshu friends 0 2012-05-22 20:03 tmpfile
4. Using chown command on symbolic link file
# ls -l tmpfile_symlnk lrwxrwxrwx 1 himanshu family 7 2012-05-22 20:03 tmpfile_symlnk -> tmpfile
So we see that the symbolic link ‘tmpfile_symlink’ links to the file ‘tmpfile’. Lets see what happens if chown command is issued on a symbolic link:
# chown root:friends tmpfile_symlnk # ls -l tmpfile_symlnk lrwxrwxrwx 1 himanshu family 7 2012-05-22 20:03 tmpfile_symlnk -> tmpfile # ls -l tmpfile -rw-r--r-- 1 root friends 0 2012-05-22 20:03 tmpfile
When the chown command was issued on symbolic link to change the owner as well as the group then its the referent of the symbolic link ie ‘tmpfile’ whose owner and group got changed. This is the default behavior of the chown command. Also, there exists a flag ‘–dereference’ for the same.
5. Using chown command to forcefully change the owner/group of symbolic file.
# ls -l tmpfile_symlnk lrwxrwxrwx 1 himanshu family 7 2012-05-22 20:03 tmpfile_symlnk -> tmpfile # chown -h root:friends tmpfile_symlnk # ls -l tmpfile_symlnk lrwxrwxrwx 1 root friends 7 2012-05-22 20:03 tmpfile_symlnk -> tmpfile
6. Change owner only if a file is owned by a particular user
Using chown “–from” flag, you can change the owner of a file, only if that file is already owned by a particular owner.
# ls -l tmpfile -rw-r--r-- 1 root friends 0 2012-05-22 20:03 tmpfile # chown --from=guest himanshu tmpfile # ls -l tmpfile -rw-r--r-- 1 root friends 0 2012-05-22 20:03 tmpfile # chown --from=root himanshu tmpfile # ls -l tmpfile -rw-r--r-- 1 himanshu friends 0 2012-05-22 20:03 tmpfile
- In the example above, we verified that the original owner/group of the file ‘tmpfile’ was root/friends.
- Next we used the ‘–from’ flag to change the owner to ‘himanshu’ but only if the existing owner is ‘guest’.
- Now, as the existing owner was not ‘guest’. So, the command failed to change the owner of the file.
- Next we tried to change the owner if the existing owner is ‘root’ (which was true) and this time command was successful and the owner was changed to ‘himanshu’.
On a related note, if you want to change the permission of a file, you should use chmod command.
If you are a beginner, you should start by reading the basics of file permissions.
7. Change group only if a file already belongs to a certain group
Here also the flag ‘–from’ is used but in the following way:
# ls -l tmpfile -rw-r--r-- 1 himanshu friends 0 2012-05-22 20:03 tmpfile # chown --from=:friends :family tmpfile # ls -l tmpfile -rw-r--r-- 1 himanshu family 0 2012-05-22 20:03 tmpfile
Since the file ‘tmpfile’ actually belonged to group ‘friends’ so the condition was correct and the command was successful.
So we see that by using the flag ‘–from=:’ we can change the group under a particular condition.
NOTE: By following the template ‘–from=:’, condition on both the owner and group can be applied.
8. Copy the owner/group settings from one file to another
This is possible by using the ‘–reference’ flag.
# ls -l file -rwxr-xr-x 1 himanshu family 8968 2012-04-09 07:10 file # ls -l tmpfile -rw-r--r-- 1 root friends 0 2012-05-22 20:03 tmpfile # chown --reference=file tmpfile # ls -l tmpfile -rw-r--r-- 1 himanshu family 0 2012-05-22 20:03 tmpfile
In the above example, we first checked the owner/group of the reference-file ‘file’ and then checked the owner/group of the target-file ‘tmpfile’. Both were different. Then we used the chown command with the ‘–reference’ option to apply the owner/group settings from the reference file to the target file. The command was successful and the owner/group settings of ‘tmpfile’ were made similar to the ‘file’.
9. Change the owner/group of the files by traveling the directories recursively
This is made possible by the ‘-R’ option.
# ls -l linux/linuxKernel -rw-r--r-- 1 root friends 0 2012-05-22 21:52 linux/linuxKernel # ls -l linux/ubuntu/ub10 -rw-r--r-- 1 root friends 0 2012-05-22 21:52 linux/ubuntu/ub10 # ls -l linux/redhat/rh7 -rw-r--r-- 1 root friends 0 2012-05-22 21:52 linux/redhat/rh7 # chown -R himanshu:family linux/ # ls -l linux/redhat/rh7 -rw-r--r-- 1 himanshu family 0 2012-05-22 21:52 linux/redhat/rh7 # ls -l linux/ubuntu/ub10 -rw-r--r-- 1 himanshu family 0 2012-05-22 21:52 linux/ubuntu/ub10 # ls -l linux/linuxKernel -rw-r--r-- 1 himanshu family 0 2012-05-22 21:52 linux/linuxKernel
So we see that after checking the owner/group of all the files in the directory ‘linux’ and its two sub-directories ‘ubuntu’ and ‘redhat’. We issued the chown command with the ‘-R’ option to change both the owner and group. The command was successful and owner/group of all the files was changed successfully.
10. Using chown command on a symbolic link directory
Lets see what happens if we issue the ‘chown’ command to recursively change the owner/group of files in a directory that is a symbolic link to some other directory.
Here is a symbolic link directory ‘linux_symlnk’ that links to the directory ‘linux’ (already used in example ‘9’ above) :
$ ls -l linux_symlnk lrwxrwxrwx 1 himanshu family 6 2012-05-22 22:02 linux_symlnk -> linux/
Now, lets change the owner (from himanshu to root) of this symbolic link directory recursively :
# chown -R root:friends linux_symlnk # ls -l linux_symlnk/ -rw-r--r-- 1 himanshu friends 0 2012-05-22 21:52 linuxKernel drwxr-xr-x 2 himanshu friends 4096 2012-05-22 21:52 redhat drwxr-xr-x 2 himanshu friends 4096 2012-05-22 21:52 ubuntu
In the ouput above we see that the owner of the files and directories was not changed. This is because by default the ‘chown’ command cannot traverse a symbolic link. This is the default behavior but there is also a flag ‘-P’ for this.
11. Using chown to forcefully change the owner/group of a symbolic link directory recursively
This can be achieved by using the flag -H
# chown -R -H guest:family linux_symlnk # ls -l linux_symlnk/ total 8 -rw-r--r-- 1 guest family 0 2012-05-22 21:52 linuxKernel drwxr-xr-x 2 guest family 4096 2012-05-22 21:52 redhat drwxr-xr-x 2 guest family 4096 2012-05-22 21:52 ubuntu
So we see that by using the -H flag, the owner/group of all the files/folder were changed.
12. List all the changes made by the chown command
Use the verbose option -v, which will display whether the ownership of the file was changed or retained as shown below.
# chown -v -R guest:friends linux changed ownership of `linux/redhat/rh7' to guest:friends changed ownership of `linux/redhat' retained to guest:friends ownership of `linux/redhat_sym' retained as guest:friends ownership of `linux/ubuntu_sym' retained as guest:friends changed ownership of `linux/linuxKernel' to guest:friends changed ownership of `linux/ubuntu/ub10' to guest:friends ownership of `linux/ubuntu' retained as guest:friends ownership of `linux' retained as guest:friends
Команда chown Linux
Основа философии Linux — все объекты операционной системы — это файлы, для предоставления доступа к тем или иным возможностям системы мы просто даем доступ пользователю к нужным файлам или убираем. Я более подробно рассказывал обо всех правах в статье права доступа к файлам в Linux, здесь же скажу только что у каждого файла есть три группы прав: для владельца, группы и всех остальных.
При создании файла ему тот пользователь, от имени которого он был создан становится его владельцем, а группой устанавливается основная группа владельца. Но владельца файла и группу можно менять, для этого используются команды chown и chgrp. В этой статье будет рассмотрена команда chown linux, а также основные примеры её использования.
Команда chown Linux
1. Синтаксис и опции
Синтаксис chown, как и других подобных команд linux очень прост:
$ chown пользователь опции /путь/к/файлу
В поле пользователь надо указать пользователя, которому мы хотим передать файл. Также можно указать через двоеточие группу, например, пользователь:группа. Тогда изменится не только пользователь, но и группа. Вот основные опции, которые могут вам понадобиться:
- -c, —changes — подробный вывод всех выполняемых изменений;
- -f, —silent, —quiet — минимум информации, скрыть сообщения об ошибках;
- —dereference — изменять права для файла к которому ведет символическая ссылка вместо самой ссылки (поведение по умолчанию);
- -h, —no-dereference — изменять права символических ссылок и не трогать файлы, к которым они ведут;
- —from — изменять пользователя только для тех файлов, владельцем которых является указанный пользователь и группа;
- -R, —recursive — рекурсивная обработка всех подкаталогов;
- -H — если передана символическая ссылка на директорию — перейти по ней;
- -L — переходить по всем символическим ссылкам на директории;
- -P — не переходить по символическим ссылкам на директории (по умолчанию).
Утилита имеет ещё несколько опций, но это самые основные и то большинство из них вам не понадобится. А теперь давайте посмотрим как пользоваться chown.
2. Использование chown
Например, у нас есть несколько папок dir и их владелец пользователь sergiy:

Давайте изменим владельца папки dir1 на root:
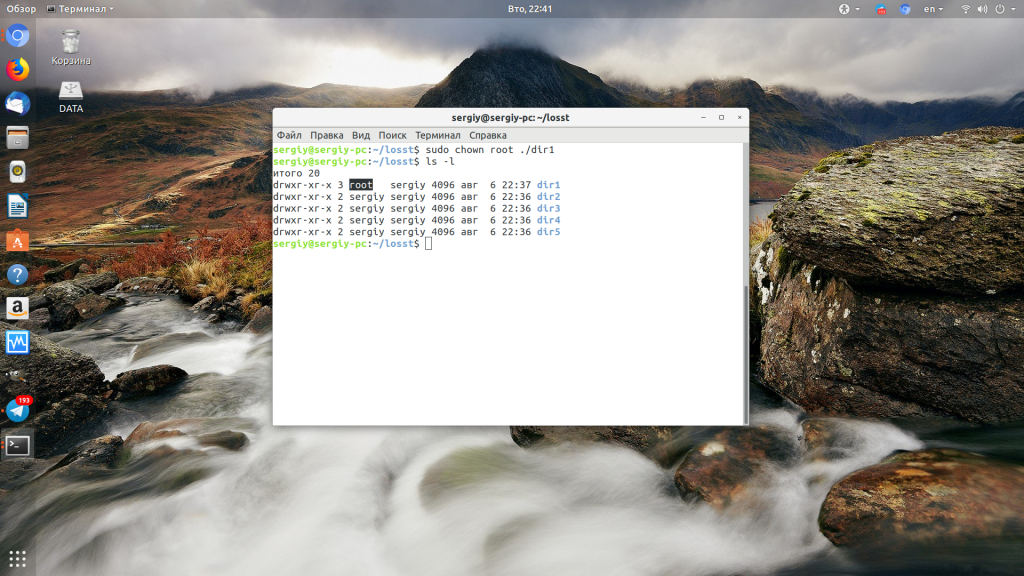
Если вы хотите поменять сразу владельца и группу каталога или файла запишите их через двоеточие, например, изменим пользователя и группу для каталога dir2 на root:

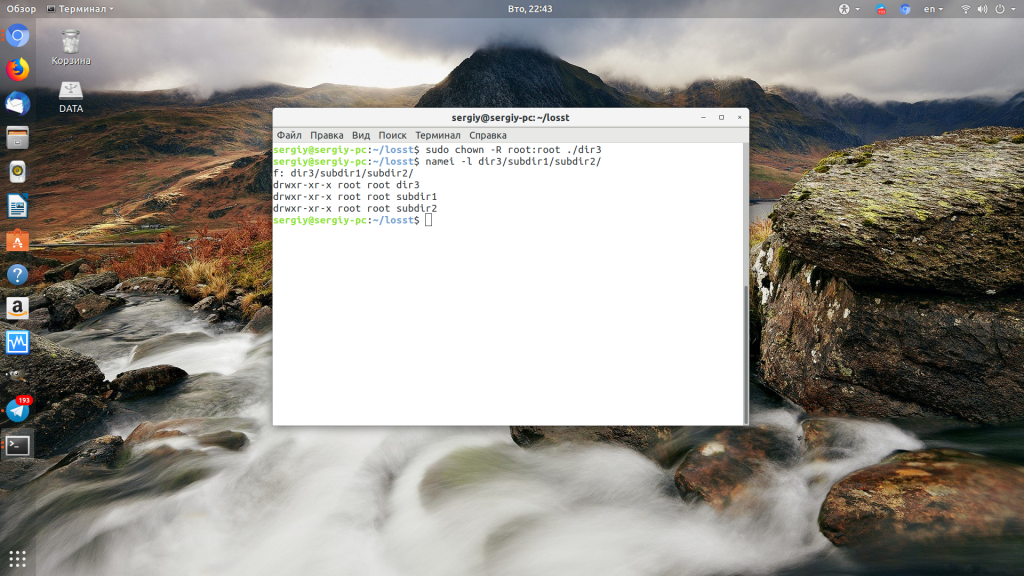
Если вы хотите чтобы изменения применялись не только к этому каталогу, но и ко всем его подкаталогам, добавьте опцию -R:
Дальше давайте изменим группу и владельца на www-data только для тех каталогов и файлов, у которых владелец и группа root в каталоге /dir3:
chown —from=root:root www-data:www-data -cR ./
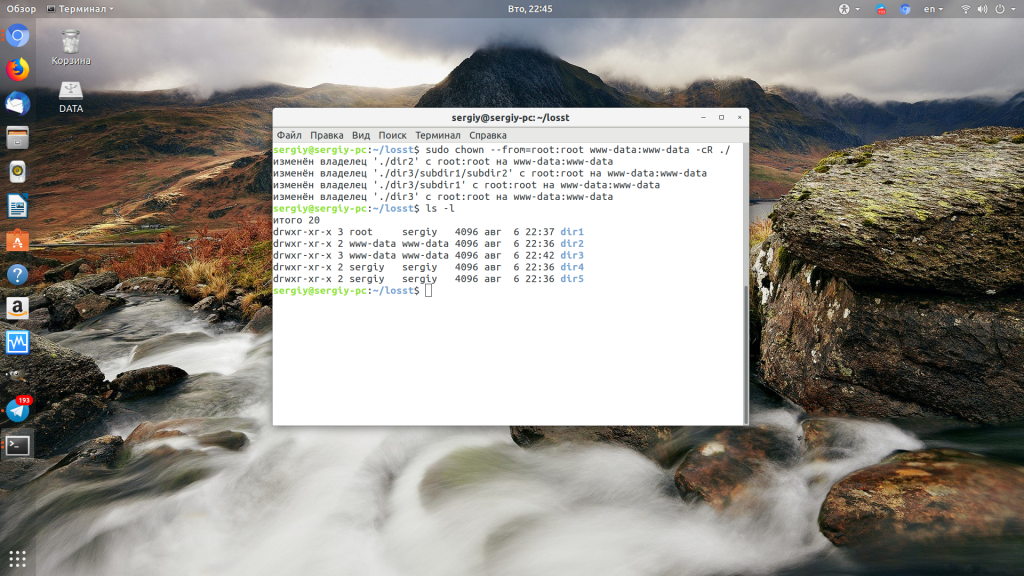
Для обращения к текущему каталогу используйте путь ./. Мы его использовали и выше. Далее указываем нужную группу с помощью опции —from и просим утилиту выводить изменения, которые она делает в файловой системе с помощью опции -c.
Выводы
Команда chown очень простая и позволяет только менять владельца и группу. Если вы хотите более подробно настроить права для владельца, группы и всех остальных, вам понадобится команда chmod. Права — довольно частая проблема при настройке работы различных программ, знание двух этих команд плюс ls и namei может помочь исправить много ошибок.
Обнаружили ошибку в тексте? Сообщите мне об этом. Выделите текст с ошибкой и нажмите Ctrl+Enter.