- Команда chown в Linux
- Синтаксис
- Примеры
- Рекурсивно массово меняем права на папки и файлы
- How To Chown Recursively In Linux?
- chmod Recursive Syntax
- List Owner Users and Groups
- Change Owner User chown Recursively
- Change Owner Group chown Recursively
- Change Owner User and Group chown Recursively
- How to Chown Recursively in Linux
- Ownership in Linux
- Lab setup to explore using the chown command with the -R option
- Change owner
- Change owner and group
- Conclusion
Команда chown в Linux
В операционной системе Линукс множество пользователей и групп. При создании файла тот администратор, от чьего имени он был образован, становится его владельцем, который находится в собственной группе, но также может объединяться с другими. Утилита сhown (ее название произошло от сочетания слов «change» и «mode») позволяет изменять владельца или группу у папок и файлов. Когда меняется владелец, он получает возможность использовать иные возможности доступа и ограничить его для остальных администраторов. Подобное разрешение можно задавать при помощи чисел и символов.
Синтаксис
- USER (имя пользователя или идентификатор нового владельца)
- GROUP (название новой группы или ее индекс)
- FILE(s) (наименование одного или нескольких файлов, каталогов, ссылок).
- -c, —changes (подробный отчет о любых произошедших изменениях).
- -f, —silent, —quiet (сокращение данных, удаление сообщений о возможных неполадках).
- —dereference (поменять права для файла, помеченного символической ссылкой).
- -v, —verbose (используется для описания действий и вывода подробных данных о каждом обработанном файле).
- -h, —no-dereference (изменить полномочия касаемо символических ссылок, но оставить неизменными файлы, на которые они указывают).
- —from (изменить пользователя только для тех файлов, владельцем которых являются он и группа).
- -R, —recursive (последовательная обработка всех подкаталогов).
- -H (если передана символическая ссылка на каталог, перейти по ней).
- -L (переходить по всем символическим ссылкам на каталоги).
- -P (не переходить по символическим ссылкам на каталоги) (по умолчанию).
Примеры
Для первого примера изменим владельца «root» папки «katalog» на «ya». Для этого запустим команду без опций, укажем имя пользователя и путь к каталогу.

Меняем владельца и группу одновременно.
Чтобы изменить сразу владельца и группу необходимо применить двоеточие без промежуточных пробелов. Синтаксис данной процедуры такой: USER:GROUP KATALOG.
Для примера изменим владельца и group для каталога «katalog» на «ya» и «nogroup».
chown ya:nogroup /root/katalog

Тоже самое сделаем для документа «dokument».
Бывают ситуации, когда нужно поменять только группу. Для этого, впереди нужно добавить «:». Поменяем группу документа «dokument» на «nogroup».

Рекурсивно массово меняем права на папки и файлы
Чтобы последовательно (алгоритмически) проводить работу со всеми файлами и каталогами, используется аргумент -R (–recursive). Для удобства предварительно зайдем в целевую директорию с помощью команды cd.
Массово поменяем владельца и группу директории «primercataloga» включая вложенные папки и файлы.
ВАЖНО! Если слишком много файлов в каталоге, можно встретить ошибку «bash: /usr/bin/chown: Argument list too long». В таком случае требуется выполнить команду:
Если требуется поменять рекурсивно не только владельца и группу, а еще и права каталога, то используется другая команда chmod с таким же параметром -R (recursive).
Установим в директории /var/www 644. Что означает:
How To Chown Recursively In Linux?

Linux distributions provide the chown command in order to manage file and folder ownership. By using the chmod command single or multiple files and folders ownership can be changed but this also requires root privileges. Even chmod command comes with different options and parameters one of the most used options is the recursive option which will be run given parameter on all current files and folders and their sub-files and sub-folders.
chmod Recursive Syntax
The recursive chown command has the following syntax. Where the -R or —recursive parameter is provided with the user or group name and the path or file information.
- -R or –recursive is used to run the chown command recursively.
- USER is the username that will set the owner user of files and folders for the specified PATH.
- GROUP is the username that will set the owner user of files and folders for the specified PATH.
- PATH is the files or folder where the ownership USER and GROUP information will be changed recursively. Also, multiple PATHs can be provided by delimiting their spaces.
List Owner Users and Groups
Before changing the owner user and group information of the files and folders listing their current owner user and groups will be very useful. We will use the ls command with the -l parameter which will provide detailed information while listing files and folders.
Change Owner User chown Recursively
We can change the owner user of the given path files and folder recursively. We will provide the user name, the path, and recursive information. In the following example, we will change all files and folders under the /home/ismail to the user named ismail . We will also provide the sudo command in order to provide the root privileges to prevent privilege related problems.
We can also provides multiple paths to change owner user information recursively like below. In the following example we will change the paths /home/ismail , /var/ismail , /mnt/disk files and folders owner to the user ismail .
$ sudo -R ismail /home/ismail /var/ismail /mnt/diskChange Owner Group chown Recursively
We can also change the owner group information for the specified path files and folders recursively with the chown command. We will provide the group information as :ismail where we will leave the user part empty.
Like changing the owner user recursively multiple paths can be specified in order to change given paths folders and files recursively.
$ sudo -R :ismail /home/ismail /var/ismail /mnt/diskChange Owner User and Group chown Recursively
We can also use the chown command in order to change the given path file and folder owner user and group information recursively with a single command. We will provide both the user and group information like ismail:dev, where ismail is the user and dev, is the group name.
$ sudo -R ismail:dev /home/ismailAlso we can change multiple paths user and group information in a single command like below.
$ sudo -R ismail:dev /home/ismail /var/ismail /mnt/diskHow to Chown Recursively in Linux
A recursive action affects a file or directory with its subdirectories. We mainly use the -R option to denote a recursive action. chown is the primary command to change ownership.
This tutorial simplifies changing a file’s ownership recursively. It starts by taking you through an overview of file permission and ownership in Linux. It then walks you through changing a file’s owner practically.
Table of Contents
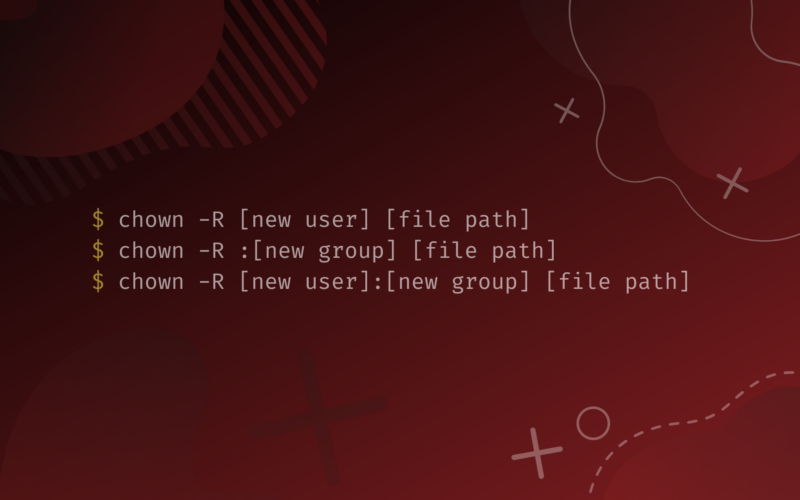
Using the chown command with the -R option
chown -R [new user] [file path]
chown -R :[new group] [file path]
chown -R [new user]:[new group] [file path]
Combining the chown and find commands
find [file path] -name [search pattern] -exec chown [user]:[group] <> \;
Ownership in Linux
This section explains file permissions and ownership in Linux.
File permissions affect users. A user can be a root, regular, or service user. A root user is created automatically during installation and can undertake any administrative role, and is permitted to access any service.
One regular user gets created during the installation of the operation system, while other users can create the rest. The user has fewer privileges on the files and is mainly meant to conduct routine tasks. A service user gets created during the installation of a package. The user executes functions and runs processes.
Users can create or access files according to the read, write, or execute permissions. A file belongs to one user and one group. So, changing the ownership of a file can be done at the user level or the group level. By default, the user who creates a file becomes its owner.
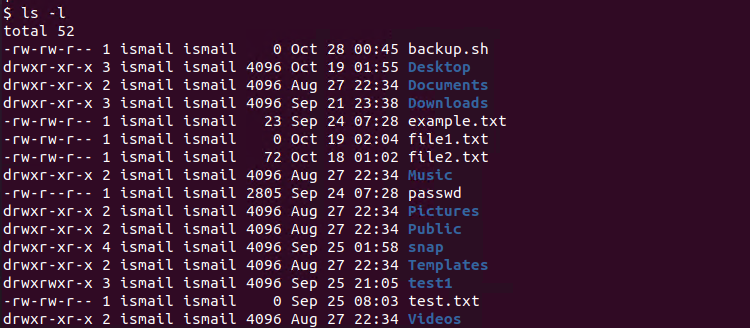
You can know who owns a file or directory by using the ls command with the -l option
Now that you understand file ownership and the commands to check and change it, let’s set up a lab and do it practically.
Lab setup to explore using the chown command with the -R option
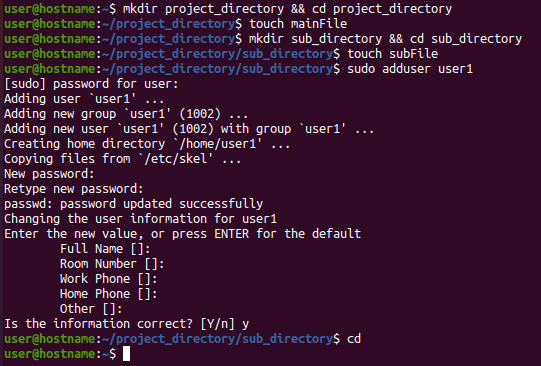
Launch the terminal. First, create the project directory and cd into it. Secondly, create a file and subdirectory with a file.
mkdir project_directory && cd project_directory touch mainFile mkdir sub_directory && cd sub_directory touch subFile
Thirdly, create a new user.
Finally, cd into the home directory in readiness to practice using the changing the files’ ownership recursively.
Change owner
Check the file’s owner
First, let’s print details of the files in the project directory.
total 4 -rw-rw-r-- 1 user user 0 Hag 16 10:41 mainFile drwxrwxr-x 2 user user 4096 Hag 16 10:42 sub_directory
We get a table of nine columns. The third column (first user ) tells the (user) owner of the file, whereas the fourth column (second user ) is the group owning the file.
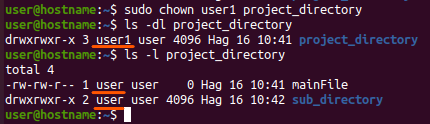
We can also get specific details of a file or directory using the -d option. For example, let’s check who owns the project directory using -d and -l options.
drwxrwxr-x 3 user user 4096 Hag 16 10:41 project_directory
The user owner is called user and the group owner is user . Let’s change its (user) owner to user1 we created in the setup section.
Non recursive change
sudo chown user1 project_directory
Now let’s confirm the change by printing the file’s details.
Sure, the owner of the file changed from user to user1 .
What about the subdirectories? Let’s check that using the ls and -l option.
Although we changed the ownership in the main file, the ownership of the subdirectory was retained.
That is where the -R option comes in to do the recursive change.
Recursive change
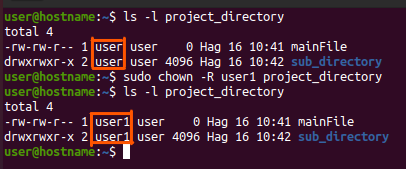
ls -l project_directory sudo chown -R user1 project_directory ls -l project_directory
[email protected]:~$ ls -l project_directory total 4 -rw-rw-r-- 1 user user 0 Hag 16 10:41 mainFile drwxrwxr-x 2 user user 4096 Hag 16 10:42 sub_directory [email protected]:~$ sudo chown -R user1 project_directory [email protected]:~$ ls -l project_directory total 4 -rw-rw-r-- 1 user1 user 0 Hag 16 10:41 mainFile drwxrwxr-x 2 user1 user 4096 Hag 16 10:42 sub_directory
user1 is the new owner of every file in the project directory.
Change owner and group
We can also change the user and the group owning the files in the project directory.
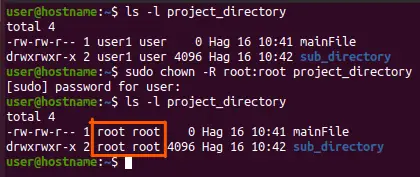
Currently, user1 (user) and user (group) own the files in project_directory . Let’s assign the root user and the root group the ownership of the project directory.
ls -l project_directory sudo chown -R root:root project_directory ls -l project_directory
[email protected]:~$ ls -l project_directory total 4 -rw-rw-r-- 1 user1 user 0 Hag 16 10:41 mainFile drwxrwxr-x 2 user1 user 4096 Hag 16 10:42 sub_directory [email protected]:~$ sudo chown -R root:root project_directory [sudo] password for user: [email protected]:~$ ls -l project_directory total 4 -rw-rw-r-- 1 root root 0 Hag 16 10:41 mainFile drwxrwxr-x 2 root root 4096 Hag 16 10:42 sub_directory
The root user and group now own the entire directory.
Bonus trick
We can also combine the chown and find commands to recursively change the file’s owner.
Assume we want to change the owner of all .py files in a directory. First, add the files in the subdirectory before changing their owner.
touch project_directory/sub_directory/file1.py project_directory/sub_directory/file2.py
You may be denied permission to add content into project_directory because we had earlier transferred their ownership to the root user. If so, run the command with sudo privileges.
sudo touch project_directory/sub_directory/file1.py project_directory/sub_directory/file2.py
Next, change the user and group ownership of every file ending in the .py extension from root to user .
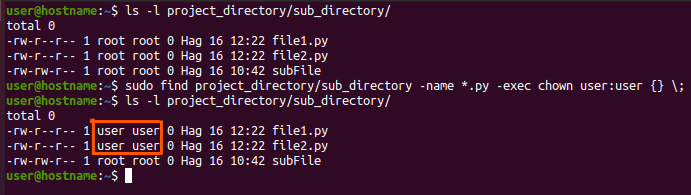
ls -l project_directory/sub_directory/ sudo find project_directory/sub_directory -name *.py -exec chown user:user <> \; ls -l project_directory/sub_directory/
We search for all * files in the subdirectory that end in the .py extension,
sudo find project_directory/sub_directory -name *.py
Then execute the chown command recursively on the match, changing the user and group owner to user and user , respectively.
[email protected]:~$ ls -l project_directory/sub_directory/ total 0 -rw-r--r-- 1 root root 0 Hag 16 12:22 file1.py -rw-r--r-- 1 root root 0 Hag 16 12:22 file2.py -rw-rw-r-- 1 root root 0 Hag 16 10:42 subFile [email protected]:~$ sudo find project_directory/sub_directory -name *.py -exec chown user:user <> \; [email protected]:~$ ls -l project_directory/sub_directory/ total 0 -rw-r--r-- 1 user user 0 Hag 16 12:22 file1.py -rw-r--r-- 1 user user 0 Hag 16 12:22 file2.py -rw-rw-r-- 1 root root 0 Hag 16 10:42 subFile
And voila, user is the new owner of the .py files!
Conclusion
You can recursively change the ownership of a file using the chown command with the -R option. Alternatively, you can use the chown and find commands as shown in this tutorial.
Before that, it would be best to understand ownership and permissions in Linux and ways to check the details of a file.