- How to Install Cisco AnyConnect VPN Client on Ubuntu Linux
- Install Prerequisites
- Install AnyConnect VPN Client
- Install DART
- Cisco any connect linux
- Installing and Using AnyConnect on Ubuntu Desktop using the User Interface
- Objective
- Introduction
- AnyConnect Software Version
- Table of Contents
- Installing AnyConnect Secure Mobility Client v4.9.x
- Prerequisites
- Check these other articles out!
- Applicable Devices | Software Version
- Licensing Information
- Step 1
- Step 2
- Step 3
- Step 4
- Step 5
- Step 6
- Step 7
- Step 8
- Using AnyConnect Secure Mobility Client v4.9.x
- Step 1
- Step 2
- Step 3
- Step 4
- Step 5
- Step 6
- Conclusion
- How to install Cisco Anyconnect VPN on Ubuntu 22.04 LTS | vetechno
- What is Network Manager ?
- Prerequisite
- How to Install network-manager-openconnect-gnome in Ubuntu 22.04 LTS Jammy Jellyfish
- Conclusion
- Frequently Asked Questions
How to Install Cisco AnyConnect VPN Client on Ubuntu Linux
Cisco AnyConnect VPN software allows remote users and employees to securely connect to a Cisco VPN gateway in an enterprise environment.
Employees use the Cisco AnyConnect Secure Mobility Client to establish connectivity to a Cisco SSL VPN server. The connected users or employees are granted access to internal resources if authentication is approved.
This is a widely used and popular VPN server within enterprises. If you’re a Linux user who needs help installing and using AnyConnect, this brief tutorial will show you how.
It shows you how to download and install AnyConnect using Ubuntu 18.04 or 16.04 desktop computers.
When you’re ready to install AnyConnect, follow the steps below:
First, you must be aware that not everyone can download the Cisco AnyConnect VPN client. The software is available to customers with active AnyConnect Apex, Plus, or VPN Only terms/contracts.
Your system/network administrator(s) may have to get a login to Cisco’s portal and download the software for you. or provide you log in to get into the portal.
AnyConnect download location is at the link below:
Install Prerequisites
Some packages will need to be installed before installing AnyConnect. To do that, run the commands below:
sudo apt-get update sudo apt-get install lib32z1 lib32ncurses5
Install AnyConnect VPN Client
After installing the packages above, download the AnyConnect file from its Download location.
Once you have downloaded the AnyConnect VPN tarball, double-click to extract the folder downloaded folder or use the commands below to extract, the current file should be named: anyconnect-linux64-4.7.03052-predeploy-k9.tar.gz.
By default, the file will be downloaded in your home folder ( /home/user/Downloads ), but typically the last used directory of the browser is where automatic downloads are placed.
Run the commands below to extract the downloaded file if you cannot double-click to extract it.
tar xvf anyconnect-linux64-4.7.03052-predeploy-k9.tar.gz
After extracting, open the newly-extracted folder to find the VPN folder. Change into the VPN folder.
Right-click the vpn_install.sh file.
And select Run.
Use the GUI App to install the Cisco AnyConnect VPN client at the root level.
If you can’t install it via the GUI app, run the commands below to install it.
That will install the Cisco AnyConnect VPN client for you.
Install DART
To install Dart, follow the steps below:
First, open the Dart. Folder inside the newly-extract and connect folder.
Right-click the dart_install.sh file.
Then select Run.
Use the GUI App to install the Cisco AnyConnect Diagnostic and Reporting Tool.
If the GUI installation doesn’t work, run the commands below to install it.
That should install AnyConnect for you, including DART. After that, the Cisco AnyConnect Secure Mobility Client should be ready to use.
Now, you have to launch it and connect to the VPN gateway.
You may also like the post below:
Richard W
I love computers; maybe way too much. What I learned I try to share at geekrewind.com.
Cisco any connect linux
В данной статье рассмотрим как установить VPN соединение и подключиться через удаленный рабочий стол на удаленную машину.
Первым делом, открываем терминал и выполняем обновление списка пакетов:
Следующим шагом установим пакет «openconnect», который включает в себя в том числе и клиент cisco anyconnect для linux.
Для установки пакета набираем следующую команду в терминале:
sudo apt-get install network-manager-openconnect-gnome
Установив openconnect, следующим шагом необходимо установить «Remmina» — ПО для подключения к удаленным рабочим столам. Самый простой способ сделать это — установить через стандартное средство «Ubuntu Software» (находим в меню приложений):
Находим «Remmina» через поиск и устанавливаем:
Кликаем по иконке сетевых подключений в меню справа, далее во всплывающем окне щелкаем «Проводная сеть» — «Параметры соединения»:
В окне «Настройки сети» в разделе «VPN» щелкаем по кнопке «Добавить» (в виде плюса):
Появится окно «Добавить VPN», в котором выбираем «Multi-protocol VPN Client Openconnect»:
Далее в окне с настройками указываем название VPN соединения, шлюз и другие необходимые настройки, после заполнения настроек нажимаем кнопку «Добавить»:
Как видим, у нас появилось новое VPN соединение, для его включения передвигаем ползунок вправо:
В окне авторизации вводим группу, логин и пароль, нажимаем кнопку «Login» для входа:
Когда мы подключены к VPN, необходимо выполнить подключение к удаленному рабочему столу. Для этого запускаем Remmina, выбираем протокол RDP, в адресной строке пишем ip-адрес удаленной машины, затем нажимаем «Enter»:
В окне авторизации RDP указываем данные вашей учетной записи с удаленной машины и нажимаем «ОК»:
Если все ок, попадаем на рабочий стол удаленной машины:
Как вы уже убедились, нет ничего сложного в подключении к VPN на Ubuntu.
Installing and Using AnyConnect on Ubuntu Desktop using the User Interface
The documentation set for this product strives to use bias-free language. For the purposes of this documentation set, bias-free is defined as language that does not imply discrimination based on age, disability, gender, racial identity, ethnic identity, sexual orientation, socioeconomic status, and intersectionality. Exceptions may be present in the documentation due to language that is hardcoded in the user interfaces of the product software, language used based on RFP documentation, or language that is used by a referenced third-party product. Learn more about how Cisco is using Inclusive Language.
Objective
The objective of this article is to guide you through installing and using AnyConnect VPN Client v4.9.x on Ubuntu Desktop version 20.04 using the User Interface (UI).
Introduction
AnyConnect Secure Mobility Client is a modular endpoint software product. It not only provides Virtual Private Network (VPN) access through Secure Sockets Layer (SSL) and Internet Protocol Security (IPsec) Internet Key Exchange version2 (IKEv2) but also offers enhanced security through various built-in modules.
AnyConnect Software Version
Table of Contents
Installing AnyConnect Secure Mobility Client v4.9.x
This toggled section provides details and tips for beginners.
Prerequisites
- You need to purchase client license(s) from a partner like CDW or through your company’s device procurement. There are options for 1 user (L-AC-PLS-3Y-S5) or packets of licenses including one year for 25 users (AC-PLS-P-25-S). Other license options available as well, including perpetual licenses. For more details on licensing, check out the links in the Licensing Information section below.
- Download the latest version of firmware available for your router.(Click here for step-by-step instructions on this process.)
- Ubuntu 20.04 (LTS), 18.04 (LTS), and 16.04 (LTS) .
Check these other articles out!
Applicable Devices | Software Version
Licensing Information
AnyConnect client licenses allow the use of the AnyConnect desktop clients as well as any of the AnyConnect mobile clients that are available. You will need a client license to download and use the Cisco AnyConnect Secure Mobility Client. A client license enables the VPN functionality and are sold in packs of 25 from partners like CDW or through your company’s device procurement.
Want to know more about AnyConnect licensing? Here are some resources:
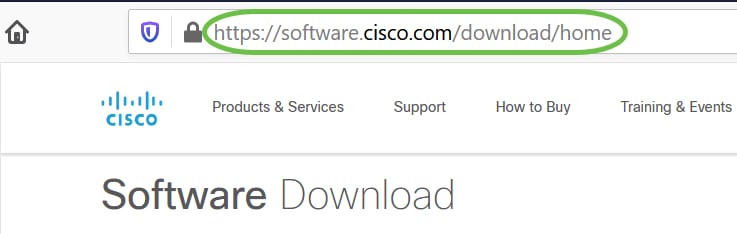
Step 1
Open a web browser and navigate to the Cisco Software Downloads webpage.
Step 2
In the search bar, start typing ‘Anyconnect’ and the options will appear. Select AnyConnect Secure Mobility Client v4.x.
Step 3
Download the Cisco AnyConnect VPN Client. Most users will select the AnyConnect Pre-Deployment Package (Linux 64-bit) option.
The images in this article are for AnyConnect v4.9.x, which was latest version at the time of writing this document.
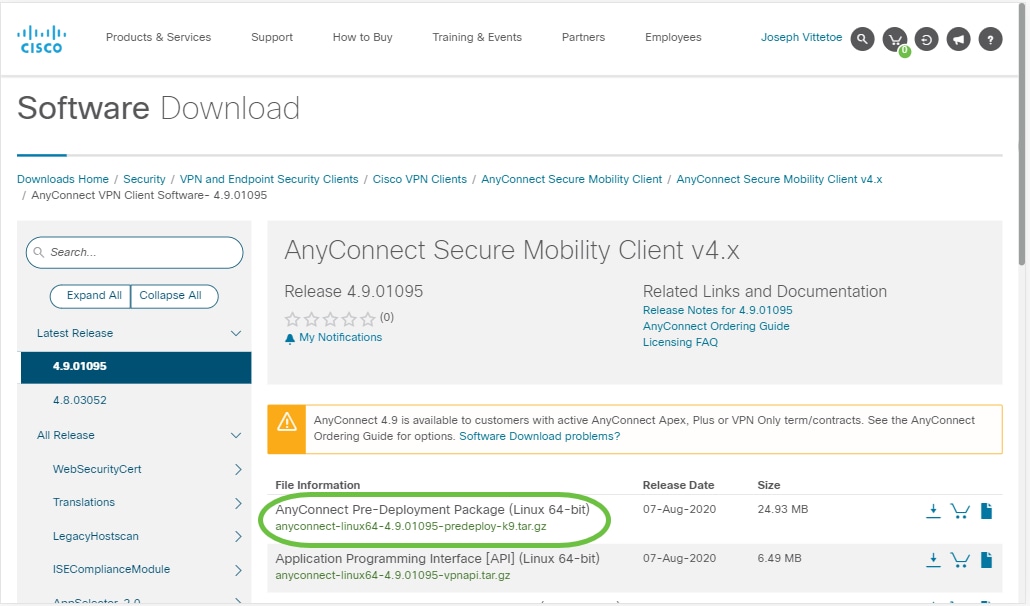
If you purchased a license and you are unable to download AnyConnect, call +1 919-993-2724. Select option 2. You will need to know your Cisco ID (the one you use to log into Cisco.com) and the sales order number when you call. They will get that situation all straightened out.
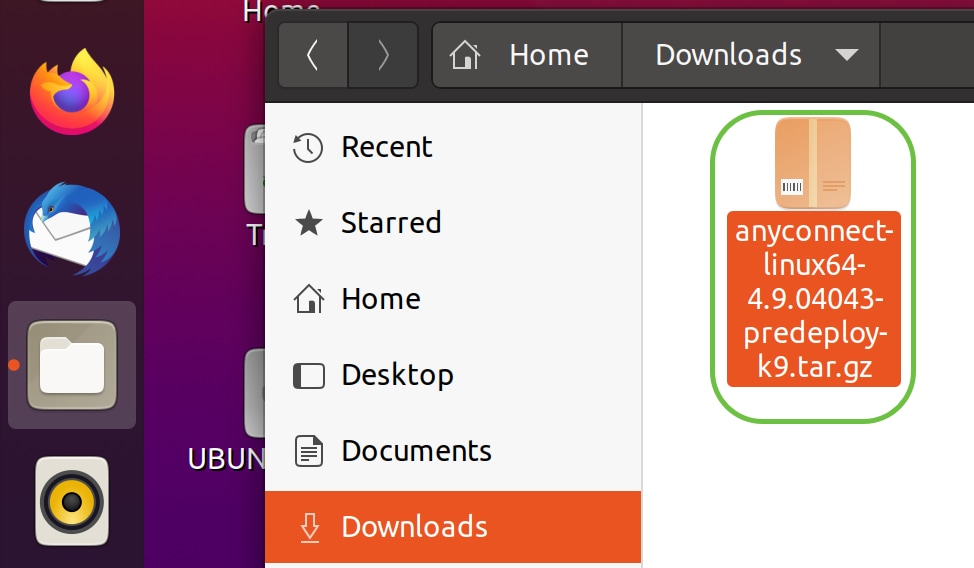
Step 4
Navigate to the folder where you have downloaded the AnyConnect Client Package.
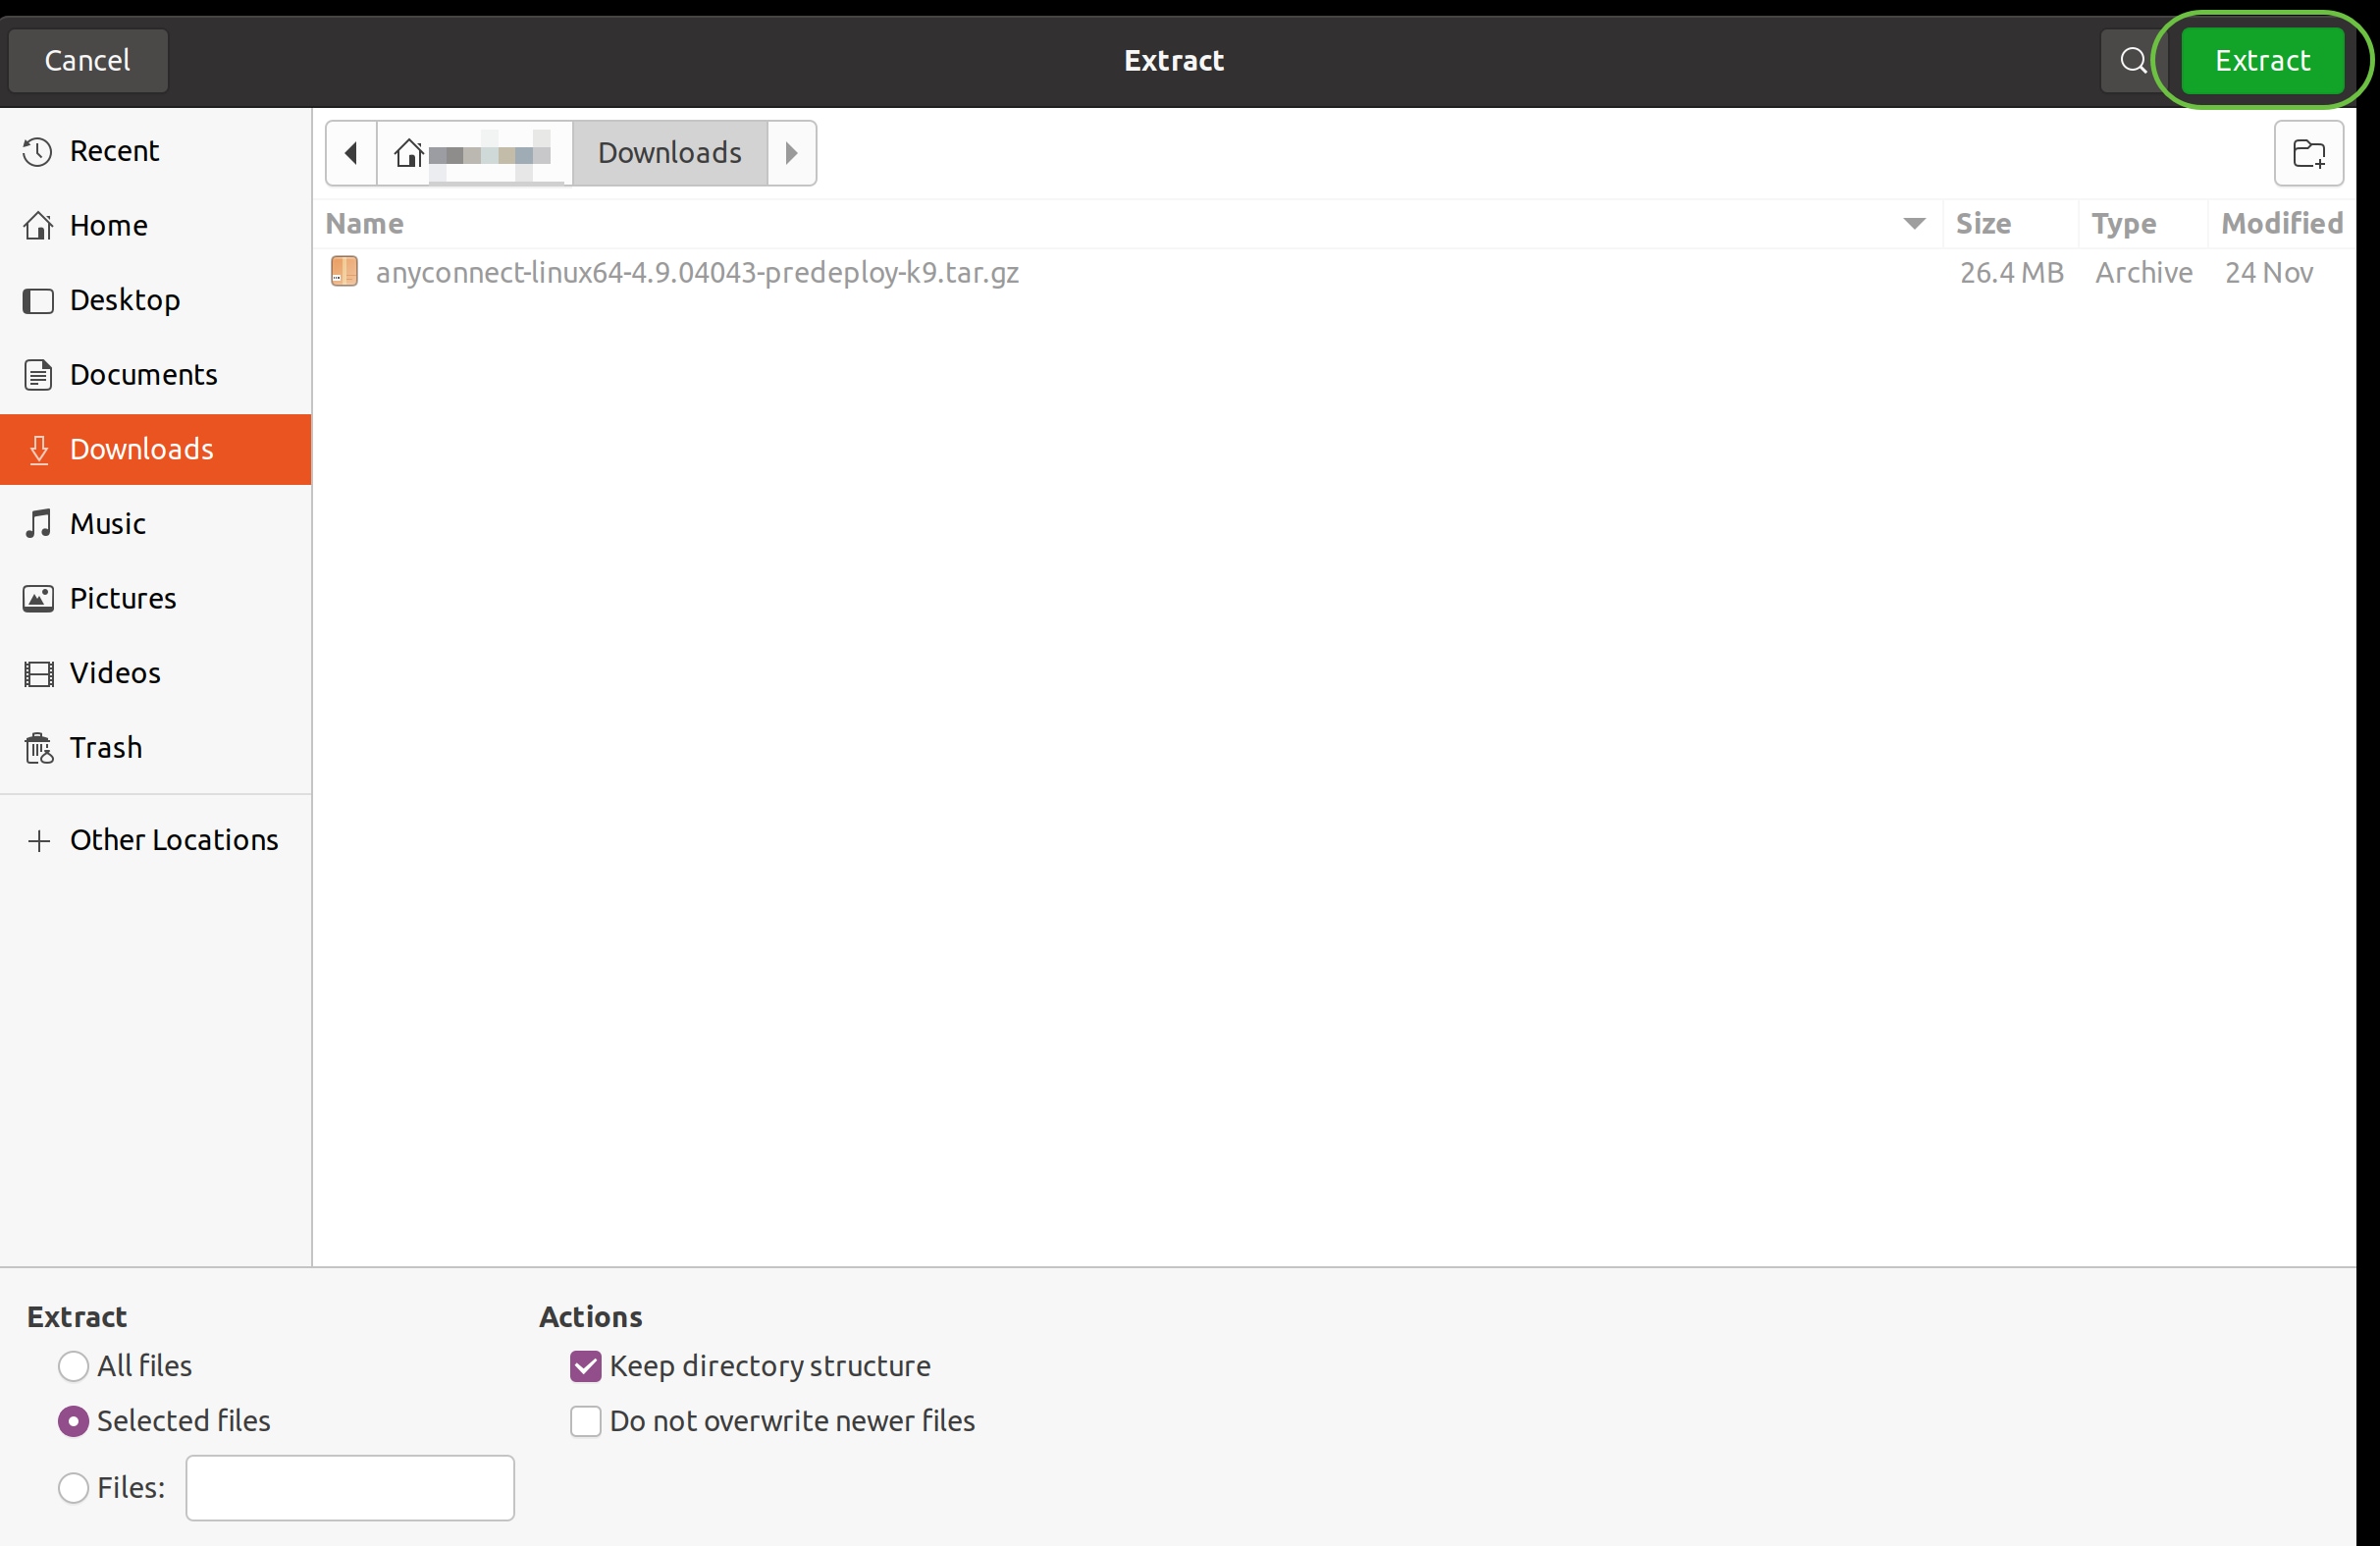
Step 5
The initial download is a tarball archive (*.TAR, several files packed into one), which must be extracted. To extract the files, right- click on the AnyConnect archive and choose Open with Archive Manager. Click Extract.
Step 6
You will see a notification once the extraction is completed. Click Close.

Step 7
Locate the vpn_install.sh file in the extracted folder.
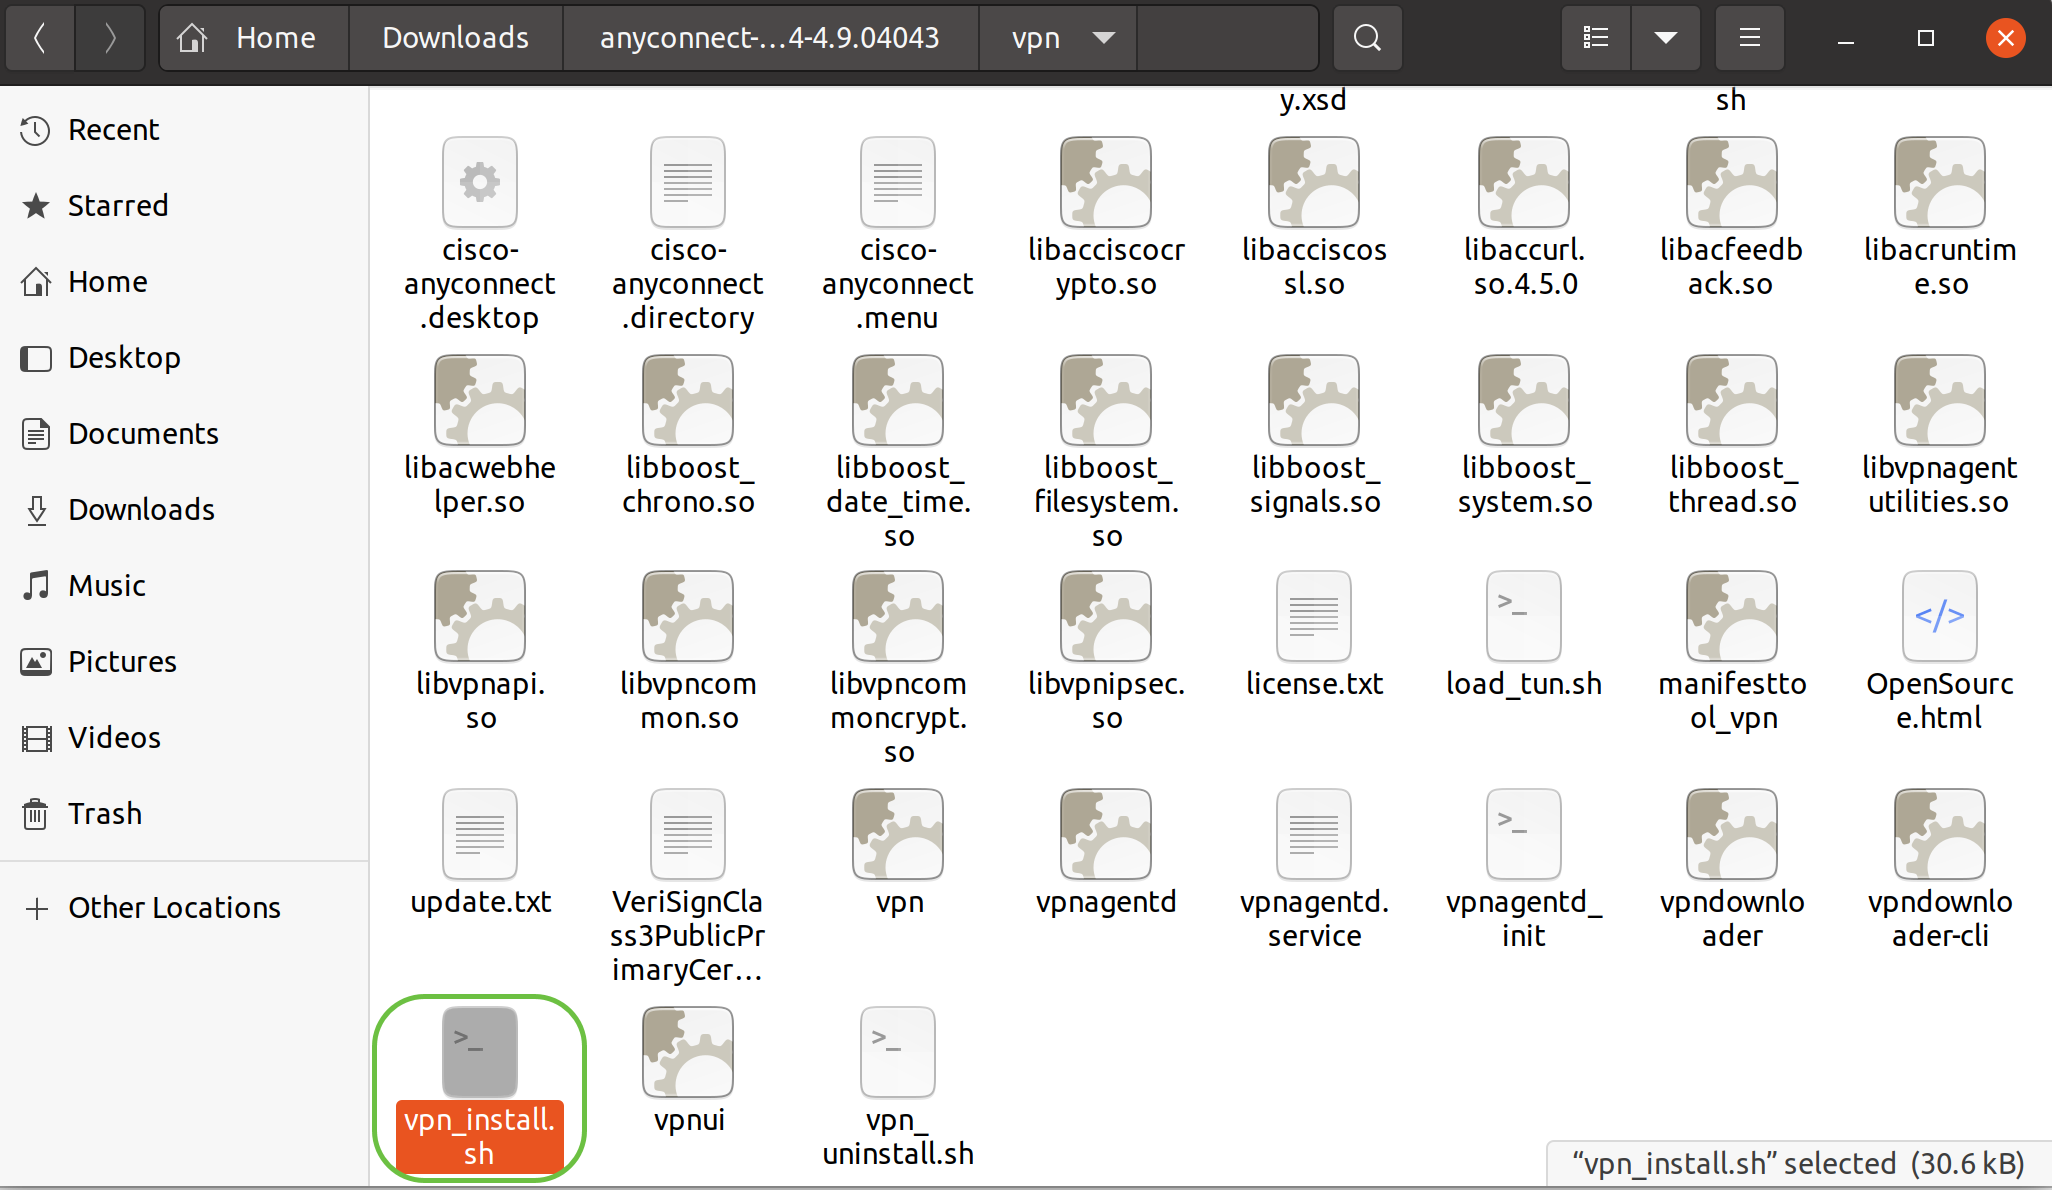
To run the AnyConnect install script, open a Linux Terminal by pressing Ctrl+Alt+T on your keyboard.
Type ‘sudo ./vpn_install.sh’. This will begin the installation process. For more details on the ‘sudo’ command, click here.

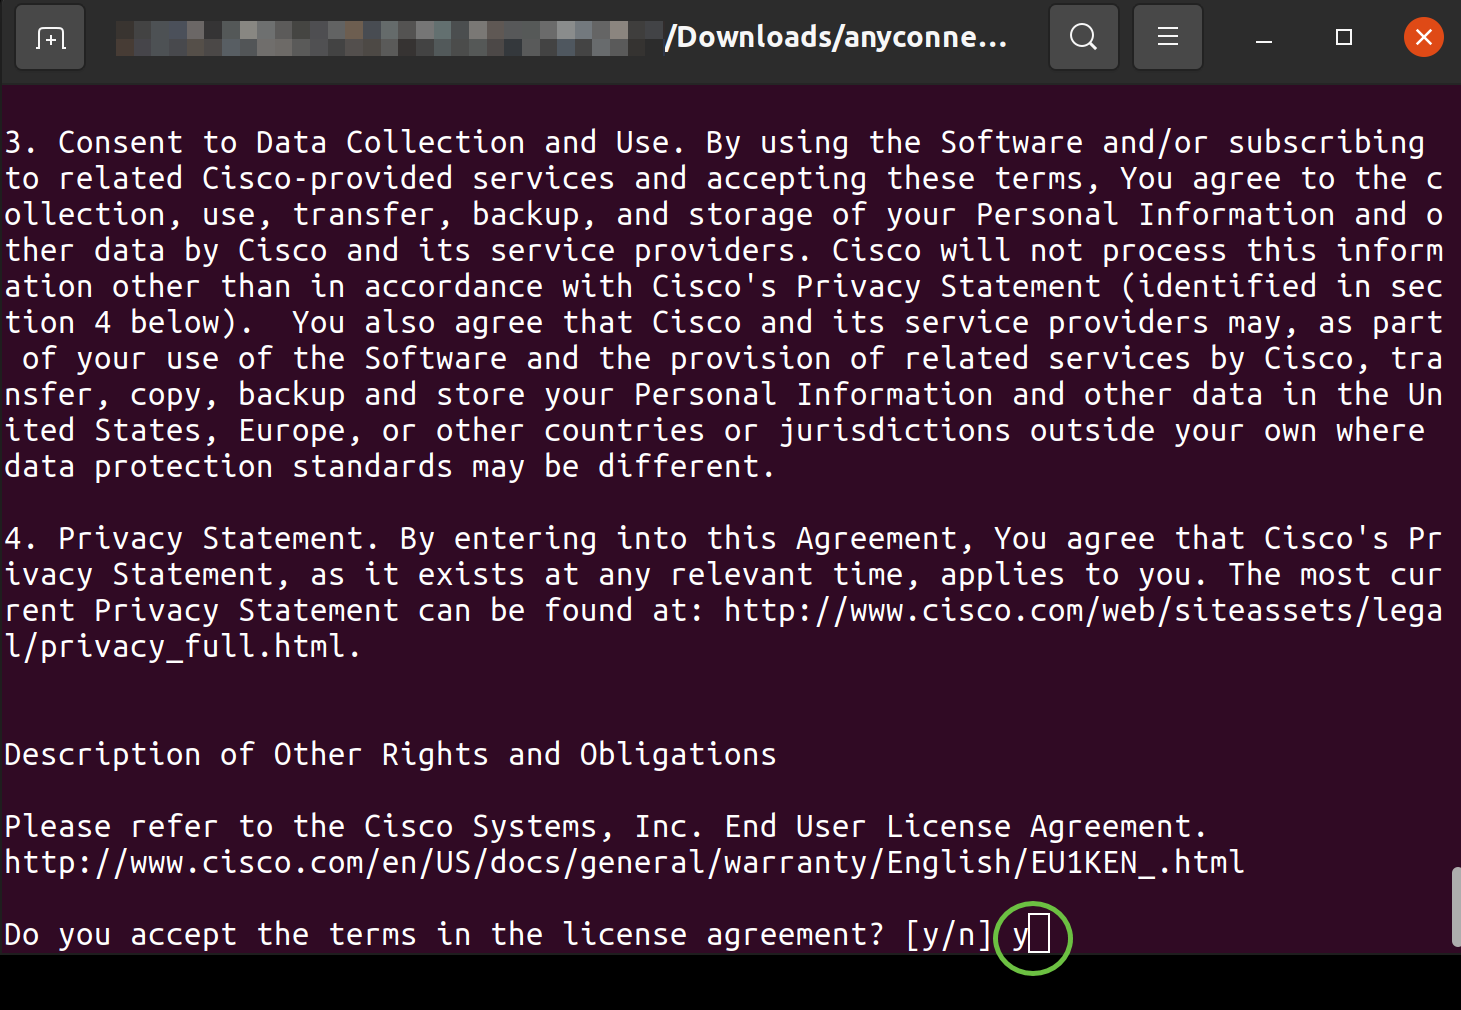
Step 8
Accept the terms in the license agreement to complete the installation by typing ‘y’.
Using AnyConnect Secure Mobility Client v4.9.x
Step 1
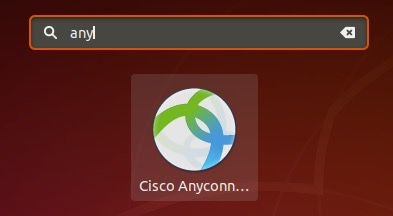
To access the AnyConnect app, click on the start icon (appears as nine dots on the lower left corner). Choose the Cisco Anyconnect app.
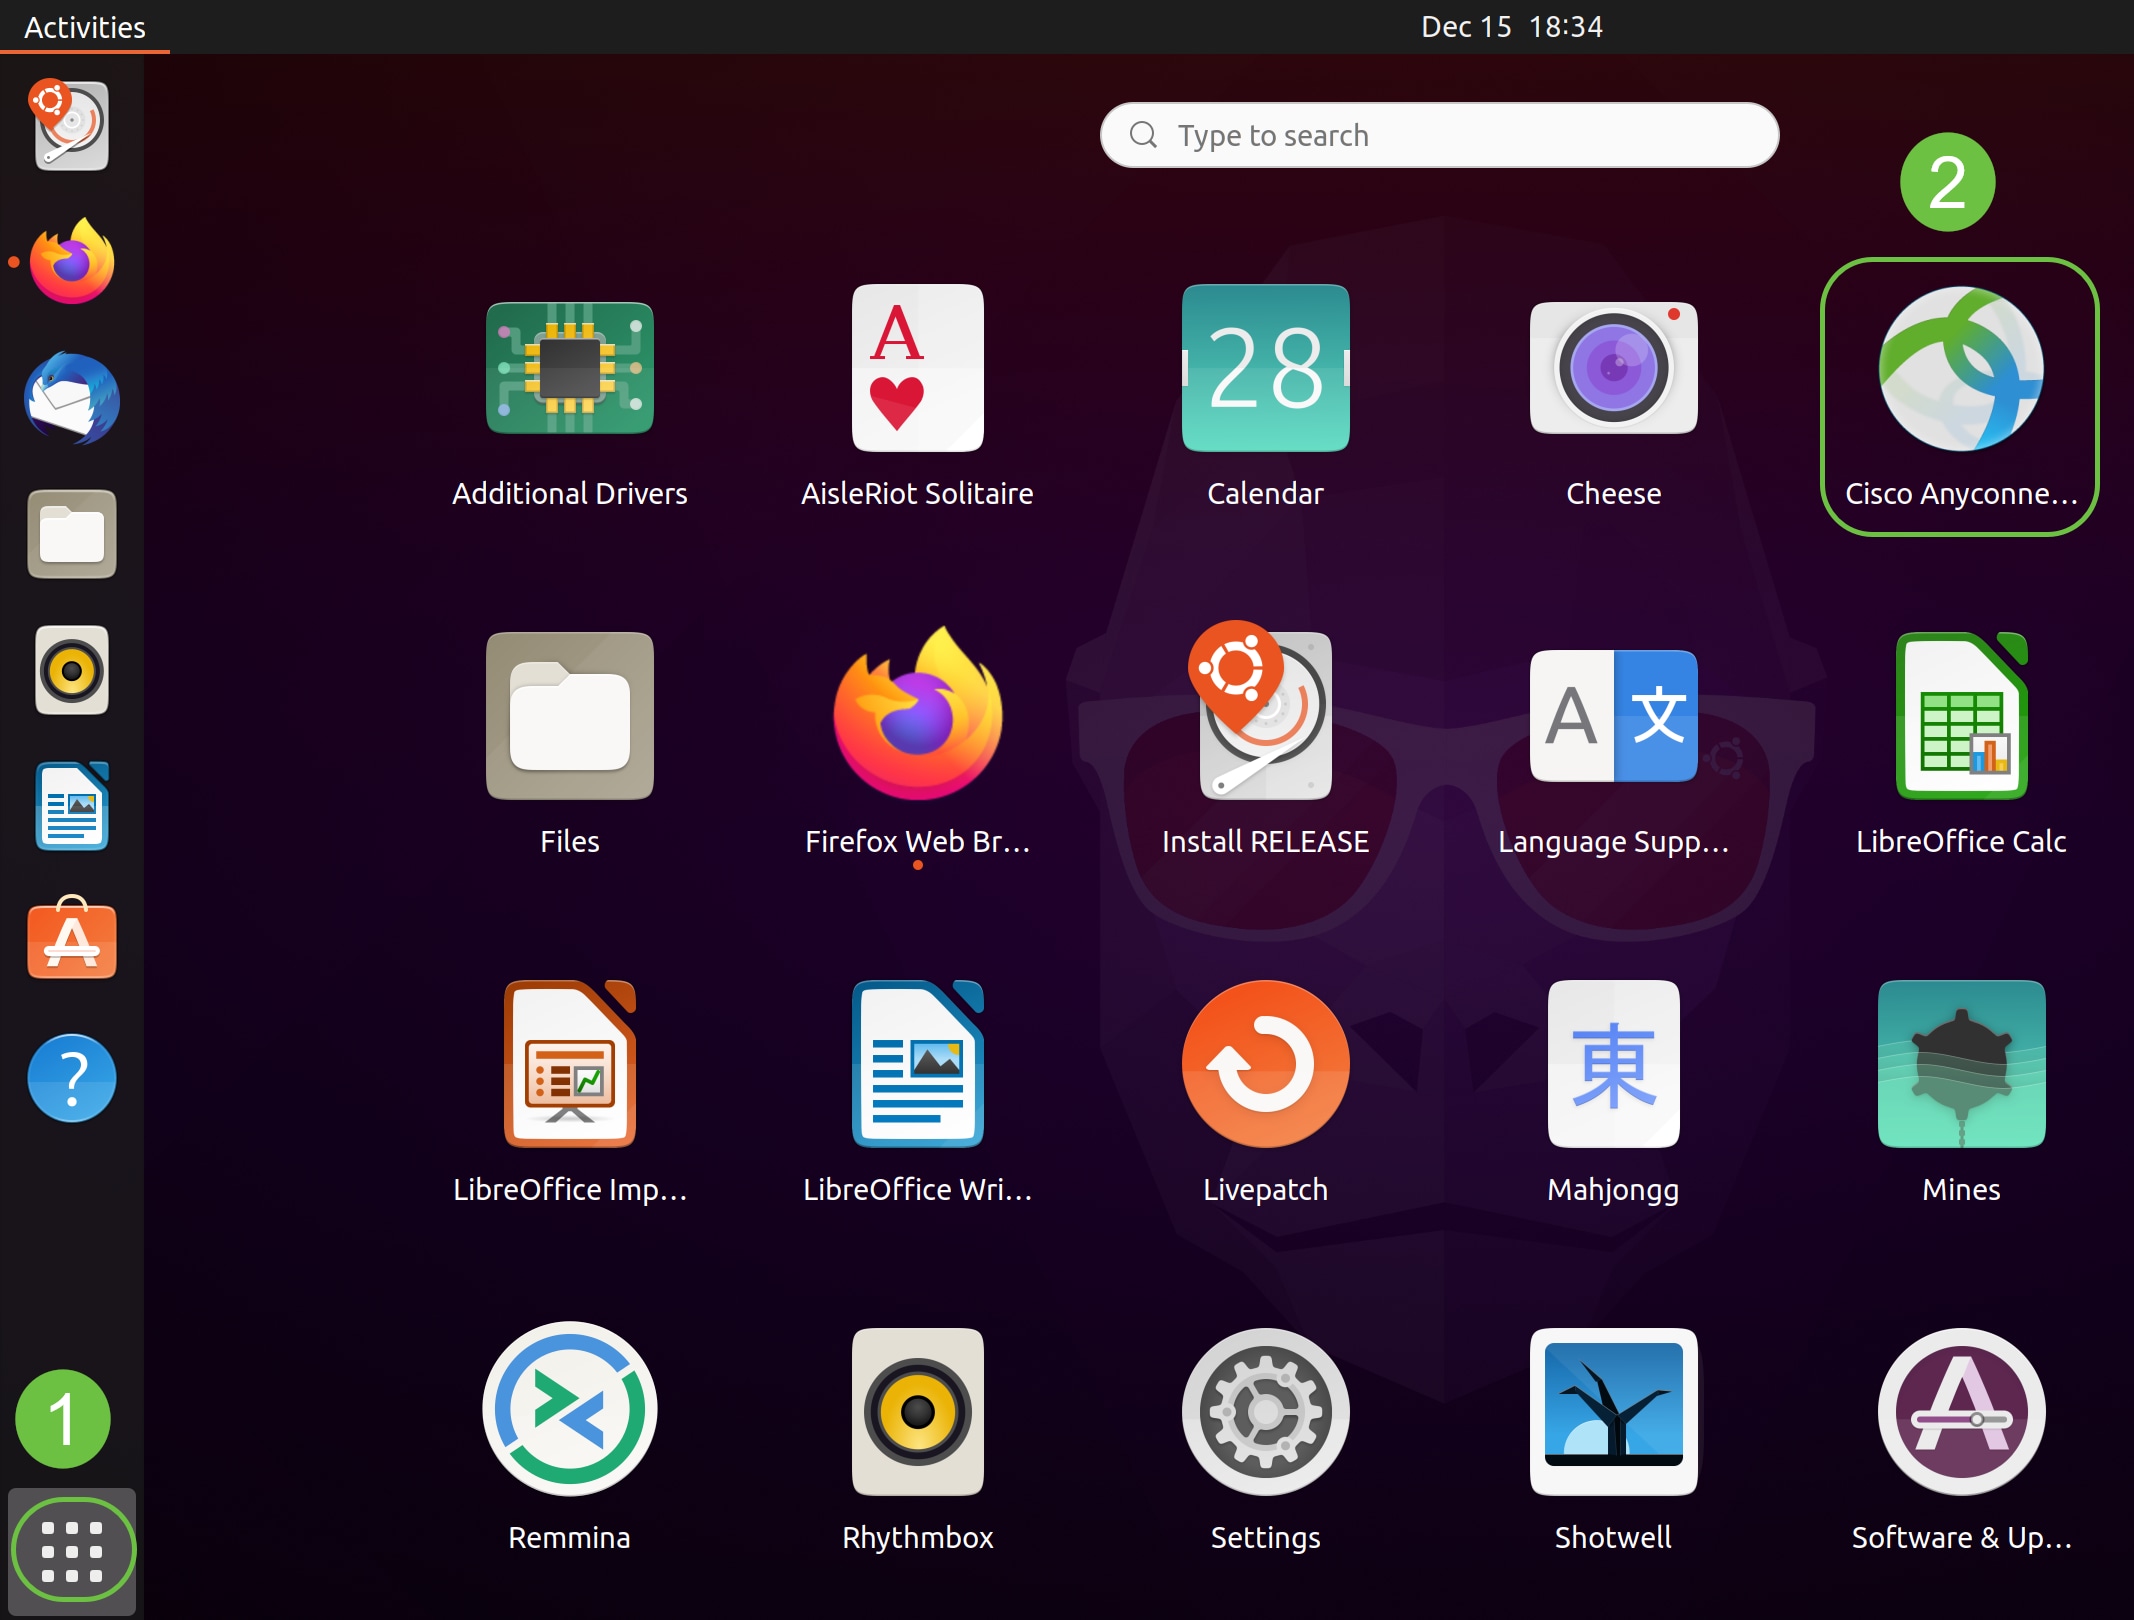
Alternatively, press Super+A (Super key is the windows icon key) on your keyboard to bring up the search bar. Start typing ‘Anyconnect’ and the app will appear.
Step 2
Click on the AnyConnect Secure Mobility Client icon.

Step 3
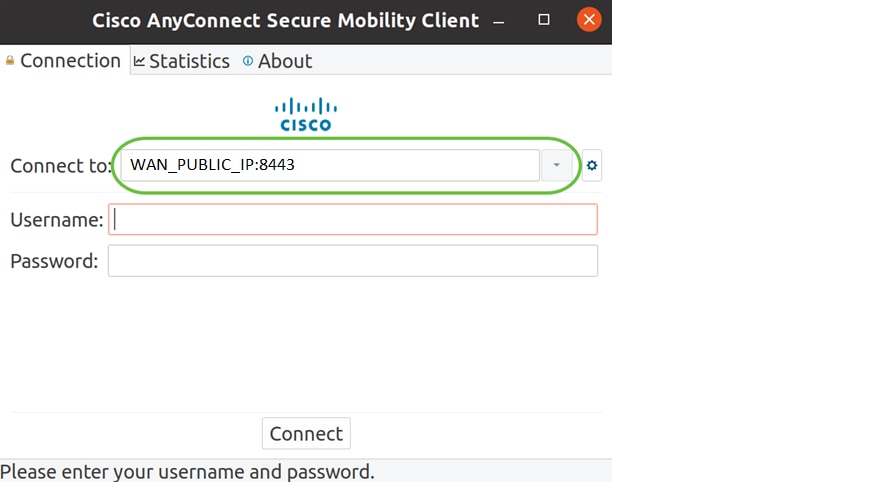
Enter the IP Address or Hostname of your desired server followed by the port number.
For RV340 family, the default port number is 8443.
Step 4
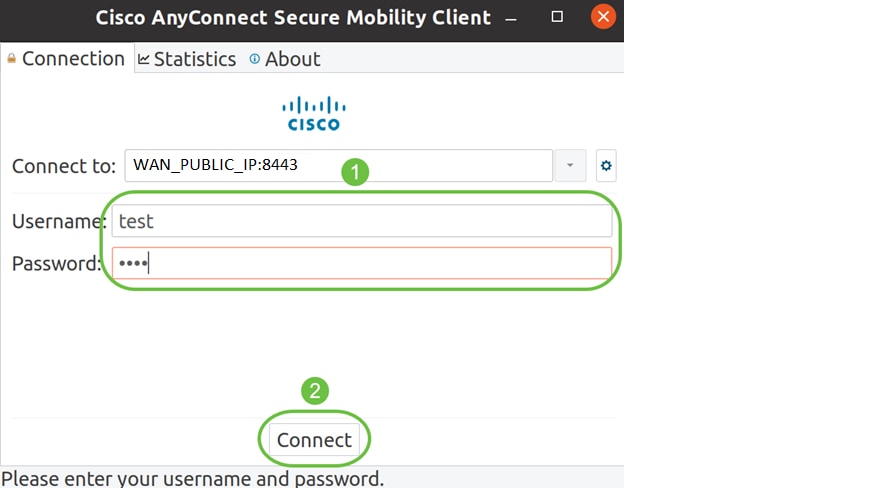
Enter your Username and Password in the fields provided. Click Connect.
Step 5
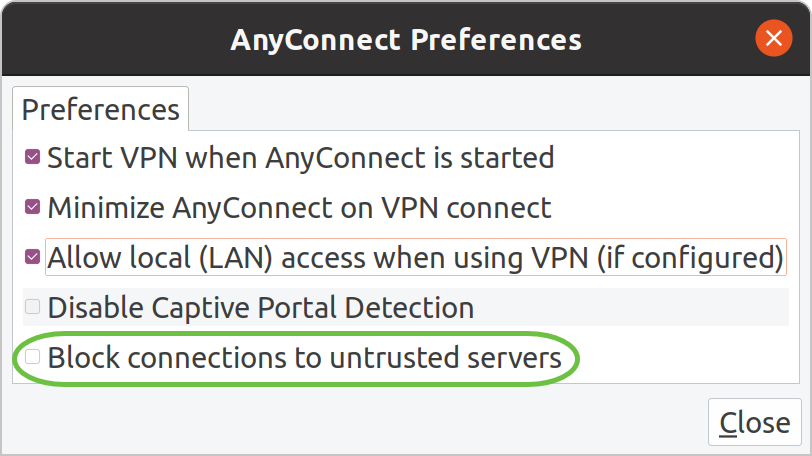
Some connections may not be secure using a trusted SSL certificate. By default, AnyConnect Client will block connection attempts to these servers.
Uncheck Block connections to untrusted servers under Preferences to connect to these servers.
Step 6
As soon as the connection is established, the login Banner will appear. Click Accept.
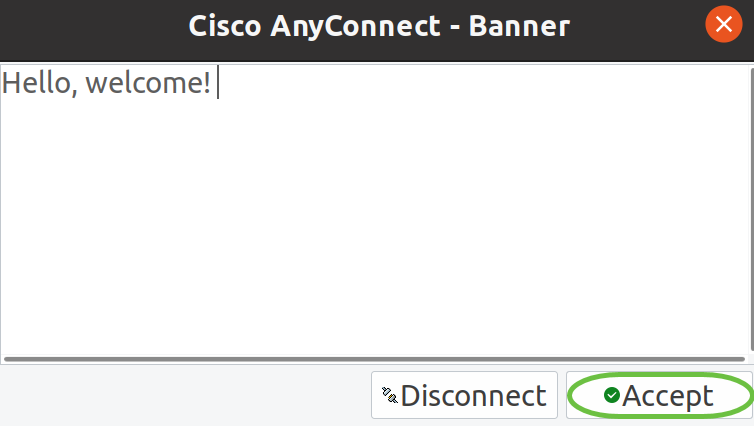
You will also see notification that the Cisco AnyConnect Secure Mobility Client is Connected.

Conclusion
There you have it! You have now successfully learned the steps to install and use the Cisco AnyConnect Secure Mobility Client v4.9.x on Ubuntu Desktop using the UI.
How to install Cisco Anyconnect VPN on Ubuntu 22.04 LTS | vetechno

Cisco AnyConnect VPN is software that allows remote users and employees to securely connect to a Cisco VPN gateway running in an enterprise environment.
Cisco AnyConnect Secure Mobility Client connects to a Cisco SSL VPN server and if authentication is approved, the connected users and employees are granted access to internal resources.
AnyConnect client for Linux, Windows, and macOS is available on the Official Downloads page
In this tutorial, we will help you to install Cisco Anyconnect VPN on Ubuntu 20.04 LTS with network-manager-openconnect-gnome command.
What is Network Manager ?
Network Manager is a system network service that manages your connections and network devices , trying to maintain active network connectivity when available. It manages WiFi, Ethernet, Mobile Broadband (WWAN) and PPPOE devices, and provides VPN integration with a variety of different VPN services like …
- Cisco AnyConnect openconnect
- Palo Alto Networks GlobalProtect
- Fortinet SSL VPN
- Array SSLPN
- Juniper Network Connect
- Plus Connect Secure
- F5 BIG-IP SSL VPN
This package provides gnome bits of the NetworkManager OpenConnect plugin.
Prerequisite
How to Install network-manager-openconnect-gnome in Ubuntu 22.04 LTS Jammy Jellyfish
To install network-manager-openconnect-gnome in Ubuntu 22.04 LTS, you can follow these steps:
Step 1. Update the apt repository
Step 2. Install Network Manager Open connect for Cisco Anyconnect VPN.
sudo apt-get install -y network-manager-openconnect-gnome
Step 3. Configure Cisco Anyconnect VPN setup on Ubuntu 22.04.
Step a) Open System Setting , then click on Network.
Step b) On VPN section click on plus ( + ) button and select Multi-portal VPN Client (openconnect)
Step 4. Select VPN Protocal Type and Enter Gatway Address / VPN Address
Step 5. Add and close the dialog windows box.
Step 6. Now connect the Cisco Anyconnect VPN on Ubuntu 22.04 LTS
Note: The above steps assume that you have administrative privileges on your Ubuntu system. If you don’t have the necessary permissions, you can contact your system administrator for assistance.
Conclusion
Congratulations you have successfully installed and configured the Cisco Anyconnect on Ubuntu 22.04 Lts Jammy Jellyfish.
Let me know in the comment box if you are facing any issue
Frequently Asked Questions
1. How do I install AnyConnect on Linux / Ubuntu ?
Follow the above steps to install Cisco Anyconnect on Ubuntu.
How do I add a VPN to Cisco AnyConnect ?
Follow Step 3. for configuring and adding Cisco Anyconnect on Ubuntu.
3. How do I install and configure Cisco AnyConnect?
If you follow this tutorial step by step, then you will be able to install and configure the cisco anyconnect vpn on your Ubuntu system.